
Popular categories
Looking for a yarn?


|
||||||||||
Simply Sweet |
||||||||||
|
|
||||||||||
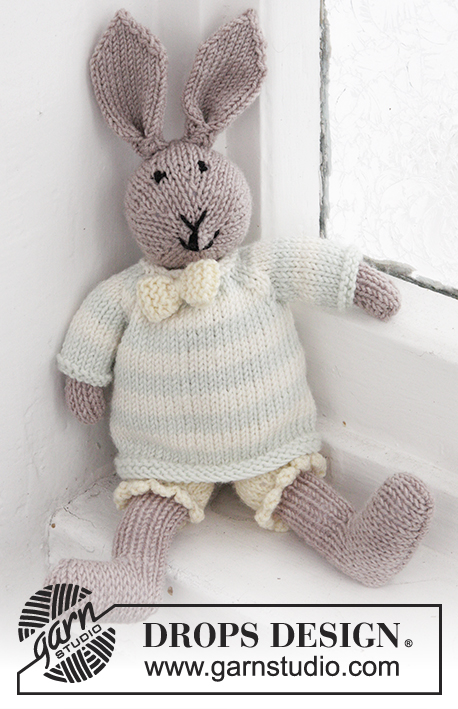
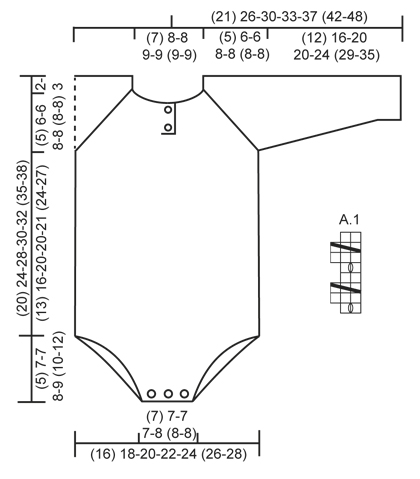
Knitted baby body in rib, worked top down in DROPS BabyMerino. Size premature – 4 years.
DROPS Baby 25-30 |
||||||||||
|
GARTER ST (back and forth on needle): K all rows. 1 ridge = 2 rows K. PATTERN: See diagram A.1. The diagram shows all rows in pattern seen from RS. RAGLAN: All inc are done from RS. Inc 1 st on each side of the 4 raglan lines by making 1 YO on each side of the 2 sts K in each raglan line (seen from RS). Work YOs into rib, i.e. P the first 2 sts from WS, K the next 2 sts from WS etc. – NOTE: Do not work YOs twisted (i.e. there should be holes on each side of the 2 K sts in raglan line). BUTTONHOLES: Dec for buttonholes on right band. 1 buttonhole = K tog third and fourth st from edge and make 1 YO (dec for buttonholes from WS). Dec for buttonholes when piece measures: SIZE (premature): 1 and 3 cm. SIZE 0/1 month + 1/3 months: 1 and 4 cm. SIZE 6/9 months + 1218 months: 1 and 4½ cm. SIZE (2 years + 3/4 years): 1 and 5 cm. DECREASE TIP 1 (applies to leg opening): Dec inside 3 edge sts in garter st. FROM RS: Dec after 3 sts in garter st as follows: P 2 twisted tog. Dec as follows before 3 sts in garter st (beg when 5 sts remain on row): P 2 tog. FROM WS: Dec after 3 sts in garter st as follows: K 2 twisted tog. Dec as follows before 3 sts in garter st (beg when 5 sts remain on row): K 2 tog. DECREASE TIP 2 (applies to sleeves): Work until 3 sts remain before marker, work 2 sts tog (in rib), work 2 sts (marker is between these 2 sts) and then work 2 sts twisted tog (in rib). ---------------------------------------------------------- BODY: The piece is worked top down. Work back and forth on circular needle to after neck vent, then work piece in the round on double pointed needles/circular needles before dividing for legs. Work sleeves in the round on double pointed needles. YOKE: Cast on (54) 60-60-64-74 (74-74) sts (incl 6 band sts in each side towards mid front) on circular needle size 3.5 mm with off white Baby Merino. Work 2 RIDGES in garter st - see explanation above (1st row = RS). Then work an elevation in the back of neck as follows (1st row = RS): K until (6) 8-8-8-10 (10-10) sts remain, turn, tighten yarn and work until (6) 8-8-8-10 (10-10) sts remain in the other side. Turn piece, tighten yarn and work until (12) 16-16-16-20 (20-20) sts remain, turn piece, tighten yarn and work back until (12) 16-16-16-20 (20-20) sts remain. Turn piece, tighten yarn and work until (18) 24-24-24-30 (30-30) sts remain, turn, tighten yarn and work until (18) 24-24-24-30 (30-30) sts remain in the other side. Turn piece, tighten yarn and work the rest of the row. Work next row as follows from WS: K 6 band sts, P the next (42) 48-48-52-62 (62-62) sts AT THE SAME TIME inc (32) 26-42-38-44 (60-60) sts evenly over these sts and finish with K 6 band sts (remember BUTTONHOLES on band – see explanation above) = (86) 86-102-102-118 (134-134) sts on needle. WORK NEXT ROW AS FOLLOWS FROM RS: SIZE (premature) + 0/1 month: 6 band sts in GARTER ST – see explanation above, K 2, P 2, A.1 (= 2 sts), P 2, K 2 (insert 1 marker in the middle of these 2 sts = raglan line), * P 2, K 2 *, repeat from *-* 3 times in total, P 2, K 2 (insert 1 marker in the middle of these 2 sts = raglan line), * P 2, K 2 *, repeat from *-* 5 times in total, P 2, K 2 (insert 1 marker in the middle of these 2 sts = raglan line), * P 2, K 2 *, repeat from *-* 3 times in total, P 2, K 2 (insert 1 marker in the middle of these 2 sts = raglan line), P 2, A.1 (= 2 sts), P 2, K 2 and 6 band sts in GARTER ST. SIZE 1/3 months + 6/9 months + 12/18 months: 6 band sts in GARTER ST – see explanation above, K 2, P 2, A.1 (= 2 sts), P 2, K 2, P 2, K 2 (insert 1 marker in the middle of these 2 sts = raglan line), * P 2, K 2 *, repeat from *-* 3-3-5 times in total, P 2, K 2 (insert 1 marker in the middle of these 2 sts = raglan line), * P 2, K 2 *, repeat from *-* 7 times in total, P 2, K 2 (insert 1 marker in the middle of these 2 sts = raglan line), * P 2, K 2 *, repeat from *-* 3-3-5 times in total, P 2, K 2 (insert 1 marker in the middle of these 2 sts = raglan line), P 2, K 2, P 2, A.1 (= 2 sts), P 2, K 2 and 6 band sts in GARTER ST. SIZE (2 years + 3/4 years): 6 band sts in GARTER ST – see explanation above, ** K 2, P 2, A.1 (= 2 sts), P 2 **, repeat from **-** 2 times in total, K 2 (insert 1 marker in the middle of these 2 sts = raglan line), * P 2, K 2 *, repeat from *-* 5 times in total, P 2, K 2 (insert 1 marker in the middle of these 2 sts = raglan line), * P 2, K 2 *, repeat from *-* 9 times in total, P 2, K 2 (insert 1 marker in the middle of these 2 sts = raglan line), * P 2, K 2 *, repeat from *-* 5 times in total, P 2, K 2 (insert 1 marker in the middle of these 2 sts = raglan line), ** P 2, A.1 (= 2 sts), P 2, K 2 **, repeat from **-** 2 times in total and finish with 6 band sts in GARTER ST. ALL SIZES: Continue pattern like this back and forth. AT THE SAME TIME on next row from RS inc for RAGLAN – see explanation above (= 8 sts inc). Repeat inc every other row/round (i.e. every row from RS) (7) 7-7-11-11 (11-11) more times (= (8) 8-8-12-12 (12-12) inc in total on each side of every raglan line). AT THE SAME TIME when piece measures (4) 5-5-6-6 (7-7) cm, band ends and piece is worked in the round on needle as follows (adjust so that next row is worked from RS): Place piece tog with sts from right band at the top (so that bands are on top of each other and buttonholes are at the edge). Work 1 round in the round AT THE SAME TIME K tog the 6 sts from right and left band 2 by 2, work the rest of round, cut the yarn and beg next round mid back. Continue rib and pattern in the round AT THE SAME TIME continue inc for raglan as before but work the 6 sts mid front as follows: P 2, A.1 (= 2 sts) and P 2. After last inc for raglan there are (144) 144-160-192-208 (224-224) sts on needle. Work (0) 2-2-2-2 (2-2) more rounds as before, piece measures approx. (7) 8-8-10-11 (11-11) cm from shoulder. On next round slip the (32) 32-32-40-48 (48-48) sts between each marker over sleeve on stitch holders (work sts before slipping them on stitch holder) = (40) 40-48-56-56 (64-64) sts remain on front and back piece. BODY: = (80) 80-96-112-112 (128-128) sts. On next round cast on (8) 16-12-12-16 (16-20) LOOSE sts under each sleeve = (96) 112-120-136-144 (160-168) sts on body – NOW MEASURES PIECE FROM HERE. Place a marker each side. Continue rib in the round as before (= K 2/P 2) with A.1 at the front as before. When piece measures (13) 16-20-20-21 (24-27) cm from armhole, divide at the markers in each side and finish front and back piece separately. BACK PIECE: = (48) 56-60-68-72 (80-84) sts. Work rib back and forth as before but work the outermost 3 sts in each side in garter st. AT THE SAME TIME dec 1 st inside the 3 edge sts in each side – READ DECREASE TIP 1 (= 2 sts dec). Repeat dec on every row (i.e. from both RS and WS) (6) 10-12-16-14 (18-14) more times (= (7) 11-13-17-15 (19-15) times in total) and then every other row (i.e. every row from RS) (5) 5-5-5-7 (7-11) times in total = (24) 24-24-24-28 (28-32) sts remain on needle. K 1 row from RS while AT THE SAME TIME dec (8) 8-8-8-10 (10-12) sts evenly = (16) 16-16-16-18 (18-20) sts remain on needle. K 10 rows (= 5 ridges) and loosely cast off with K from WS. FRONT PIECE: = (48) 56-60-68-72 (80-84) sts. Work rib back and forth as before but work the outermost 3 sts in each side in garter st. AT THE SAME TIME dec 1 st inside the 3 edge sts in each side – READ DECREASE TIP 1 (= 2 sts dec). Repeat dec on every row (i.e. from both RS and WS) (11) 13-17-21-19 (23-17) more times (= (12) 14-18-22-20 (24-18) times in total) and then every other row (i.e. every row from RS) (0) 2-0-0-2 (2-8) times in total = (24) 24-24-24-28 (28-32) sts remain on needle. K 1 row from RS while AT THE SAME TIME dec (8) 8-8-8-10 (10-12) sts evenly = (16) 16-16-16-18 (18-20) sts on needle. K 1 row from WS. On next row (= RS), dec for 3 buttonholes as follows: K (3) 3-3-3-3 (3-4), * 1 YO, K 2 tog, K (2) 2-2-2-3 (3-3) *, repeat from *-* 1 more time, K 2 tog, 1 YO and K (3) 3-3-3-3 (3-4). K 4 rows (= 2 ridges) and loosely cast off with K from WS. SLEEVE: = (32) 32-32-40-48 (48-48) sts. Cast on (8) 16-12-12-16 (16-20) LOOSE sts under sleeve = (40) 48-44-52-64 (64-68) sts on needle (work in the round on double pointed needles). Insert 1 marker at beg of round (= mid under sleeve) - NOW MEASURE PIECE FROM HERE. Continue rib in the round as before (= K 2/P 2). AT THE SAME TIME when sleeve measures 1 cm, dec 1 st on each side of marker - READ DECREASE TIP 2. Repeat dec every (4) 4-6-6-6 (8-8) rows (3) 7-3-7-7 (7-7) more times (= (4) 8-4-8-8 (8-8) times in total) = (32) 32-36-36-48 (48-52) sts remain on needle. When sleeve measures (12) 16-20-20-24 (29-35) cm, loosely cast off with K over K and P over P. Work the other sleeve the same way. ASSEMBLY: Sew the openings under the sleeves. Sew 2 buttons on to left button band in the neck and 3 buttons at the bottom of body. |
||||||||||
Diagram explanations |
||||||||||
|
||||||||||
|
||||||||||
|
Have you made this or any other of our designs? Tag your pictures in social media with #dropsdesign so we can see them! Do you need help with this pattern?You'll find tutorial videos, a Comments/Questions area and more by visiting the pattern on garnstudio.com. © 1982-2024 DROPS Design A/S. We reserve all rights. This document, including all its sub-sections, has copyrights. Read more about what you can do with our patterns at the bottom of each pattern on our site. |
||||||||||


With over 40 years in knitting and crochet design, DROPS Design offers one of the most extensive collections of free patterns on the internet - translated to 17 languages. As of today we count 304 catalogues and 11422 patterns - 11422 of which are translated into English (UK/cm).
We work hard to bring you the best knitting and crochet have to offer, inspiration and advice as well as great quality yarns at incredible prices! Would you like to use our patterns for other than personal use? You can read what you are allowed to do in the Copyright text at the bottom of all our patterns. Happy crafting!
Comments / Questions (50)
Derfra mangler diagram på netudgave!
17.02.2021 - 17:55Hej jeg er i tvivl, om man fortsætter i retstrikning, mens man laver forhøjning ba i nakken m vendestrik. Mvh maya
17.02.2021 - 17:15DROPS Design answered:
Hej Mays, ja forhøjningen strikkes i retstrik, men du kan naturligvis strikke den i glatstrik hvis du hellere vil det :)
18.02.2021 - 08:42Strikker denne i str 12/18 mnd. Får ikke maskeantallet til å stemme på første omgang der inndelingen til raglanlinjen er. Følger inndelingen som det står, men får for lite masker på slutten.
29.12.2020 - 19:33DROPS Design answered:
Hei Hilde. Har du satt merket for raglanlinjene etter 2 rett eller slik det står i oppskriften, sett 1 merke midt mellom disse 2 maskene? Strikk 6 stolpemasker + 14 masker, 1. raglanmerke settes mellom 13. og 14. maske. Deretter strikkes det 24 masker og 2. raglanmerke settes mellom 23. og 24. maske (=1.erme). Så strikkes det 32 masker og 3. raglanmerke settes mellom 31. og 32. maske (=bakstykket). Så strikkes det 24 masker og 4. raglanmerke settes mellom 23. og 24. maske (=2.erme), så strikkes det 12 masker + 6 stolpemasker. Da blir det 19 masker (1.merke) + 24 masker (2. merke) + 32 masker (3.merke) + 24 masker (4.merke) + 19 masker = 118 masker på pinnen. God Fornøyelse!
13.01.2021 - 14:34It does :) Thank you!!
17.12.2019 - 15:28Thank you so much for your quick response! Very much appreciated. If my understanding is right, then I would have to increase without creating new ribbing until the purl stitches between the RAGLAN LINE and the 2 KNIT STITCHES OF THE RIB (next to the raglan line on both sides) become 6. Then I can create 2P, 2K, 2P
17.12.2019 - 11:02DROPS Design answered:
Dear Mrs Nobutan, if you have: P2, K2 (with marker = raglan line), P2, you will work the 1st increases like this: P2, K1, K2 (raglan line), K1, P2, then 2nd: P2, K2, K2 (raglan line), K2, P2, then Purl the next 2 sts increased and so on. Does it answer your question?
17.12.2019 - 14:49Hi, I understand this part: Inc 1 st on each side of the 4 raglan lines by making 1 YO on each side of the 2 sts K in each raglan line (seen from RS), but my question is, if I keep on increasing every other row on the RS, the PURL STITCHES between the 'raglan line' and the 'knit stitches of rib on both sides of the raglan line' keep on increasing. It says to work in rib but should I not go along with the original rib created in the pattern? I hope you understand my question, I am a beginner!
17.12.2019 - 02:05DROPS Design answered:
Dear Nobutan, hope I understand your question: you will increase on both sides of the K2 = raglan lines, and the new stitches increased will be worked in rib so that the rib on each piece will continue over the new stitches. But you should always have K2 on each raglan line (= between the both yarn overs for inc). You will increase on every other row = every row from RS when working back and forth hand then every other round (when working in the round later). Happy knitting!
17.12.2019 - 09:28Hei. Maskeantallet stemmer ikke når jeg setter merketrå for raglanfelling. Er sikker på at jeg har fulgt maskeantallet i mønsteret . Forslag til hva jeg skal gjøre videre?
27.11.2018 - 13:14DROPS Design answered:
Hei Lise-Gro. Så etter å ha økt masker jevnt fordelt har du nå (86) 86-102-102-118 (134-134) masker på pinnen. Hvilken størrelse strikker du? vi kan enklere forklare deg akkurat hva du skal gjøre om vi vet hvilken størrelse du strikker nemlig. Hilsen Drops
29.11.2018 - 14:25Dhanam wrote:
Hi, me again - I counted the total stitches in 1/3 month size - starting with 86 after the increase in the yoke section. In the following pattern - the stitches totoalled to 96 !
03.02.2018 - 18:37DROPS Design answered:
Hi Dhanam, You have a total of 12 band stitches in garter stitch, + 2 x A.1 (4 stitches), + K2, P2 x 17 (68 stitches) + P2, which is a total of 86 stitches. Hope this helps and happy knitting!
04.02.2018 - 06:53Salomé wrote:
I am already done with the yoke and the neck elevation, there is no indication whether you start the diagram on the row where you make a stitch or whether you start at the bottom which is just plain knitting. Normally the diagrams are numbered, but yours is not.
31.12.2017 - 19:07DROPS Design answered:
Dear Salomé, start reading diagram on the bottom corner on the right side, from the right towards the left from RS (and every round), and from the left towards the right from WS when working back and forth. Happy knitting!
02.01.2018 - 11:20Salomé wrote:
Hi there, I have an uncertainty about where to start with the diagram, normally it is numbered starting from the bottom. I am to start on the pattern after the increase but am not sure whether to start from the bottom of the diagram which is a make one row or do I start at the top which is just plain knit?
29.12.2017 - 19:40DROPS Design answered:
Dear Salomé, after you finish knitting the yoke (including the elevation of the back) you start the patterned stitches with the first row of the diagram. Happy Knitting!
30.12.2017 - 15:54