
Popular categories
Looking for a yarn?


|
|
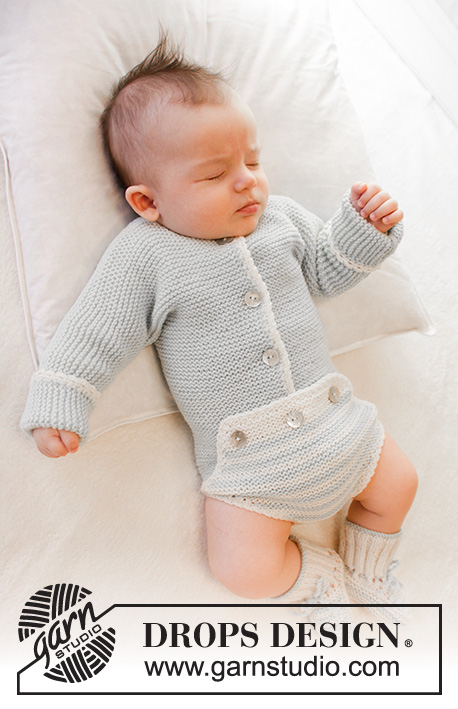
First Impression Singlet |
|
|
|
|
Knitted baby singlet in rib in DROPS BabyMerino. Size premature - 4 years.
DROPS Baby 25-29 |
|
|
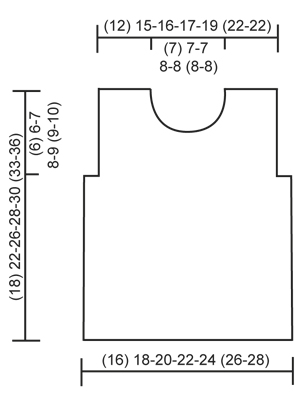
GARTER ST (in the round on double pointed needles/circular needle): * K 1 round and P 1 round *, repeat from *-*. 1 ridge = 2 rounds. ---------------------------------------------------------- SINGLET: Piece is worked in the round up to armhole, then finish front and back piece back and forth on needle. Cast on (104) 120-128-144-152 (168-176) sts on circular needle size 3 mm with Baby Merino. Insert 1 marker at beg of round and 1 marker after (52) 60-64-72-76 (84-88) sts (= in the sides). Work rib as follows: SIZE (premature) + 6/9 months + 12/18 months + (2 years): * K 1, P 2, K 1 *, repeat from *-* the entire round. SIZE 0/1 months + 1/3 months + (3/4 years): * P 1, K 2, P 1 *, repeat from *-* the entire round. Continue rib like this. When piece measures (11) 15-18-19-20 (23-25) cm, work next round as follows: K (7) 9-9-11-11 (11-13) sts AT THE SAME TIME dec (1) 2-2-3-3 (3-3) sts evenly over these sts (= (6) 7-7-8-8 (8-10) sts K remain), continue rib over the next (38) 42-46-50-54 (62-62) sts (rib beg and ends with 2 K sts inside ridges in garter st in each side), K the next (14) 18-18-22-22 (22-26) sts AT THE SAME TIME dec (2) 4-4-6-6 (6-6) sts evenly over these sts (= (12) 14-14-16-16 (16-20) sts K remain), continue rib over the next (38) 42-46-50-54 (62-62) sts (rib beg and ends with 2 K sts inside ridges in garter st in each side) and K over the last (7) 9-9-11-11 (11-13) sts AT THE SAME TIME dec (1) 2-2-3-3 (3-3) evenly over these sts (= (6) 7-7-8-8 (8-10) sts K remain) = (100) 112-120-132-140 (156-164) sts. Then work 2 ridges in GARTER ST (= 4 rounds) – see explanation above, over the middle (12) 14-14-16-16 (16-20) sts in each side (i.e. over (6) 7-7-8-8 (8-10) sts on each side of both markers) – continue the remaining (38) 42-46-50-54 (62-62) sts front and back in rib. Work next round after the 2 ridges in each side as follows: Cast off (2) 3-3-4-4 (4-6) sts for armhole, work 4 sts in garter st, rib over the next (38) 42-46-50-54 (62-62) sts, 4 sts in garter st, cast off (4) 6-6-8-8 (8-12) sts for armhole, work 4 sts in garter st, rib over the next (38) 42-46-50-54 (62-62) sts, 4 sts in garter st and cast off the remaining (2) 3-3-4-4 (4-6) sts for armhole, cut the yarn. Finish front and back piece separately. BACK PIECE: = (46) 50-54-58-62 (70-70) sts. Continue rib but work the outermost 4 sts in each side in garter st (= armhole edges). When piece measures (16) 20-24-26-28 (31-34) cm, cast off the middle (18) 18-18-22-22 (22-22) sts for neck and finish each shoulder separately. LEFT SHOULDER: Then cast off at beg of every row from neck: 1 st 2 times = (12) 14-16-16-18 (22-22) sts remain on shoulder. Work until 1 row remains before piece measures (18) 22-26-28-30 (33-36) cm and work next row from RS. K 1 row from RS while AT THE SAME TIME dec 2 sts evenly, then cast off the remaining (10) 12-14-14-16 (20-20) sts on next row. RIGHT SHOULDER: Work as left shoulder but instead of casting off, continue back and forth in garter st for approx. 1½ cm for button hem before casting off. FRONT PIECE: = (46) 50-54-58-62 (70-70) sts. Work as on back piece until piece measures (15) 19-23-25-26 (29-31) cm. Now slip the middle (10) 10-10-14-14 (14-14) sts on 1 stitch holder for neck and finish each shoulder separately. LEFT SHOULDER: Then cast off at beg of every row from neck: 2 sts 2 times and 1 st 2 times = (12) 14-16-16-18 (22-22) sts remain on shoulder. Work until 1 row remains before piece measures (18) 22-26-28-30 (33-36) cm and work next row from RS. K 1 row from RS while AT THE SAME TIME dec 2 sts evenly, then cast off the remaining (10) 12-14-14-16 (20-20) sts on next row. RIGHT SHOULDER: Work as left shoulder but when approx. 1½ cm remain until finished measurements (i.e. as long as button hem on back piece), K 1 row from RS while AT THE SAME TIME dec 2 sts evenly = (10) 12-14-14-16 (20-20) sts remain on row. Continue to work in garter st AT THE SAME TIME on first row dec for (2) 2-2-2-2 (3-3) buttonholes evenly. 1 buttonhole = K 2 tog and make 1 YO. When piece measures (18) 22-26-28-30 (33-36) cm, cast off. ASSEMBLY: Sew left shoulder seam. NECK EDGE: Pick up from RS approx. 55 to 75 sts around the neck (incl sts on stitch holder at the front) on circular needle size 3 mm with Baby Merino. K 1 row from WS while AT THE SAME TIME dec evenly to (46) 50-52-56-58 (60-62) sts. K 4 rows and loosely cast off with K from RS. Sew buttons on to the right shoulder. |
|
|
|
|
Have you made this or any other of our designs? Tag your pictures in social media with #dropsdesign so we can see them! Do you need help with this pattern?You'll find tutorial videos, a Comments/Questions area and more by visiting the pattern on garnstudio.com. © 1982-2024 DROPS Design A/S. We reserve all rights. This document, including all its sub-sections, has copyrights. Read more about what you can do with our patterns at the bottom of each pattern on our site. |


With over 40 years in knitting and crochet design, DROPS Design offers one of the most extensive collections of free patterns on the internet - translated to 17 languages. As of today we count 304 catalogues and 11422 patterns - 11422 of which are translated into English (UK/cm).
We work hard to bring you the best knitting and crochet have to offer, inspiration and advice as well as great quality yarns at incredible prices! Would you like to use our patterns for other than personal use? You can read what you are allowed to do in the Copyright text at the bottom of all our patterns. Happy crafting!
Comments / Questions (24)
Har dere oppskrift på bukse også?
14.04.2024 - 17:00In the pattern for First Impression Singlet I have followed the pattern to the point of having 112 sts remain. Then the next step says to work 2 ridges in Garter St (=4 rounds) - see explanation above, however I cannot find any explanation above! Can you please tell me how I can find this explanation?
15.07.2023 - 09:20DROPS Design answered:
Hi Gail. please see GARTER ST (in the round on double pointed needles/circular needle). Happy knitting!
15.07.2023 - 10:42Skal man strikke 1 vr, 2r, 1vr, 2vr på hele pinden?
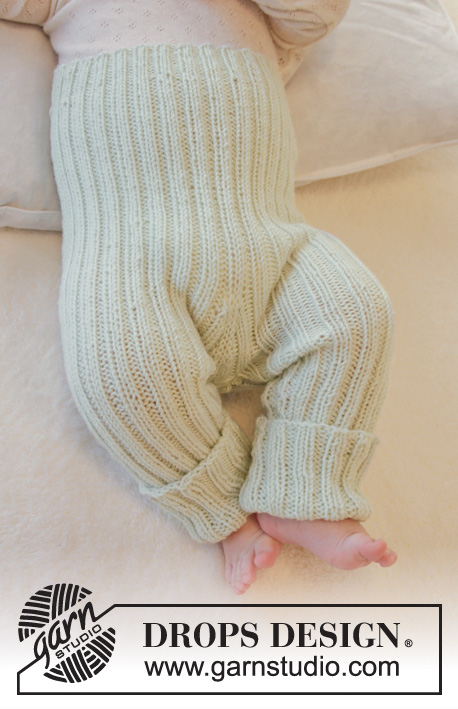
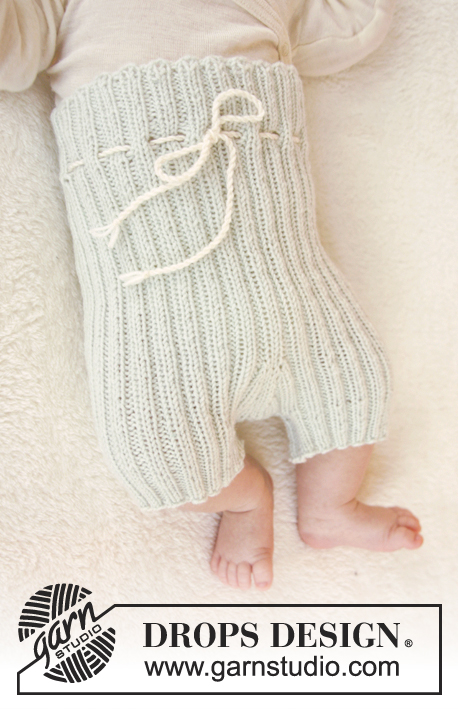
01.06.2022 - 17:07Hello, is there a pattern for the pants please?
31.01.2022 - 08:04DROPS Design answered:
Hi Annie, yes, see the pattern 25-28 from the same catalogue. Happy knitting!
31.01.2022 - 09:04Hej, Jeg skal lave str. 2 år. Rib står der 1r 2vr 1r, men det giver ikke mønstret på billedet af opskriften?
12.01.2021 - 11:26DROPS Design answered:
Hei Heidi. Jo, bilder viser 2 rett, 2 vrang. Når du begynner å strikke vrangborden, starter du med 1 rett, strikker 2 vrang og 1 vrang, dette gjentas omgangen rundt og når du avslutter er det med 1 rett, slik at første maske og siste maske blir 2 rett. God Fornøyelse!
18.01.2021 - 09:45Hvis man strikker ret på rundpind får man glatstrik og ikke riller under ærmegabet. I bør rette opskriften til at man skal strikke skiftevis ret og vrag under ærmegabet for at få riller.
19.10.2020 - 06:58Can you knit this in yarn group B - I have a massive supply of DK wool that I would like to use. I
02.01.2020 - 00:16DROPS Design answered:
Dear Heather, we are unfortunately not able to adjust every pattern to every single request. For any further personnal assistance, you are welcome to contact your yarn store or any knitting forum. Thanks for your comprehension. Happy knitting!
02.01.2020 - 16:01Hello I can not understand stand your k1, p2, k1 then p1, k2, p1 ribbing it's just not simple as 2,/2ribbing
23.09.2019 - 07:20DROPS Design answered:
Dear Sheebah, pattern is a K2/P2 ribbing , but you start the round in some sizes with *K1, then work P2, K1* and repeat from *-* (you will get K2/P2), but the round will end with K1 (so that there are K2 there too). Happy knitting!
23.09.2019 - 10:01Bonjour, Il ne me reste qu'à monter les mailles pour le col. Est-ce vraiment avec les aiguilles circulaires? Dans ce cas, pourquoi les boutonnières? Le col s'enfile par la tête? Je ne comprends pas très bien. Est-ce possible d'avoir une photo du haut du maillot pour comprendre les détails du col? Merci
05.08.2019 - 04:40DROPS Design answered:
Bonjour Agathe! Le col est tricote en aller et retour avec les aiguilles circulaires, 2 boutonnieres sont sur l'epaule droite. L'epaule gauche a ete cousue. Bon tricot!
05.08.2019 - 08:09Hei, jeg strikker denne i prematur størrelse. Når jeg legger opp og følger mønster ifht vrangbord går ikke dette opp for min del. På baksiden ender min med 2vr 1r 1vr og deretter starter runden på nytt med 1r 2vr. Er dette riktig? Har også strikket buksen som hører til og vrangbord der er 2r 2vr osv, så blir litt forvirret over at det er forskjellig mønster. Håper dere forstod spørsmålet mitt 😊
31.07.2019 - 17:55DROPS Design answered:
Hei Kristine, Vrangbord består av 4 masker, 1r, 2vr, 1r, og 104 delt på 4 er 26. Da skal vrangbordet gå opp hver runde. God fornøyelse!
01.08.2019 - 12:31