DROPS Alpaca
DROPS Alpaca
100% Alpaca
from 3.40 £ /50g
Get the yarn to make this pattern from 27.20£.

The yarn cost is calculated from the pattern’s smallest size and the yarn’s cheapest product type. Looking for an even better price? You might find it on the DROPS Deals!

DROPS SS24

Playdate

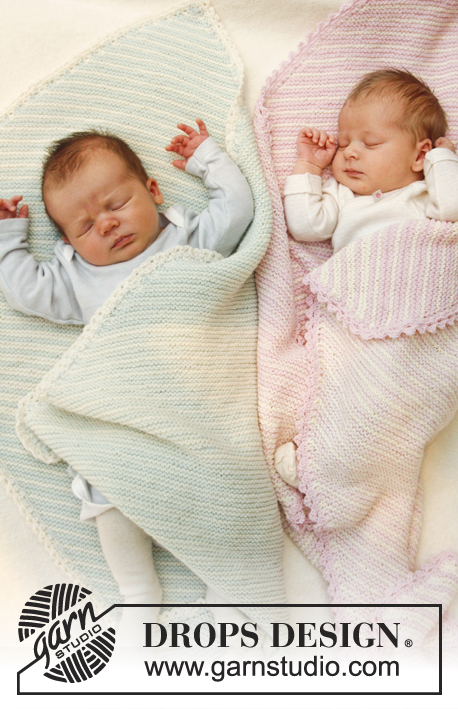
Knitted baby overall with hood in garter st worked in 2 threads DROPS Alpaca. Size 0 – 4 years.

DROPS Baby 25-17
DROPS design: Pattern no z-095-by
Yarn group A + A
-----------------------------------------------------------
Size: 0/1 - 1/3 - 6/9 - 12/18 months (2 - 3/4) years
Size in cm: 48/52 - 56/62 - 68/74 - 80/86 (92 - 98/104)
Materials:
DROPS ALPACA from Garnstudio
150-200-200-200-200-250-250 g colour no 100, off white
250-250-300-300-350-400 g colour no 3112, dusty pink

DROPS CIRCULAR NEEDLE (60 cm) SIZE 5 mm - or size needed to get 17 sts x 34 rows in garter st with 2 strands = 10 x 10 cm.
DROPS DOUBLE POINTED NEEDLES and CIRCULAR NEEDLE (60 cm) SIZE 4 mm - for rib.
DROPS MOTHER-OF-PEARL BUTTON w/HOLES, NO 521: 5-5-6-6 (6-7) pieces

-------------------------------------------------------

Alternative Yarn – See how to change yarns here
Yarn Groups A to F – Use the same pattern and change the yarn here
Yarn usage using an alternative yarn – Use our yarn converter here

-------------------------------------------------------

DROPS Alpaca
DROPS Alpaca
100% Alpaca
from 3.40 £ /50g
Get the yarn to make this pattern from 27.20£.

The yarn cost is calculated from the pattern’s smallest size and the yarn’s cheapest product type. Looking for an even better price? You might find it on the DROPS Deals!

Pattern instructions

NOTE: This pattern is written in British English. All measurements in charts are in cm. For conversion from cm to inches - click here. There are different terms for crocheting in British and American English. If this pattern includes crochet, click for "crochet terms" here. For this pattern in American English, please click here.
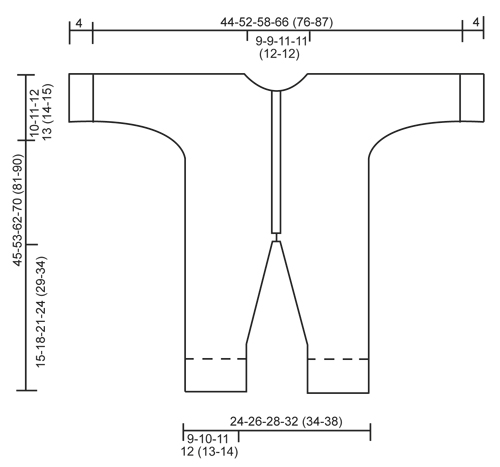
GARTER ST (back and forth on circular needle):
K all rows. 1 ridge = 2 rows K.

STRIPES:
* 4 cm in garter st with 2 strands off white, 4 cm in garter st with 1 strand off white + 1 strand dusty pink, 4 cm in garter st with 2 strands dusty pink *, repeat from *-* until finished measurements.
----------------------------------------------------------

LEG:
Worked back and forth on circular needle.
LOOSELY cast on 38-42-46-50 (54-58) sts (incl 1 edge st in each side) on circular needle size 4 mm with 2 strands dusty pink. K 1 row from WS, continue with rib K 2/P 2 with 1 edge st in each side. When piece measures 4 cm, K 1 row from RS while AT THE SAME TIME dec 6-6-6-8 (8-8) sts evenly = 32-36-40-42 (46-50) sts. Switch to circular needle size 5 mm. Then work in GARTER ST – see explanation above while AT THE SAME TIME working STRIPES – see explanation above.
REMEMBER THE KNITTING TENSION!
AT THE SAME TIME when piece measures 6 cm, inc 1 st in each side, repeat inc every 3-5-6-6 (8-9) rows a total of 7-7-7-9 (9-10) times = 46-50-54-60 (64-70) sts. When piece measures 15-18-21-24 (29-34) cm, cast off 3 sts at the beg of the next 2 rows = 40-44-48-54 (58-64) sts. Put piece aside and knit another leg the same way. Make sure that legs have the same no of stripes.

SUIT:
Slip both legs on to same circular needle size 5 mm with cast off sts towards each other = 80-88-96-108 (116-128) sts. Continue to work back and forth from mid front as follows (1st row = RS and continue stripes where they ended): Work 3 ridges in garter st back and forth. At beg of the next 2 rows cast off 3 sts = 74-82-90-102 (110-122) sts remain on row. Insert 1 marker 17-19-21-24 (26-29) sts in from each side (= 40-44-48-54 (58-64) sts between markers on back piece). Continue in GARTER ST and STRIPES. When piece measures 35-42-50-57 (67-75) cm, divide piece at the 2 markers and finish front and back piece separately.

BACK PIECE:
= 40-44-48-54 (58-64) sts. Continue in garter st and stripes - AT THE SAME TIME cast on new sts at the end of every row in each side for sleeves: 3 sts 2-1-2-3 (1-2) times, 5 sts 1-1-1-1 (2-2) times, 7 sts 0-1-1-1 (2-2) times and then 6-7-7-8 (9-12) sts 1 time = 74-88-98-112 (130-148) sts on row. When piece measures 44-52-61-69 (80-89) cm, cast off the middle 16-16-18-18 (20-20) sts for neck and finish each shoulder/sleeve separately. Work 2 rows over the 29-36-40-47 (55-64) sts in each side – LOOSELY cast off, piece measures approx. 45-53-62-70 (81-90) cm.

LEFT FRONT PIECE:
= 17-19-21-24 (26-29) sts. Continue in garter st and stripes - AT THE SAME TIME cast on new sts at the end of row towards the side for sleeve as on back piece = 34-41-46-53 (62-71) sts. When piece measures 41-49-58-65 (76-85) cm, cast off for neck at the beg of every row from neck as follows: 2 sts 2 times in all sizes and then 1 st 1-1-2-2 (3-3) times in total = 29-36-40-47 (55-64) sts remain on row for shoulder/sleeve. Continue to work until piece measures 45-53-62-70 (81-90) cm, LOOSELY cast off.

RIGHT FRONT PIECE:
Work as left front piece but reversed.

ASSEMBLY:
Sew overarm seams with grafting/kitchener sts from RS.
Sew underarm seams tog edge to edge in front loop of outermost sts. Sew tog legs inside 1 edge st and then sew from opening mid front up to vent.

LEFT BAND:
Pick up from RS inside 1 edge st approx. 46 to 90 sts along left front piece on circular needle size 4 mm with 2 strands dusty pink. P 1 row from WS while AT THE SAME TIME inc evenly to 64-72-88-96 (108-116) sts. Work next row as follows from RS (i.e. from neck and down): 1 edge st in garter st, * K 2, P 2 *, repeat from *-* until 3 sts remain and finish with K 2 and 1 edge st in garter st. Continue rib like this for 3½-4 cm (adjust according to vent at the bottom) and loosely cast off with K over K and P over P.

RIGHT BAND:
Work as left but after 1½ cm dec evenly for 5-5-6-6 (6-7) buttonholes. 1 buttonhole = work 2 sts tog and make 1 YO (P 2 tog in a P-section will look more pretty). Upper buttonhole should be max. 1 cm from neck edge, and bottom hole approx. 2-3 cm from vent. Sew the buttons on to the left band. Sew bands right over left at the bottom of vent.

HOOD:
Pick up from RS approx. 50 to 60 sts around the neck on circular needle size 5 mm with 2 strands dusty pink (also pick up over bands). Work in garter st - AT THE SAME TIME on 2nd row (= from RS) inc evenly to 72-76-80-84 (88-92) sts. (If you do not want a hood, cast off after 2 ridges in garter st.) When piece measures 19-21-23-25 (27-28) cm, cast off all sts. Place hood double and sew tog at the top with grafting/kitchener sts.

CUFF:
Pick up from RS 32-32-36-36 (40-40) sts on double pointed needles size 4 mm with 2 strands dusty pink at the bottom around one sleeve. Work rib = K 2/P 2 until cuff measures 4 cm, then loosely cast off with K over K and P over P. Work the same way around the edge of the other sleeve.

Diagram

diagram measurements

Each of our patterns has specific tutorial videos to help you.

Do you have a question? See a list of frequently asked questions (FAQ)

Knitting tension is what determines the final measurements of your work, and is usually measured per 10 x 10 cm. It is provided like so: number of stitches in width x number of rows in height - eg: 19 stitches x 26 rows = 10 x 10 cm.

The knitting tension is very individual; some people knit/crochet loosely while others work tightly. You adjust the knitting tension with the needle size, which is why the suggested needle size is only meant as a guide! You need to adjust this (up or down) to ensure that YOUR knitting tension matches the knitting tension provided in the pattern. If you work with a different knitting tension than provided you will have a different yarn consumption, and your work will have different measurements than what the pattern suggests.

The knitting tension also determines which yarns can replace each other. As long as you achieve the same knitting tension you can replace one yarn with another.

See DROPS lesson: How to measure your tension/gauge

See DROPS video: How to make a gauge tension swatch

The required amount of yarn is provided in grams, eg: 450 g. To calculate how many balls you’ll need you first need to know how many grams are in 1 ball (25g, 50g or 100g). This information is available if you click on the individual yarn quality on our pages. Divide the amount required with the amount of each ball. For example, if each ball is 50g (the most common amount), the calculation will be as follows: 450 / 50 = 9 balls.

The important thing when changing from one yarn to another is that the knitting/crochet tension remains the same. This is so that the measurements of the finished piece will be the same as on the sketch provided. It is easier to achieve the same knitting tension using yarns from the same yarn group. It is also possible to work with multiple strands of a thinner yarn to achieve the knitting tension of a thicker one. Please try our yarn converter. We recommend you to always work a test swatch.

Please NOTE: when changing yarn the garment might have a different look and feel to the garment in the photo, due to individual properties and qualities of each yarn.

See DROPS lesson: Can I use a different yarn than the one mentioned in the pattern?

All our yarns are categorised into yarn groups (from A to F) according to thickness and knitting tension – group A contains the thinnest yarns and group F the thickest. This makes it easier for you to find alternative yarns to our patterns, should you wish to switch yarn. All yarns within the same group have a similar knitting tension and can easily replace each other. However, different yarn qualities have different structures and properties which will give the finished work a unique look and feel.

Click here for an overview of the yarns in each yarn group

At the top of all our patterns you’ll find a link to our yarn calculator, which is a helpful tool should you wish to use a different yarn than suggested. By filling in the yarn quality you wish to replace, the amount (in your size) and number of strands, the calculator will present good alternative yarns with the same knitting tension. Additionally it will tell you how much you’ll require in the new qualities and whether you’ll need to work with multiple strands. Most skeins are 50g (some are 25g or 100g).

If the pattern is worked with multiple colours, every colour will have to be calculated separately. Similarly, if the pattern is worked with several strands of different yarns (for example 1 strand Alpaca and 1 strand Kid-Silk) you will have to find alternatives for each, individually.

Click here to see our yarn calculator

Since different yarns have different qualities and textures we have chosen to keep the original yarn in our patterns. However, you can easily find options among our available qualities by using our yarn calculator, or simply pick a yarn from the same yarn group.

It is possible that some retailers still have discontinued yarns in stock, or that someone has a few skeins at home that they would like to find patterns for.

The yarn calculator will provide both alternative yarn as well as required amount in the new quality.

If you think it's hard to decide what size to make, it can be a good idea to measure a garment you own already and like the size of. Then you can pick the size by comparing those measures with the ones available in the pattern's size chart.

You'll find the size chart at the bottom of the pattern.

See DROPS lesson: How to read size chart

The needle size provided in the pattern serves only as a guide, the important thing is to follow the knitting tension. And since knitting tension is very individual, you will have to adjust the needle size to ensure that YOUR tension is the same as in the pattern – maybe you’ll have to adjust 1, or even 2 needle sizes, up or down to achieve the correct tension. For this, we recommend that you work test swatches.

Should you work with a different knitting tension than the one provided, the measurements of the finished garment might deviate from the measurement sketch.

See DROPS lesson: How to measure your tension/gauge

See DROPS video: How to make a tension/gauge swatch

Working a garment top-down provides more flexibility and room for personal adjustment. For example it is easier to try the garment on while working, as well as making adjustments to length of yoke and shoulder caps.

The instructions are carefully explaining every step, in the correct order. Diagrams are adjusted to the knitting direction and are worked as usual.

The diagram depicts all rows/rounds, and every stitch seen from the right side. It is read from bottom to top, from right to left. 1 square = 1 stitch.

When working back and forth, every other row is worked from the right side and every other row is worked from the wrong side. When working from the wrong side, the diagram will have to be worked reversed: from left to right, knit stitches are purled, purl stitches are knit etc.

When working in the round every round is worked from the right side and the diagram are worked from right to left on all rounds.

See DROPS lesson: How to read knitting diagrams

The diagram depicts all rows/rounds, and every stitch seen from the right side. It is worked from bottom to top, from right to left.

When working back and forth every other row is worked from the right side: from right to left and every other row is worked from the wrong side: from left to right.

When working in the round, every row in the diagram are worked from the right side, from right to left.

When working a circular diagram you start in the middle and work your way outwards, counter clockwise, row by row.

The rows usually start with a given number of chain stitches (equivalent to the height of the following stitch), this will either be depicted in the diagram or explained in the pattern.

See DROPS lesson: How to read crochet diagrams

Instructions for working several diagrams after each other on the same row/round, will often be written like so: “work A.1, A.2, A.3 a total of 0-0-2-3-4 times". This means you work A.1 once, then A.2 is worked once, and A.3 is repeated (in width) the number of times provided for your size – in this case like so: S = 0 times, M = 0 times, L=2 times, XL= 3 times and XXL = 4 times.

The diagrams are worked as usual: begin with the first row in A.1, then work the first row in A.2 etc.

See DROPS lesson: How to read knitting diagrams

See DROPS lesson: How to read crochet diagrams

The total width of the garment (from wrist-to-wrist) will be larger in the larger sizes, despite the actual sleeves being shorter. The larger sizes have longer sleeve caps and wider shoulders, so there will be a good fit in all sizes.

The measurement sketch/schematic drawing provides information regarding the full length of the garment. If it’s a jumper or a jacket the length is measured from the highest point on the shoulder closest to the neckline, and straight down to the bottom of the garment. It is NOT measured from the tip of shoulder. Similarly, the length of yoke is measured from the highest point on the shoulder and down to where yoke is split into body and sleeves.

On a jacket measures are never taken along bands, unless specifically stated. Always measure inside band stitches when measuring the length.

See DROPS lesson: How to read a schematic drawing

Diagrams are often repeated on the round or in height. 1 repeat is the diagram the way it appears in the pattern. If it says to work 5 repeats of A.1 in the round, then you work A.1 a total of 5 times after/next to each other in the round. If it says to work 2 repeats of A.1 vertically/in height you work the entire diagram once, then begin again at the start and work the entire diagram one more time.

Chain stitches are slightly narrower than other stitches and to avoid working the cast-on edge too tight, we simply chain more stitches to begin with. The stitch count will be adjusted on the following row to fit the pattern and measurement sketch.

The rib edge is more elastic and will contract slightly compared to, for example, stocking stitch. By increasing before the rib edge, you avoid a visible difference in width between the rib edge and the rest of the body.

It’s very easy to cast off too tightly, and by making yarn overs while casting off (and simultaneously casting these off) you avoid a too tight cast off edge.

See DROPS video: How to bind off with yarn overs (yo)

To achieve an even increase (or decrease) you can increase on, for example: every 3rd and 4th row alternately, like so: work 2 rows and increase on the 3rd row, work 3 rows and increase on the 4th. Repeat this until the increase is complete.

See DROPS lesson: Increase or decrease 1 st on every 3rd and 4th row alternately

Should you prefer to work in the round instead of back and forth, you may of course adjust the pattern. You’ll need to add steeks mid-front (usually 5 stitches), and follow the instructions. When you would normally turn and work from the wrong side, simply work across the steek and continue in the round. At the end you’ll cut the piece open, pick up stitches to work bands, and cover the cut edges.

See DROPS video: How to knit steeks and cut open

Should you prefer to work back and forth instead of in the round, you may of course adjust the pattern so you work the pieces separately and then assemble them at the end. Divide the stitches for the body in 2, add 1 edge stitch in each side (for sewing) and work the front and back pieces separately.

See DROPS lesson: Can I adapt a pattern for circular needles into straight needles?

Pattern repeats can vary slightly in the different sizes, in order to get the correct proportions. If you’re not working the exact same size as the garment in the photo, yours might deviate slightly. This has been carefully developed and adjusted so that the complete impression of the garment is the same in all sizes.

Make sure to follow instructions and diagrams for your size!

If you have found a pattern you like which is available in women’s size it’s not very difficult to convert it to men’s size. The biggest difference will be the length of sleeves and body. Start working on the women size that you think would fit across the chest. The additional length will be worked right before you cast off for the armhole/sleeve cap. If the pattern is worked top-down you can add the length right after the armhole or before the first decrease on sleeve.

Regarding additional yarn amount, this will depend on how much length you add, but it is better with a skein too many than too few.

All yarns will have excess fibres (from production) that might come off as lint or shedding. Brushed yarns (ie hairier yarns) have more of these loose, excess fibres, causing more shedding.

Shedding also depends on what is worn under or over the garment, and whether this pulls at the yarn fibres. It’s therefore not possible to guarantee that there will be no shedding

Below are some tips on how to get the best result when working with hairier yarns:

1. When the garment is finished (before you wash it) shake it vigorously so the looser hairs come off. NOTE: do NOT use a lint roller, brush or any method that pulls at the yarn.

2. Place the garment in a plastic bag and put it in your freezer - the temperature will cause the fibres to become less attached to each other, and excess fibres will come off easier.

3. Leave in the freezer for a few hours before taking it out and shaking it again.

4. Wash the garment according to the instructions on the yarn label.

Pilling is a natural process that happens to even the most exclusive of fibers. It's a natural sign of wear and tear that is hard to avoid, and that is most visible in high friction areas of your garment like a sweater's arms and cuffs.

You can make your garment look as new by removing the pilling, using a fabric comb or a pill/lint remover.

Still can't find the answer you need? Then scroll down and leave your question so one of our experts can try to help you. This will be done normally within 5 to 10 working days.
In the meantime, you can read the questions and answers that others have left to this pattern or join the DROPS Workshop on Facebook to get help from fellow knitters/crocheters!

You might also like...

Beatrice’s winter suit

Jessi, United States

Drops Playdate

Sunbluebird, Portugal

Post a comment to pattern DROPS Baby 25-17

We would love to hear what you have to say about this pattern!

If you want to leave a question, please make sure you select the correct category in the form below, to speed up the answering process. Required fields are marked *.

Comments / Questions (88)

country flag Ulla Ladefoged wrote:

Jeg forstår ikke, hvad der skal ske med benene, når alle masker fra begge ben er sat på samme rundpind. Strikkes de to ben så sammen - altså der strikkes frem og tilbage over alle 90 m? Indtil arbejdet måler 50 cm? Det giver ikke mening for mig, at der ikke meget tidligere skal deles til ryg og forstykke. Jeg kan evt. sende et foto, måske forklarer jeg det ikke tydligt nok Med venlig hilsen Ulla Ladefoged

26.09.2018 - 21:32

DROPS Design answered:

Hej Ulla, i størrelse 6/9 måneder, skal benene måle 21 cm, der strikkes nu frem og tilbage fra midt foran til arb måler 50 cm, nu er du kommet til under ærmerne og fortsætter ifølge opskriften. God fornøjelse!

28.09.2018 - 14:52

country flag Bogusia wrote:

Czy jedna nitka z DROPS Big Merino też wchodzi w grę? Jeśli tak, to czy ilość motków powinna zostać zmieniona? Będę robić rozmiar trzeci, czyli dla 6/9 miesięcznego dziecka. Dziękuję i pozdrawiam :)

09.05.2018 - 14:53

DROPS Design answered:

Witaj ponownie Bogusiu! 1 nitka BIG Merino wchodzi jak najbardziej w grę. Na 6/9 mies. trzeba by kupić ok. 550 g, tj. 11 motków. Pozdrawiam

09.05.2018 - 15:23

country flag Bogusia wrote:

Dzień dobry. Czy kombinezon można wykonać podwójną nitką Baby Merino lub jedną Merino Extra Fine? Jaki rozmiar drutów należy użyć w obydwóch przypadkach? Z góry dziękuję za odpowiedź. Pozdrawiam.

09.05.2018 - 11:17

DROPS Design answered:

Witaj Bogusiu, najlepiej będzie użyć 2 nitek włóczki DROPS Baby Merino, rozmiar drutów będzie taki sam jak we wzorze (4 na ściągacze i 5 na pozostałą część). Powodzenia!

09.05.2018 - 14:47

country flag Vilde wrote:

Hei, eg skal starte og strikke denne dressen og lurte på kva dukken meiner med kantmaskene? kan du forklare meg fordi eg ikkje veit kva kantmasker er?

10.04.2018 - 17:21

DROPS Design answered:

Hei Vilde. Kantmaskene er masker i endene av pindene på et plagg (derav navnet). De følger ikke mønsteret, men brukes som regel for å lage en gjevn kant i plagget, og ofte skal man montere innenfor denne kanten ved montering. Her er en video av hvordan å strikke kantmaske i rillestrikk. God fornøyelse

12.04.2018 - 15:44

country flag Renata wrote:

POSSO EFFETTUARE QUESTO LAVORO CON FERRI DRITTI? Non ho molta dimestichezza con i ferri circolari. Grazie

10.04.2018 - 16:21

DROPS Design answered:

Buongiorno Renata. Può usare i ferri dritti al posto dei circolari. Le spiegazioni sono date per una lavorazione in ferri di andata e ritorno, pertanto può seguirle senza doverle modificare. Buon lavoro!

10.04.2018 - 17:08

country flag Sandra wrote:

Hi, I'm doing the left front. I'm ready to bind off for the neck. Do I bind off on one row or do I bind off on more than one row? It says to do 2 stitches 2 times and then 1 stitch 2 times. I'm kind of confused with this part.

26.11.2017 - 16:38

DROPS Design answered:

Dear Sandra, the neck of the frint is bound off through a few rows (exact number depends on the actual size) 2 sts 2 times (in other words in two rows) in all sizes and then 1 st 1-1-2-2 (3-3) times (in other words 1-1-2-2 (3-3) rowa) I hope this helps. Happy Knitting!

26.11.2017 - 17:08

country flag Margrit wrote:

Hallo. Wieviel g Wolle brauche ich von jeder Farbe? Herzliche Grüße Margrit

04.11.2017 - 21:00

DROPS Design answered:

Liebe Margrit, Garnmenge für jede Größe finden Sie unter Tab "Material", z.B. in die 1. Größe brauchen Sie 150 g Alpaca Farbe 100 (= 3 Knäuel je 50 g) + 250 g Farbe 3112 (= 5 Knäuel je 50 g). Viel Spaß beim stricken!

06.11.2017 - 09:36

country flag Anne wrote:

... Die beiden Beine werden dann in der Reihenfolge auf ein Seil genommen: 3 M abgk, M Bein 1, 3 M abgk, 3 M abgek, M Bein 2, 3 M abgk. 3. "19 M von jeder Seite entfernt": verstehe ich: von Anfang und Ende einer R, nicht: Vorder- und Rückseite korrekt? Ganz herzlichen Dank für die Hilfe!

22.10.2017 - 13:10

DROPS Design answered:

Die 3 Maschen am Anfang einer Hinreihe abketten, bis zur Ende der Reihe stricken, dann die 3 ersten Maschen am Anfang der Rückreihe stricken, dann bis zur Ende der Reihe stricken (= 6 M wurden insgesamt abgekettet = 82 M bleiben). Dann 1 Markierer muss 19 M vom Anfang + 1 Markierer 19 M vom Ende einsetzen = 44 M zwischen beide Markierer für Rückenteil). Viel Spaß beim stricken!

23.10.2017 - 10:32

country flag Anne wrote:

... 2. "Nach 18 cm am Anfang der 2 nächsten R je 3 M abk": ab wo wird gemessen? Trotz etwas kleinerer Maschenprobe war ich gerade mit den Zunahmen fertig war, als die 18cm erreicht waren. Zunahme und Abnahme fielen so in dieselbe R wenn ich inkl. Bündchen gemessen habe. Abketten verstehe ich: Hin R: erste 3 M abk, stricken, wenden, Rück R: erste 3 M abk.

22.10.2017 - 13:08

DROPS Design answered:

Die Zunahmen sind in jeder 5. Reihe insg. 7 x, dh 31 Reihe (die 1. Zunnahme ist am Anfang), mit einer Maschenprobe 34 Reihe = 10 cm sollen beim 18 cm alle Zunahmen fertig sein. Dann die 3 ersten M am Anfang der nächsten Hinreihe abketten, die Reihe bis zur Ende stricken, wenden, die 3 ersten M der nächsten Rückreihe abbketten, die Reihe bis zur Ende stricken = 3 M wurden auf beiden Seite abgekettet.

23.10.2017 - 10:28

country flag Anne wrote:

Hallo, ich bin ganz begeistert von dem Overall. Da ich zum ersten Mal so etwas stricke, tun sich mir schon bei den Beinen die ersten Fragen auf: 1. "Gleichzeitig nach 6cm auf jeder Seite 1 M aufnehmen": werden die 6cm mit oder ohne Bündchen gemessen? Heißt "Seite" am Anfang und Ende jeder 5. Reihe? Oder 1 M in der Hin- (5.) und 1 M in der Rück (6.) R aufnehmen?

22.10.2017 - 13:04

DROPS Design answered:

Liebe Anne, die 6 cm werden von der Anschlagskante gemessen. Sie sollen 1 M auf beiden Seiten zunehmen, dh 1 M am Anfang der Reihe + 1 M am Ende der Reihe (= 2 M zugenommen). Dann 4 Reihe ohne Zunahmen stricken, und dann 1 Reihe mit Zunahme wie zuvor = diese 5 Reihe so wiederholen.

23.10.2017 - 10:21