
Popular categories
Looking for a yarn?


|
|||||||||||||
Beth |
|||||||||||||
|
|
|||||||||||||
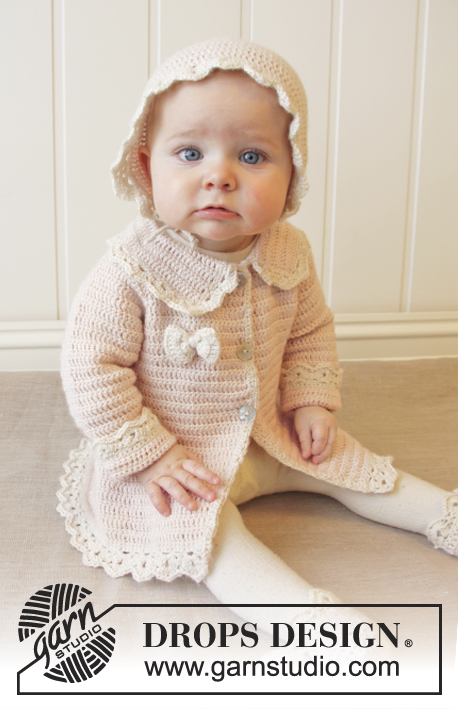
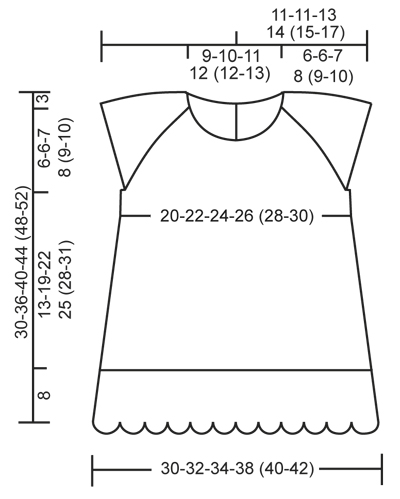
Crochet baby dress with raglan, short sleeves and fan edges, worked top down in DROPS BabyAlpaca Silk. Size 0-4 years
DROPS Baby 25-16 |
|||||||||||||
|
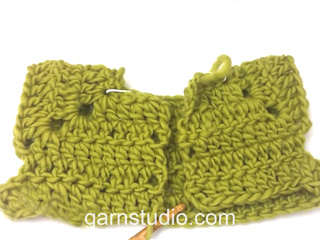
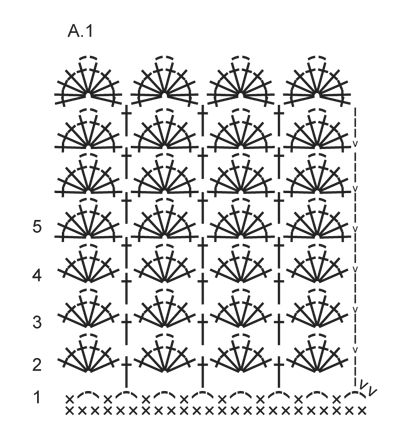
CROCHET INFO: Replace first sc at beg of every sc round/row with 1 ch. Finish round with 1 sl st in ch from beg of round. Finish row with 1 sc in 3rd ch from beg of previous row. Replace first dc at beg of every dc round/row with 3 ch. Finish round with 1 sl st in 3rd ch from beg of round. Finish row with 1 dc in ch from beg of previous row. TEXTURE ROWS: * 1 row/round sc, 1 row/round dc *, repeat from *-* (1 row/round sc + 1 row/round dc = 1 texture row). INCREASE TIP: Inc 1 sc/dc by working 2 sc/dc in same st. PATTERN: See diagram A.1. ---------------------------------------------------------- DRESS: Read US/UK above! The piece is worked top down. Work back and forth from mid back to after vent mid back, then work piece in the round. YOKE: Ch 67-71-75-79 (79-83) (includes 1 ch to turn with) on hook size 3.5 mm/E/4 with powder. Work 1 sc in 2nd ch from hook, then work 1 sc in every ch the entire row = 66-70-74-78 (78-82) sc on row. Now insert 4 markers in piece for raglan as follows (beg mid back – NOTE: Do NOT work while inserting markers): Skip 9-10-11-12 (12-13) sc (= right back piece), insert 1 marker in next sc, skip 13 sc (= sleeve), insert 1 marker in next sc, skip 18-20-22-24 (24-26) sc (= front piece), insert 1 marker in next sc, skip 13 sc (= sleeve) and insert last marker in next sc (there are now 9-10-11-12 (12-13) sc on left back piece after last marker). READ ALL OF THE FOLLOWING SECTION BEFORE CONTINUING: READ CROCHET INFO and work next row as follows from RS: Work 1 dc in every sc but in every sc with marker work 2 dc + 2 ch + 2 dc = 78-82-86-90 (90-94) dc on row. Then work TEXTURE ROWS – see explanation above (work back and forth with 1 sc/dc in every st from previous row but on every row with sc from WS work 2 ch over the 2 ch from previous row in raglan lines). AT THE SAME TIME on 1st row from RS (i.e. row with dc) inc for raglan as follows: Work 2 dc + 2 ch + 2 dc in every ch-space in every raglan line (= 16 dc inc on row - NOTE: Work in both ch-spaces). Repeat inc on every row from RS 3-3-4-4 (5-6) more times (= 4-4-5-5 (6-7) times in total) = 142-146-166-170 (186-206) sts. REMEMBER THE CROCHET GAUGE! After last inc for raglan work 1 row with sc from WS as before. Work next row as follows from RS: Work 1 dc in each of the first 19-20-23-24 (26-29) sc (= right back piece), skip the next 33-33-37-37 (41-45) sc (= sleeve), work 6-8-6-10 (10-8) ch, work 1 dc in each of the next 38-40-46-48 (52-58) sc (= front piece), skip the next 33-33-37-37 (41-45) sc (= sleeve), work 6-8-6-10 (10-8) ch and work 1 dc in each of the last 19-20-23-24 (26-29) sc (= left back piece). Sleeve caps are now done and piece is worked in the round. BODY: Put piece tog mid back with RS out and work 1 round with sc (work 1 sc in every dc from previous round and 1 sc in every ch under each sleeve – remember CROCHET INFO) = 88-96-104-116 (124-132) sts on round. Insert 1 marker in each side = 44-48-52-58 (62-66) sts on front and back piece. Continue in the round with TEXTURE ROWS. When piece measures approx. 2 cm / ¾" from markers under sleeves, inc 1 st on each side of both markers - READ INCREASE TIP (= 4 sts inc). Repeat inc every 1½-2-3-3 (3-3½) cm / ½"-¾"-3⅛"-3⅛" (1⅛"-1¼") 5-6-6-7 (8-8) more times (= 6-7-7-8 (9-9) times in total) = 112-124-132-148 (160-168) sts. When piece measures approx. 13-19-22-25 (28-31) cm / 5⅛"-7½"-8¾"-9¾" (11"-12¼") from markers (finish after 1 round with dc, inc should be done), work 1 round sc AT THE SAME TIME inc 8-2-0-2 (2-0) sc evenly – READ INCREASE TIP = 120-126-132-150 (162-168) sc. Cut the yarn. Switch to off white and work 1 round sc with 1 sc in every sc from previous round. Then work Fan pattern according to diagram A.1, i.e. work as follows: ROUND 1: * ch 3, skip 2 sc, 1 sc in next sc *, repeat from *-* the entire round and finish with 3 ch and 1 sl st in 1st ch from beg of round = 40-42-44-50 (54-56) ch-spaces. ROUND 2: Work sl sts until mid of first ch-space, 3 ch (= 1 dc), * 3 dc + 2 ch + 3 dc in next ch-space, 1 dc in next ch-space *, repeat from *-* until 1 ch-space remains, work 3 dc + 2 ch + 3 dc in last ch-space and finish with 1 sl st in 3rd ch from beg of round = 20-21-22-25 (27-28) dc-groups with 1 dc between every dc-group. ROUND 3-4: 3 ch (= 1 dc), * 3 dc + 2 ch + 3 dc in ch-space in mid of next dc-group, 1 dc in next dc *, repeat from *-* the entire round, finish with 3 dc + 2 ch + 3 dc in ch-space in mid of last dc-group and 1 sl st in 3rd ch from beg of round. ROUND 5: Work as round 3-4 but in ch-space in the mid of every dc-group work 4 dc + 2 ch + 4 dc (instead of 3 dc + 2 ch + 3 dc). Repeat 5th round until edge measures approx. 6 cm / 2½" in all sizes (or desired length). Then work last round the same way but with 5 dc + 2 ch + 5 dc in ch-space in the mid of every dc-group. TWINED STRING: Cut 3 lengths off white yarn of 3 metres/3.25 yds each. Twine the strands tog until they resist, fold the string double so that it twines again. Make a knot at each end. Thread the string up and down through a dc row, approx. 2 cm / ¾" below armhole on dress, beg from mid front. BOW: Ch 11 on hook size 3.5 mm/E with off white. Work first row as follows: 1 dc in 4th ch from hook, 1 dc in each of the next 7 ch = 9 dc on row. Turn piece and work TEXTURE ROWS back and forth until piece measures approx. 10 cm / 4" – finish after 1 row with sc. Fasten off. Sew short sides tog to form a ring and twine some yarn around the mid of bow to tighten it neatly in the middle. Fasten bow mid front on dress, just above string. ADJUSTING NECKLINE: For better fit work a small elevation at the back of neck. Insert 1 marker in st in each corner in neck, i.e. at beg of every raglan line and 1 marker mid front. Work on hook size 3.5 mm/E with powder as follows: Beg mid back, work 1 sc in every st until 1 st remains before st with marker, work 1 hdc in next st, 1 dc in st with marker and 1 hdc in next st, then work 1 sc in every st until 1 st remains before next st with marker, 1 hdc in next st, 1 dc in st with marker and 1 hdc in next st, the work 1 sc in every st until 4-4-5-5 (5-6) sts remain before marker mid front. Turn piece and work 1 sc in every sc back to mid back but at every marker work 3 sc tog, i.e. work 1 sc in hdc but wait with last YO and pull through, work 1 sc in st with marker but wait with last YO and pull through, work 1 sc in next hdc but now pull last YO through all 4 sts on hook (= 2 sc dec). Cut the yarn and repeat from mid back to mid front in the other side. BUTTON BAND AT THE BACK: Work along left opening mid back with powder as follows: 1 sc in every sc row and 2 sc in every dc row. Work a total of 4 rows sc back and forth, fasten off. Along right opening mid back work buttonholes as follows (beg from RS at neckline): Work 3 sc (1 sc in sc row and 2 sc in dc row). 4 ch (= 1 buttonhole), skip approx. 1 cm / ½", work sc until approx. mid on band, ch 4, skip approx. 1 cm / ½", work sc until 1 cm / ½" remains on band, 4 ch and fasten with 1 sc in last st. Fasten off. Sew the buttons on to button band in the left side. NECK EDGE: Work around the neck with off white as follows: 1 sc in first st, * ch 2, skip 2 sts, 1 sc in next st *, repeat from *-* the entire row, fasten off. FAN EDGE AROUND SLEEVE CAPS: Work with off white as follows: Work 1 sc in each of the 6-8-6-10 (10-8) sts mid under sleeve, then work fan edge around the sleeve opening as follows: * Skip approx. 2 sts, in next st work 3 dc + 2 ch + 3 dc, skip approx. 2 sts, 1 sc in next st *, repeat from *-* and finish with 1 sl st in first sc from beg of round (= approx. 5-5-6-6 (7-7) fans along sleeve cap). Fasten off. Repeat at the bottom around the other sleeve cap. |
|||||||||||||
Diagram explanations |
|||||||||||||
|
|||||||||||||
|
|||||||||||||
|
|||||||||||||
|
Have you made this or any other of our designs? Tag your pictures in social media with #dropsdesign so we can see them! Do you need help with this pattern?You'll find tutorial videos, a Comments/Questions area and more by visiting the pattern on garnstudio.com. © 1982-2024 DROPS Design A/S. We reserve all rights. This document, including all its sub-sections, has copyrights. Read more about what you can do with our patterns at the bottom of each pattern on our site. |
|||||||||||||


With over 40 years in knitting and crochet design, DROPS Design offers one of the most extensive collections of free patterns on the internet - translated to 17 languages. As of today we count 304 catalogs and 11422 patterns - 11417 of which are translated into English (US/in).
We work hard to bring you the best knitting and crochet have to offer, inspiration and advice as well as great quality yarns at incredible prices! Would you like to use our patterns for other than personal use? You can read what you are allowed to do in the Copyright text at the bottom of all our patterns. Happy crafting!
Comments / Questions (47)
LIJF: rij vasten gehaakt en 2 steekmarkeerders geplaatst aan elke kant. Dan instructie: Ga verder in de rondte in STRUCTUURPATROON. 3 Vragen hierover: 1) beginnen met een structuurpatroon .... moet ik dan nog een toer vasten doen (hiervoor is er net een toer vasten geweest immers) of beginnen met stokjes? 2) er staat 'in de rondte': moet ik nu steeds maar door blijven haken en niet meer keren? 3) als je rond blijft haken, hoe krijg je dan de vasten aan de verkeerde kant?
26.06.2017 - 21:58DROPS Design answered:
Hoi Ina, Voordat je start met structuurpatroon haak je 1 stokje in elke vaste, zoals beschreven staat in het patroon. Daarna start het structuurpatroon, inderdaad met vasten (1). Bij 'LEES INFORMATIE VOOR HET HAKEN' zie je hoe je de toer eindigt en begint wanneer je in de rondte haakt. Je keert dan inderdaad niet meer als je in de rondte haakt (2) Wat je met vraag 3 bedoelt begrijp ik niet, maar als je in de rondte haakt, haak je steeds op de goede kant, ook de vasten. Hopelijk kom je er zo uit.
29.06.2017 - 13:29LIJF: rij vasten gehaakt en 2 steekmarkeerders geplaatst aan elke kant. Dan instructie: Ga verder in de rondte in STRUCTUURPATROON. 3 Vragen hierover: 1) beginnen met een structuurpatroon .... moet ik dan nog een toer vasten doen (hiervoor is er net een toer vasten geweest immers) of beginnen met stokjes? 2) er staat 'in de rondte': moet ik nu steeds maar door blijven haken en niet meer keren? 3) als je rond blijft haken, hoe krijg je dan de vasten aan de verkeerde kant?
26.06.2017 - 09:05Buongiorno, sto iniziando questo modello ed é la prima volta che lavoro un raglan. Quando nelle istruzioni dello sprone scrivete "saltare 11maglie" si intende lavorarle normalmente prima di inserire il segno? E non capisco nemmeno l'indicazione che dice di non lavorare le maglie mentre si inseriscono i segni: Bisogna fare un buco? Ma in quel modo i punti diminuiscono... Grazie dell'aiuto!
31.03.2017 - 16:35DROPS Design answered:
Buongiorno Veronica. Dopo aver lavorato la prima riga, si ferma ed inserisce i segni senza lavorare nessuna maglia. Quindi conta 11 m.b e inserisce 1 segno nella m successiva; da lì, conta 13 m.b e inserisce 1 segno nella m successiva e così via come indicato nel testo. Buon lavoro!
31.03.2017 - 17:29Jeg har 8 m da jeg laver den næste str. Men skal jeg så markere m 4 eller 5 ? Forstår ikke helt hvad maske det skal være, nu det er et lige antal m under ærmet😊
13.03.2017 - 12:18DROPS Design answered:
Hej Mia. Du skal saette imellem maskerne, saa med 8 m har du 4 paa hver side under aermet....
13.03.2017 - 14:24Hejsa Jeg er igang med jeres fine kjole i str. 1/3 mdr, er dog gået i stå ved følgende stykke: sæt 1 mærke i hver side = 48 m på for- og rygstk. Jeg forstår ikke helt hvor jeg skal tælle fra, kan se I har svaret på en norsk kommentar og ved de skal være i armhulen men hvordan? Jeg er sluttet midt bagpå og har de 96 m rundt. Hvis jeg tæller 48 m fra begyndelse og slutningen ender jeg i de 2 miderste m foran🙃🙃
10.03.2017 - 22:01DROPS Design answered:
Hej Mia. Du har 6 fm under hvert aerme, saa du saetter dit maerke i midten af disse 6 fm (altsaa 3 fm paa hver side under aermet) og det gör du i begge sider, og saa burde du have 48 paa for- og rygstk.
13.03.2017 - 12:07Hei! Litt nytt for meg dette. Angående bærestykke med raglan. Hekles det sammen (rundt)? Eller i to deler og sammen når man starter på bolen? mvh Jorunn
28.02.2017 - 16:06DROPS Design answered:
Hei Jorunn. Du hekler baerestykket frem og tilbage og naar du kommer til bolen hekler du videre rundt.
28.02.2017 - 16:08Hei! Hekler i str 6/9 mnd og skal starte med bol, men skjønner ikke når det står i oppskriften "Sett 1 merke i hver side = 44-48-52-58 (62-66) m på for- og bakstk". Fra hvilken maske skal jeg begynne å telle? Blir det 2 merker jeg skal sette? Og blir det foran/bak eller på sidene?
21.01.2017 - 19:05DROPS Design answered:
Hej Hilde. Du skal saette 2 merker i arbejdet, i begge sider, saa du har 52 m paa for- og bakstk. Siden er i midten af de 6 lm som du har under hvert erme.
23.01.2017 - 14:46Bonjour je viens de terminer le raglan et j'ai fermé les manche, j'ai le bon nombre de maille, j'ai fermé le dos avec le rand de MS, par contre je n'ai pas saisi ou se place les marqueurs ? Sous les manche? Car a 44 mailles c'est tou juste la moitier?? Merci de m'éclairer !
25.05.2016 - 21:00DROPS Design answered:
Bonjour Mélanie, les marqueurs des côtés se mettent au milieu des chaînettes montées sous les manches (soit les 6 ml - 1ère taille - vous avez ainsi 3 des nouvelles mailles sur la chaînette sous la manche de chaque côté du marqueur). Bon crochet!
26.05.2016 - 09:45Jeg er igang med at hækle kjolen i str 1/3 måneder, og er nået til at skulle hækle det nederste af bærestk. Jeg forstår det ikke helt, har hæklet de første 20 st= højre rygstk og skal springe 33 fm over, skal de hækles og hvad med de to lm der er over buerne hvad skal man med dem
02.03.2016 - 08:24DROPS Design answered:
Hej, Efter de første 20 st, hækler du 8 lm hopper over 33m og fortsætter i den 34.m. God fornøjelse!
02.03.2016 - 13:56I am so confused with where is says to finish the round with 1sl St in 3rd chain from beg of row ( I think I got that) but then what does finish row with 1dc in chain from beginning of previous row mean? I'm not sure where that stitch would go.
27.02.2016 - 21:23DROPS Design answered:
Dear Mrs Dryden, when you work in rows (back and forth), the last st on row is worked in the 3rd ch from beg of previous row (the 3 ch replace the 1st dc at beg of each row) - as shown in video below. Happy crocheting!
29.02.2016 - 09:16