
Popular categories
Looking for a yarn?


|
|||||||||||||
Little Lady Rose |
|||||||||||||
|
|
|||||||||||||
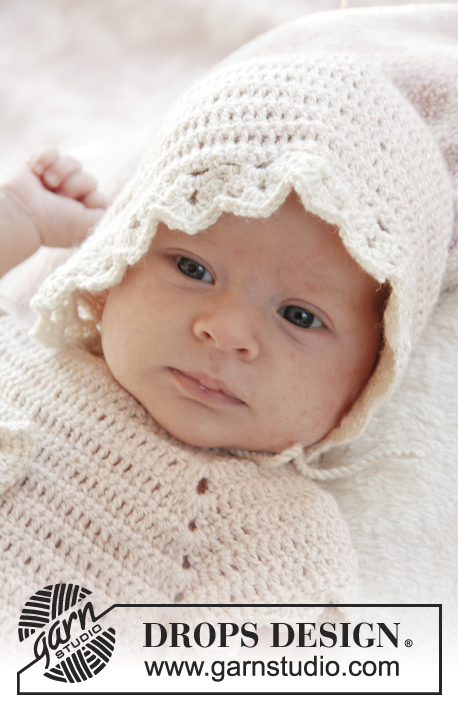
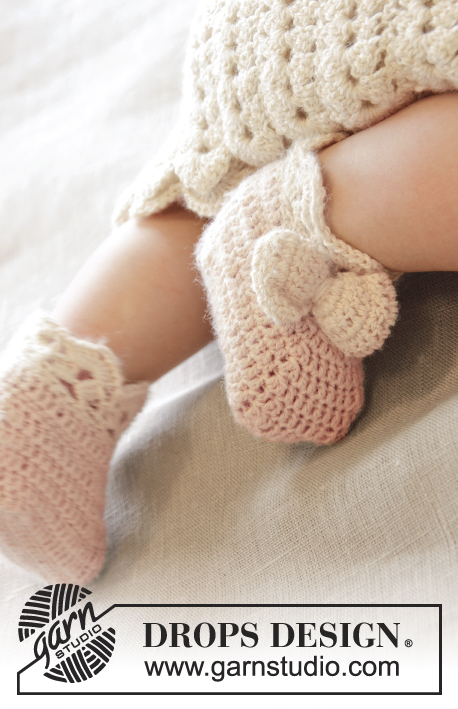
Crochet baby jacket with raglan and fan edges, worked top down in DROPS BabyAlpaca Silk. Size 0-4 years.
DROPS Baby 25-12 |
|||||||||||||
|
CROCHET INFO: Replace first dc at beg of every dc row with 1 ch, finish row with 1 dc in 3rd ch from beg of previous row. Replace first tr at beg of every tr row with 3 ch, finish row with 1 tr in ch from beg of previous row. TEXTURE ROWS: * 1 row dc (worked from WS), 1 row tr (worked from RS) *, repeat from *-* (1 row dc + 1 row tr = 1 texture row). INCREASE TIP: Inc 1 dc/tr by working 2 dc/tr in same st. DECREASE TIP: Work 1 dc/tr but wait with last pull through (= 2 sts on hook), then work next dc/tr but on last pull through, pull yarn through all sts on hook = 1 dc/tr dec. PATTERN: See diagram A.1. (A.2 applies to inc on collar). ---------------------------------------------------------- JACKET: The piece is worked top down. Worked back and forth from mid front. YOKE: Work 83-87-91-91 (91-95) ch (incl 1 ch to turn with) on hook size 3.5 mm with powder. Work 1 dc in 2nd ch from hook, then work 1 dc in every ch the entire row = 82-86-90-90 (90-94) dc on row (incl 5 band sts in each side towards mid front). Now insert 4 markers in piece for raglan as follows (beg mid front – NOTE: Do NOT work while inserting markers): Skip 15-16-17-17 (17-18) dc (= left front piece), insert 1 marker in next dc, skip 14 dc (= sleeve), insert 1 marker in next dc, skip 20-22-24-24 (24-26) dc (= back piece), insert 1 marker in next dc, skip 14 dc (= sleeve) and insert last marker in next dc (there are now 15-16-17-17 (17-18) dc on right front piece after last marker). READ ALL OF THE FOLLOWING SECTION BEFORE CONTINUING: READ CROCHET INFO and work next row as follows from RS: Work 1 tr in every dc but in every dc with marker work 2 tr + 2 ch + 2 tr = 94-98-102-102 (102-106) tr on row. Then work TEXTURE ROWS - see explanation above (work back and forth with 1 dc/tr in every st from previous row – but on every row with dc from WS work 2 ch over the 2 ch from previous row in raglan lines. On row with tr work 2 tr + 2 ch + 2 tr in both ch-spaces). AT THE SAME TIME on first row from RS (i.e. on row with tr) inc for raglan as follows: Work 2 tr + 2 ch + 2 tr in every ch-space in every raglan line (= 16 tr inc on row – note: work around both ch-spaces). Repeat inc on every row from RS 3-4-5-6 (7-8) more times (= 4-5-6-7 (8-9) times in total) = 158-178-198-214 (230-250) sts. REMEMBER THE CROCHET TENSION! After last inc for raglan work 1 row with dc from WS as before. Work next row as follows from RS: Work 1 tr in each of the first 25-28-31-33 (35-38) dc (= left front piece), skip the next 34-38-42-46 (50-54) dc (= sleeve), work 6-6-6-6 (8-8) ch, work 1 tr in each of the next 40-46-52-56 (60-66) dc (= back piece), skip the next 34-38-42-46 (50-54) dc (= sleeve), work 6-6-6-6 (8-8) ch and work 1 tr in each of the last 25-28-31-33 (35-38) dc (= right front piece). Then finish body and sleeves separately. BODY: NOW MEASURE PIECE FROM HERE! Work 1st row from WS – work 1 dc in every tr from previous row and 1 dc in each of the 6-6-6-6 (8-8) ch under each armhole = 102-114-126-134 (146-158) dc on row. Insert 1 marker 28-31-34-36 (39-42) sts in from each side (= 46-52-58-62 (68-74) sts on back piece). Continue back and forth with TEXTURE ROWS. AT THE SAME TIME when piece measures 2-2-2-3 (2-3) cm, inc 1 st on each side of both markers – READ INCREASE TIP (= 4 sts inc). Repeat inc approx. every 1-1½-1½-1½ (1½-1½) cm 10-10-10-10 (13-13) more times (= 11-11-11-11 (14-14) times in total) = 146-158-170-178 (202-214) sts. When piece measures approx. 15-17-18-20 (22-24) cm from armhole – adjust so that inc are done, work 1 row dc from WS AT THE SAME TIME inc 2-2-2-0 (0-0) dc evenly – READ INCREASE TIP = 148-160-172-178 (202-214) dc. Fasten off. Switch to off white and work 1 row dc from WS with 1 dc in every dc from previous row. Then work Fan pattern according to diagram A.1, i.e. work as follows: ROW 1 (= RS): 1 ch, 1 dc in first st, * 3 ch, skip 2 dc, 1 dc in next st *, repeat from *-* the entire row = 49-53-57-59 (67-71) ch-spaces, turn. ROW 2 (= WS): Work 3 ch (= 1 tr), 3 tr + 2 ch + 3 tr in first ch-space, * 1 tr in next ch-space, 3 tr + 2 ch + 3 tr in next ch-space *, repeat from *-* the entire row and finish with 1 tr in first dc from beg of previous row = 25-27-29-30 (34-36) tr-groups with 1 tr between every tr-group, turn piece. ROW 3 (= RS): Work 3 ch (= 1 tr), 3 tr + 2 ch + 3 tr in ch-space in the mid of first tr-group, * 1 tr in next tr, 3 tr + 2 ch + 3 tr in ch-space in the mid of next tr-group *, repeat from *-* the entire row and finish with 1 tr in 3rd ch from beg of previous row = 25-27-29-30 (34-36) tr-groups with 1 tr between every tr-group. Fasten off. SLEEVE: = 34-38-42-46 (50-54) sts. Insert 1 marker here – NOW MEASURE PIECE FROM HERE. Work 1st row from RS with powder as follows: work 3-3-3-3 (4-4) ch, work 1 tr in each stitch and work 3-3-3-3 (4-4) ch. Turn piece, work 1 dc in 2nd ch from hook, work 1 dc in each of the next 1-1-1-1 (2-2) ch, 1 dc in every tr from previous row and 1 tr in each of the 3-3-3-3 (4-4) ch from beg of previous row = 40-44-48-52 (58-62) sts on row. Then work TEXTURE ROWS back and forth as before with tr from RS and dc from WS. AT THE SAME TIME when sleeve measures 2-2-3-3(3-3) cm from marker, dec 1 st in each side - SEE DECREASE TIP! Repeat dec every 8-5-3-3 (2½-2½) cm 1-2-4-5 (7-8) more times (= 2-3-5-6 (8-9) times in total in each side) = 36-38-38-40 (42-44) sts. When sleeve measures approx. 13-14-16-19 (23-26) cm from marker – finish after 1 row with dc from WS, fasten off. Switch to off white. Work 1 row dc from WS AT THE SAME TIME inc 4-2-2-6 (4-2) dc evenly = 40-40-40-46 (46-46) dc. Then work Fan pattern according to diagram A.1, beg from RS, the same way as on bottom of jacket. After 1st row there are 13-13-13-15 (15-15) ch-spaces on row and after 2nd row there are 7-7-7-8 (8-8) tr-groups with 1 tr between every tr-group. ASSEMBLY: Sew underarm seams tog edge to edge in front loop of outermost sts. Sew the openings under the sleeves. Sew the buttons on to left front piece. Upper button should be approx. 1 cm from neckline and there should be approx. 5 to 7 cm between each button. Button through tr in texture pattern. ELEVATION IN BACK OF NECK: For better fit work a small elevation at the back of neck. Insert 1 marker in st in each corner in neck, i.e. at beg of every raglan line. Work on hook size 3.5 mm with powder as follows: Beg in 11th st from mid front, work 1 dc in every st until 1 st remains before st with marker, work 1 htr in next st, 1 tr in st with marker and 1 htr in next st, then work 1 dc in every st until 1 st remains before next st with marker, 1 htr in next st, 1 tr in st with marker and 1 htr in next st. Continue like this until 10 sts remain before mid front in the other side. Turn piece and work 1 dc in every dc but at every marker work 3 dc tog, i.e. work 1 dc in htr but wait with last YO and pull through, work 1 dc in st with marker but wait with last YO and pull through, work 1 dc in next htr but now pull last YO through all 4 sts on hook (= 2 dc dec). Fasten off. COLLAR: Work on hook size 3.5 mm with powder as follows: Beg in 4th st from mid front and work 1 dc in every dc around the neck until 3 dc remain on row AT THE SAME TIME work 5th and 6th st tog – READ DECREASE TIP = approx. 57-60-64-64 (64-67) dc remain. Make sure that markers at each raglan line moves upwards - remove the markers from the sts they are in and place them between the st they were in and the next st toward the sleeve.Then work texture rows back and forth as on body with 1 st in every st. AT THE SAME TIME after 3-3-3-4 (4-4) cm, inc on the next 2 rows as shown in A.2. After last inc, collar measures approx. 5-5-5-6 (6-6) cm. Fasten off. CROCHET EDGE ALONG MID FRONT: Work with off white as follows: Beg from WS at the bottom on left front piece and work 1 row dc up along mid front and then over the 3 sts at the top of neck before collar beg - work approx. 2 dc in every tr-row and 1 dc in every dc-row. Turn piece and work as follows: * 3 ch, skip 2 dc, 1 dc in next st *, repeat from *-* the entire row to bottom of band. Fasten off and repeat along right front piece, beg from WS at the top by neck. CROCHET EDGE AROUND COLLAR: Work with off white as follows: Beg from RS where collar beg after the 3 sts at the top of neck and work 1 row dc around the entire collar until where collar ends before the top 3 sts in neck in the other side. Turn piece and work as follows: * 3 ch, skip approx. 2 sts, 1 dc in next dc *, repeat from *-*, NOTE: Adjust so that no of ch-spaces can be divided by 2 + 1. Turn piece and work a finishing edge with fans as follows from RS: Work sl sts until mid of first ch-space, 3 ch (= 1 tr), * 3 tr + 2 ch + 3 tr in next ch-space, 1 tr in next ch-space *, repeat from *-* the entire row. Fasten off. BOW: Work 11 ch on hook size 3.5 mm with off white. Work first row as follows: 1 tr in 4th ch from hook, 1 tr in each of the next 7 ch = 9 tr on row. Turn piece and work TEXTURE ROWS back and forth until piece measures approx. 10 cm – finish after 1 row with dc. Fasten off. Sew short sides tog to form a ring and twine some yarn around the mid of bow to tighten it neatly in the middle. Fasten bow at the top on right front piece. |
|||||||||||||
Diagram explanations |
|||||||||||||
|
|||||||||||||

|
|||||||||||||

|
|||||||||||||
|
Have you made this or any other of our designs? Tag your pictures in social media with #dropsdesign so we can see them! Do you need help with this pattern?You'll find tutorial videos, a Comments/Questions area and more by visiting the pattern on garnstudio.com. © 1982-2024 DROPS Design A/S. We reserve all rights. This document, including all its sub-sections, has copyrights. Read more about what you can do with our patterns at the bottom of each pattern on our site. |
|||||||||||||


With over 40 years in knitting and crochet design, DROPS Design offers one of the most extensive collections of free patterns on the internet - translated to 17 languages. As of today we count 304 catalogues and 11422 patterns - 11422 of which are translated into English (UK/cm).
We work hard to bring you the best knitting and crochet have to offer, inspiration and advice as well as great quality yarns at incredible prices! Would you like to use our patterns for other than personal use? You can read what you are allowed to do in the Copyright text at the bottom of all our patterns. Happy crafting!
Comments / Questions (111)
What do you mean by mid front, is this the corner edge where the front neck line starts? Also, to work the 5th and 6th st tog on collar, is this counted from the corner edge? How many stitches on the last inc row. Is the last row an increase row or sc for the collar?
05.01.2018 - 04:54DROPS Design answered:
Dear Mrs Weiss, starting collar in the 4th st from edge means you will leave 3 sts unworked at the edge at the beginning of row and work row until 3 sts remain at the edge of other side of collar (left front piece). You then increase a total of 2 times as shown in A.2, ie first 2 sts at each marker then 1 st at each marker. Happy crocheting!
05.01.2018 - 09:21For the collar, Is the term "mid front" referring to the corner of the front? I worked sc in every sc, but there is a space between the edge and the sc. Is that suppose to be? Also, if it 5th to 6th st tog from the corner edge?
05.01.2018 - 04:48DROPS Design answered:
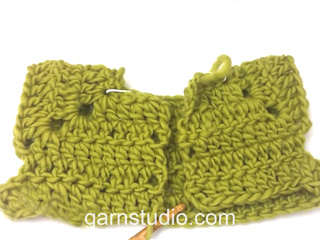
Dear Mrs Weiss, mid front is meant towards the opening of the jacket. The space between edge of front piece and collar will be "hidden" by the crocheted edge around the jacket later - see also picture. Happy crocheting!
05.01.2018 - 09:18Can you please send the pattern for the hat shown in the picture with the cardigan. Thank you
15.12.2017 - 23:49DROPS Design answered:
Hi Linda, The pattern is called Camille and is pattern no bs-010-by. Happy crocheting!
16.12.2017 - 06:27Mi scusi, ma non capisco lo stesso. Copio dallo schema "Lavorare ora la riga successiva come segue, sul diritto del lavoro: Lavorare 1 m.a in ognuna delle prime 25-28-31-33 (35-38) m.a (= davanti sinistro), saltare le 34-38-42-46 (50-54) m.b successive (= manica)..." Quindi non lavoriamo le ma sulla manica, la lasciamo con le mb. O ho capito male?
10.12.2017 - 08:54DROPS Design answered:
Buongiorno Olga. Ha capito correttamente: non lavora le maglie per le maniche. Buon lavoro!
10.12.2017 - 14:37Mi scusi, ma non capisco lo stesso. Copio dallo schema "Lavorare ora la riga successiva come segue, sul diritto del lavoro: Lavorare 1 m.a in ognuna delle prime 25-28-31-33 (35-38) m.a (= davanti sinistro), saltare le 34-38-42-46 (50-54) m.b successive (= manica)..." Quindi non lavoriamo le ma sulla manica, la lasciamo con le mb. O ho capito male?
10.12.2017 - 08:49Mi scusi, ma non capisco lo stesso. Copio dallo schema "Lavorare ora la riga successiva come segue, sul diritto del lavoro: Lavorare 1 m.a in ognuna delle prime 25-28-31-33 (35-38) m.a (= davanti sinistro), saltare le 34-38-42-46 (50-54) m.b successive (= manica)..." Quindi non lavoriamo le ma sulla manica, la lasciamo con le mb. O ho capito male?
10.12.2017 - 01:02Salve! Ho difficoltà nel cominciare le maniche. All'inizio, quando abbiamo saltato le maglie per le maniche (38 nel mio caso) le abbiamo lasciato con una riga di mb. Perché quando cominciamo a lavorare le maniche ci troviamo di nuovo a lavorare una riga di mb sul rovescio? Da dove bisogna iniziare per fare 3 cat.? Grazie.
10.12.2017 - 00:27DROPS Design answered:
Buongiorno Olga. Il giro in cui vengono saltate le maglie delle maniche è un giro di maglie alte lavorato sul diritto del lavoro. Riprende poi le maniche lavorando a maglie basse sul rovescio del lavoro. Avvia le 3 cat senza attaccarle al lavoro e prosegue lavorando 1 m bassa in ogni maglia. Buon lavoro!
10.12.2017 - 00:48For clarity, For Body Section: Is the texture rows done before measuring 1 inch with no increases? Can the texture rows be done with NO Increases?
04.12.2017 - 16:25DROPS Design answered:
Dear Mrs Weiss, on body you work textured rows for 1 inch without any increase, then continue textured rows with increasing on the sides to get the A-line. Happy crocheting!
05.12.2017 - 08:16For the Body section, where it says continue back and forth with Textured Rows. I'm doing the 4th size- the 12-18 month size, so I will increase after 1 inch. I did DC rows before it measured 1 inch. Should it have been alternating DC and SC rows before the increase row? Also, when it says to increase 10 more time, does the textured rows continue after that or just DC rows? Am I continuing to increase the DC rows for another 10 rows? Thank you- Linda
04.12.2017 - 05:11DROPS Design answered:
Dear Linda, you continue working textured pattern while increasing, so that if your last row was a dc-row then increase on next row ie on the sc-row then work ½” and inc on next row (with sc or dc depending on the next row you have to work). Happy crocheting!
04.12.2017 - 10:41I'm confused about the sleeve, do I chain 3 and join with a sc at the 46th stitch or join with a sc at the 46th stitch and then chain 3?
20.11.2017 - 05:12DROPS Design answered:
Dear Mrs Sporloe, sleeve is worked back and forth: chain 3, then crochet 1 sc in each st over sleeve and finish with 5 chains, turn and crochet 1 dc in 4th ch from hook, 1 dc in next chain, 1 dc over each sc from sleeve and finish with 1 dc in each of the last 3 chains. Happy crocheting!
20.11.2017 - 10:01