
Popular categories
Looking for a yarn?


|
|||||||||||||
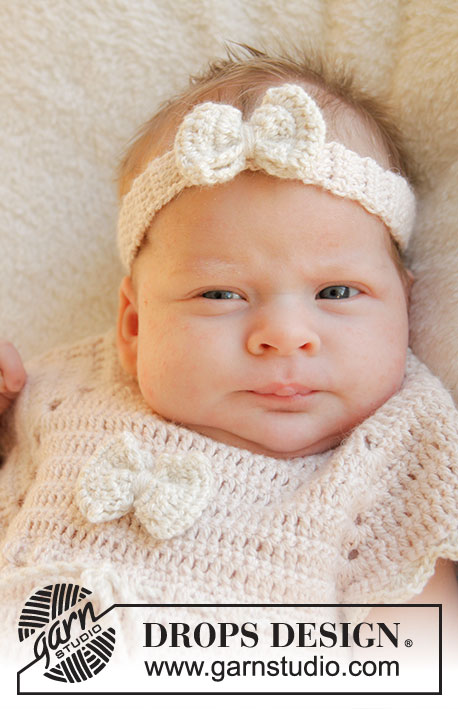
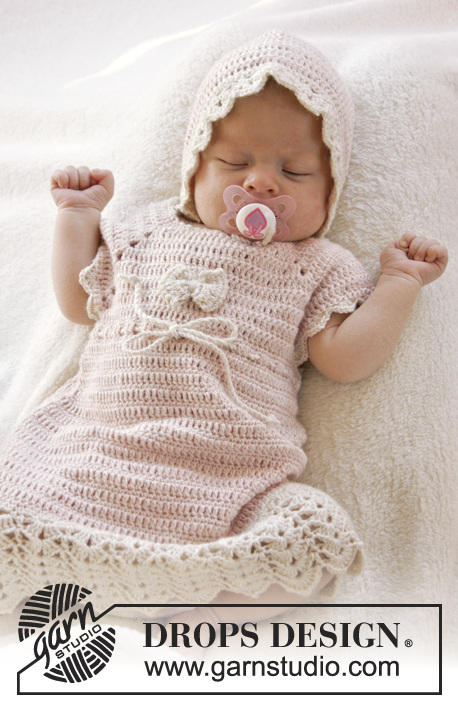
Little Lady Rose |
|||||||||||||
|
|
|||||||||||||
Crochet baby jacket with raglan and fan edges, worked top down in DROPS BabyAlpaca Silk. Size 0-4 years.
DROPS Baby 25-12 |
|||||||||||||
|
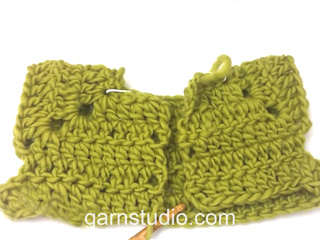
CROCHET INFO: Replace first dc at beg of every dc row with 1 ch, finish row with 1 dc in 3rd ch from beg of previous row. Replace first tr at beg of every tr row with 3 ch, finish row with 1 tr in ch from beg of previous row. TEXTURE ROWS: * 1 row dc (worked from WS), 1 row tr (worked from RS) *, repeat from *-* (1 row dc + 1 row tr = 1 texture row). INCREASE TIP: Inc 1 dc/tr by working 2 dc/tr in same st. DECREASE TIP: Work 1 dc/tr but wait with last pull through (= 2 sts on hook), then work next dc/tr but on last pull through, pull yarn through all sts on hook = 1 dc/tr dec. PATTERN: See diagram A.1. (A.2 applies to inc on collar). ---------------------------------------------------------- JACKET: The piece is worked top down. Worked back and forth from mid front. YOKE: Work 83-87-91-91 (91-95) ch (incl 1 ch to turn with) on hook size 3.5 mm with powder. Work 1 dc in 2nd ch from hook, then work 1 dc in every ch the entire row = 82-86-90-90 (90-94) dc on row (incl 5 band sts in each side towards mid front). Now insert 4 markers in piece for raglan as follows (beg mid front – NOTE: Do NOT work while inserting markers): Skip 15-16-17-17 (17-18) dc (= left front piece), insert 1 marker in next dc, skip 14 dc (= sleeve), insert 1 marker in next dc, skip 20-22-24-24 (24-26) dc (= back piece), insert 1 marker in next dc, skip 14 dc (= sleeve) and insert last marker in next dc (there are now 15-16-17-17 (17-18) dc on right front piece after last marker). READ ALL OF THE FOLLOWING SECTION BEFORE CONTINUING: READ CROCHET INFO and work next row as follows from RS: Work 1 tr in every dc but in every dc with marker work 2 tr + 2 ch + 2 tr = 94-98-102-102 (102-106) tr on row. Then work TEXTURE ROWS - see explanation above (work back and forth with 1 dc/tr in every st from previous row – but on every row with dc from WS work 2 ch over the 2 ch from previous row in raglan lines. On row with tr work 2 tr + 2 ch + 2 tr in both ch-spaces). AT THE SAME TIME on first row from RS (i.e. on row with tr) inc for raglan as follows: Work 2 tr + 2 ch + 2 tr in every ch-space in every raglan line (= 16 tr inc on row – note: work around both ch-spaces). Repeat inc on every row from RS 3-4-5-6 (7-8) more times (= 4-5-6-7 (8-9) times in total) = 158-178-198-214 (230-250) sts. REMEMBER THE CROCHET TENSION! After last inc for raglan work 1 row with dc from WS as before. Work next row as follows from RS: Work 1 tr in each of the first 25-28-31-33 (35-38) dc (= left front piece), skip the next 34-38-42-46 (50-54) dc (= sleeve), work 6-6-6-6 (8-8) ch, work 1 tr in each of the next 40-46-52-56 (60-66) dc (= back piece), skip the next 34-38-42-46 (50-54) dc (= sleeve), work 6-6-6-6 (8-8) ch and work 1 tr in each of the last 25-28-31-33 (35-38) dc (= right front piece). Then finish body and sleeves separately. BODY: NOW MEASURE PIECE FROM HERE! Work 1st row from WS – work 1 dc in every tr from previous row and 1 dc in each of the 6-6-6-6 (8-8) ch under each armhole = 102-114-126-134 (146-158) dc on row. Insert 1 marker 28-31-34-36 (39-42) sts in from each side (= 46-52-58-62 (68-74) sts on back piece). Continue back and forth with TEXTURE ROWS. AT THE SAME TIME when piece measures 2-2-2-3 (2-3) cm, inc 1 st on each side of both markers – READ INCREASE TIP (= 4 sts inc). Repeat inc approx. every 1-1½-1½-1½ (1½-1½) cm 10-10-10-10 (13-13) more times (= 11-11-11-11 (14-14) times in total) = 146-158-170-178 (202-214) sts. When piece measures approx. 15-17-18-20 (22-24) cm from armhole – adjust so that inc are done, work 1 row dc from WS AT THE SAME TIME inc 2-2-2-0 (0-0) dc evenly – READ INCREASE TIP = 148-160-172-178 (202-214) dc. Fasten off. Switch to off white and work 1 row dc from WS with 1 dc in every dc from previous row. Then work Fan pattern according to diagram A.1, i.e. work as follows: ROW 1 (= RS): 1 ch, 1 dc in first st, * 3 ch, skip 2 dc, 1 dc in next st *, repeat from *-* the entire row = 49-53-57-59 (67-71) ch-spaces, turn. ROW 2 (= WS): Work 3 ch (= 1 tr), 3 tr + 2 ch + 3 tr in first ch-space, * 1 tr in next ch-space, 3 tr + 2 ch + 3 tr in next ch-space *, repeat from *-* the entire row and finish with 1 tr in first dc from beg of previous row = 25-27-29-30 (34-36) tr-groups with 1 tr between every tr-group, turn piece. ROW 3 (= RS): Work 3 ch (= 1 tr), 3 tr + 2 ch + 3 tr in ch-space in the mid of first tr-group, * 1 tr in next tr, 3 tr + 2 ch + 3 tr in ch-space in the mid of next tr-group *, repeat from *-* the entire row and finish with 1 tr in 3rd ch from beg of previous row = 25-27-29-30 (34-36) tr-groups with 1 tr between every tr-group. Fasten off. SLEEVE: = 34-38-42-46 (50-54) sts. Insert 1 marker here – NOW MEASURE PIECE FROM HERE. Work 1st row from RS with powder as follows: work 3-3-3-3 (4-4) ch, work 1 tr in each stitch and work 3-3-3-3 (4-4) ch. Turn piece, work 1 dc in 2nd ch from hook, work 1 dc in each of the next 1-1-1-1 (2-2) ch, 1 dc in every tr from previous row and 1 tr in each of the 3-3-3-3 (4-4) ch from beg of previous row = 40-44-48-52 (58-62) sts on row. Then work TEXTURE ROWS back and forth as before with tr from RS and dc from WS. AT THE SAME TIME when sleeve measures 2-2-3-3(3-3) cm from marker, dec 1 st in each side - SEE DECREASE TIP! Repeat dec every 8-5-3-3 (2½-2½) cm 1-2-4-5 (7-8) more times (= 2-3-5-6 (8-9) times in total in each side) = 36-38-38-40 (42-44) sts. When sleeve measures approx. 13-14-16-19 (23-26) cm from marker – finish after 1 row with dc from WS, fasten off. Switch to off white. Work 1 row dc from WS AT THE SAME TIME inc 4-2-2-6 (4-2) dc evenly = 40-40-40-46 (46-46) dc. Then work Fan pattern according to diagram A.1, beg from RS, the same way as on bottom of jacket. After 1st row there are 13-13-13-15 (15-15) ch-spaces on row and after 2nd row there are 7-7-7-8 (8-8) tr-groups with 1 tr between every tr-group. ASSEMBLY: Sew underarm seams tog edge to edge in front loop of outermost sts. Sew the openings under the sleeves. Sew the buttons on to left front piece. Upper button should be approx. 1 cm from neckline and there should be approx. 5 to 7 cm between each button. Button through tr in texture pattern. ELEVATION IN BACK OF NECK: For better fit work a small elevation at the back of neck. Insert 1 marker in st in each corner in neck, i.e. at beg of every raglan line. Work on hook size 3.5 mm with powder as follows: Beg in 11th st from mid front, work 1 dc in every st until 1 st remains before st with marker, work 1 htr in next st, 1 tr in st with marker and 1 htr in next st, then work 1 dc in every st until 1 st remains before next st with marker, 1 htr in next st, 1 tr in st with marker and 1 htr in next st. Continue like this until 10 sts remain before mid front in the other side. Turn piece and work 1 dc in every dc but at every marker work 3 dc tog, i.e. work 1 dc in htr but wait with last YO and pull through, work 1 dc in st with marker but wait with last YO and pull through, work 1 dc in next htr but now pull last YO through all 4 sts on hook (= 2 dc dec). Fasten off. COLLAR: Work on hook size 3.5 mm with powder as follows: Beg in 4th st from mid front and work 1 dc in every dc around the neck until 3 dc remain on row AT THE SAME TIME work 5th and 6th st tog – READ DECREASE TIP = approx. 57-60-64-64 (64-67) dc remain. Make sure that markers at each raglan line moves upwards - remove the markers from the sts they are in and place them between the st they were in and the next st toward the sleeve.Then work texture rows back and forth as on body with 1 st in every st. AT THE SAME TIME after 3-3-3-4 (4-4) cm, inc on the next 2 rows as shown in A.2. After last inc, collar measures approx. 5-5-5-6 (6-6) cm. Fasten off. CROCHET EDGE ALONG MID FRONT: Work with off white as follows: Beg from WS at the bottom on left front piece and work 1 row dc up along mid front and then over the 3 sts at the top of neck before collar beg - work approx. 2 dc in every tr-row and 1 dc in every dc-row. Turn piece and work as follows: * 3 ch, skip 2 dc, 1 dc in next st *, repeat from *-* the entire row to bottom of band. Fasten off and repeat along right front piece, beg from WS at the top by neck. CROCHET EDGE AROUND COLLAR: Work with off white as follows: Beg from RS where collar beg after the 3 sts at the top of neck and work 1 row dc around the entire collar until where collar ends before the top 3 sts in neck in the other side. Turn piece and work as follows: * 3 ch, skip approx. 2 sts, 1 dc in next dc *, repeat from *-*, NOTE: Adjust so that no of ch-spaces can be divided by 2 + 1. Turn piece and work a finishing edge with fans as follows from RS: Work sl sts until mid of first ch-space, 3 ch (= 1 tr), * 3 tr + 2 ch + 3 tr in next ch-space, 1 tr in next ch-space *, repeat from *-* the entire row. Fasten off. BOW: Work 11 ch on hook size 3.5 mm with off white. Work first row as follows: 1 tr in 4th ch from hook, 1 tr in each of the next 7 ch = 9 tr on row. Turn piece and work TEXTURE ROWS back and forth until piece measures approx. 10 cm – finish after 1 row with dc. Fasten off. Sew short sides tog to form a ring and twine some yarn around the mid of bow to tighten it neatly in the middle. Fasten bow at the top on right front piece. |
|||||||||||||
Diagram explanations |
|||||||||||||
|
|||||||||||||

|
|||||||||||||

|
|||||||||||||
|
Have you made this or any other of our designs? Tag your pictures in social media with #dropsdesign so we can see them! Do you need help with this pattern?You'll find tutorial videos, a Comments/Questions area and more by visiting the pattern on garnstudio.com. © 1982-2024 DROPS Design A/S. We reserve all rights. This document, including all its sub-sections, has copyrights. Read more about what you can do with our patterns at the bottom of each pattern on our site. |
|||||||||||||


With over 40 years in knitting and crochet design, DROPS Design offers one of the most extensive collections of free patterns on the internet - translated to 17 languages. As of today we count 304 catalogues and 11422 patterns - 11422 of which are translated into English (UK/cm).
We work hard to bring you the best knitting and crochet have to offer, inspiration and advice as well as great quality yarns at incredible prices! Would you like to use our patterns for other than personal use? You can read what you are allowed to do in the Copyright text at the bottom of all our patterns. Happy crafting!
Comments / Questions (111)
Thank you for the button list. I didn't realize that Drops sells buttons. This is helpful. The sweater came out great, it's really beautiful. Now I'm considering adding the crocheted shoes and hat to the gift.
23.01.2018 - 02:49I had asked you what size buttons are needed, you replied 15 mm. Turns out after looking all over and having them shipped to me internationally from Wool Warehouse they are way too big. So disappointed! I'll need to bring the sweater with me to see what actually fits. The search continues!
22.01.2018 - 17:55DROPS Design answered:
Dear Mrs Weiss, you can check the button size on this page here. Happy finishing!
22.01.2018 - 18:13I DO understand that the DC is on RS and the single crochet is on WS, and I am proficient at making the stitches. However since the instructions did not say to mark the RS, when you're looking at the cardigan, please advice how to tell the difference between the RS and WS.
16.01.2018 - 17:43DROPS Design answered:
Dear Mrs Weiss, the dc rows are worked from RS and the sc rows are worked from WS, so that RS of piece is the side where you worked the dc. Happy crocheting!
17.01.2018 - 08:22In the elevation of the neck there is no # of stitches indicated, which would have been helpful to know how many stitches from start to finish. The phase "but wait" must be a European phrase, never seen that terminology in US patterns. Then for the Collar section, size 9-12, how many decreases in the SC row to reach 64 stitches? Not mentioned.
15.01.2018 - 00:24DROPS Design answered:
Dear Mrs Weiss, start elevation on back piece in the 11th st from neck and work the row as explained until 10 sts remain at the end of row, then turn and work return row dec 2 sts at each marker as explained. For collar, you should dec as explained to get 64 sts (for both size 6/9 and 12/18 months). Happy crocheting!
15.01.2018 - 10:13The problem is I am LEFT HANDED so everything is in reverse. Since I am not sure which is the right side and which is the wrong side, I do not know whether the seams for the sleeves go out or in. Yes I do understand that the rows change for the texture rows. However, is there any way to visually tell if it's the RS or WS when you finish the body and are ready for the neck elevation and to go down the seams of the arms?
12.01.2018 - 14:42DROPS Design answered:
Dear Mrs Weiss, in this video showing how to crochet a double crochet, you can see how the dc will look from RS (when they are worked on row 1 - and all uneven numbered rows) and how they will look from WS (when they are worked on row 2 and all evennumbered row). Same with sc in this video. Happy crocheting!
12.01.2018 - 15:08I didn't mark the RS when starting the garment and now I'm not sure how to tell the RS from the WS. Can you help me. I am a tight crocheter and the back and front look the same. I'm not sure if I should rip out parts of it if I'm doing it on the wrong side.
12.01.2018 - 05:53DROPS Design answered:
Dear Mrs Weiss, the sc rows have been worked from WS and the dc rows have been worked from RS (see TEXTURE ROWS) and first sc row worked at the beginning of yoke has been worked from RS. Remember you can show your work to your store (even sending photo per mail) so that they can provide you any further personnal assistance. Happy crocheting!
12.01.2018 - 09:09Please can u explain the first four rows or so of the sleeve part of the pattern. Im doing the first size, but its the pattern I'm struggling with not the size.
09.01.2018 - 22:39DROPS Design answered:
Dear Mrs Smith, the first row on sleeve is worked from WS: crochet 3 ch, then 1 dc in every st on sleeve and finish with 5 ch. Turn and work 1 tr in 4th ch from hook, then 1 tr in each chain and dc from previous rouw = 40 tr. Continue now with texture row (dc from WS and tr from RS) dec at the beg and end of every 8 cm a total of 2 times (= 36 sts remain). Happy crocheting!
10.01.2018 - 08:55Im really struggling to understand the pattern for the sleeves. Please help. I think a little video would b great for the sleeves and collar. Thank u in advance. Xx
09.01.2018 - 11:36DROPS Design answered:
Dear Mrs Smith, you are welcome to ask your question here, ie which point is tricky for you (and which size) and/or contact the store where you bought your yarn for any further individual assistance. Happy crocheting!
09.01.2018 - 12:05For the collar, if I sc around the top first edge there is a space between the edge and the row before. So should I pick up the row before in the sc to avoid this space that shows? What's your advice? Thank you for your help.
05.01.2018 - 16:07DROPS Design answered:
Dear Linda, that little space is there intentionally, so when the cardigan is buttoned the two edges of the collar are not ON each other, but lies /fold out neatly one right next to the other. I hope this helped. Happy crafting!
06.01.2018 - 13:23For the crochet edge along Mid Front: as left handed, would I still start with the WS? I crochet left to right as a lefty. Is there any section that I should do RS when it says WS and visa versa. Thank you!
05.01.2018 - 04:58DROPS Design answered:
Dear Mrs Weiss, first row on collar is worked from RS, adjust your way of working so that this row will be worked from RS. Happy crocheting!
05.01.2018 - 09:22