
Popular categories
Looking for a yarn?


|
|||||||||||||
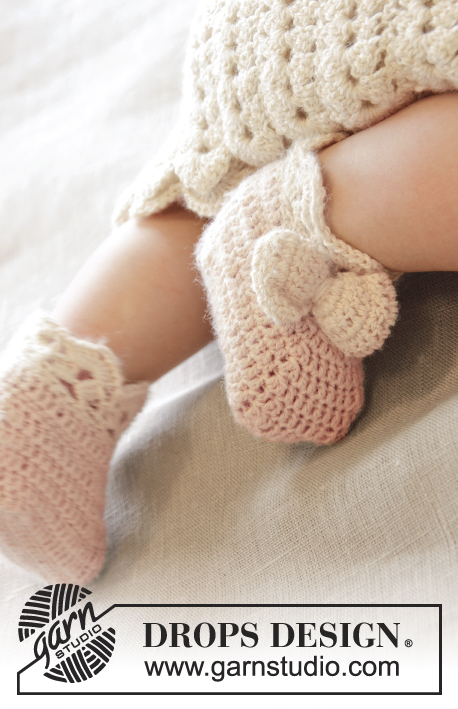
Little Lady Rose |
|||||||||||||
|
|
|||||||||||||
Crochet baby jacket with raglan and fan edges, worked top down in DROPS BabyAlpaca Silk. Size 0-4 years.
DROPS Baby 25-12 |
|||||||||||||
|
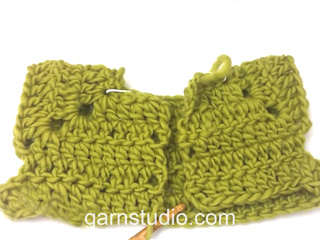
CROCHET INFO: Replace first dc at beg of every dc row with 1 ch, finish row with 1 dc in 3rd ch from beg of previous row. Replace first tr at beg of every tr row with 3 ch, finish row with 1 tr in ch from beg of previous row. TEXTURE ROWS: * 1 row dc (worked from WS), 1 row tr (worked from RS) *, repeat from *-* (1 row dc + 1 row tr = 1 texture row). INCREASE TIP: Inc 1 dc/tr by working 2 dc/tr in same st. DECREASE TIP: Work 1 dc/tr but wait with last pull through (= 2 sts on hook), then work next dc/tr but on last pull through, pull yarn through all sts on hook = 1 dc/tr dec. PATTERN: See diagram A.1. (A.2 applies to inc on collar). ---------------------------------------------------------- JACKET: The piece is worked top down. Worked back and forth from mid front. YOKE: Work 83-87-91-91 (91-95) ch (incl 1 ch to turn with) on hook size 3.5 mm with powder. Work 1 dc in 2nd ch from hook, then work 1 dc in every ch the entire row = 82-86-90-90 (90-94) dc on row (incl 5 band sts in each side towards mid front). Now insert 4 markers in piece for raglan as follows (beg mid front – NOTE: Do NOT work while inserting markers): Skip 15-16-17-17 (17-18) dc (= left front piece), insert 1 marker in next dc, skip 14 dc (= sleeve), insert 1 marker in next dc, skip 20-22-24-24 (24-26) dc (= back piece), insert 1 marker in next dc, skip 14 dc (= sleeve) and insert last marker in next dc (there are now 15-16-17-17 (17-18) dc on right front piece after last marker). READ ALL OF THE FOLLOWING SECTION BEFORE CONTINUING: READ CROCHET INFO and work next row as follows from RS: Work 1 tr in every dc but in every dc with marker work 2 tr + 2 ch + 2 tr = 94-98-102-102 (102-106) tr on row. Then work TEXTURE ROWS - see explanation above (work back and forth with 1 dc/tr in every st from previous row – but on every row with dc from WS work 2 ch over the 2 ch from previous row in raglan lines. On row with tr work 2 tr + 2 ch + 2 tr in both ch-spaces). AT THE SAME TIME on first row from RS (i.e. on row with tr) inc for raglan as follows: Work 2 tr + 2 ch + 2 tr in every ch-space in every raglan line (= 16 tr inc on row – note: work around both ch-spaces). Repeat inc on every row from RS 3-4-5-6 (7-8) more times (= 4-5-6-7 (8-9) times in total) = 158-178-198-214 (230-250) sts. REMEMBER THE CROCHET TENSION! After last inc for raglan work 1 row with dc from WS as before. Work next row as follows from RS: Work 1 tr in each of the first 25-28-31-33 (35-38) dc (= left front piece), skip the next 34-38-42-46 (50-54) dc (= sleeve), work 6-6-6-6 (8-8) ch, work 1 tr in each of the next 40-46-52-56 (60-66) dc (= back piece), skip the next 34-38-42-46 (50-54) dc (= sleeve), work 6-6-6-6 (8-8) ch and work 1 tr in each of the last 25-28-31-33 (35-38) dc (= right front piece). Then finish body and sleeves separately. BODY: NOW MEASURE PIECE FROM HERE! Work 1st row from WS – work 1 dc in every tr from previous row and 1 dc in each of the 6-6-6-6 (8-8) ch under each armhole = 102-114-126-134 (146-158) dc on row. Insert 1 marker 28-31-34-36 (39-42) sts in from each side (= 46-52-58-62 (68-74) sts on back piece). Continue back and forth with TEXTURE ROWS. AT THE SAME TIME when piece measures 2-2-2-3 (2-3) cm, inc 1 st on each side of both markers – READ INCREASE TIP (= 4 sts inc). Repeat inc approx. every 1-1½-1½-1½ (1½-1½) cm 10-10-10-10 (13-13) more times (= 11-11-11-11 (14-14) times in total) = 146-158-170-178 (202-214) sts. When piece measures approx. 15-17-18-20 (22-24) cm from armhole – adjust so that inc are done, work 1 row dc from WS AT THE SAME TIME inc 2-2-2-0 (0-0) dc evenly – READ INCREASE TIP = 148-160-172-178 (202-214) dc. Fasten off. Switch to off white and work 1 row dc from WS with 1 dc in every dc from previous row. Then work Fan pattern according to diagram A.1, i.e. work as follows: ROW 1 (= RS): 1 ch, 1 dc in first st, * 3 ch, skip 2 dc, 1 dc in next st *, repeat from *-* the entire row = 49-53-57-59 (67-71) ch-spaces, turn. ROW 2 (= WS): Work 3 ch (= 1 tr), 3 tr + 2 ch + 3 tr in first ch-space, * 1 tr in next ch-space, 3 tr + 2 ch + 3 tr in next ch-space *, repeat from *-* the entire row and finish with 1 tr in first dc from beg of previous row = 25-27-29-30 (34-36) tr-groups with 1 tr between every tr-group, turn piece. ROW 3 (= RS): Work 3 ch (= 1 tr), 3 tr + 2 ch + 3 tr in ch-space in the mid of first tr-group, * 1 tr in next tr, 3 tr + 2 ch + 3 tr in ch-space in the mid of next tr-group *, repeat from *-* the entire row and finish with 1 tr in 3rd ch from beg of previous row = 25-27-29-30 (34-36) tr-groups with 1 tr between every tr-group. Fasten off. SLEEVE: = 34-38-42-46 (50-54) sts. Insert 1 marker here – NOW MEASURE PIECE FROM HERE. Work 1st row from RS with powder as follows: work 3-3-3-3 (4-4) ch, work 1 tr in each stitch and work 3-3-3-3 (4-4) ch. Turn piece, work 1 dc in 2nd ch from hook, work 1 dc in each of the next 1-1-1-1 (2-2) ch, 1 dc in every tr from previous row and 1 tr in each of the 3-3-3-3 (4-4) ch from beg of previous row = 40-44-48-52 (58-62) sts on row. Then work TEXTURE ROWS back and forth as before with tr from RS and dc from WS. AT THE SAME TIME when sleeve measures 2-2-3-3(3-3) cm from marker, dec 1 st in each side - SEE DECREASE TIP! Repeat dec every 8-5-3-3 (2½-2½) cm 1-2-4-5 (7-8) more times (= 2-3-5-6 (8-9) times in total in each side) = 36-38-38-40 (42-44) sts. When sleeve measures approx. 13-14-16-19 (23-26) cm from marker – finish after 1 row with dc from WS, fasten off. Switch to off white. Work 1 row dc from WS AT THE SAME TIME inc 4-2-2-6 (4-2) dc evenly = 40-40-40-46 (46-46) dc. Then work Fan pattern according to diagram A.1, beg from RS, the same way as on bottom of jacket. After 1st row there are 13-13-13-15 (15-15) ch-spaces on row and after 2nd row there are 7-7-7-8 (8-8) tr-groups with 1 tr between every tr-group. ASSEMBLY: Sew underarm seams tog edge to edge in front loop of outermost sts. Sew the openings under the sleeves. Sew the buttons on to left front piece. Upper button should be approx. 1 cm from neckline and there should be approx. 5 to 7 cm between each button. Button through tr in texture pattern. ELEVATION IN BACK OF NECK: For better fit work a small elevation at the back of neck. Insert 1 marker in st in each corner in neck, i.e. at beg of every raglan line. Work on hook size 3.5 mm with powder as follows: Beg in 11th st from mid front, work 1 dc in every st until 1 st remains before st with marker, work 1 htr in next st, 1 tr in st with marker and 1 htr in next st, then work 1 dc in every st until 1 st remains before next st with marker, 1 htr in next st, 1 tr in st with marker and 1 htr in next st. Continue like this until 10 sts remain before mid front in the other side. Turn piece and work 1 dc in every dc but at every marker work 3 dc tog, i.e. work 1 dc in htr but wait with last YO and pull through, work 1 dc in st with marker but wait with last YO and pull through, work 1 dc in next htr but now pull last YO through all 4 sts on hook (= 2 dc dec). Fasten off. COLLAR: Work on hook size 3.5 mm with powder as follows: Beg in 4th st from mid front and work 1 dc in every dc around the neck until 3 dc remain on row AT THE SAME TIME work 5th and 6th st tog – READ DECREASE TIP = approx. 57-60-64-64 (64-67) dc remain. Make sure that markers at each raglan line moves upwards - remove the markers from the sts they are in and place them between the st they were in and the next st toward the sleeve.Then work texture rows back and forth as on body with 1 st in every st. AT THE SAME TIME after 3-3-3-4 (4-4) cm, inc on the next 2 rows as shown in A.2. After last inc, collar measures approx. 5-5-5-6 (6-6) cm. Fasten off. CROCHET EDGE ALONG MID FRONT: Work with off white as follows: Beg from WS at the bottom on left front piece and work 1 row dc up along mid front and then over the 3 sts at the top of neck before collar beg - work approx. 2 dc in every tr-row and 1 dc in every dc-row. Turn piece and work as follows: * 3 ch, skip 2 dc, 1 dc in next st *, repeat from *-* the entire row to bottom of band. Fasten off and repeat along right front piece, beg from WS at the top by neck. CROCHET EDGE AROUND COLLAR: Work with off white as follows: Beg from RS where collar beg after the 3 sts at the top of neck and work 1 row dc around the entire collar until where collar ends before the top 3 sts in neck in the other side. Turn piece and work as follows: * 3 ch, skip approx. 2 sts, 1 dc in next dc *, repeat from *-*, NOTE: Adjust so that no of ch-spaces can be divided by 2 + 1. Turn piece and work a finishing edge with fans as follows from RS: Work sl sts until mid of first ch-space, 3 ch (= 1 tr), * 3 tr + 2 ch + 3 tr in next ch-space, 1 tr in next ch-space *, repeat from *-* the entire row. Fasten off. BOW: Work 11 ch on hook size 3.5 mm with off white. Work first row as follows: 1 tr in 4th ch from hook, 1 tr in each of the next 7 ch = 9 tr on row. Turn piece and work TEXTURE ROWS back and forth until piece measures approx. 10 cm – finish after 1 row with dc. Fasten off. Sew short sides tog to form a ring and twine some yarn around the mid of bow to tighten it neatly in the middle. Fasten bow at the top on right front piece. |
|||||||||||||
Diagram explanations |
|||||||||||||
|
|||||||||||||

|
|||||||||||||

|
|||||||||||||
|
Have you made this or any other of our designs? Tag your pictures in social media with #dropsdesign so we can see them! Do you need help with this pattern?You'll find tutorial videos, a Comments/Questions area and more by visiting the pattern on garnstudio.com. © 1982-2024 DROPS Design A/S. We reserve all rights. This document, including all its sub-sections, has copyrights. Read more about what you can do with our patterns at the bottom of each pattern on our site. |
|||||||||||||


With over 40 years in knitting and crochet design, DROPS Design offers one of the most extensive collections of free patterns on the internet - translated to 17 languages. As of today we count 304 catalogues and 11422 patterns - 11422 of which are translated into English (UK/cm).
We work hard to bring you the best knitting and crochet have to offer, inspiration and advice as well as great quality yarns at incredible prices! Would you like to use our patterns for other than personal use? You can read what you are allowed to do in the Copyright text at the bottom of all our patterns. Happy crafting!
Comments / Questions (111)
Hola,para realizar el tamaño 3/6 meses ,no me coinciden los puntos. Inicio con 86 p.b. y cuando separo me da la sumatoria da 82. Puede ser??
10.10.2021 - 02:04DROPS Design answered:
Hola Adriana, los marcapuntos se insertan en el punto, no entre los puntos. Estos 4 puntos son aquellos puntos que tienen marcapuntos: 16 + 1 (punto con el marcapuntos) + 14 +1 (punto con el marcapuntos) + 22 + 1 (punto con el marcapuntos) + 14 + 1 punto con el marcapuntos) + 16 = 86 puntos.
10.10.2021 - 23:27Re bonjour, Désolée, mais je ne comprends toujours pas... J'ai beau essayer plusieurs choses, cela ne ressemble à rien.. Où dois-je piquer mon crochet pour commencer une manche svp ? Et à quoi servent ces ml ? J'ai bien compris que je ne travaillais pas en rond mais en AR ; mais le résultat est plus que douteux 🤨 merci par avance.
27.08.2021 - 11:19DROPS Design answered:
Bonjour Vanina, la manche commence par 3 ou 4 mailles en l'air, puis 1 rang sur les mailles sautées de la manche, puis 3-4 mailles en l'air, tournez et crochetez en rangs (= allers et retours). Quand la manche sera terminée, ces 3/4 mailles en l'air de chaque côté seront assemblées aux 6/8 mailles en l'air montées à la division de l'empiècement. Ainsi, il n'y aura pas de trou sous la manche. Bon crochet!
27.08.2021 - 11:57Bonjour, Pour les manches, vous indiquez "34-38-42-46 (50-54) m. Placer 1 marqueur ici – MESURER DÉSORMAIS À PARTIR D'ICI." ce sont des mailles en l'air, ou doit on crocheter dans l'emmanchure directement ? Merci par avance !
26.08.2021 - 20:12DROPS Design answered:
Bonjour Vanina, vous devez mesurer la manche à partir de la division, autrement dit à partir du 1er rang crocheté sur les manches. Placez votre marqueur au niveau des mailles en l'air ou bien au milieu des mailles du dessus de la manche, ce marqueur sert à mesurer la hauteur. Ces 34-54 mailles sont celles que vous avez sautées pour terminer le do/les devants, vous commencez par crocheter des mailles en l'air (sous la manche), crochetez les mailles indiquées et terminez par des mailles en l'air (milieu sous la manche). Bon crochet!
27.08.2021 - 07:50Tack snälla för svar :). NU fattar jag och kan fortsätta. Med vänlig hälsning, Lotta
21.06.2021 - 10:41Jag är på oket och virkar. Har gjort 2 St- 2 lm- 2 st vid varje markör. 106 st/ varvet. Sen skriver ni att på nästa varv med fm ska jag göra 2 lm över föregående vars 2 lm. Sen skriver ni 2 st-2 lm - 2 st i BÄGGE lmbågarna, var hittar ni den andra lm bågen ? Tacksam för svar för jag har kört fast helt. Med vänlig hälsning, Lotta
16.06.2021 - 19:02DROPS Design answered:
Hei Lotta. Jo, i raglanlinjen hekles det 2 luftmasker på hver rad, både når det hekles fastmasker og når det hekles staver. Da blir de 2 luftmaskebuene liggende over hverandre og det er disse 2 luftmaskebuene, fra hver sin rad der er snakk om. mvh DROPS design
21.06.2021 - 10:21Hallo! Vielen Dank für die tolle(n) Anleitung(en)! Nur, um sicher zu gehen - wenn ich die Ärmel häkle beginne ich ja mit festen Maschen und das macht mit der Reihe davor (bevor ich mit dem Rumpfteil begonnen habe) dann ja zwei Reihen mit festen Maschen, ist das so richtig? Oder fällt das nicht so auf, weil ich die von hinten häkle? Vielen Dank und liebe Grüße!
08.07.2020 - 21:57DROPS Design answered:
Liebe Maren, ja stimmt so, aber ich vermute Sie können auch die erste Reihe ben den Ärmeln mit Stäbchen häkeln, damit Sie das Strukturmuster wie zuvor weiterzuhäkeln. Viel Spaß beim häkeln!
09.07.2020 - 09:32As I Began the Yoke I ended finishing on the RS . But then the directions say to start Next Row on The RS . What do I do here, tie off the last row? Or?
03.06.2020 - 00:33DROPS Design answered:
Dear Mrs Ryan, the dividing row on yoke is a row worked from RS (with double crochets/US-term.) on first row on body you crochet from WS 1 row with sc and continue the texture rows as before. Happy crocheting!
03.06.2020 - 07:19Hei. Jeg forstår ikke hvordan jeg skal hekle armene. Når jeg skal begynne har jeg 52 masker og ikke 46 og ender opp med 57 masker når jeg har heklet de to første radene oppskriften i (12/18mnd) dette går ikke opp med fellingen av masker for å få til 40 masker til slutt. og skal jeg begynne med en rad med å hekle en rad med fm over den raden med fm som er der fra før? og skal den hekles sammen eller syes sammen når armen er ferdig heklet?
07.04.2020 - 22:21Thank you!\r\nits an adorable pattern!
16.02.2020 - 21:24Jeg forstår ikke hvor jeg skal begynder at lave ærmer de 4 lm?, hvor skal jeg hækle fm ? Efter ... når jeg prøversom der står får jeg et stort hul og en flap af de 6 lm . Jeg håber du kan hjælpe mig . Mvh Marianne
28.01.2020 - 19:37DROPS Design answered:
Hei Marianne. Usikker på hvilken størrelse du hekler, men i f.eks størrelse 2 år har du 50 masker, nå startes det med 4 luftmasker, deretter 1 fastmaske i hver av de neste 50 masker, så hekles det 6 luftmasker. Snu arbeidet og hekle 1 stav i 4. luftmaske fra nålen, hekle 1 stav i hver av de 2 neste luftmaskene (i de 6 luftmaskene er det heklet 3 staver, de 3 luftmaskene som er igjen = 1 stav), 1 stav i hver fastmaske fra forrige rad og 1 stav i hver av de 4 luftmaskene fra begynnelsen av forrige rad (ingen luftmasker igjen) = 58 masker på raden. Videre hekles det STRUKTURRADER frem og tilbake som før med fastmasker fra vrangen og staver fra retten. God Fornøyelse!
10.02.2020 - 14:24