
Popular categories
Looking for a yarn?


|
|||||||||||||||||||
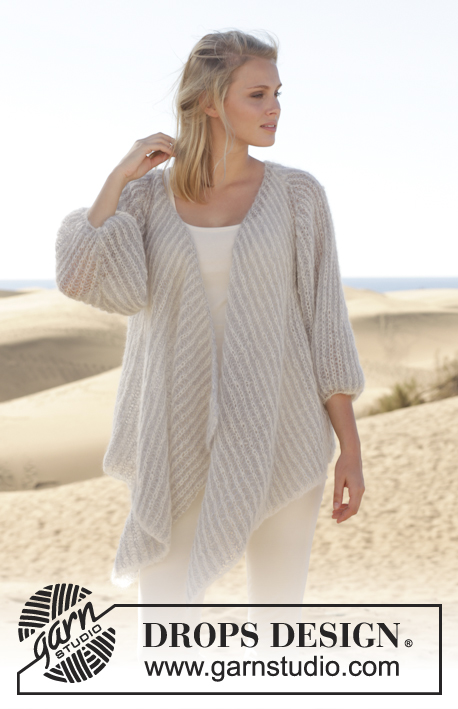
Florentina Jacket |
|||||||||||||||||||
|
|
|||||||||||||||||||
Knitted DROPS jacket with lace pattern and raglan in ”Muskat” or "Belle". Size: S - XXXL.
DROPS 152-19 |
|||||||||||||||||||
|
GARTER ST (in the round on circular needle): * K 1 round and P 1 round *, repeat from *-*. 1 ridge = 2 rounds. GARTER ST (back and forth on needle): K all rows. 1 ridge = K2 rows. PATTERN: See diagrams A.1-A.3. The diagrams show all rows in pattern seen from RS. INCREASE TIP: Inc from RS. Inc 1 st by making 1 YO, on next row P YO twisted (i.e. work in back loop of st instead front) to avoid holes. RAGLAN BODY: Dec as follows from RS: Before marker: Beg 4 sts before marker, P 2, K 2 tog (= 1 st dec). After marker: Beg on 1st st after marker, slip 1 st as if to K, K 1, psso, P 2 (= 1 st dec). BUTTONHOLES: Dec for buttonholes on right band (= 5 band sts). 1 buttonhole = K tog third and fourth st from edge and make 1 YO. Dec for buttonholes when piece measures: SIZE S: 17, 24, 31, 38 and 45 cm / 6¾"-9½"-12¼"-15"-17¾" SIZE M: 19, 26, 33, 40 and 47 cm / 7½"-10¼"-13"-15¾"-18½"- SIZE L: 21, 28, 35, 42 and 49 cm / 8¼"-11"-13¾"-16½"-19¼" SIZE XL: 23, 30, 37, 44 and 51 cm / 9"-11¾"-14½"-17¼"-20" SIZE XXL: 20, 27, 34, 41, 48 and 55 cm / 8"-10½"-13⅜"-16⅛"-19"-21⅝". SIZE XXXL: 22, 29, 36, 43, 50 and 57 cm / 8¾"-11⅜"-14¼"-17"-19¾"-22½". ---------------------------------------------------------- BODY: Worked back and forth on circular needle from mid front. Cast on 194-194-226-250-274-298 sts (includes 5 band sts in garter st in each side towards mid front) on circular needle size 3.5 mm / US 4 with Muskat or "Belle". Work 3 ridges in GARTER ST - see explanation above. Then switch to circular needle size 4 mm / US 6 and work as follows from RS: 5 band sts in garter st, stockinette st over the next 39-39-47-53-59-65 sts, A.1 over the next 14 sts, stockinette st over the next 78-78-94-106-118-130 sts (= back piece), A.1 over the next 14 sts, stockinette st over the next 39-39-47-53-59-65 sts, 5 band sts in garter st. Work another row the same way. REMEMBER THE GAUGE! Continue back and forth the same way, AT THE SAME TIME on next row from RS inc 1 st on each side of the 2 repetitions of A.1 in the sides (= 4 sts inc on row) – READ INCREASE TIP! Beg 1 st before A.1 and inc as follows: 1 YO, K 1, A.1 over 14 sts, K 1, 1 YO (= 2 sts inc in each side). Repeat the same inc every 2½-2½-2-2-4-3½ cm/7/8"-⅞"-¾"-¾"-1½"-1¼" 6-6-6-6-3-3 more times, 7-7-7-7-4-4 times in total = 222-222-254-278-290-314 sts on row. AT THE SAME TIME when piece measures 17-19-21-23-20-22 cm / 6¾"-7½"-8¼"-9"-8"-8¾", beg to dec for BUTTONHOLES on right band - see explanation above! Continue in stockinette st, pattern according to diagram A.1 and 5 band sts in garter st until piece measures 29-31-29-28-32-31 cm / 11⅜"-12¼"-11⅜"-11"-12½"-12¼". On next row from WS, bind off for armholes in each side as follows: Work until the 2 repetitions in left side and bind off the 14 sts over A.1, work all sts over back piece, and bind off 14 sts over A.1 in right side, work the rest of row and put piece aside (= 28 sts bound off in total) = 51-51-59-65-68-74 sts remain on front pieces and 92-92-108-120-126-138 sts on back piece (= 194-194-226-250-262-286 sts remain on needle). SLEEVE: Worked in the round on circular needle. Cast on 133-133-147-161-154-168 sts on circular needle size 3.5 mm / US 4 with Muskat or "Belle". Work 3 ridges in garter st - see explanation above. Insert a marker at beg of round = mid under sleeve. Then switch to circular needle size 4 mm / US 6 and work pattern A.1 (= 7 sts) over all sts on round = 19-19-21-23-22-24 repetitions on round. Continue like this with pattern until piece measures 5 cm / 2" from cast-on edge. NOTE! Stop after a round with stockinette st after a round like 3rd row in A.1 (i.e. after 4th row, 8th row, 12th row etc.), AT THE SAME TIME on this round bind off one whole repetition of A.1 on each side of marker (= 14 sts bind off in total mid under sleeve) = 119-119-133-147-140-154 sts remain on needle. Put piece aside and make another sleeve. YOKE: Read all of the following section before continuing! Slip sleeves on to same circular needle as body where armholes were bind off = 432-432-492-544-542-594 sts, insert 1 marker in all transitions between body and sleeves (= 4 markers). Continue as follows on 1st row from RS: 5 band sts in garter st, 46-46-54-60-63-69 sts in stockinette st (= right front piece), insert a marker here, A.2 (= 21 sts), A.1 11-11-13-15-14-16 times in total, A.3 (= 21 sts), insert a marker here, stockinette st over the next 92-92-108-120-126-138 sts (= back piece), insert a marker here, A.2 (= 21 sts), A.1 11-11-13-15-14-16 times in total, A.3 (= 21 sts), insert a marker here, 46-46-54-60-63-69 sts stockinette st (= left front piece), 5 band sts in garter st. AT THE SAME TIME beg dec for RAGLAN BODY on body – see explanation above = 4 sts dec. Repeat the same dec every row from RS 30-30-37-44-44-51 more times, 31-31-38-45-45-52 times in total, AT THE SAME TIME continue working pattern with dec for raglan on sleeves. NOTE! When A.2 and A.3 have been worked 1 time vertically, continue with the same dec in pattern on sleeves and the same dec for raglan on body as before. When all dec are done for raglan body, 164-164-164-156-154-146 sts remain on needle. Then continue as follows on next row from RS: Work the first 18-18-18-18-20-20 sts before slipping them on a stitch holder for neck, continue over sleeves and back piece as before, and slip the remaining 18-18-18-18-20-20 sts on a stitch holder. On the next 6 rows continue with pattern over sleeves, stockinette st on back piece and dec as before (i.e. dec for raglan as dec for raglan body), AT THE SAME TIME work an elevation in the back of neck as follows: Reduce no of sts worked as follows: Work until 3 sts remain on row, turn, work until 3 sts remain, turn, work until 6 sts remain, turn, work until 6 sts remain, turn, work until 9 sts remain, turn, work until 9 sts remain. Then slip sts from stitch holders back on needle, switch to circular needle size 3.5 mm / US 4 and work 3 ridges over all sts, AT THE SAME TIME on 1st row on edge in garter st adjust sts to 153-153-153-144-144-136 evenly on needle (but not over the 5 band sts in garter st in each side). Loosely bind off. ASSEMBLY: Sew the openings under the sleeves tog. Sew the buttons on to left band. |
|||||||||||||||||||
Diagram explanations |
|||||||||||||||||||
|
|||||||||||||||||||

|
|||||||||||||||||||

|
|||||||||||||||||||
|
Have you made this or any other of our designs? Tag your pictures in social media with #dropsdesign so we can see them! Do you need help with this pattern?You'll find tutorial videos, a Comments/Questions area and more by visiting the pattern on garnstudio.com. © 1982-2024 DROPS Design A/S. We reserve all rights. This document, including all its sub-sections, has copyrights. Read more about what you can do with our patterns at the bottom of each pattern on our site. |
|||||||||||||||||||


With over 40 years in knitting and crochet design, DROPS Design offers one of the most extensive collections of free patterns on the internet - translated to 17 languages. As of today we count 304 catalogs and 11422 patterns - 11417 of which are translated into English (US/in).
We work hard to bring you the best knitting and crochet have to offer, inspiration and advice as well as great quality yarns at incredible prices! Would you like to use our patterns for other than personal use? You can read what you are allowed to do in the Copyright text at the bottom of all our patterns. Happy crafting!
Comments / Questions (30)
Varför är inte knapphålen jämnt fördelade i storlek xxl? Det andra knapphålet kommer efter bara 4cm enligt mönstret. Det borde väl också komma efter 7 cm som alla andra knapphål i alla andra storlekar?
02.08.2018 - 16:43DROPS Design answered:
Hej Lena, her bør der stå 27 cm, det skal vi få rettet. Tak for info :)
15.08.2018 - 08:54XL: Wie sollen die 2M vorm/nach dem Maschenmarkierer (Vorderteil) gestrickt werden? Werden die verkürzten Reihen nur 1x gearbeitet oder in allen 3 Hinreihen? Und wie sollen die Abnahmen des Rückenteils mit den verkürzten Reihen kombiniert werden? Dankeschön
29.11.2017 - 17:10DROPS Design answered:
Liebe Franziska, es werden nur 6 verkürzten Reihen (Erhöhung) gestrickt, die Raglanabnahmen stricken Sie wie zuvor nur über die gestrickte Maschen (= nach diesen 6 Reihen werden beidseitig 9 M auf beiden Seiten still gelegt + die 18 M beidesitig für den Halsausschnitt= 27 M auf beiden Seiten). Viel Spaß beim stricken!
30.11.2017 - 08:31XL: wie kommt man nach den Abnahmen (PASSE) von 156M auf 144M mit 8 Reihen und Abnahme von 45M? MfG Franziska
29.11.2017 - 17:06DROPS Design answered:
Liebe Franziska, wenn Sie 156 M haben, dann legen Sie die mittleren 18 M für Hals still und stricken jetzt verkürzten Reihen und Raglanabnahmen wie zuvor. Nach diesen verkürzten Reihen stricken Sie alle Maschen wieder, auch die stillgelegten 18 M für den Hals, dann bei der 1. Reihe des 3 Krausrippen ab- bzw zunehmen damit Sie 144 M für den Hals haben (dieser Satz mit den Maschenanzahl sollte ausgelöscht werden). Viel Spaß beim stricken!
30.11.2017 - 08:23Hej Efter en hel del frustration o svordomar så fann jag felet. Ok: Ni skriver att man ska sticka 56 m, sätta en markör, sedan sticka enligt A2 innan A1.....FEL FEL FEL. Det är 60 m, precis som på tröjan. Ber er vänligast ändra innan någon annan sitter o repar upp.
24.01.2016 - 17:00Man minskar ju vartannat varv på oket. Hur många maskor minskas på ärmarna. Svår att se på diagrammet.
21.09.2015 - 16:33DROPS Design answered:
Hej Lena, om du tittar på diagrammet så minskar du ytterst i diagrammet (strecket som går över 2 m från hörn till hörn) på varannat varv. Fråga gärna din DROPSbutik! Lycka till!
24.09.2015 - 09:10Stickar oket på jackan. När A2 samt A3 är färdigstickade "fortsätter det med samma minskningar i mönstret på ärmarna". Hur gör jag det?
20.09.2015 - 19:23DROPS Design answered:
Hej Lena, du fortsätter med samma minskn i mönstret på ärmarna och samma minskn till raglan på fram- och bakst som förut, dvs som du har gjort hela tiden. Lycka till!
21.09.2015 - 08:26Hej med jer. Hvornår må jeg forvente et svar, så jeg kan komme videre. For så vidt jeg kan se, har det ikke noget med maskeantallet at gøre. Mvh Inge Kjærgaard
12.08.2015 - 19:22DROPS Design answered:
Hej Inge, Maskeantal stemmer med diagrammer og målene i opskriften, og der vil ikke blive lavet nogle ændringer i størrelserne. God fornøjelse!
18.08.2015 - 10:10Ryg- forstykke. JeG forstå ikke logikken i at når arbejdet måler 23-25-22-20-23-21 cm skal der lukkes af til ærmet. Hvorfor stiger den ikke i antal cm i alle str. Jeg strikker str. XL og den skal kun være 20 cm. Håber mit spørgsmål er klart. MVH Inge Kjærgaarr
06.08.2015 - 13:34DROPS Design answered:
Hej Inge, Det have noget at gøre med antal m i mønsterrapporten.... Vi skal få design til at se på det.
07.08.2015 - 08:13Rigtig fin bluse, men jeg kunne ikke strikke den i 550g Muskat i str. L. som der står. Var nød til at bestille 2 nøgler mere før jeg kunne blive færdig, lidt træls at skulle betale porto 2 gange. Måske man skulle rette det i opskriften?
07.06.2015 - 17:32DROPS Design answered:
Hej Bettina. Tak for info. Vi noterer det og modtager vi flere bemaerkninger vedr. antal nögler til denne model, saa kigger vi om der er fejl i mönstret. God weekend.
12.06.2015 - 12:29Panne beim Nachstricken der Jacke in Gr. XXL bei der PASSE: Nach Uebernahme der Aermel auf die Rundnadel mit dem Rumpfteil sind 542 auf der Nadel. Doch nachdem Abnahmen fuer die Raglanschraegungen an Aermel und Rumpfteil jeweils 44 x wiederholt wurden (= 176 M. abgenommen) sind immer noch 366 M auf der Nadel und nicht 182 M wie in der Anleitung. Ich hab sie auch in anderen 2 Sprachen gelesen, aber die Angaben sind die gleichen. Bitte um Hilfe, Tip, Erklaerung...
29.10.2014 - 12:45DROPS Design answered:
Haben Sie die Abnahmen an den Ärmeln auch beachtet? Sie nehmen ja nicht nur 4 M am Rumpfteil ab, sondern auch immer 4 M an den Ärmeln, also 8 M, dazu in der 1. und 13. Rd von A.2 und A.3 nochmal zusätzlich je 1 M (= 4 zusätzliche M in der ganzen Rd). Sie nehmen also 44x 4 M am Rumpfteil ab, 44x 4 M an den Ärmeln + 2x 4 zusätzliche M an den Ärmeln = 360 M abgenommen. Das passt dann zu den 182 M.
29.10.2014 - 14:30