
Popular categories
Looking for a yarn?


|
|||||||||||||||||||
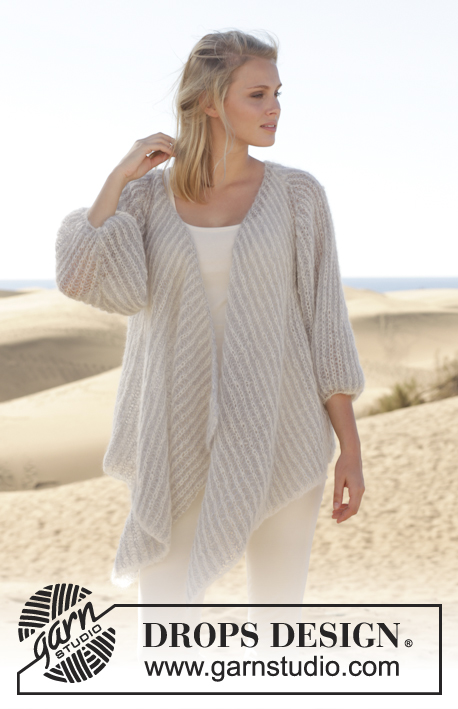
Florentina Jacket |
|||||||||||||||||||
|
|
|||||||||||||||||||
Knitted DROPS jacket with lace pattern and raglan in ”Muskat” or "Belle". Size: S - XXXL.
DROPS 152-19 |
|||||||||||||||||||
|
GARTER ST (in the round on circular needle): * K 1 round and P 1 round *, repeat from *-*. 1 ridge = 2 rounds. GARTER ST (back and forth on needle): K all rows. 1 ridge = K2 rows. PATTERN: See diagrams A.1-A.3. The diagrams show all rows in pattern seen from RS. INCREASE TIP: Inc from RS. Inc 1 st by making 1 YO, on next row P YO twisted (i.e. work in back loop of st instead front) to avoid holes. RAGLAN BODY: Dec as follows from RS: Before marker: Beg 4 sts before marker, P 2, K 2 tog (= 1 st dec). After marker: Beg on 1st st after marker, slip 1 st as if to K, K 1, psso, P 2 (= 1 st dec). BUTTONHOLES: Dec for buttonholes on right band (= 5 band sts). 1 buttonhole = K tog third and fourth st from edge and make 1 YO. Dec for buttonholes when piece measures: SIZE S: 17, 24, 31, 38 and 45 cm / 6¾"-9½"-12¼"-15"-17¾" SIZE M: 19, 26, 33, 40 and 47 cm / 7½"-10¼"-13"-15¾"-18½"- SIZE L: 21, 28, 35, 42 and 49 cm / 8¼"-11"-13¾"-16½"-19¼" SIZE XL: 23, 30, 37, 44 and 51 cm / 9"-11¾"-14½"-17¼"-20" SIZE XXL: 20, 27, 34, 41, 48 and 55 cm / 8"-10½"-13⅜"-16⅛"-19"-21⅝". SIZE XXXL: 22, 29, 36, 43, 50 and 57 cm / 8¾"-11⅜"-14¼"-17"-19¾"-22½". ---------------------------------------------------------- BODY: Worked back and forth on circular needle from mid front. Cast on 194-194-226-250-274-298 sts (includes 5 band sts in garter st in each side towards mid front) on circular needle size 3.5 mm / US 4 with Muskat or "Belle". Work 3 ridges in GARTER ST - see explanation above. Then switch to circular needle size 4 mm / US 6 and work as follows from RS: 5 band sts in garter st, stockinette st over the next 39-39-47-53-59-65 sts, A.1 over the next 14 sts, stockinette st over the next 78-78-94-106-118-130 sts (= back piece), A.1 over the next 14 sts, stockinette st over the next 39-39-47-53-59-65 sts, 5 band sts in garter st. Work another row the same way. REMEMBER THE GAUGE! Continue back and forth the same way, AT THE SAME TIME on next row from RS inc 1 st on each side of the 2 repetitions of A.1 in the sides (= 4 sts inc on row) – READ INCREASE TIP! Beg 1 st before A.1 and inc as follows: 1 YO, K 1, A.1 over 14 sts, K 1, 1 YO (= 2 sts inc in each side). Repeat the same inc every 2½-2½-2-2-4-3½ cm/7/8"-⅞"-¾"-¾"-1½"-1¼" 6-6-6-6-3-3 more times, 7-7-7-7-4-4 times in total = 222-222-254-278-290-314 sts on row. AT THE SAME TIME when piece measures 17-19-21-23-20-22 cm / 6¾"-7½"-8¼"-9"-8"-8¾", beg to dec for BUTTONHOLES on right band - see explanation above! Continue in stockinette st, pattern according to diagram A.1 and 5 band sts in garter st until piece measures 29-31-29-28-32-31 cm / 11⅜"-12¼"-11⅜"-11"-12½"-12¼". On next row from WS, bind off for armholes in each side as follows: Work until the 2 repetitions in left side and bind off the 14 sts over A.1, work all sts over back piece, and bind off 14 sts over A.1 in right side, work the rest of row and put piece aside (= 28 sts bound off in total) = 51-51-59-65-68-74 sts remain on front pieces and 92-92-108-120-126-138 sts on back piece (= 194-194-226-250-262-286 sts remain on needle). SLEEVE: Worked in the round on circular needle. Cast on 133-133-147-161-154-168 sts on circular needle size 3.5 mm / US 4 with Muskat or "Belle". Work 3 ridges in garter st - see explanation above. Insert a marker at beg of round = mid under sleeve. Then switch to circular needle size 4 mm / US 6 and work pattern A.1 (= 7 sts) over all sts on round = 19-19-21-23-22-24 repetitions on round. Continue like this with pattern until piece measures 5 cm / 2" from cast-on edge. NOTE! Stop after a round with stockinette st after a round like 3rd row in A.1 (i.e. after 4th row, 8th row, 12th row etc.), AT THE SAME TIME on this round bind off one whole repetition of A.1 on each side of marker (= 14 sts bind off in total mid under sleeve) = 119-119-133-147-140-154 sts remain on needle. Put piece aside and make another sleeve. YOKE: Read all of the following section before continuing! Slip sleeves on to same circular needle as body where armholes were bind off = 432-432-492-544-542-594 sts, insert 1 marker in all transitions between body and sleeves (= 4 markers). Continue as follows on 1st row from RS: 5 band sts in garter st, 46-46-54-60-63-69 sts in stockinette st (= right front piece), insert a marker here, A.2 (= 21 sts), A.1 11-11-13-15-14-16 times in total, A.3 (= 21 sts), insert a marker here, stockinette st over the next 92-92-108-120-126-138 sts (= back piece), insert a marker here, A.2 (= 21 sts), A.1 11-11-13-15-14-16 times in total, A.3 (= 21 sts), insert a marker here, 46-46-54-60-63-69 sts stockinette st (= left front piece), 5 band sts in garter st. AT THE SAME TIME beg dec for RAGLAN BODY on body – see explanation above = 4 sts dec. Repeat the same dec every row from RS 30-30-37-44-44-51 more times, 31-31-38-45-45-52 times in total, AT THE SAME TIME continue working pattern with dec for raglan on sleeves. NOTE! When A.2 and A.3 have been worked 1 time vertically, continue with the same dec in pattern on sleeves and the same dec for raglan on body as before. When all dec are done for raglan body, 164-164-164-156-154-146 sts remain on needle. Then continue as follows on next row from RS: Work the first 18-18-18-18-20-20 sts before slipping them on a stitch holder for neck, continue over sleeves and back piece as before, and slip the remaining 18-18-18-18-20-20 sts on a stitch holder. On the next 6 rows continue with pattern over sleeves, stockinette st on back piece and dec as before (i.e. dec for raglan as dec for raglan body), AT THE SAME TIME work an elevation in the back of neck as follows: Reduce no of sts worked as follows: Work until 3 sts remain on row, turn, work until 3 sts remain, turn, work until 6 sts remain, turn, work until 6 sts remain, turn, work until 9 sts remain, turn, work until 9 sts remain. Then slip sts from stitch holders back on needle, switch to circular needle size 3.5 mm / US 4 and work 3 ridges over all sts, AT THE SAME TIME on 1st row on edge in garter st adjust sts to 153-153-153-144-144-136 evenly on needle (but not over the 5 band sts in garter st in each side). Loosely bind off. ASSEMBLY: Sew the openings under the sleeves tog. Sew the buttons on to left band. |
|||||||||||||||||||
Diagram explanations |
|||||||||||||||||||
|
|||||||||||||||||||

|
|||||||||||||||||||

|
|||||||||||||||||||
|
Have you made this or any other of our designs? Tag your pictures in social media with #dropsdesign so we can see them! Do you need help with this pattern?You'll find tutorial videos, a Comments/Questions area and more by visiting the pattern on garnstudio.com. © 1982-2024 DROPS Design A/S. We reserve all rights. This document, including all its sub-sections, has copyrights. Read more about what you can do with our patterns at the bottom of each pattern on our site. |
|||||||||||||||||||


With over 40 years in knitting and crochet design, DROPS Design offers one of the most extensive collections of free patterns on the internet - translated to 17 languages. As of today we count 304 catalogs and 11422 patterns - 11417 of which are translated into English (US/in).
We work hard to bring you the best knitting and crochet have to offer, inspiration and advice as well as great quality yarns at incredible prices! Would you like to use our patterns for other than personal use? You can read what you are allowed to do in the Copyright text at the bottom of all our patterns. Happy crafting!
Comments / Questions (30)
Hei. Jatkuuko lyhennetyillä kerroksilla raglan kavennukset myös hihoissa, vaiko vain takakappaleessa?
15.11.2023 - 14:46Huomasin että aloitan mallikerrat vain normaalisti alusta, alhaalta uudelleen. Eli, ei tarvitse vastata. Hätäilin taas turhaan kysymyksen kanssa.
12.11.2023 - 20:24Hei. Koko L. Olen puolivälissä A2A3 kuviota. Hyvin sujuu. Jatko arveluttaa. En ymmärrä miten hihojen raglankavennukset jatkuvat kun A2A3 ovat valmiit. Kavennetaanko silloin myös A1 kuviosta? Jos, niin miten? Kuinka monta silmukkaa on hihassa kun kaikki kavennukset on tehty? Ja kuinka monta A1 kuviokertaa on silloin hihassa jäljellä?
10.11.2023 - 12:10Korjaus edelliseen, siis jos lisäyksiä olisi x8 olisi s määrä 258
06.11.2023 - 19:11Koko L. Ohjeen alkuvaiheessa kun lisäyksiä tehdään; ohjeessa lukee "Toista tällaiset lisäykset ...vielä 7 kertaa=254 s työssä. " Pitäisikö olla "tee lisäykset yhteensä 7 kertaa...."? Koska jos on kerran lisätty ja lisätään "vielä" 7 kertaa, on lisäyksiä tehty yhteensä 8 kertaa ja siömukkamäärä olisi 254.
06.11.2023 - 19:10DROPS Design answered:
Hei, olet oikeassa! Ohjeeseen on tehty korjaus.
08.11.2023 - 17:43Größe L: Ich habe das Passe 38x gestrickt. Das Rückenteil hat jetzt 32 Maschen, die Ärmel jeweils 43 Maschen. Nun kommen verkürzte Reihen für einen höheren Halsausschnitt. Auf jeder Seite sollen 3 - 6 - 9 Maschen stillgelegt werden. Damit würden sich die verkürzten Reihen über die Ärmel erstrecken, also nicht nur im Rückenteil, dafür sind ja zuwenige MAschen für das Rückenteil da. Also im Ärmel für die verkürzten Reihen wenden. Ist das richtig?
30.07.2022 - 14:25DROPS Design answered:
Liebe Sandra, ja so ist es richtig, vergessen Sie aber nicht, gleichzeitig die Raglanabnahmen wie zuvor zu arbeiten. Viel Spaß beim stricken!
01.08.2022 - 16:44A1 und A2 werden wiederholt, so wie es auf der Zeichnung zu sehen ist? Also die zusätzlichen Abnahmen auch? Bei Größe L sind das 3x das Schema (3 x 12 Reihen = 36 + 2 = 38 Wiederholungen) mit den zusätzlichen 4 Abnahmen pro Ärmel. Bei der 37. Reihe keine zusätzliche Abnahmen mehr. Dann ergibt sich eine Maschenzahl von 164 übrigen Maschen. In Zahlen: 38 x 8 und zusätzlich 12 abnahmen pro Ärmel, also 24 = 328. 492-328=164. Ist das richtig?
28.03.2022 - 00:55DROPS Design answered:
Liebe Sandra, ja das ist korrekt, Sie wiederholen A1 und A2 mit den Abnahmen und haben am Ende 164 Maschen. Viel Spaß beim Weiterstricken!
31.03.2022 - 22:20Det du skriver stämmer med det jag kommit fram till, men det stämmer inte med mönstret. Både du och jag har kommit fram till att framstycket är 60 m och bakstycket 120. Men i mönstret är det 56 resp 112 i xl. Redan 2016 kom Marita Johansson fram till samma sak, men hon fick inget svar. Och nu sitter jag och kämpar med samma fel i mönstret och vet inte om det kommer att funka att sticka färdigt koftan.
23.04.2020 - 09:23DROPS Design answered:
Hej Det var fel tal på den svenska och danska översättningen, men detta är nu rättat. Tack för info! Mvh DROPS Design
23.04.2020 - 10:51Stickar oket i XL. Kan inte få mönstret att stämma. 5+56+147+112+147+56+5 (som det ska vara i XL enligt mönstret) =528, inte 544 som det står att det ska vara på stickan innan man börjar sticka oket. Så här blev det för mig: 5+60+147+120+147+60+5=544. Detta stämmer med det angivna antalet maskor på stickan. Men jag blir osäker på hur det blir senare i mönstret. Kan ni hjälpa mig med det här?
04.04.2020 - 11:00DROPS Design answered:
= 544 masker, 5 stolpe-m rille, 60 m glstrikk (= høyre forstk), sett et merke her, A.2 (= 21 m), A.1 totalt 15 ganger =105 m, A.3 (= 21 m), sett et merke her, glstrikk over de neste 120 m (= bakstykke), sett et merke her, A.2 (= 21 m), A.1 totalt 15 ganger = 105, A.3 (= 21 m), sett et merke her, 60 m glstrikk (= venstre forstk), 5 stolpe-m rille. = totalt 544 masker.
21.04.2020 - 11:19Denne sætning til sidst er noget get vrøvl: SAMTIDIG på 1.p retstrik justeres der til 153-153-153-144-144-136 på p (men ikke over de 5 kantm i retstrik i hver side) = 139-139-139-139-134-134 m tilbage på p. Skal der være 153 eller 139 m tilbage i str S/M?
27.02.2019 - 17:03