
Popular categories
Looking for a yarn?


|
|
Rosalie |
|
|
|
|
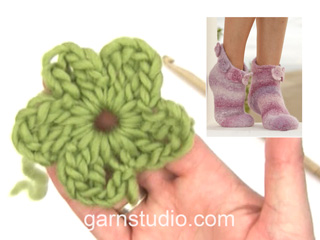
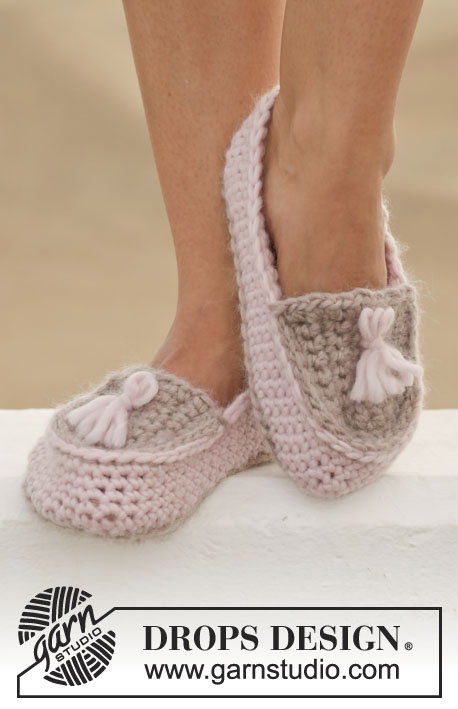
Felted DROPS slippers with 2 strands ”Big Delight”.
DROPS 154-32 |
|
|
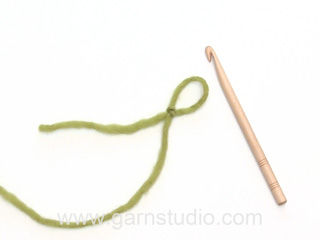
ANKLE ELEVATION: From RS: * Work 6-6-7-7 sts, turn and work 6-6-7-7 sts – see KNITTING TIP! Work 10-10-12-12 sts, turn and work 10-10-12-12 sts. Work 6-6-7-7 sts, turn and work 6-6-7-7 sts *. Work 1 row over all sts, repeat from *-* in opposite side, beg from WS. Then work 1 row back over all sts from WS. KNITTING TIP: When turning mid piece slip 1st st. Tighten yarn and continue as before. There might be a small hole in piece but this will even out after felting. -------------------------------------------------------- SLIPPER: Worked back and forth in stockinette st. Before working the slipper, put yarn aside for crochet flowers. To get different colors on these, use yarn from inside and outside of ball. Cut 12 lengths in total of 2.5 metres each. Beg at the top of the leg and finish with the toe. REMEMBER THE GAUGE! Cast on 38-42-44-44 sts on needle size 9 mm / US 13 with 2 strands Big Delight. Work stockinette st as follows (1st row = from RS): K 2 tog, K 34-38-40-40, K 2 tog = 36-40-42-42 sts. Work 2nd row as follows (= from WS): P 2 tog, P 32-36-38-38, P 2 tog = 34-38-40-40 sts. Work 3rd row as follows (= from RS): Work ANKEL ELEVATION 1 time over the outermost sts in each side – see explanation above! Work 4 rows over all sts, AT THE SAME TIME on 1st row dec 4-4-4-2 sts evenly = 30-34-36-38 sts. Work 2 row over all sts. NOW INC FOR HEEL AS FOLLOWS: From RS: * Work 10-10-11-12 sts, turn and work 9-9-10-11 sts, work 2 sts in last st on needle. Work 6-6-7-7 sts, turn and work 5-5-6-6 sts, work 2 sts in last st on needle. Work 1 row over all sts *. Repeat from *-* on the opposite side, beg from WS. Repeat from *-* 2 more times in each side (= 3 times in total) = 42-46-48-50 sts. NOW DEC FOR HEEL AS FOLLOWS: From RS: * Work 10-10-11-12 sts, turn and work 8-8-9-10 sts, work last 2 sts tog. Work 6-6-7-7 sts, turn and work 4-4-5-5 sts, work last 2 sts tog. Work 1 row over all sts *. Repeat from *-* on the opposite side, beg from WS. Repeat from *-* 2 more times in each side (= 3 times in total) = 30-34-36-38 sts. NOW WORK THE FOOT AS FOLLOWS: Insert 1 marker in the outermost st on one side, now measure piece from here. Then dec from RS on top of foot like this: Work 8-8-9-10 sts, K the next 2 sts tog, work until 10-10-11-12 sts remain, K 2 tog, work remaining sts on row, repeat the dec on every row from RS a total of 3-3-4-4 times = 24-28-28-30 sts. Continue to work without dec until piece measures approx. 18-21-25-29 cm / 7"-8¾"-9¾"-11"½, measured from marker. DEC FOR TOE AS FOLLOWS: Dec 3-4-4-4 sts evenly on next row from RS. Repeat the dec on every row from RS 4-4-4-4 times in total = 12-12-12-14 sts on needle. On next row from RS K 2 tog the entire row = 6-6-6-7 sts. Pull yarn through the remaining sts, tighten tog and fasten. Sew tog mid under foot and up to cast-on row, sew edge to edge in front loops of sts to avoid a chunky seam. FLOWERS: Crochet 4 ch on hook size 4.5 mm/US 7 with Big Delight, form a ring with 1 sl st in first ch. Then work as follows: ch 1, * 1 sc in ch-ring, ch 1, 1 dc in ch-ring, ch 1, 1 tr in ch-ring and 3 ch *, repeat from *-* 4 more times (5 leaves in total) and finish with 1 sl st in first ch from beg of round. Work 12 flowers in total. Fasten off. FELTING: Place a small plastic (sandwich) bag inside the toe to avoid felting the toe tog. Secure it with a safety pin. Place the slippers and the flowers in the washing machine with a detergent without enzymes and optical bleach. Wash warm at 40C/ 104F with normal spin but no pre-wash. After wash shape the slippers to the right measurements while still wet and leave to dry flat. At subsequent wash, wash the slippers at regular wool program. ASSEMBLY: Sew flowers at the top around opening on slipper. AFTER FELTING: If the piece is not felted enough and is too big: Wash the piece one more time in the washing machine while it is still wet add a terry towel that measures approx. 50 x 70 cm = 19¾" x 27½" - NOTE: Do not use a short program. If the piece has been felted too much and is too small: While the piece is still wet stretch it to the correct measurements, if the piece is dry, make sure to soak it first. Remember: All subsequent washes are as a normal wool garment. |
|
|
Have you made this or any other of our designs? Tag your pictures in social media with #dropsdesign so we can see them! Do you need help with this pattern?You'll find tutorial videos, a Comments/Questions area and more by visiting the pattern on garnstudio.com. © 1982-2024 DROPS Design A/S. We reserve all rights. This document, including all its sub-sections, has copyrights. Read more about what you can do with our patterns at the bottom of each pattern on our site. |


With over 40 years in knitting and crochet design, DROPS Design offers one of the most extensive collections of free patterns on the internet - translated to 17 languages. As of today we count 304 catalogs and 11422 patterns - 11417 of which are translated into English (US/in).
We work hard to bring you the best knitting and crochet have to offer, inspiration and advice as well as great quality yarns at incredible prices! Would you like to use our patterns for other than personal use? You can read what you are allowed to do in the Copyright text at the bottom of all our patterns. Happy crafting!
Comments / Questions (23)
DROPS Big Delight is discontinued. What yarns work for this project?
29.08.2023 - 12:08DROPS Design answered:
Dear Maria, you can use any other feltable yarn from yarn group C - see them here (make sure you choose a yarn group C thanks to the converter) - get the new amount of yarn with our Yarn converter. Happy knitting!
30.08.2023 - 07:42Buongiorno volevo sapere se i fiori vanno applicati prima di infeltrire o dopo, grazie
07.02.2021 - 14:55DROPS Design answered:
Buonasera Susanne, anche i fiori sono infeltriti. Buon lavoro!
07.02.2021 - 22:45Hej! Köpte två nystan rose garden av Big delight, men de börjar inte i samma färg, varken inifrån eller utifrån. Spelar det någon roll när man ska sticka med två trådar eller ska man nysta upp tills de har samma färg att starta med?
26.02.2020 - 23:29DROPS Design answered:
Hej Lory, Nej du behöver inte anpassa färgerna, meleringen kommer bli superfin när den är ihopstickad och tovad. Lycka till :)
27.02.2020 - 08:51På mönster: DROPS Design: Modell nr db-033 Garngrupp C+C eller E - står stickor nr. 9. Måste väl ändå vara fel. Garnet tunt till att tovade sockor.
02.03.2019 - 14:47DROPS Design answered:
Hei Annika. Det er den korrekte strikkefastheten med 2 tråder garn fra garngruppe C (som feks Big Delight) eller 1 tråd garn fra garngruppe E (som feks Eskimo). Pinnestørrelsen er kun veiledende, det er strikkefastheten som er viktig å overholde. Her er den 10 masker x 14 pinner glattstrikk = 10 x 10 cm før toving, strikket med 2 tråder. God fornøyelse
04.03.2019 - 13:28Wat doe ik als mijn proeflapje uitkomt op 10 steken x 13 naalden is 10x10 cm? Wanneer ik een maat kleiner naald gebruik heb ik meer steken nodig om aan 10 cm te komen....
20.12.2018 - 17:44DROPS Design answered:
Dag Monique,
Het is vooral belangrijk dat de stekenverhouding in de breedte klopt, zodat je het aantal steken op kunt zetten, zoals in het patroon is aangegeven, en dat is bij jou dus het geval. In de hoogte kun je tot de gewenste lengte breien, zoals aangegeven in het patroon. 20.12.2018 - 17:56Förstår inte riktigt vad som menas med: "Fäst en liten plastpåse i toppen med en säkerhetsnål så att toppen inte tovas ihop"? Är det uppe vid tåspetsen och hur ska man fästa den då och skall sockan vara inne i plastpåsen? Finns någon bild på detta?
19.08.2018 - 17:11DROPS Design answered:
Plastpåsen fästs inuti sockan längst in mot tårna så att arbetet inte tovas ihop. Påsen kan du fästa med en säkerhetsnål.
20.08.2018 - 17:49Après une lessive a 40C mes chaussons n'ont pas suffisamment rétrécis. Il y a au moins 10cm de trop dans la longueur et le tour de cheville trop large. L'échantillon correspondait bien à la bonne taille. Que puis faire?
24.12.2017 - 15:12DROPS Design answered:
Chere Glorieux, si l'ouvrage est encore trop grand, lavez-le à nouveau et mettez-le en forme aux mesures indiquées. Bon travail!
31.12.2017 - 22:27Bonjour, ai-je bien compris que ces chaussons se tricotent en fil double ? Du début à la fin ? Et dans ce cas, une seule pelote de laine va suffire ? je vous remercie de votre réponse P. Lemerre
11.10.2017 - 12:12DROPS Design answered:
Bonjour Mme Lemerre, ces chaussons se tricotent effectivement avec le fil en double, il faudra 200 g (= 2 pelotes) Big Delight dans les 2 premières tailles et 300 g (= 3 pelotes) Big Delight dans les 2 grandes tailles. Bon tricot!
11.10.2017 - 13:41DROPS 154-32 DROPS design: Model nr. db-033 Kan ik deze slof gewoon breien zonder te vilten ? Is er een groot verschil in het stekenaantal dan? Hartelijke dank Grtjs Ann
29.10.2014 - 01:27DROPS Design answered:
Dit patroon is alleen geschikt om te vilten, anders zullen de sloffen veel te groot zijn. Als u niet wilt vilten, raden we u aan een van onze andere patronen te kiezen voor gehaakte of gebreide sloffen die zo gedragen kunnen worden.
29.10.2014 - 07:52Thanks for coming back in a sec.I just couldn't find the hint 18-29 cm. I'll continue happily ever...
03.10.2014 - 21:12