
Popular categories
Looking for a yarn?


|
|
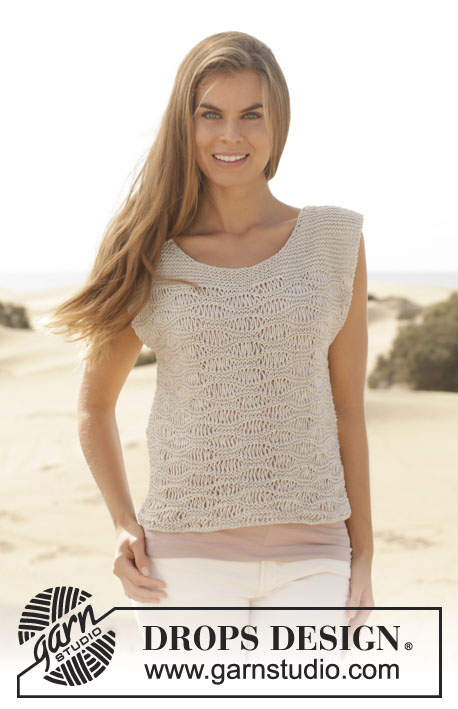
Amanda Cardigan |
|
|
|
|
Knitted DROPS jacket with lace pattern and raglan in "Bomull-Lin" or "Paris". Size: S - XXXL.
DROPS 153-35 |
|
|
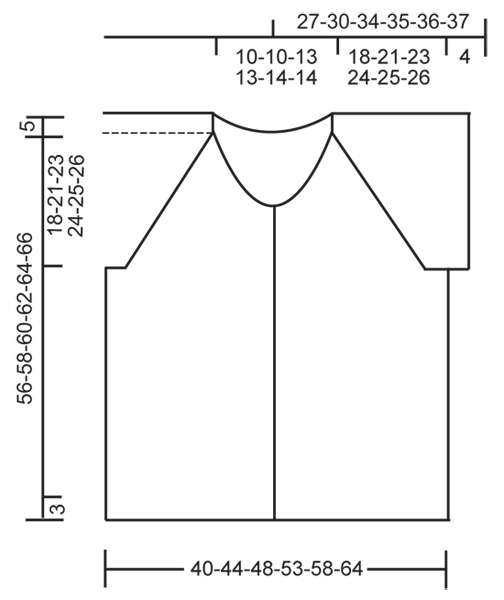
TEXTURE: * K 1, P 1 *, repeat from *-*. GARTER ST (back and forth on needle): K all rows. 1 ridge = K2 rows. GARTER ST (in the round on circular needle): * K 1 round and P 1 round *, repeat from *-*. 1 ridge = 2 rounds. DECREASE TIP 1: Dec 1 st on front/back piece and 1 st on each side of sleeve as follows: Beg 5 sts before 1st, 3rd, 5th and 7th marker: K 3 tog, 2 YO, 2 sts twisted tog, (1st, 3rd, 5th and 7th marker), K 1, (2nd, 4th, 6th and 8th marker), K 2 tog, 2 YO, K 3 tog. On next row work yo's like this: K 1st yo and K 2nd yo twisted (i.e work in back loop). Dec 1 st on front/back piece and 2 sts on each side of sleeve as follows: Beg 5 sts before 1st and 5th marker: K 3 tog, 2 YO, 2 sts twisted tog, (1st and 5th marker), K 1, (2nd and 6th marker), K 2 tog, 2 YO, K 4 tog, then work as before until 6 sts remain before 3rd and 7th marker: K 4 tog, 2 YO, 2 sts twisted tog, (3rd and 7th marker), K 1, (4th and 8th marker), K 2 tog, 2 YO, K 3 tog. On next row work yo's like this: K 1st yo and K 2nd yo twisted (i.e work in back loop). DECREASE TIP 2: Dec inside 5 band sts in each side. All dec are done from RS! Dec after 5 band sts as follows: Slip 1 st as if to K, K 1, psso. Dec as follows before 5 band sts: K 2 tog. BUTTONHOLES: Dec for buttonholes on right band. 1 buttonhole = K tog second and third st from edge and make 1 YO. Dec for buttonholes when piece measures: SIZE S: 3, 12, 21, 30 and 39 cm / 1⅛",4¾",8¼",11¾",15¼". SIZE M: 5, 14, 23, 32 and 41 cm / 2",5½",9",12½",16⅛". SIZE L: 7, 14, 21, 28, 35 and 42 cm / 2¾",5½",8¼",11",13¾",16½". SIZE XL: 9, 16, 23, 30, 37 and 44 cm / 3½",6¼",9",11¾",14½",17¼". SIZE XXL: 5, 13, 21, 29, 37 and 45 cm / 2",5⅛",8¼",11⅜",14½",17¾". SIZE XXXL: 7, 15, 23, 31, 39 and 47 cm / 2¾",6",9",12¼",15¼",18½". ---------------------------------------------------------- BODY: Worked back and forth on needle. Cast on 138-150-162-178-194-214 sts (includes 5 band sts in each side) on circular needle size 4.5 mm / US 7 with Bomull-Lin. Work in GARTER ST - see explanation above - for 3 cm / 1". Switch to circular needle size 5.5 mm / US 9. Then work in stockinette st with 5 sts in garter st (= band sts) in each side of piece. REMEMBER BUTTONHOLES! When piece measures 38-37-37-38-39-40 cm / 15"-14½"-14½"-15"-15¼"-15¾", bind off for armhole from RS as follows: Work 5 band sts in garter st, 28-31-34-37-41-46 sts in stockinette st, bind off the next 8-8-8-10-10-10 sts, stockinette st over the next 56-62-68-74-82-92 sts, bind off the next 8-8-8-10-10-10 sts, stockinette st over the next 28-31-34-37-41-46 sts, finish with 5 sts in garter st (= band) = 122-134-146-158-174-194 sts remain on needle. Put piece aside and knit the sleeves. SLEEVE: Worked in the round on circular needle. Cast on 85-87-91-93-97-101 sts on circular needle size 4.5 mm / US 7 with Bomull-Lin. Work 2 ridges in GARTER ST - see explanation above. Switch to circular needle size 5.5 mm / US 9. Then continue to work until finished measurements as follows: 1 round in stockinette st, 1 round TEXTURE – see explanation above, repeat these 2 rounds until finished measurements. When piece measures 4 cm / 1½", insert 1 marker at the beg of round = mid under sleeve. On next round bind off 8-8-8-10-10-10 sts mid under sleeve (i.e. 4-4-4-5-5-5 sts on each side of marker) = 77-79-83-83-87-91 sts. Put piece aside and Make another sleeve. YOKE: Slip sleeves on to same circular needle as body where armholes were bind off = 276-292-312-324-348-376 sts. Now insert 8 markers in the piece from RS as follows: Work 5 sts in garter st (= band), K 27-30-33-36-40-45, insert 1st marker, K 1, insert 2nd marker, 77-79-83-83-87-91 sts texture as before (= sleeve), insert 3rd marker, K 1, insert 4th marker, K 54-60-66-72-80-90, insert 5th marker, K 1, insert 6th marker, 77-79-83-83-87-91 sts texture as before (= sleeve), insert 7th marker, K 1, insert 8th marker, K 27-30-33-36-40-45 and finish with 5 sts in garter st (= band). Continue as before with garter st, stockinette st and texture AT THE SAME TIME dec for raglan – read DECREASE TIP 1. Dec is different on sleeves and front/back piece. ON SLEEVE: Dec in each side of sleeve on every row from RS 1 st 7-12-13-15-16-16 times, then 2 sts 11-9-9-8-8-9 times. ON FRONT/BACK PIECE: Dec on every row from RS 1 st 18-21-22-23-24-25 times. REMEMBER BUTTONHOLES! AT THE SAME TIME when piece measures 40-42-43-45-46-48 cm / 15¾"-16½"-17"-17¾"-18"-19" (adjust so that approx. 2 rows have been worked after last buttonhole on right band), work short rows over bands as follows (beg from RS): K 5 band sts, turn piece, tighten yarn and K back, turn piece and work as before over all sts, turn piece, K 5 band sts, turn and work back, turn piece. Then work back and forth over all sts as before, AT THE SAME TIME on 1st row from RS dec 1 st in each side towards mid front for V-neck – READ DECREASE TIP 2. Repeat dec on every row from RS 12-12-14-14-15-15 times (it is ok if neck dec overlap raglan dec on front piece). After all dec, approx. 64-64-72-80-94-110 sts remain on needle. AT THE SAME TIME after last row with dec for raglan work the next 2 rows as follows (beg from WS): Work 5 band sts as before, slip them on 1 stitch holder and work the rest of row, turn piece, work 5 band sts as before, slip them on 1 stitch holder and work the rest of row = approx. 54-54-62-70-84-100 sts on needle. P 1 row from WS while AT THE SAME TIME dec 6-6-10-18-30-46 sts evenly = approx. 48-48-52-52-54-54 sts remain on needle. Bind off. BAND + NECK EDGE: Slip the 5 band sts from stitch holder on right band back on needle size 5.5 mm / US 9. Continue in garter st back and forth over these 5 sts. Work until neck edge measures approx. 9-11 cm / 3½"-4½" from where sts were slipped back on needle (place neck edge towards neckline on garment mid back, lightly pull it and make sure that it fits the measurements), then bind off. Repeat along left band. Sew seam mid back inside bind-off edge (seam should be in towards WS on garment). Sew neck edge to neck line inside 1 edge st on back piece so that neck edge lies nicely against neck line. Sew the opening under the sleeves. Sew on buttons. |
|
|
|
|
Have you made this or any other of our designs? Tag your pictures in social media with #dropsdesign so we can see them! Do you need help with this pattern?You'll find tutorial videos, a Comments/Questions area and more by visiting the pattern on garnstudio.com. © 1982-2024 DROPS Design A/S. We reserve all rights. This document, including all its sub-sections, has copyrights. Read more about what you can do with our patterns at the bottom of each pattern on our site. |


With over 40 years in knitting and crochet design, DROPS Design offers one of the most extensive collections of free patterns on the internet - translated to 17 languages. As of today we count 304 catalogs and 11422 patterns - 11417 of which are translated into English (US/in).
We work hard to bring you the best knitting and crochet have to offer, inspiration and advice as well as great quality yarns at incredible prices! Would you like to use our patterns for other than personal use? You can read what you are allowed to do in the Copyright text at the bottom of all our patterns. Happy crafting!
Comments / Questions (41)
Dank voor uw antwoord. Ik snap het helaas nog steeds niet. Volgens het patroon moet ik aan de voorpandkant van de raglan 18 steken minderen. Als ik ook 12 steken moet minderen voor de v-hals, heb ik geen 18 steken over. M.a.w. Als ik 11 steken heb geminderd voor de raglan, gaan de v-hals minderingen er al overheen. Wat doe ik niet goed?
29.07.2018 - 17:21DROPS Design answered:
Dag Pia, Als je nog niet alle minderingen voor de raglan hebt gedaan en de minderingen voor de v-hals gaan al over de raglan heen, is dat niet erg. Er staat ook in het patroon tussen haakjes dat het niet uitmaakt als de minderingen elkaar overlappen. Daarnaast staat het aantal steken dat je over hebt na alle minderingen als ongeveer aangegeven. Dus je kunt gewoon door breien, ook al ben je nog niet klaar met alle raglanminderingen op het voorpand.
31.07.2018 - 11:50Nog een vraag: na de minderingen voor de armsgaten, blijven er 28 steken over voor elk van de voorpanden (plus 5 st. voor de bies). Verderop staat dat je 18 x 1 steek moet minderen voor de raglan en tegelijkertijd 12 x 1 steek voor de v-hals. Dat is tezamen 30 steken. Maar zoveel steken heb je niet eens. Bovendien heb je voor het raglanpatroon 5 steken nodig, die derhalve op de pen moeten blijven. Hoe zit dit?
27.07.2018 - 12:00DROPS Design answered:
Dag Pia, Zoals je ook op de foto kunt zien, loopt de v-hals a.h.w. over de raglan heen. M.a.w. door de minderingen van de hals loopt de raglan in de voorpanden op een gegeven moment niet meer door. In het patroon is ook aangegeven dat het geen probleem is als de minderingen voor de hals de minderingen voor de raglan overlappen.
29.07.2018 - 10:40Het aantal minderingen voor maat S klopt denk ik niet. Er staat voor de mouw 17 x 1 steek en 11 x 2 steken. Dat is tezamen 28 pennen. Voor de panden staat 18 x 1 steek. Dus 18 pennen. Moet het totaal 28 pennen zijn of 18 pennen en staat het aantal minderingen voor de mouw fout.
24.07.2018 - 11:24Bei mir sieht das Strukturmuster ganz anders aus, eher wie ein Rippenmuster rechts/links. Ich stricke die Hinreihe rechts, die Rückreihe im Wechsel 1xrechts/1xlinks, so wie beschrieben. Das Resultat ist aber unterschiedlich. Woran liegt das?
29.08.2017 - 16:49DROPS Design answered:
Liebe Gisela, so wird es auch gestrickt. Am besten zeigen Sie Ihr Strickstück Ihrem Laden, damit Sie Ihnen weiter helfen können. Viel Spaß beim stricken!
30.08.2017 - 09:12Ich möchte mit dem Raglan beginnen und werde aus der Anleitung nicht schlau. Dort heißt es Tipp zur Abnahme 1: je 1 M am Vorder- und Rückenteil und 1 M auf jeder Seiter der Ärmel wie folgt ?aufn.? bedeutet das "aufnehmen"? Ich dachte ich muss abnehmen?Gestehe, es ist meiner erster Raglan, vielleicht liegt die Verständnisschwierigkeit darin ;) Danke für die Beantwortung!
29.04.2017 - 20:49DROPS Design answered:
Liebe Carina, es stimmt, es sollte "abnehmen" sein, Anleitung wird korrigiert. Danke für Ihre Rückmeldung! Viel Spaß beim stricken!
02.05.2017 - 09:53Efter alle indtag har jeg 90 masker i str. Xl, og ikke ca. 80 som anført i opskriften, min trøje bliver fin, men synes der har været nogle uklarheder i opskriften!
08.08.2016 - 11:42Har fundet ud af det hele
05.08.2016 - 10:28DROPS Design answered:
Hej. Så fint att du funnit ut av det. Mvh DROPS Design
11.08.2016 - 11:14Hvilken side af strukturmønstret er retsiden? Det bliver jo forskelligt alt efter om man efter de 4 cm starter på ret eller vrangpind?
04.08.2016 - 16:283. Tilføjelse i mit spørgsmål. Skal de omslagene masker ikke strikkes spejlvendt på ærmet i forhold til på forstykket/ bagstykket? Altså de huller der bliver på hver sider af rabatten mellem ærme og for/bagstykker?
04.08.2016 - 13:33Og er det korrekt at omslagene skal strikkes ret og drejet ret; næste pind er jo fra vrangsiden?
04.08.2016 - 13:09