
Popular categories
Looking for a yarn?


|
|
Lila Sun |
|
 |
 |
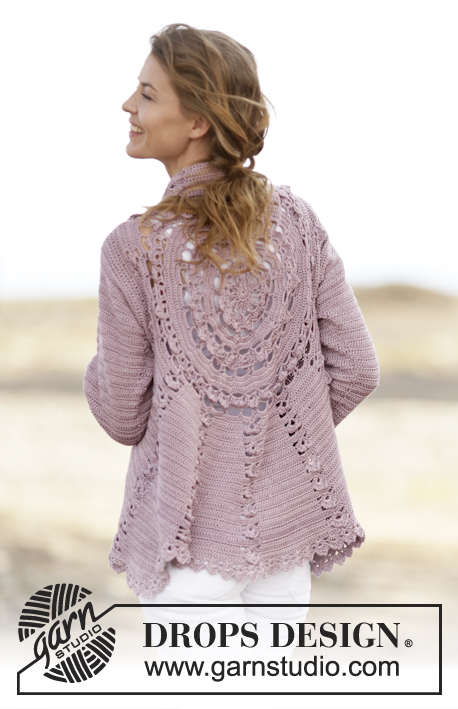
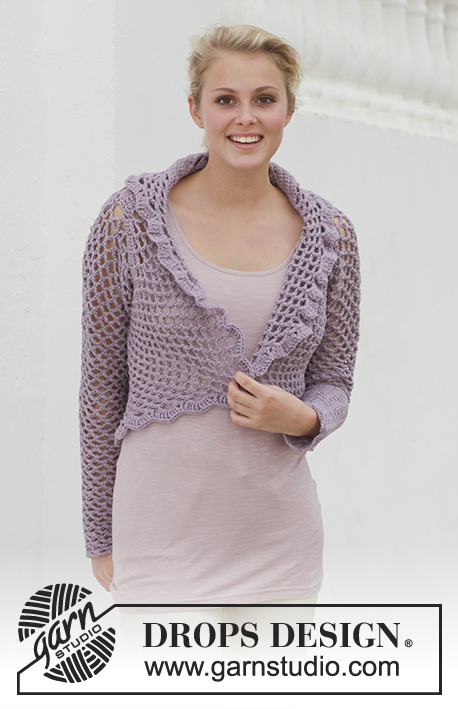
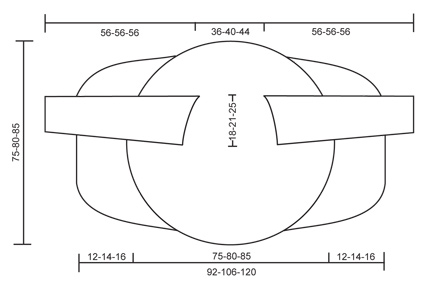
Crochet DROPS jacket worked in a circle in "Big Merino". Size: S - XXXL.
DROPS 155-10 |
|
|
CROCHET INFO: Replace first tr on every round/row with 3 ch. Finish every round with 1 sl st in 3rd ch from beg of round. ---------------------------------------------------------- CIRCLE: Work 4 ch on hook size 5 mm with Big Merino and form a ring with 1 sl st in first ch. Continue to work in the ring. ROUND 1: Read CROCHET INFO! Work 3 ch + 11 tr in ch-ring = 12 tr. ROUND 2: Work 2 tr in every tr = 24 tr. ROUND 3: * 2 tr in first tr, 1 tr in next tr *, repeat from *-* the entire round = 36 tr. ROUND 4: * 2 tr in first tr, 1 tr in each of the next 2 tr *, repeat from *-* the entire round = 48 tr. ROUND 5: * 2 tr in first tr, 1 tr in each of the next 3 tr *, repeat from *-* the entire round = 60 tr. ROUND 6: * 2 tr in first tr, 1 tr in each of the next 4 tr *, repeat from *-* the entire round = 72 tr. ROUND 7: * 2 tr in first tr, 1 tr in each of the next 5 tr *, repeat from *-* the entire round = 84 tr. Stop here in size S/M. ROUND 8: Work 1 tr in every tr. ROUND 9: * 2 tr in first tr, 1 tr in each of the next 6 tr *, repeat from *-* the entire round = 96 tr. Stop here in size L/XL. ROUND 10: Work 1 tr in every tr. ROUND 11: * 2 tr in first tr, 1 tr in each of the next 7 tr *, repeat from *-* the entire round = 108 tr. The circle now measures approx. 18-23-28 cm in diameter. ALL SIZES (= 84-96-108 tr): ROUND 12: * 3 ch, skip 1 tr, 1 dc in next tr *, repeat from *-* the entire round and finish with 3 ch and 1 sl st in 1st ch from beg of round = 42-48-54 ch-spaces. ROUND 13: Work sl sts until mid of first ch-space, 3 ch (= 1 tr), * 2 tr + 2 ch + 2 tr in next ch-space, 1 tr in next ch-space *, repeat from *-* until 1 ch-space remains, work 2 tr + 2 ch + 2 tr in last ch-space and finish with 1 sl st in 3rd ch from beg of round = 21-24-27 tr-groups with 1 tr between each. ROUND 14: Work 1 tr in every tr and 1 tr-group as on previous row in ch-space in every tr-group. ROUND 15: 3 ch (= 1 tr), * 3 tr + 2 ch + 3 tr in ch-space in mid of tr-group, 1 tr in next tr *, repeat from *-* the entire round, finish with 3 tr + 2 ch + 3 tr in ch-space in mid of last tr-group and 1 sl st in 3rd ch from beg of round. ROUND 16: Work 1 tr in every tr and 1 tr-group as on previous row in ch-space in every tr-group. ROUND 17: 3 ch (= 1 tr), * 4 tr + 2 ch + 4 tr in ch-space in mid of tr-group, 1 tr in next tr *, repeat from *-* the entire round, finish with 4 tr + 2 ch + 4 tr in ch-space in mid of last tr-group and 1 sl st in 3rd ch from beg of round. ROUND 18: Work 1 tr in every tr and 1 tr-group as on previous row in ch-space in every tr-group. ROUND 19: 4 ch (= 1 dtr), * 4 dtr + 2 ch + 4 dtr in ch-space in mid of tr-group, 1 dtr in next tr *, repeat from *-* the entire round, finish with 4 dtr + 2 ch + 4 dtr in ch-space in mid of last tr-group and 1 sl st in 4th ch from beg of round. ROUND 20: Work 1 dtr in every dtr and 1 tr-group as on previous row in ch-space in every tr-group. ROUND 21: 8 ch, * work 1 dc in 2 ch in the middle of next fan, 5 ch, 1 tr in next dtr, 5 ch *, repeat from *-* finish with 1 dc in 2 ch in the middle of next fan, 5 ch and 1 sl st in 3rd ch from beg of round = 42-48-54 ch-spaces. ROUND 22: Work 6 tr in every ch-space = 252-288-324 tr. ROUND 23: Work 1 tr in each of the first 30-36-42 tr, work 30-36-42 ch, skip the next 30-36-42 tr, work 1 tr in each of the next 132-144-156 tr, work 30-36-42 ch, skip the next 30-36-42 tr, work 1 tr in each of the last 30-36-42 tr. (Round beg = mid back of neck.) ROUND 24: Work 1 tr in every tr and 30-36-42 tr in every ch-space, AT THE SAME TIME inc 28-20-12 tr evenly on round = 280-308-336 tr. Piece measures approx. 56-61-66 cm in diameter. ROUND 25: Work 1 dc in first tr, * 5 ch, skip 3 tr, 1 dc in next tr *, repeat from *-* and finish with 1 sl st in first dc = 70-77-84 ch-spaces. ROUND 26: Work sl sts until middle of first ch-space, 1 dc, * work 5 ch, 1 dc in next ch-space *, repeat from *-* and finish with 1 sl st in first dc. ROUND 27: Work sl sts until middle of first ch-space, 1 dc, ** work 5 ch, 1 dc in next ch-space, 5 ch, 1 dc in same ch-space, * work 5 ch, 1 dc in next ch-space *, repeat from *-* 6 times **, repeat from **-** and finish with 1 sl st in first dc = 80-88-96 spaces. ROUND 28: Work as 26th round. ROUND 29: Work sl sts until middle of first ch-space, 1 dc, ** work 5 ch, 1 dc in next ch-space, 5 ch, 1 dc in same ch-space, * work 5 ch, 1 dc in next ch-space *, repeat from *-* 7 times **, repeat from **-** and finish with 1 sl st in first dc = 90-99-108 spaces. ROUND 30: Work as 26th round. Piece now measures approx. 75-80-85 cm in diameter, cut the yarn. Continue working only over 26-28-30 ch-spaces in each side – i.e. do not work over 19-21-24 ch-spaces at top by neck and 19-22-24 ch-spaces at bottom of back. Continue with explanation below left front piece. LEFT FRONT PIECE: = 26-28-30 ch-spaces. Continue as follows: ROW 1: Work sl sts until middle of first ch-space, 1 dc, * work 5 ch, 1 dc in next ch-space *, repeat from *-* and finish with 1 dc in last ch-space = 25-27-29 ch-spaces. Repeat 1st row 12-14-16 times in total (= approx. 12-14-16 cm). 14 ch-spaces remain at the edge of front piece. Cut the yarn. RIGHT FRONT PIECE: Work same way as on left front piece over 26-28-30 ch-spaces in the right side. Cut the yarn. FINISHING EDGE: Work an edge around the entire circle as follows: In every space work 4 dtr + 2 ch + 4 dtr. Fasten off. SLEEVE: Worked top down. Work 45-53-65 ch with Big Merino on hook size 5 mm. Turn and work 1 dc in 9th ch from hook, * 5 ch, skip 3 ch, 1 dc in next ch *, repeat from *-* = 10-12-15 ch-spaces. ROW 1: Work 5 ch, 1 dc in first ch-space, 5 ch, 1 dc in same ch-space, * 5 ch, 1 dc in next ch-space *, repeat from *-* until 1 ch-space remains, work 5 ch, 1 dc in last ch-space = 11-13-16 ch-spaces. Repeat 1st row 4 more times = 15-17-20 ch-spaces. Continue to work as follows: ROW 6: Work 5 ch, 1 dc in first ch-space, * 5 ch, 1 dc in next ch-space *, repeat from *-* until 1 ch-space remains, work 5 ch, 1 dc in last ch-space = 15-17-20 ch-spaces. ROW 7: Work sl sts until middle of first ch-space, * 5 ch, 1 dc in next ch-space *, repeat from *-* until 1 ch-space remains, work 5 ch, 1 dc in last ch-space = 14-16-19 ch-spaces. ROW 8-11: Work as 6th row. ROW 12: Work as 7th row = 13-15-18 ch-spaces. Repeat rows 8 to 12 - i.e. dec 1 ch-space in the side every 5th row - dec alternately in right and left side of sleeve. Repeat these 5 rows 4-5-7 more times (= 6-7-9 dec in total) = 9-10-11 ch-spaces on row. Continue to work as row 1 until piece measures 56 cm in all sizes. Place sleeve double and work tog mid under as follows - work from RS through both layers: Work * 1 dc, 3 ch, skip approx. 1 cm *, repeat from *-*, finish with 1 dc. Fasten off. ASSEMBLY: Work sleeve tog with armhole as follows: Work from RS through both layers: Work * 1 dc, 3 ch, skip approx. 1 cm *, repeat from *-* around the entire armhole. |
|
|
|
|
Have you made this or any other of our designs? Tag your pictures in social media with #dropsdesign so we can see them! Do you need help with this pattern?You'll find tutorial videos, a Comments/Questions area and more by visiting the pattern on garnstudio.com. © 1982-2024 DROPS Design A/S. We reserve all rights. This document, including all its sub-sections, has copyrights. Read more about what you can do with our patterns at the bottom of each pattern on our site. |
|


With over 40 years in knitting and crochet design, DROPS Design offers one of the most extensive collections of free patterns on the internet - translated to 17 languages. As of today we count 304 catalogues and 11422 patterns - 11422 of which are translated into English (UK/cm).
We work hard to bring you the best knitting and crochet have to offer, inspiration and advice as well as great quality yarns at incredible prices! Would you like to use our patterns for other than personal use? You can read what you are allowed to do in the Copyright text at the bottom of all our patterns. Happy crafting!
Comments / Questions (45)
Hallo, ik had graag meer uitleg over de mouwen gehad. Er staat dat ik 53 lussen. Ik ben aan toer 12 geraakt, en als ik deze dubbel vouw, dan is deze te klein, past niet bij de armsgaten, ben ik verkeerde bezig? Mvg Stella
05.04.2014 - 15:15DROPS Design answered:
Helaas, wij kunnen dat vanaf hier niet beoordelen. Wellicht kunt u met uw werk naar een DROPS winkel in de buurt gaan of kan een handige haakster even meekijken of uw werk goed is.
07.04.2014 - 18:53Hallo, ik had graag meer uitleg gehad ivm toer 27+29. Mijn 1st gedacht was : herhaal * x7 en ** x6, maar dan kom niet uit aan 88 lussen. Ik ben 3 maanden geleden beginnen haken, en deze is mijn 1st groot project. Mvg, Stella
25.03.2014 - 19:26DROPS Design answered:
Hoi Lopes. Toer 27 haak je: haak 5 l, 1 v in volgende l-lus, 5 l, 1 v in dezelfde l-lus (= 2 lussen), dan haak je *haak 5 l, 1 v in volgende l-lus* en herhaalt *-* 6 keer. Dat betekent dat heb je **-** één keer gehaakt heb je 8 lussen. Haak deze over de hele toer (11 keer herhalen) en je hebt 88 lussen. Hetzelfde werkwijze voor 29
26.03.2014 - 12:32Så sød en hæklet trøje! Den tror jeg godt jeg kan finde ud af at hækle!
28.01.2014 - 14:26Fabulous! I will reproduce it with a fine cotton yarn to make just a light cover-up.
17.01.2014 - 10:09Love the design. It is lushes in lavender but it would look great in any color. Of course I am partical to the circular design.
13.01.2014 - 22:12Love the pattern. Can hardly wait till I can get the Pattern. My first garment for the Spring.
13.01.2014 - 22:00This is a 'purple crocheted beauty'. I'm in awe!!
06.01.2014 - 19:17Zulema Privat wrote:
Soits a beutiful. Is a fun project to make for the winter- best regards
05.01.2014 - 18:46Vilken vacker kofta,den måste man bara göra. Kul med mycke mönster och att man syns också väcker uppmärksamhet när den används.
31.12.2013 - 09:12Looks like a perfect summer wear
30.12.2013 - 09:21