
Popular categories
Looking for a yarn?


|
||||||||||||||||||||||||||||
Summer Blush |
||||||||||||||||||||||||||||
|
|
||||||||||||||||||||||||||||
Crochet DROPS jacket with lace pattern in ”Cotton Merino”. Size S-XXXL.
DROPS 154-1 |
||||||||||||||||||||||||||||
|
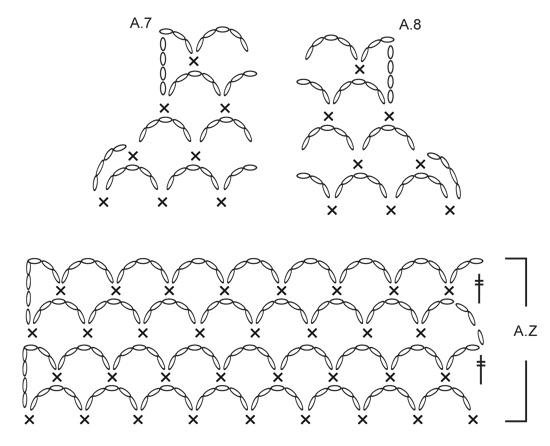
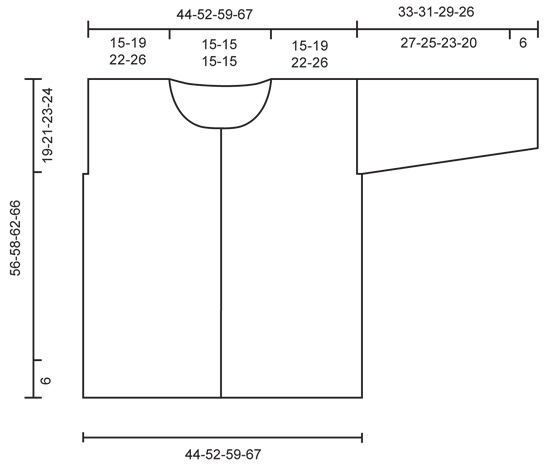
PATTERN: See diagrams A.1-A.8. CROCHET TIP: Ch-spaces will contract more than crochet pattern at the upper part of body. The jacket will thus be naturally rounded without dec in pattern. BUTTONHOLES: Measure from neck edge at the front and sew buttons on left band: SIZE S/M: 1, 7, 14, 21, 28, 35 and 41 cm / ⅜",2¾",5½",8¼",11",13¾",16⅛" SIZE L: 1, 7, 15, 22, 29, 36 and 43 cm / ⅜",2¾",6",8¾",11⅜",14¼",17" SIZE XL/XXL: 1, 8, 15, 21, 27, 33, 40 and 47 cm / ⅜",3⅛",6",8¼",10⅝",13",15¾",18½" SIZE XXXL: 1, 8, 15, 22, 29, 36, 43 and 50 cm / ⅜",3⅛",6",8¾",11⅜",14¼",17",19¾" --------------------------------------------------------- JACKET: Worked in parts, top down and worked tog when finished. LEFT FRONT PIECE: Work 54-66-79-92 ch with Cotton Merino on hook size 3 mm / C. Continue with 1 tr in 4th ch from hook = 2 tr. Continue to work as follows: 1 tr in each of the next 1-6-5-4 ch, * skip ch 1, 1 tr in each of the next 6 ch *, repeat from *-* 7-8-10-12 times in total = 45-56-67-78 tr. (= 1ST ROW in diagrams A.4, A.5 and A.6). Continue to work as follows: ROW 2 (= WS): Work A.6, then work A.5 3-4-5-6 times in total, and finish with A.4. Turn piece. ROW 3: Work A.6, then work A.5 3-4-5-6 times in total, and finish with A.4. Continue back and forth with this pattern, AT THE SAME TIME inc for neck in right side of piece (seen from RS) from 6th row in diagram. When 8th row in diagram has been worked from WS, cut the yarn. Then work 12 loose ch, before working as follows from RS (= 9th row): 1 tr in last tr on 8TH ROW. Continue with pattern according to diagram A.4, A.5 and A.6 as before. When piece measures 19-21-23-24 cm / 7½"-8¼"-9"-9½", insert a marker for armhole in the side, AT THE SAME TIME when A.4, A.5 and A.6 have been worked 1 time vertically, repeat A.x until piece measures approx. 27-29-31-33 cm / 10½"-11½"-12¼"-13". Adjust so that pattern is finished on a row with ch-spaces from WS. Then work ch-spaces with 5 ch in every space as follows from RS: Continue with 1ST ROW in A.Z. Repeat the 4 rows in A.Z until piece measures 51-55-57-61 cm / 10½"-11½"-12¼"-13" in total – Read CROCHET TIP! Work an edge as follows, beg from WS: Beg on 1st row in A.X. Work A.6, A.5 3-4-5-6 times in width, A.4. Continue back and forth until 2nd row in A.X with tr-groups has been worked (i.e. until 6th row in A.X has been worked). Piece measures approx. 56-58-62-66 cm / 22"-22¾"-24½"-26". Fasten off. Put piece aside and work right front piece. RIGHT FRONT PIECE: Beg and work as left front piece but reversed. Adjust according to left front piece. BACK PIECE: First work right shoulder as follows: Work 52-64-77-90 ch with Cotton Merino on hook size 3 mm / C. Cut the yarn and put piece aside. Then work left shoulder as follows: Work 54-66-79-92 ch with Cotton Merino on hook size 3 mm / C. Continue with 1 tr in 4th ch from hook = 2 tr. Continue to work as follows: 1 tr in each of the next 1-6-5-4 ch, * skip ch 1, 1 tr in each of the next 6 ch *, repeat from *-* 7-8-10-12 times in total = 45-56-67-78 tr for left shoulder. Then work 43 LOOSE ch before continuing over right shoulder (i.e. the ch-row): Continue with 1 tr in the first 2 ch on row = 2 tr. Continue to work as follows: 1 tr in each of the next 1-6-5-4 ch, * skip ch 1, 1 tr in each of the next 6 ch *, repeat from *-* 7-8-10-12 times in total = 45-56-67-78 tr for right shoulder. Turn piece (= WS), and work 1 tr in each of the 45-56-67-78 next tr, then work 1 tr in each of the next 43 ch, and finish with 1 tr in each of the next 45-56-67-78 tr = 133-155-177-199 tr. NOTE! This row is the 1st row in diagram A.1, A.2 and A.3. On next row work as follows (= RS): A.1, then work A.2 11-13-15-17 times in total, and finish with A.3. Continue as follows. When piece measures 19-21-23-24 cm / 7½"-8¼"-9"-9½", insert a marker each side to mark armholes, AT THE SAME TIME when A.1, A.2 and A.3 have been worked 1 time vertically, repeat A.Y until piece measures approx. 27-29-31-33 cm / 10½"-11½"-12¼"-13". Adjust pattern according to front pieces. Then work ch-spaces with 5 ch in every space as follows from RS: Continue with 1ST ROW in A.Z. Repeat the 4 rows in A.Z until piece measures 51-55-57-61 cm / 10½"-11½"-12¼"-13" in total – adjust according to front pieces. Work an edge at the bottom of body as on front pieces. Fasten off. Put piece aside. Piece measures approx. 56-58-62-66 cm / 22"-22¾"-24½"-26". Sew shoulder seams on front pieces and back piece tog. SLEEVE: Worked back and forth from body and outwards. ROW 1: Beg at one of the markers, and work ch-spaces along armhole as follows: * ch 5, skip approx. 1½ cm / ½", 1 sc *, repeat from *-* until there are 22-26-27-28 ch-spaces in total between the two markers. Continue with pattern from 2nd row in diagram A.Z, AT THE SAME TIME at beg of the next 2 rows dec 1 ch-space in the side – See diagram A.7 for left side of sleeve, and A.8 for right side of sleeve. 20-24-25-26 ch-spaces remain. Repeat the same dec at beg of the next 2-4-4-4 rows = 18-20-21-22 ch-spaces remain. Continue with ch-spaces as before, AT THE SAME TIME dec as follows: for S/M dec 1 ch-space in each side of sleeve when piece measures 15 cm / 6", and for sizes L - XL/XXL – XXXL dec 1 ch-space in each side of sleeve when piece measures 13-12-11 cm / 5"-4¾"-4½" and 1 ch-space in each side when piece measures 19-18-15 cm / 7½"-7"-6" = 16-16-17-18 ch-spaces remain. Continue until sleeve measures 27-25-23-20 cm / 10½"-9¾"-9"-8" (shorter measurements in the larger sizes because of wider shoulders), and adjust to finish on next to last row in A.Z (i.e. a row with whole ch-spaces in each side of piece). Then work an edge as follows: Beg on 1st row in A.X (= row with ch-spaces, and half ch-spaces in each side of piece) and work this pattern over all ch-spaces at the bottom of sleeve. Continue back and forth until 6th row in A.X has been worked (i.e. 2nd row in with tr-groups). Fasten off. ASSEMBLY: Work underarm seams and side seams in one as follows: 1 sc in front piece, ch 3, 1 sc in back piece, * ch 3, skip approx. 1 cm / ⅜", 1 sc in front piece, ch 3, skip 1 cm / ⅜", 1 sc in back piece *, repeat from *-* and continue the same way for sleeve. NECK EDGE AND BAND: Then work an edge along the band and neck. Beg at the bottom on right front piece, and work as follows: Fasten yarn with one sc, * ch 3, skip 1 cm / ⅜", 1 sc *, repeat from *-* along right band, neck and left band. Sew buttons on to the left band - see explanation above. Button through a hole in right front piece. |
||||||||||||||||||||||||||||
Diagram explanations |
||||||||||||||||||||||||||||
|
||||||||||||||||||||||||||||

|
||||||||||||||||||||||||||||

|
||||||||||||||||||||||||||||
|
||||||||||||||||||||||||||||
|
||||||||||||||||||||||||||||
|
Have you made this or any other of our designs? Tag your pictures in social media with #dropsdesign so we can see them! Do you need help with this pattern?You'll find tutorial videos, a Comments/Questions area and more by visiting the pattern on garnstudio.com. © 1982-2024 DROPS Design A/S. We reserve all rights. This document, including all its sub-sections, has copyrights. Read more about what you can do with our patterns at the bottom of each pattern on our site. |
||||||||||||||||||||||||||||


With over 40 years in knitting and crochet design, DROPS Design offers one of the most extensive collections of free patterns on the internet - translated to 17 languages. As of today we count 304 catalogs and 11422 patterns - 11417 of which are translated into English (US/in).
We work hard to bring you the best knitting and crochet have to offer, inspiration and advice as well as great quality yarns at incredible prices! Would you like to use our patterns for other than personal use? You can read what you are allowed to do in the Copyright text at the bottom of all our patterns. Happy crafting!
Comments / Questions (179)
Hvordan gør jeg når jeg skal spejlvende andet forstykke ? Jeg kan ikke få startet på det :-(
16.08.2014 - 07:43DROPS Design answered:
Vi se se om vi kan lave et spejlvendt diagram, som man kan følge til højre forstykke.
21.08.2014 - 15:08Marisol Cancino wrote:
Donde empiezo? no entiendo :( ya lo he desbaratado 4 veces y no me sale
14.08.2014 - 02:18DROPS Design answered:
Hola Marisol, se comienza realizando el delantero izquierdo luego haremos el derecho y mas tarde la espalda. Finalmente unimos las tres partes. Todas se realizan de arriba abajo. Al empezar el delantero izq realiza tantos p.de cad como requiera tu talla: 54 para la S/M; 66 para la L...etc En la sig fila se trabaja 1 p.a.d. en el 4º p.de cad y se continúa como indica el patrón.
18.08.2014 - 17:05Hallo, ik ben nu bezig met het rechtervoorpand en moet spiegelen, maar ik kom er niet uit. Hoe kan ik na de 2e toer (van rechts naar links in de tekening) eindigen met een lus van 4 lossen en dan vervolgens een ketting van 7 lossen (begin 3e tour)starten in het midden van die lus van 4 lossen en dan tegelijk beginnen met 7 dstk in de vorige lus? Ik snap er niks van.
10.08.2014 - 17:00DROPS Design answered:
Hoi Mirjam. Haak je toer twee van rechts naar links dan eindig je met 7 dstk en 1 v in de laatste boog van 4 l van de vorige toer. Keer en begin dan toer 4 met 7 l (3 l ter vervanging van 1 dstk), 1 loop tussen de 2e en 3e dstk van de vorige toer, 5 l, 1 loop enzovoort.
11.08.2014 - 16:22Hallo, ik ben nu bezig met het rechtervoorpand en moet spiegelen, maar ik kom er niet uit. Hoe kan ik na de 2e toer (van rechts naar links in de tekening) eindigen met een lus van 4 lossen en dan vervolgens een ketting van 7 lossen (begin 3e tour)starten in het midden van die lus van 4 lossen en dan tegelijk beginnen met 7 dstk in de vorige lus? Ik snap er niks van.
10.08.2014 - 17:00Van toer 1 begrijp ik niets! En dan met name : Ga verder en haak als volgt: 1 dstk in elke van de volgende 1-6-5-4 L. Als ik de kleinste maat haak geldt dan voor mij 1? Daarna haak ik verder als in de beschrijving, ik heb dan wel de 45 dstk, haak ik de 2e toer dan kom ik niet uit zoals op de teltekening. De groepjes kloppen dan niet. Wat doe ik fout?
31.07.2014 - 14:13DROPS Design answered:
Het patroon klopt. U haakt 1 keer A.6 over 9 dstk, dan 3 keer A.5 over 11 dstk = 33 dstk, dan A.4 over 3 dstk. 9 +33 + 3 = 45 dstk. We kunnen natuurlijk niet zien wat u verkeerd doet, maar dit geeft u misschien wat houvast.
01.08.2014 - 08:45Voorpand, als ik de beschrijving volg, klopt het aantal dstk, maar het ziet erheen anders uit op het telpatroon bij de eerste twee toeren. Het lijkt erop alsof de lossen die je moet overslaan niet op de goede plek zitten, denkfout?
26.07.2014 - 14:17DROPS Design answered:
De eerst getekende rij in het telpatroon zijn de lossen (geen echte toer, maar de opzet), de tweede rij is de eerste echte toer, de dstk die u direct in de lossen haakt. Daarna gaat het patroon verder volgens de tekeningen, is dat wat niet helemaal duidelijk is? Anders begrijp ik wellicht uw vraag niet goed.
28.07.2014 - 09:39Voorpand: als ik de beschrijving volg klopt het aantal dstk wel, maar ziet het er heel anders uit dan op het telpatroon bij de eerste twee toeren. Het lijkt of de lossen die je moet overslaan op niet op d goede plek zitten. Maak k een denkfout?o
26.07.2014 - 11:50Hallo, auch ich habe Probleme mit dem gegengleichen rechten Vorderteil. Wie ist das zu verstehen?
25.07.2014 - 08:00DROPS Design answered:
Liebe Ulrike, siehe Antwort an Claudia vom 21.7.2014
14.08.2014 - 15:35Ik kwam niet uit het spiegelen voor de rechterkant een heen na de eerste toer de draad afgeknipt en ben aan de goede kant met de 2e toer begonnen dit werkt ook alleen een dagje met afwerken Het is een erg mooi vestje maak hem voor mijn schoondochter
24.07.2014 - 15:14Mitt tips:KÄMPA PÅ!Det löser sig,men att virka spegelvänt var en pärs!Man ska tänka tvärtom,INTE klippa av tråden efter v.8 (lm-raden blir då på slutet på v. istället för början )annars kommer dst med avigan på rätsidan. Hoppas det löser sig, Maria!!
12.07.2014 - 00:37