
Popular categories
Looking for a yarn?


|
||||||||||||||||||||||||||||
Summer Blush |
||||||||||||||||||||||||||||
|
|
||||||||||||||||||||||||||||
Crochet DROPS jacket with lace pattern in ”Cotton Merino”. Size S-XXXL.
DROPS 154-1 |
||||||||||||||||||||||||||||
|
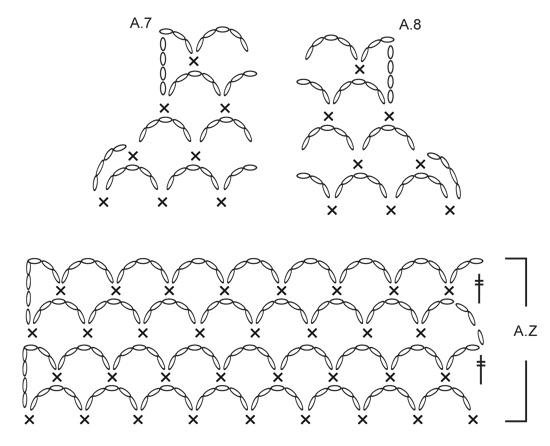
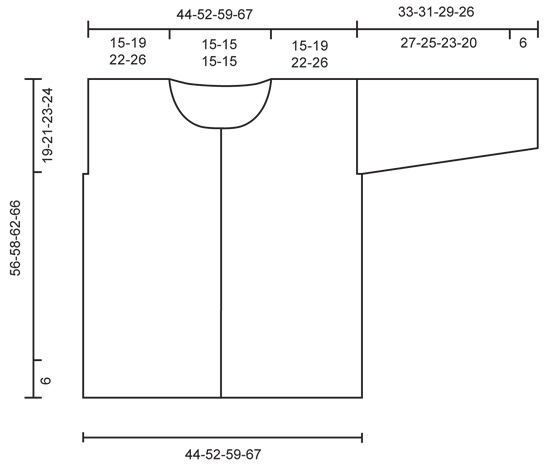
PATTERN: See diagrams A.1-A.8. CROCHET TIP: Ch-spaces will contract more than crochet pattern at the upper part of body. The jacket will thus be naturally rounded without dec in pattern. BUTTONHOLES: Measure from neck edge at the front and sew buttons on left band: SIZE S/M: 1, 7, 14, 21, 28, 35 and 41 cm / ⅜",2¾",5½",8¼",11",13¾",16⅛" SIZE L: 1, 7, 15, 22, 29, 36 and 43 cm / ⅜",2¾",6",8¾",11⅜",14¼",17" SIZE XL/XXL: 1, 8, 15, 21, 27, 33, 40 and 47 cm / ⅜",3⅛",6",8¼",10⅝",13",15¾",18½" SIZE XXXL: 1, 8, 15, 22, 29, 36, 43 and 50 cm / ⅜",3⅛",6",8¾",11⅜",14¼",17",19¾" --------------------------------------------------------- JACKET: Worked in parts, top down and worked tog when finished. LEFT FRONT PIECE: Work 54-66-79-92 ch with Cotton Merino on hook size 3 mm / C. Continue with 1 tr in 4th ch from hook = 2 tr. Continue to work as follows: 1 tr in each of the next 1-6-5-4 ch, * skip ch 1, 1 tr in each of the next 6 ch *, repeat from *-* 7-8-10-12 times in total = 45-56-67-78 tr. (= 1ST ROW in diagrams A.4, A.5 and A.6). Continue to work as follows: ROW 2 (= WS): Work A.6, then work A.5 3-4-5-6 times in total, and finish with A.4. Turn piece. ROW 3: Work A.6, then work A.5 3-4-5-6 times in total, and finish with A.4. Continue back and forth with this pattern, AT THE SAME TIME inc for neck in right side of piece (seen from RS) from 6th row in diagram. When 8th row in diagram has been worked from WS, cut the yarn. Then work 12 loose ch, before working as follows from RS (= 9th row): 1 tr in last tr on 8TH ROW. Continue with pattern according to diagram A.4, A.5 and A.6 as before. When piece measures 19-21-23-24 cm / 7½"-8¼"-9"-9½", insert a marker for armhole in the side, AT THE SAME TIME when A.4, A.5 and A.6 have been worked 1 time vertically, repeat A.x until piece measures approx. 27-29-31-33 cm / 10½"-11½"-12¼"-13". Adjust so that pattern is finished on a row with ch-spaces from WS. Then work ch-spaces with 5 ch in every space as follows from RS: Continue with 1ST ROW in A.Z. Repeat the 4 rows in A.Z until piece measures 51-55-57-61 cm / 10½"-11½"-12¼"-13" in total – Read CROCHET TIP! Work an edge as follows, beg from WS: Beg on 1st row in A.X. Work A.6, A.5 3-4-5-6 times in width, A.4. Continue back and forth until 2nd row in A.X with tr-groups has been worked (i.e. until 6th row in A.X has been worked). Piece measures approx. 56-58-62-66 cm / 22"-22¾"-24½"-26". Fasten off. Put piece aside and work right front piece. RIGHT FRONT PIECE: Beg and work as left front piece but reversed. Adjust according to left front piece. BACK PIECE: First work right shoulder as follows: Work 52-64-77-90 ch with Cotton Merino on hook size 3 mm / C. Cut the yarn and put piece aside. Then work left shoulder as follows: Work 54-66-79-92 ch with Cotton Merino on hook size 3 mm / C. Continue with 1 tr in 4th ch from hook = 2 tr. Continue to work as follows: 1 tr in each of the next 1-6-5-4 ch, * skip ch 1, 1 tr in each of the next 6 ch *, repeat from *-* 7-8-10-12 times in total = 45-56-67-78 tr for left shoulder. Then work 43 LOOSE ch before continuing over right shoulder (i.e. the ch-row): Continue with 1 tr in the first 2 ch on row = 2 tr. Continue to work as follows: 1 tr in each of the next 1-6-5-4 ch, * skip ch 1, 1 tr in each of the next 6 ch *, repeat from *-* 7-8-10-12 times in total = 45-56-67-78 tr for right shoulder. Turn piece (= WS), and work 1 tr in each of the 45-56-67-78 next tr, then work 1 tr in each of the next 43 ch, and finish with 1 tr in each of the next 45-56-67-78 tr = 133-155-177-199 tr. NOTE! This row is the 1st row in diagram A.1, A.2 and A.3. On next row work as follows (= RS): A.1, then work A.2 11-13-15-17 times in total, and finish with A.3. Continue as follows. When piece measures 19-21-23-24 cm / 7½"-8¼"-9"-9½", insert a marker each side to mark armholes, AT THE SAME TIME when A.1, A.2 and A.3 have been worked 1 time vertically, repeat A.Y until piece measures approx. 27-29-31-33 cm / 10½"-11½"-12¼"-13". Adjust pattern according to front pieces. Then work ch-spaces with 5 ch in every space as follows from RS: Continue with 1ST ROW in A.Z. Repeat the 4 rows in A.Z until piece measures 51-55-57-61 cm / 10½"-11½"-12¼"-13" in total – adjust according to front pieces. Work an edge at the bottom of body as on front pieces. Fasten off. Put piece aside. Piece measures approx. 56-58-62-66 cm / 22"-22¾"-24½"-26". Sew shoulder seams on front pieces and back piece tog. SLEEVE: Worked back and forth from body and outwards. ROW 1: Beg at one of the markers, and work ch-spaces along armhole as follows: * ch 5, skip approx. 1½ cm / ½", 1 sc *, repeat from *-* until there are 22-26-27-28 ch-spaces in total between the two markers. Continue with pattern from 2nd row in diagram A.Z, AT THE SAME TIME at beg of the next 2 rows dec 1 ch-space in the side – See diagram A.7 for left side of sleeve, and A.8 for right side of sleeve. 20-24-25-26 ch-spaces remain. Repeat the same dec at beg of the next 2-4-4-4 rows = 18-20-21-22 ch-spaces remain. Continue with ch-spaces as before, AT THE SAME TIME dec as follows: for S/M dec 1 ch-space in each side of sleeve when piece measures 15 cm / 6", and for sizes L - XL/XXL – XXXL dec 1 ch-space in each side of sleeve when piece measures 13-12-11 cm / 5"-4¾"-4½" and 1 ch-space in each side when piece measures 19-18-15 cm / 7½"-7"-6" = 16-16-17-18 ch-spaces remain. Continue until sleeve measures 27-25-23-20 cm / 10½"-9¾"-9"-8" (shorter measurements in the larger sizes because of wider shoulders), and adjust to finish on next to last row in A.Z (i.e. a row with whole ch-spaces in each side of piece). Then work an edge as follows: Beg on 1st row in A.X (= row with ch-spaces, and half ch-spaces in each side of piece) and work this pattern over all ch-spaces at the bottom of sleeve. Continue back and forth until 6th row in A.X has been worked (i.e. 2nd row in with tr-groups). Fasten off. ASSEMBLY: Work underarm seams and side seams in one as follows: 1 sc in front piece, ch 3, 1 sc in back piece, * ch 3, skip approx. 1 cm / ⅜", 1 sc in front piece, ch 3, skip 1 cm / ⅜", 1 sc in back piece *, repeat from *-* and continue the same way for sleeve. NECK EDGE AND BAND: Then work an edge along the band and neck. Beg at the bottom on right front piece, and work as follows: Fasten yarn with one sc, * ch 3, skip 1 cm / ⅜", 1 sc *, repeat from *-* along right band, neck and left band. Sew buttons on to the left band - see explanation above. Button through a hole in right front piece. |
||||||||||||||||||||||||||||
Diagram explanations |
||||||||||||||||||||||||||||
|
||||||||||||||||||||||||||||

|
||||||||||||||||||||||||||||

|
||||||||||||||||||||||||||||
|
||||||||||||||||||||||||||||
|
||||||||||||||||||||||||||||
|
Have you made this or any other of our designs? Tag your pictures in social media with #dropsdesign so we can see them! Do you need help with this pattern?You'll find tutorial videos, a Comments/Questions area and more by visiting the pattern on garnstudio.com. © 1982-2024 DROPS Design A/S. We reserve all rights. This document, including all its sub-sections, has copyrights. Read more about what you can do with our patterns at the bottom of each pattern on our site. |
||||||||||||||||||||||||||||


With over 40 years in knitting and crochet design, DROPS Design offers one of the most extensive collections of free patterns on the internet - translated to 17 languages. As of today we count 304 catalogs and 11422 patterns - 11417 of which are translated into English (US/in).
We work hard to bring you the best knitting and crochet have to offer, inspiration and advice as well as great quality yarns at incredible prices! Would you like to use our patterns for other than personal use? You can read what you are allowed to do in the Copyright text at the bottom of all our patterns. Happy crafting!
Comments / Questions (179)
Het linkerpand gaat nu goed. Ik begin aan het rechterpand. Ik las hiervoor al dat het patroon gespiegeld moet worden. Ik ben begonnen en de goede kant komt achter. Ik pieker me suf. Hoe kan ik beginnen met een dubbelstokje. Wat dat gebeurt als ik het spiegel. Ik hoop dat iemand mij wil helpen!
04.06.2014 - 17:26DROPS Design answered:
Hoi Mariken. Als je een toer moet beginnen met een stokje, dubbelstokje enzovoort, dan vervang je altijd deze door 3 l (= 1 stk) of 4 l (= 1 dstk).
11.06.2014 - 19:33Vedk. oppskrift 1 i hefte 154. Eg har fått spm frå ein av kundane våre om denne oppskrifta. Ho har prøvd å lage denne jakka, men kjem ikkje lenger enn til og med 6. omg. då stemmer ikkje diagrammet med arbeidet. Ho har prøvd fleire gangar. Eg har og prøvd og kjem like langt. På slutten av 7. omg "manglar" siste lm.boge og eg får ikkje hekla dei siste 4 dbl.st. Er det feil i diagrammet eller mønsteret? Kan de sjå på det og komme tilbake til meg med forklaring/retting?
02.06.2014 - 11:29DROPS Design answered:
Hej, se rettelse under opskriften. God fornøjelse!
02.09.2014 - 11:30Goedendag, excuses voor het 2x plaatsen vh zelfde bericht. Ik ben ondertussen met 2,5 bezig en Cotton Merino. Ik heb gehaakt volgens het patroon en heb dus 17 toeren gehaakt. In de 18e toer weet ik niet hoe ik moet eindigen. 2 lossen en een dubbel stokje levert niet de juiste rechte bies op. Ik hoop dat iemand mij kan helpen. Vriendelijke groeten, Mariken
30.05.2014 - 18:03DROPS Design answered:
Hoi Mariken. Je moet steeds de teltekeningen volgen zoals beschreven in het patroon. Op de teltekening kan je ook zien hoe je een toer moet eindigen. Als het nog niet lukt, moet je even aangeven hoe de toer gehaakt wordt (welke toer je haakt op de teltekening).
20.06.2014 - 12:01Zo graag wil ik deze maken. Ben eerst begonnen met Cotton Light. Met naald 3, met S/M. Het wordt te breed. Dus naald 2,5. Wordt nog steeds te breed. Een "het bobbelt". Kan dat goed komen? Toch maar Cotton Merino gekocht. Mooi spul! Weer naald 3 begonnen. Het moet 15cm breed zijn, het is minstens 16cm. Nu maar weer met naald 2,5 begonnen. Lijkt even breed te zijn als met naald 3. Is mijn eerste haakwerk met een vest. Wil graag dat het mooi en goed wordt... Wat nu?
29.05.2014 - 14:26DROPS Design answered:
Hoi Mariken. Voordat je begint met het haken of breien van een project is het een goed idee om eerst een proeflapje te haken om de stekenverhouding te controlleren, in dit geval: 3 herhalingen van A.5 = 11 cm breed. Kies de naald die deze afmeting geeft. Was ook altijd je proeflapje voor het meten voor het beste resultaat. Klopt je stekenverhouding, zullen de afmetingen ook kloppen
20.06.2014 - 11:59Waar moet de vaste komen na de 5 losse?
23.05.2014 - 08:16DROPS Design answered:
Hoi Marit. Welke 5 losse bedoel je (waar in het patroon ben je)?
23.05.2014 - 10:00Goedemorgen, ik snap helemaal niets van het telpatroon vanaf toer 5 deze toer gaat van rechts naar links als ik het goed heb?
23.05.2014 - 08:15DROPS Design answered:
Hoi Marit. Ja, als je haakt op de goede kant, dan haak je van rechts naar links. Kijk ook hier hoe je onze telpatronen moet lezen.
23.05.2014 - 09:59Dank je wel voor de reactie. Ik ben er inmiddels zelf uitgekomen.
19.05.2014 - 17:55Undrar vad S till XXXL motsvarar för storlekar och bröstvidd.
19.05.2014 - 12:42DROPS Design answered:
Hej Maud. Se mit svar til dig paa dit forrige spörgsmaal.
19.05.2014 - 13:26Hallo Drops Design, sind Sie sicher,dass man das mit einer Nadel Nr. 3 häkeln soll? Die ist doch viel zu dünn für die Wolle. Ich probierte mal eine Maschenprobe mit Nr. 4, das kommt mir passender vor. Aber jedenfalls danke für dieses tolle Modell! Viele Grüße, Christine
19.05.2014 - 11:52DROPS Design answered:
Liebe Christine, die Nadelstärke ist letztendlich immer nur ein Vorschlag, Sie müssen für sich selbst herausfinden, mit welcher Nadelstärke Sie die Maschenprobe erreichen. Wenn sie bei Ihnen mit 4 stimmt, dann ist das die passende Nadel. Häkelt man lockerer, reicht Nr. 3, auch bei diesem Garn, die Nadel ist dafür nicht zu dünn. Gutes Gelingen!
19.05.2014 - 14:09Hej, Den er SÅ fin denne her - men jeg forstår ikke mønsteret. Jeg er i gang med venstre forstykke. Jeg kommer op til rækken før man skal hækle 4 dbl stg i den sidste bue. Er det muligt for Jer at forklare mig det? Og er det muligt at tage et nærbillede af øverste del af jakken på modellen, så man kan se mønsteret? Vil I evt skrive mønsteret pr række? Det ville bare være super fantastisk... men tænker, at det nok er et stort arbejde. Kh Hanne
19.05.2014 - 10:34DROPS Design answered:
Hej Hanne. Jeg skal pröve at hjaelpe Jeg gaar ud fra du mener omg 7 i diagram A.4/5/6? Du afslutter med 4 dbl-st om den sidste bue med 6 lm. Vend, haekl 5 lm, 1 loop mellem de 4 dbl-st fra slutningen af raekken, 6 lm, 1 loop mellem den 2. og 3. sidste dbl-st fra gruppen med 7 dbl-st, osv. For enden af denne omgang har du saa lavet 1 lm-bue mere (taget ud langs forkanten). Haaber det er tydeligt saadan, og jeg skal spörge om vi har et naerbillede af mönstret. God weekend.
23.05.2014 - 16:09