DROPS Paris
DROPS Paris
100% Cotton
from 1.60 $ /50g
Get the yarn to make this pattern from 14.40$.

The yarn cost is calculated from the pattern’s smallest size and the yarn’s cheapest product type. Looking for an even better price? You might find it on the DROPS Deals!

DROPS SS24

Long Beach

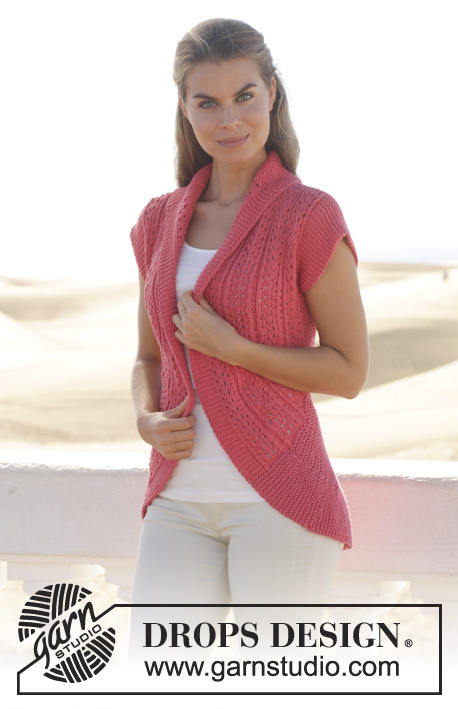
Knitted DROPS jumper with lace pattern, worked top down in ”Paris”. Size: S - XXXL.

DROPS 154-2
DROPS design: Pattern no w-529
Yarn group C or A + A
-----------------------------------------------------------
Size: S - M - L - XL - XXL - XXXL
Finished measurements:
Bust: 96-104-114-124-134-150 cm / 37¾"-41"-45"-48¾"-52¾"-59"
Full length: 61-63-65-68-70-72 cm / 24"-24¾"-25½"-26¾"-27½"-28⅜"

Materials:
DROPS PARIS from Garnstudio
450-500-550-600-650-700 g color no 01, apricot

DROPS DOUBLE POINTED NEEDLES AND CIRCULAR NEEDLE (80 cm / 32") SIZE 5.5 mm / US 9 – or size needed to get 13 sts of pattern A.1 = width 10 cm / 4". Or 15 sts x 21 rows in stockinette st = 4" x 4" (10 x 10 cm).
DROPS CIRCULAR NEEDLE (40 cm / 16") SIZE 5.5 mm / US 9 – for neck edge.

-------------------------------------------------------

Alternative Yarn – See how to change yarns here
Yarn Groups A to F – Use the same pattern and change the yarn here
Yarn usage using an alternative yarn – Use our yarn converter here

-------------------------------------------------------

DROPS Paris
DROPS Paris
100% Cotton
from 1.60 $ /50g
Get the yarn to make this pattern from 14.40$.

The yarn cost is calculated from the pattern’s smallest size and the yarn’s cheapest product type. Looking for an even better price? You might find it on the DROPS Deals!

Pattern instructions

NOTE: This pattern is written in American English. All measurements in charts are in cm. For conversion from inches to cm - click here. There are different terms for crocheting in American and British English. If this pattern includes crochet, click for "crochet terms" here. For this pattern in British English, please click here.
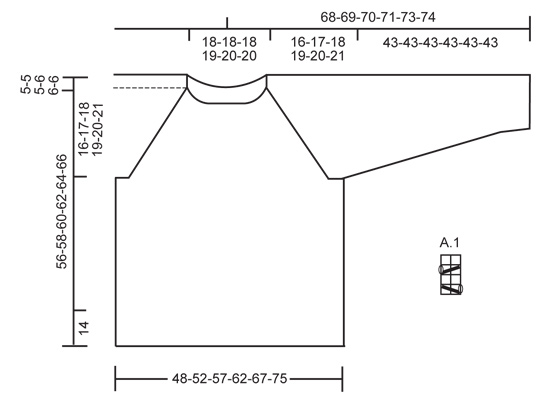
GARTER ST (in the round on circular needle/double pointed needles):
* K 1 round and P 1 round *, repeat from *-*. 1 ridge = 2 rounds.

GARTER ST (back and forth on needle):
K all rows.

PATTERN:
See diagram A.1. The diagram shows all rows in pattern seen from RS.

RAGLAN:
Inc 8 sts on every round with inc. Inc on each side of the 3 sts in stockinette st which separate back piece, front piece and sleeves. Inc by making 1 YO, K YO twisted on next row to avoid holes. Work the inc sts in the pattern A.1:
Inc every 2nd and 3rd round 20-20-22-20-22-14 times in total.
Then work and inc differently on sleeves and front/back piece in the different sizes as follows:
SIZE S: Work 3 more rounds without inc = 232 sts on needle.
SIZE M: Inc every round on front/back piece 3 times and inc on 3rd round 1 time on sleeves. Work 2 rounds without inc = 248 sts on needle.
SIZE L: Inc every round 4 times on front/back piece, no inc on sleeves = 264 sts on needle.
SIZE XL: Inc every round 9 times on front/back piece and inc every 3rd round 3 times on sleeves = 288 sts on needle.
SIZE XXL: Inc every round 9 times on front/back piece and inc every 3rd round 2 times on sleeves = 304 sts on needle.
SIZE XXXL: Inc every round 23 times on front/back piece and inc every other round 11 times on sleeves = 332 sts on needle.

DECREASE TIP:
Dec on each side of 3 sts in stockinette st mid under sleeve.
Dec as follows before sts: Work until 2 sts remain before the 3 sts, slip 1 st, K 1, psso.
Dec as follows after sts: K 2 tog.
----------------------------------------------------------

JUMPER:
The piece is worked top down. Cast on 84-84-84-92-96-96 sts on circular needle size 5.5 and work 2 ridges in the round.
K 1 round and dec 12 sts evenly in all sizes = 72-72-72-80-84-84 sts. P 1 round - AT THE SAME TIME insert markers in the piece as follows: 1st marker at beg of round (= beg of back piece), 2nd marker after 18-18-18-18-20-20 sts (= end of back piece), 3rd marker after 3 sts, 4th marker after 12-12-12-16-16-16 sts (= left sleeve), 5th marker after 3 sts, 6th marker after 18-18-18-18-20-20 sts (= end of front piece), 7th marker after 3 sts, 8th marker after 12-12-12-16-16-16 sts (= right sleeve).

Then work according to diagram A.1 over front piece, back piece and sleeves AT THE SAME TIME inc for RAGLAN - see explanation above on each side of the 3 sts in stockinette st that separate the sleeves, front and back piece.

After raglan inc there are 232-248-264-288-304-332 sts on needle. On next round work A.1 over the 58-64-70-76-82-94 sts on back piece, bind off 3 sts, work A.1 over the 52-54-56-62-64-66 sts on right sleeve, slip sts from sleeve on a stitch holder. Bind off 3 sts, work A.1 over the 58-64-70-76-82-94 sts on front piece and bind off 3 sts, work A.1 over the 52-54-56-62-64-66 sts on left sleeve, slip sts from sleeve on a stitch holder and bind off 3 sts. Then work body and sleeves separately.

BODY: Work next row as follows: A.1 over the next 58-64-70-76-82-94 sts (= back piece), cast on 4 new sts under right sleeve, A.1 over the
next 58-64-70-76-82-94 sts (= front piece) and cast on 4 new sts under left sleeve = 124-136-148-160-172-196 sts. insert marker in the middle of the 4 new sts under each sleeve and move these when working. Put piece tog and work in the round according to A.1 over all sts until piece measures 41-43-45-47-49-51 cm / 16⅛"-17"-17¾"-18½"-19¼"-20". Work 2 ridges over 4 sts on each side of markers and A.1 over the other sts as before. (= 8 sts in each side in garter st). On next round divide the piece at the markers and work front and back piece separately until finished measurements with 4 sts in garter st in each side = 62-68-74-80-86-98 sts on needle. Work until piece measures 54-56-58-60-62-64 cm / 21¼"-22"-22¾"-23⅝"-24⅜"-25¼" and work 2 ridges. K 1 row while AT THE SAME TIME inc 10-10-12-14-14-14 sts evenly = 72-78-86-94-100-112 sts. K 1 row and loosely bind off. Piece measures approx. 56-58-60-62-64-66 cm / 22"-22¾"-23⅝"-24⅜"-25¼"-26".


SLEEVE:
Slip sts for sleeve back on needle = 52-54-56-62-64-66 sts, cast on 3 new sts and put piece tog and continue in the round on circular needle/double pointed needles = 55-57-59-65-67-69 sts. Work the 3 new sts under sleeve in stockinette st and work the other sts according to diagram A.1 as before. Insert a marker mid under sleeve, measure piece from here. When piece measures 2 cm / ¾", dec 1 st on each side of the 3 sts in stockinette st mid under sleeve - READ DECREASE TIP ABOVE, repeat dec every 2½-2-2-2-1½-1½ cm / ⅞"-¾"-¾"-¾"-½"½" 15-16-16-18-19-19 more times (16-17-17-19-20-20 dec in total ) = 23-23-25-27-27-29 sts. Work until piece measures approx. 41 cm / 16" from marker, K 1 round, P 1 round, K 1 round and P 1 round. K 1 round while AT THE SAME TIME inc 4 sts evenly = 27-27-29-31-31-33 sts, P 1 round and loosely bind off. Piece measures approx. 43 cm / 17" (same length for all sizes because of wider body in the larger sizes).

ASSEMBLY:
Sew the openings under sleeves.

This pattern has been corrected.

Updated online: 03.05.2022
ASSEMBLY: Sew the openings under sleeves.

Diagram

All measurements in charts are in cm.

symbols = K from RS or P from WS
symbols = 1 YO between 2 sts
symbols = slip 1 st as if to K, K 1, psso
symbols = K 2 tog
diagram
Do you have a question? See a list of frequently asked questions (FAQ)

Knitting tension is what determines the final measurements of your work, and is usually measured per 10 x 10 cm. It is provided like so: number of stitches in width x number of rows in height - eg: 19 stitches x 26 rows = 10 x 10 cm.

The knitting tension is very individual; some people knit/crochet loosely while others work tightly. You adjust the knitting tension with the needle size, which is why the suggested needle size only serve as a guide! You need to adjust this (up or down) to ensure that YOUR knitting tension matches the knitting tension provided in the pattern. If you work with a different knitting tension than provided you will have a different yarn consumption, and your work will have different measurements than what the pattern suggests.

The knitting tension also determines which yarns can replace each other. As long as you achieve the same knitting tension you can replace one yarn with another.

See DROPS lesson: How to measure your tension/gauge

See DROPS video: How to make a gauge tension swatch

The required amount of yarn is provided in grams, eg: 450 g. To calculate how many balls you’ll need you first need to know how many grams are in 1 ball (25g, 50g or 100g). This information is available if you click on the individual yarn quality on our pages. Divide the amount required with the amount of each ball. For example, if each ball is 50g (the most common amount), the calculation will be as follows: 450 / 50 = 9 balls.

The important thing when changing from one yarn to another is that the knitting/crochet tension remains the same. This is so that the measurements of the finished piece will be the same as on the sketch provided. It is easier to achieve the same knitting tension using yarns from the same yarn group. It is also possible to work with multiple strands of a thinner yarn to achieve the knitting tension of a thicker one. Please try our yarn converter. We recommend you to always work a test swatch.

Please NOTE: when changing yarn the garment might have a different look and feel to the garment in the photo, due to individual properties and qualities of each yarn.

See DROPS lesson: Can I use a different yarn than the one mentioned in the pattern?

All our yarns are categorised into yarn groups (from A to F) according to thickness and knitting tension – group A contains the thinnest yarns and group F the thickest. This makes it easier for you to find alternative yarns to our patterns, should you wish to switch yarn. All yarns within the same group have a similar knitting tension and can easily replace each other. However, different yarn qualities have different structures and properties which will give the finished work a unique look and feel.

Click here for an overview of the yarns in each yarn group

At the top of all our patterns you’ll find a link to our yarn converter, which is a helpful tool should you wish to use a different yarn than suggested. By filling in the yarn quality you wish to replace, the amount (in your size) and number of strands, the converter will present good alternative yarns with the same knitting tension. Additionally it will tell you how much you’ll require in the new qualities and whether you’ll need to work with multiple strands. Most skeins are 50g (some are 25g or 100g).

If the pattern is worked with multiple colours, every colour will have to be converted separately. Similarly, if the pattern is worked with several strands of different yarns (for example 1 strand Alpaca and 1 strand Kid-Silk) you will have to find alternatives for each, individually.

Click here to see our yarn converter

Since different yarns have different qualities and textures we have chosen to keep the original yarn in our patterns. However, you can easily find options among our available qualities by using our yarn converter, or simply pick a yarn from the same yarn group.

It is possible that some retailers still have discontinued yarns in stock, or that someone has a few skeins at home that they would like to find patterns for.

The yarn converter will provide both alternative yarn as well as required amount in the new quality.

If you think it's hard to decide what size to make, it can be a good idea to measure a garment you own already and like the size of. Then you can pick the size by comparing those measures with the ones available in the pattern's size chart.

You'll find the size chart at the bottom of the pattern.

See DROPS lesson: How to read size chart

The needle size provided in the pattern serves only as a guide, the important thing is to follow the knitting tension. And since knitting tension is very individual, you will have to adjust the needle size to ensure that YOUR tension is the same as in the pattern – maybe you’ll have to adjust 1, or even 2 needle sizes, up or down to achieve the correct tension. For this, we recommend that you work test swatches.

Should you work with a different knitting tension than the one provided, the measurements of the finished garment might deviate from the measurement sketch.

See DROPS lesson: How to measure your tension/gauge

See DROPS video: How to make a gauge tension swatch

Working a garment top-down provides more flexibility and room for personal adjustment. For example it is easier to try the garment on while working, as well as making adjustments to length of yoke and shoulder caps.

The instructions are carefully explaining every step, in the correct order. Diagrams are adjusted to the knitting direction and are worked as usual.

The diagram depicts all rows/rounds, and every stitch seen from the right side. It is read from bottom to top, from right to left. 1 square = 1 stitch.

When working back and forth, every other row is worked from the right side and every other row is worked from the wrong side. When working from the wrong side, the diagram will have to be worked reversed: from left to right, knit stitches are purled, purl stitches are knit etc.

When working in the round every round is worked from the right side and the diagram are worked from right to left on all rounds.

See DROPS lesson: How to read knitting diagrams

The diagram depicts all rows/rounds, and every stitch seen from the right side. It is worked from bottom to top, from right to left.

When working back and forth every other row is worked from the right side: from right to left and every other row is worked from the wrong side: from left to right.

When working in the round, every row in the diagram are worked from the right side, from right to left.

When working a circular diagram you start in the middle and work your way outwards, counter clockwise, row by row.

The rows usually start with a given number of chain stitches (equivalent to the height of the following stitch), this will either be depicted in the diagram or explained in the pattern.

See DROPS lesson: How to read crochet diagrams

Instructions for working several diagrams after each other on the same row/round, will often be written like so: “work A.1, A.2, A.3 a total of 0-0-2-3-4 times". This means you work A.1 once, then A.2 is worked once, and A.3 is repeated (in width) the number of times provided for your size – in this case like so: S = 0 times, M = 0 times, L=2 times, XL= 3 times and XXL = 4 times.

The diagrams are worked as usual: begin with the first row in A.1, then work the first row in A.2 etc.

See DROPS lesson: How to read knitting diagrams

See DROPS lesson: How to read crochet diagrams

The total width of the garment (from wrist-to-wrist) will be larger in the larger sizes, despite the actual sleeves being shorter. The larger sizes have longer sleeve caps and wider shoulders, so there will be a good fit in all sizes.

The measurement sketch/schematic drawing provides information regarding the full length of the garment. If it’s a jumper or a jacket the length is measured from the highest point on the shoulder (usually closest to the neckline), and straight down to the bottom of the garment. It is NOT measured from the tip of shoulder. Similarly, the length of yoke is measured from the highest point on the shoulder and down to where yoke is split into body and sleeves.

See DROPS lesson: How to read a schematic drawing

Diagrams are often repeated on the round or in height. 1 repeat is the diagram the way it appears in the pattern. If it says to work 5 repeats of A.1 in the round, then you work A.1 a total of 5 times after/next to each other in the round. If it says to work 2 repeats of A.1 vertically/in height you work the entire diagram once, then begin again at the start and work the entire diagram one more time.

Chain stitches are slightly narrower than other stitches and to avoid working the cast-on edge too tight, we simply chain more stitches to begin with. The stitch count will be adjusted on the following row to fit the pattern and measurement sketch.

The rib edge is more elastic and will contract slightly compared to, for example, stocking stitch. By increasing before the rib edge, you avoid a visible difference in width between the rib edge and the rest of the body.

It’s very easy to cast off too tightly, and by making yarn overs while casting off (and simultaneously casting these off) you avoid a too tight cast off edge.

See DROPS video: How to bind off with yarn overs (yo)

To achieve an even increase (or decrease) you can increase on, for example: every 3rd and 4th row alternately, like so: work 2 rows and increase on the 3rd row, work 3 rows and increase on the 4th. Repeat this until the increase is complete.

See DROPS lesson: Increase or decrease 1 st on every 3rd and 4th row alternately

Should you prefer to work in the round instead of back and forth, you may of course adjust the pattern. You’ll need to add steeks mid-front (usually 5 stitches), and follow the instructions. When you would normally turn and work from the wrong side, simply work across the steek and continue in the round. At the end you’ll cut the piece open, pick up stitches to work bands, and cover the cut edges.

See DROPS video: How to knit steeks and cut open

Should you prefer to work back and forth instead of in the round, you may of course adjust the pattern so you work the pieces separately and then assemble them at the end. Divide the stitches for the body in 2, add 1 edge stitch in each side (for sewing) and work the front and back pieces separately.

See DROPS lesson: Can I adapt a pattern for circular needles into straight needles?

Pattern repeats can vary slightly in the different sizes, in order to get the correct proportions. If you’re not working the exact same size as the garment in the photo, yours might deviate slightly. This has been carefully developed and adjusted so that the complete impression of the garment is the same in all sizes.

Make sure to follow instructions and diagrams for your size!

If you have found a pattern you like which is available in women’s size it’s not very difficult to convert it to men’s size. The biggest difference will be the length of sleeves and body. Start working on the women size that you think would fit across the chest. The additional length will be worked right before you cast off for the armhole/sleeve cap. If the pattern is worked top-down you can add the length right after the armhole or before the first decrease on sleeve.

Regarding additional yarn amount, this will depend on how much length you add, but it is better with a skein too many than too few.

All yarns will have excess fibres (from production) that might come off as lint or shedding. Brushed yarns (ie hairier yarns) have more of these loose, excess fibres, causing more shedding.

Shedding also depends on what is worn under or over the garment, and whether this pulls at the yarn fibres. It’s therefore not possible to guarantee that there will be no shedding

Below are some tips on how to get the best result when working with hairier yarns:

1. When the garment is finished (before you wash it) shake it vigorously so the looser hairs come off. NOTE: do NOT use a lint roller, brush or any method that pulls at the yarn.

2. Place the garment in a plastic bag and put it in your freezer - the temperature will cause the fibres to become less attached to each other, and excess fibres will come off easier.

3. Leave in the freezer for a few hours before taking it out and shaking it again.

4. Wash the garment according to the instructions on the yarn label.

Pilling is a natural process that happens to even the most exclusive of fibers. It's a natural sign of wear and tear that is hard to avoid, and that is most visible in high friction areas of your garment like a sweater's arms and cuffs.

You can make your garment look as new by removing the pilling, using a fabric comb or a pill/lint remover.

Still can't find the answer you need? Then scroll down and leave your question so one of our experts can try to help you. This will be done normally within 5 to 10 working days.
In the meantime, you can read the questions and answers that others have left to this pattern or join the DROPS Workshop on Facebook to get help from fellow knitters/crocheters!

You might also like...

Post a comment to pattern DROPS 154-2

We would love to hear what you have to say about this pattern!

If you want to leave a question, please make sure you select the correct category in the form below, to speed up the answering process. Required fields are marked *.

Comments / Questions (71)

country flag Carla Camilloni wrote:

Aiuto! È la prima volta che uso i ferri circolari e quindi che inizio un maglione dal collo. Nelle spiegazioni non mi dice quando è come iniziare con i ferri a doppia punta. Mi aiutate? Grazie

22.10.2014 - 19:01

DROPS Design answered:

Buonasera Carla, solitamente i ferri a doppia punta vengono utilizzati per le maniche, per il collo si inizia con i ferri circolari da 40 cm e quando aumenta il n° di m si passa al cavo più lungo. Può iniziare anche con i ferri a doppia punta ma avrà un n° elevato di m su ogni f. Ci riscriva se ha altri dubbi. Buon lavoro!!!

22.10.2014 - 22:12

country flag Carla wrote:

Buongiorno come ci si regola con le misure? Ossia, una M a che taglia europea corrisponde? Grazie Carla Camilloni

07.10.2014 - 11:37

DROPS Design answered:

Buongiorno Carla. Dopo le spiegazioni del modello, trova il grafico con riportate le misure in cm. Confrontando queste misure con quelle di un suo capo analogo della misura corretta, riesce ad individuare quale taglia seguire. Buon lavoro!

07.10.2014 - 12:09

country flag Dajana wrote:

Hallo, wo genau nehme ich die 8 maschen zu, bei den 3 glatt rechts maschen..weil wenn ich ja am ende zunehme, habe ich ja gleich zwei Umschläge am anfang.

03.09.2014 - 21:27

DROPS Design answered:

Sie nehmen jeweils rechts und links von den 3 M je 1 M zu, die 3 M befinden sich also zwischen 2 Zunahme-Umschlägen. Es stimmt, dass an einigen Stellen der Zunahme-Umschlag auf den Umschlag von A.1 trifft, Sie haben dann also 2 Umschläge nacheinander. Das macht aber nichts, denn den einen Umschlag von A.1 stricken Sie in der nächsten Rd normal rechts ab, den Zunahme-Umschlag stricken Sie hingegen re verschränkt.

09.09.2014 - 22:15

country flag Anja wrote:

Hatte mich ebenfalss gewundert, kenne ich sonst von Baumwolle auch nicht. An einem Accessoire kann es nichtliegen, meine Schwester hatte den Puli mehrmals nur mit einem Shirt darunter an, er fusselt sogar auf den Bürostuhl.

03.09.2014 - 10:54

country flag Anja wrote:

Pulli ist fertig und sehr schön geworden. Ich habe ihn für meine Schwester gestrickt, die sich sehr gefreut hat, mir aber nun mitteilte, daß der Pulli sehr fusseln würde. Ich habe die angegebene Wolle (Drops Paris) verwendet, wie kann das passieren und was kann man daggegen tun?

24.08.2014 - 13:58

DROPS Design answered:

Liebe Anja, Ihre Rückmeldung hat uns sehr erstaunt. Paris ist seit Jahrzehnten im Sortiment und wir hatten nie eine Rückmeldung über Fusseln. Glatte Baumwollgarns fusseln eingetlich nicht, vielleicht kamen die Fusseln von einem Accessoire?

02.09.2014 - 08:22

country flag Anja wrote:

Unten stehende Frage hat sich erledigt. Wenn man anfängt zu stricken erübrigt sich die Frage :-)

28.07.2014 - 16:54

country flag Anja wrote:

"In jeder 2. und 3. Runde insgesamt 20-20-22-20-22-14 x aufn. " Frage: Bezieht sich die 2. und 3. Runde auf das Muster A1? Wenn ja, nehme ich bei der 1. und 4. Runde also keine Maschen auf, sondern nur 2 Reihen hintereinander Aufnahmen und 2 keine Aufnahmen?

26.07.2014 - 22:15

country flag SUSAN LOUDON wrote:

For pattern # 154-2:Confused with the increase instructions..it says increase for Raglan.. " increase every round 8 sts", but then continues on to say"increase every 2nd and 3rd round,22 times in total" . So which is it? every round or every 2nd or 3rd? Then, later, on the sleeves , it says to increase every rnd 9 times for the front and back, and every 3rd rnd 2 times on sleeves. WHERE DO I DO THOSE INCREASES? It does''t say at what marker that I'd do the YO... Thanks!.. Susan

18.06.2014 - 08:20

DROPS Design answered:

Dear Mrs London, you increase for raglan a total of 8 sts per inc round. You inc first every 2nd and 3rd row a total of 22 times on body and sleeve. Then dec will not be the same anymore for body and sleeve: for body you inc every round a total of 9 times, and for sleeves every 3rd round a total of 2 times. Happy knitting!

18.06.2014 - 08:52

country flag Jkadmaer wrote:

Ik kan niet printen. Wat is de suggestie?

12.06.2014 - 09:32

DROPS Design answered:

Hoi Jkadmaer. Er is geen fout op de pagina. Dus als je de instructies volgt: druk op AFDRUKKEN: PATROON, dan volgt een pop-up met een advertentie, druk nogmaals op Patroon afdrukken (rechts aan) en de printversie van het patroon zou verschijnen. Kies printer en print. Verschijnt dit niet, dan ligt het aan uw pc/printerinstellingen, en hier kan ik u helaas niet mee helpen.

12.06.2014 - 19:04

country flag Alice Shaw wrote:

DROPS Pattern 154-2 has no Graph "A-1" to show the stitches. There should be five pages, but there are only four. Can I get the stitch pattern? Thanks for the great wool sale -- I buy from Nordic Mart in CA. and I love your patterns!

29.05.2014 - 22:42

Karin answered:

Graph is beneath the sleeve in the diagram.

30.05.2014 - 08:47