DROPS Paris
DROPS Paris
100% Cotton
from 1.25 € /50g
Get the yarn to make this pattern from 10.00€.

The yarn cost is calculated from the pattern’s smallest size and the yarn’s cheapest product type. Looking for an even better price? You might find it on the DROPS Deals!

DROPS SS24

River Run

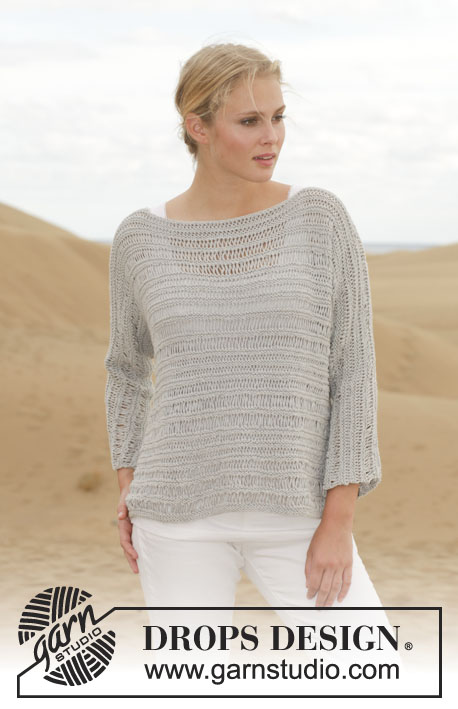
Knitted DROPS vest with cables and lace pattern in ”Paris”. Size: S - XXXL.

DROPS 153-23
DROPS design: Pattern no w-527
Yarn group C
-----------------------------------------------------------
Size: S - M - L - XL - XXL - XXXL
Materials:
DROPS PARIS from Garnstudio
400-400-450-500-550-600 g colour no 30, denim blue

DROPS DOUBLE POINTED NEEDLES AND CIRCULAR NEEDLE (60 or 80 cm) SIZE 5 mm - or size needed to get 17 sts x 22 rows in stocking st = 10 x 10 cm.

-------------------------------------------------------

Alternative Yarn – See how to change yarns here
Yarn Groups A to F – Use the same pattern and change the yarn here
Yarn usage using an alternative yarn – Use our yarn converter here

-------------------------------------------------------

DROPS Paris
DROPS Paris
100% Cotton
from 1.25 € /50g
Get the yarn to make this pattern from 10.00€.

The yarn cost is calculated from the pattern’s smallest size and the yarn’s cheapest product type. Looking for an even better price? You might find it on the DROPS Deals!

Pattern instructions

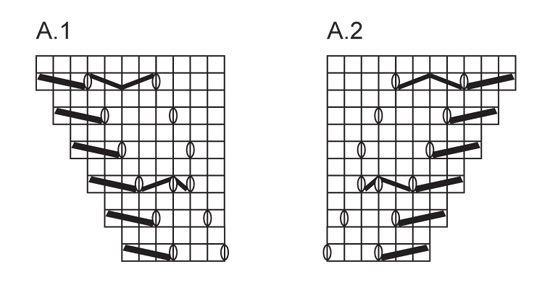
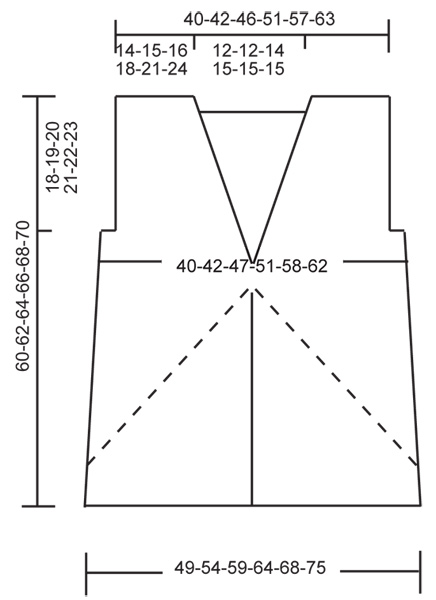
GARTER ST (back and forth on needle):
K all rows. 1 ridge = 2 rows K.

PATTERN:
See diagrams A.1-A.2. The diagrams show all rows in pattern seen from RS.
----------------------------------------------------------

VEST:
The piece is worked top down.

LEFT BACK PIECE/SHOULDER:
Worked back and forth on needle. Cast on 24-26-28-30-36-40 sts on circular needle size 5 mm with Paris. On 1st row (= from RS) work 3 sts in GARTER ST – see explanation above, 14-16-18-20-26-30 sts in stocking st, finish with 7 sts in garter st (= towards the neck). Work like this for 3 cm. Adjust so that last row is from RS. Put piece aside and knit right back piece/shoulder.

RIGHT BACK PIECE/SHOULDER:
Work as left but reversed.

Now put back piece tog as follows from WS: Work over right back piece as before, cast on 20-20-24-26-26-26 sts between right back piece and left back piece, work over left back piece as before = 68-72-80-86-98-106 sts on needle. On next row from RS work 3 sts in garter st, 14-16-18-20-26-30 sts in stocking st, 34-34-38-40-40-40 sts in garter st (over the 7 sts in garter st in each side on back piece and the new 20-20-24-26-26-26 sts), 14-16-18-20-26-30 sts in stocking st, finish with 3 sts in garter st. Repeat this row one more time, then work in stocking st with 3 sts in garter st in each side until piece measures 18-19-20-21-22-23 cm. Adjust so that last row is from WS. Put piece aside and knit the front pieces.

RIGHT FRONT PIECE:
Worked back and forth on needle. Cast on 24-26-28-30-36-40 sts on circular needle size 5 mm with Paris. Work as follows from RS: Work 3 sts in garter st, 14-16-18-20-26-30 sts in stocking st, finish with 7 st in garter st (= towards the neck). Work like this for 2 cm. Then inc from RS with 1 YO before the 7 sts in garter st, work YO twisted on next row, repeat inc every 2 cm 7-7-8-8-9-9 more times = 32-34-37-39-46-50 sts on needle. When piece measures 18-19-20-21-22-23 cm, put piece aside. Adjust so that last row is from WS. Work left front piece.

LEFT FRONT PIECE:
Work as right but reversed.

BODY:
Now slip all sts on to same needle. Work sts as before AT THE SAME TIME cast on 8-8-8-10-10-10 sts between left front piece and left back piece and 8-8-8-10-10-10 sts between right back piece and right front piece = 148-156-170-184-210-226 sts on needle.

On next row from WS work as follows: Work 7 sts in garter st, 22-24-27-29-36-40 sts in stocking st, 14-14-14-16-16-16 sts in garter st (over the 3 sts in garter st in each side and the 8-8-8-10-10-10 new sts), 62-66-74-80-92-100 sts in stocking st (= back piece), 14-14-14-16-16-16 sts in garter st (over the 3 sts in garter st in each side and the 8-8-8-10-10-10 new sts), 22-24-27-29-36-40 sts in stocking st, finish with 7 sts in garter st. Repeat row 1 more time. Then work in stocking st with 7 sts in garter st in each side of piece AT THE SAME TIME continue inc in each side (before/after the 7 sts in garter st) every 2 cm on front piece 2-2-3-4-3-3 more times (= 10-10-12-13-13-13 inc in total) = 152-160-176-192-216-232 sts on needle. When inc in the neck is finished, piece measures approx. 20-20-24-26-26-26 cm. Cut the yarn. Then work as follows from RS: Cast on 3 sts, work 1 st in garter st, work A.1 (= 6 sts) over the next 6 sts in garter st, work in stocking st until 7 sts remain, A.2 (= 6 sts) over the next 6 sts, 1 st in stocking st, cast on 3 sts = 158-166-182-198-222-238 sts on needle. A.1/A.2 are displaced 1 st out towards mid back on every row from RS until finished measurements. On next row from WS work as follows: 2 sts in garter st, P 1, K 1 (= band), pattern and stocking st as before until 4 sts remain, K 1, P 1, 2 sts in garter st (= band). On next row (= from RS) work band as follows: 2 sts in garter st, K 1, P 1, pattern and stocking st as before until 4 sts remain, P 1, K 1, 2 sts in garter st. Repeat these 2 rows over band until finished measurements AT THE SAME TIME continue with A.1/A2 and stocking st as before. NOTE: On 5th row in A.1/A.2 inc 1 st (= 2 sts inc) - see diagram = 160-168-184-200-224-240 sts on needle. Inc only 1 time in A.1/A.2, then continue cables over 4 sts as shown on next to last row in A.1/A.2. When piece measures 25-25-29-31-31-31 cm, insert 2 markers in piece as follows: Work 41-43-47-51-57-61 sts as before, insert 1st marker in next st WHILE working, work 76-80-88-96-108-116 sts as before, insert 2nd marker in next st WHILE working, work the remaining 41-43-47-51-57-61 sts as before. Then inc on next row from RS as follows: Work as before until sts with markers, 1 YO, K 1 (= st with marker), 1 YO (= 4 sts inc). Work YOs twisted on next row. Repeat inc every 11-7-7-7-13-8 cm 3-5-5-5-3-5 more times in each side = 176-192-208-224-240-264 sts on needle. Work in garter st, stocking st and with pattern A.1/A.2 until piece measures 59-61-63-65-67-69 cm. Work 1 ridge in garter st over all sts. Cast off.

TWINED STRING:
Cut 2 strands of 3 metres each, twine the strands tog until they resist, fold the string double so that it twines again. Tie a knot in one end, fasten the other end to the first hole at the top of A.1. Make another twined string and fasten it to the first hole at the top of A.2.

ASSEMBLY:
Sew the shoulder seams.

This pattern has been corrected.

Updated online: 13.03.2014
Sentence added under BODY: ....NOTE: On 5th row in A.1/A.2 inc 1 st (= 2 sts inc) - see diagram = 160-168-184-200-224-240 sts on needle. Inc only 1 time in A.1/A.2, then continue cables over 4 sts as shown on next to last row in A.1/A.2. When piece measures 25-25-29-31-31-31 cm….

Diagram

symbols = K from RS, P from WS
symbols = K 3 twisted tog
symbols = K 3 tog
symbols = 1 YO between 2 sts
symbols = slip 2 sts on cable needle behind piece, K 2, K 2 from cable needle
symbols = slip 2 sts on cable needle in front of piece, K 2, K 2 from cable needle
symbols = slip 2 sts on cable needle behind piece, K 1, 1 YO, K 2 from cable needle
symbols = slip 2 sts on cable needle in front of piece, K 1, 1 YO, K 2 from cable needle
diagram
diagram

Each of our patterns has specific tutorial videos to help you.

Do you have a question? See a list of frequently asked questions (FAQ)

Knitting tension is what determines the final measurements of your work, and is usually measured per 10 x 10 cm. It is provided like so: number of stitches in width x number of rows in height - eg: 19 stitches x 26 rows = 10 x 10 cm.

The knitting tension is very individual; some people knit/crochet loosely while others work tightly. You adjust the knitting tension with the needle size, which is why the suggested needle size is only meant as a guide! You need to adjust this (up or down) to ensure that YOUR knitting tension matches the knitting tension provided in the pattern. If you work with a different knitting tension than provided you will have a different yarn consumption, and your work will have different measurements than what the pattern suggests.

The knitting tension also determines which yarns can replace each other. As long as you achieve the same knitting tension you can replace one yarn with another.

See DROPS lesson: How to measure your tension/gauge

See DROPS video: How to make a gauge tension swatch

The required amount of yarn is provided in grams, eg: 450 g. To calculate how many balls you’ll need you first need to know how many grams are in 1 ball (25g, 50g or 100g). This information is available if you click on the individual yarn quality on our pages. Divide the amount required with the amount of each ball. For example, if each ball is 50g (the most common amount), the calculation will be as follows: 450 / 50 = 9 balls.

The important thing when changing from one yarn to another is that the knitting/crochet tension remains the same. This is so that the measurements of the finished piece will be the same as on the sketch provided. It is easier to achieve the same knitting tension using yarns from the same yarn group. It is also possible to work with multiple strands of a thinner yarn to achieve the knitting tension of a thicker one. Please try our yarn converter. We recommend you to always work a test swatch.

Please NOTE: when changing yarn the garment might have a different look and feel to the garment in the photo, due to individual properties and qualities of each yarn.

See DROPS lesson: Can I use a different yarn than the one mentioned in the pattern?

All our yarns are categorised into yarn groups (from A to F) according to thickness and knitting tension – group A contains the thinnest yarns and group F the thickest. This makes it easier for you to find alternative yarns to our patterns, should you wish to switch yarn. All yarns within the same group have a similar knitting tension and can easily replace each other. However, different yarn qualities have different structures and properties which will give the finished work a unique look and feel.

Click here for an overview of the yarns in each yarn group

At the top of all our patterns you’ll find a link to our yarn calculator, which is a helpful tool should you wish to use a different yarn than suggested. By filling in the yarn quality you wish to replace, the amount (in your size) and number of strands, the calculator will present good alternative yarns with the same knitting tension. Additionally it will tell you how much you’ll require in the new qualities and whether you’ll need to work with multiple strands. Most skeins are 50g (some are 25g or 100g).

If the pattern is worked with multiple colours, every colour will have to be calculated separately. Similarly, if the pattern is worked with several strands of different yarns (for example 1 strand Alpaca and 1 strand Kid-Silk) you will have to find alternatives for each, individually.

Click here to see our yarn calculator

Since different yarns have different qualities and textures we have chosen to keep the original yarn in our patterns. However, you can easily find options among our available qualities by using our yarn calculator, or simply pick a yarn from the same yarn group.

It is possible that some retailers still have discontinued yarns in stock, or that someone has a few skeins at home that they would like to find patterns for.

The yarn calculator will provide both alternative yarn as well as required amount in the new quality.

If you think it's hard to decide what size to make, it can be a good idea to measure a garment you own already and like the size of. Then you can pick the size by comparing those measures with the ones available in the pattern's size chart.

You'll find the size chart at the bottom of the pattern.

See DROPS lesson: How to read size chart

The needle size provided in the pattern serves only as a guide, the important thing is to follow the knitting tension. And since knitting tension is very individual, you will have to adjust the needle size to ensure that YOUR tension is the same as in the pattern – maybe you’ll have to adjust 1, or even 2 needle sizes, up or down to achieve the correct tension. For this, we recommend that you work test swatches.

Should you work with a different knitting tension than the one provided, the measurements of the finished garment might deviate from the measurement sketch.

See DROPS lesson: How to measure your tension/gauge

See DROPS video: How to make a tension/gauge swatch

Working a garment top-down provides more flexibility and room for personal adjustment. For example it is easier to try the garment on while working, as well as making adjustments to length of yoke and shoulder caps.

The instructions are carefully explaining every step, in the correct order. Diagrams are adjusted to the knitting direction and are worked as usual.

The diagram depicts all rows/rounds, and every stitch seen from the right side. It is read from bottom to top, from right to left. 1 square = 1 stitch.

When working back and forth, every other row is worked from the right side and every other row is worked from the wrong side. When working from the wrong side, the diagram will have to be worked reversed: from left to right, knit stitches are purled, purl stitches are knit etc.

When working in the round every round is worked from the right side and the diagram are worked from right to left on all rounds.

See DROPS lesson: How to read knitting diagrams

The diagram depicts all rows/rounds, and every stitch seen from the right side. It is worked from bottom to top, from right to left.

When working back and forth every other row is worked from the right side: from right to left and every other row is worked from the wrong side: from left to right.

When working in the round, every row in the diagram are worked from the right side, from right to left.

When working a circular diagram you start in the middle and work your way outwards, counter clockwise, row by row.

The rows usually start with a given number of chain stitches (equivalent to the height of the following stitch), this will either be depicted in the diagram or explained in the pattern.

See DROPS lesson: How to read crochet diagrams

Instructions for working several diagrams after each other on the same row/round, will often be written like so: “work A.1, A.2, A.3 a total of 0-0-2-3-4 times". This means you work A.1 once, then A.2 is worked once, and A.3 is repeated (in width) the number of times provided for your size – in this case like so: S = 0 times, M = 0 times, L=2 times, XL= 3 times and XXL = 4 times.

The diagrams are worked as usual: begin with the first row in A.1, then work the first row in A.2 etc.

See DROPS lesson: How to read knitting diagrams

See DROPS lesson: How to read crochet diagrams

The total width of the garment (from wrist-to-wrist) will be larger in the larger sizes, despite the actual sleeves being shorter. The larger sizes have longer sleeve caps and wider shoulders, so there will be a good fit in all sizes.

The measurement sketch/schematic drawing provides information regarding the full length of the garment. If it’s a jumper or a jacket the length is measured from the highest point on the shoulder closest to the neckline, and straight down to the bottom of the garment. It is NOT measured from the tip of shoulder. Similarly, the length of yoke is measured from the highest point on the shoulder and down to where yoke is split into body and sleeves.

On a jacket measures are never taken along bands, unless specifically stated. Always measure inside band stitches when measuring the length.

See DROPS lesson: How to read a schematic drawing

Diagrams are often repeated on the round or in height. 1 repeat is the diagram the way it appears in the pattern. If it says to work 5 repeats of A.1 in the round, then you work A.1 a total of 5 times after/next to each other in the round. If it says to work 2 repeats of A.1 vertically/in height you work the entire diagram once, then begin again at the start and work the entire diagram one more time.

Chain stitches are slightly narrower than other stitches and to avoid working the cast-on edge too tight, we simply chain more stitches to begin with. The stitch count will be adjusted on the following row to fit the pattern and measurement sketch.

The rib edge is more elastic and will contract slightly compared to, for example, stocking stitch. By increasing before the rib edge, you avoid a visible difference in width between the rib edge and the rest of the body.

It’s very easy to cast off too tightly, and by making yarn overs while casting off (and simultaneously casting these off) you avoid a too tight cast off edge.

See DROPS video: How to bind off with yarn overs (yo)

To achieve an even increase (or decrease) you can increase on, for example: every 3rd and 4th row alternately, like so: work 2 rows and increase on the 3rd row, work 3 rows and increase on the 4th. Repeat this until the increase is complete.

See DROPS lesson: Increase or decrease 1 st on every 3rd and 4th row alternately

Should you prefer to work in the round instead of back and forth, you may of course adjust the pattern. You’ll need to add steeks mid-front (usually 5 stitches), and follow the instructions. When you would normally turn and work from the wrong side, simply work across the steek and continue in the round. At the end you’ll cut the piece open, pick up stitches to work bands, and cover the cut edges.

See DROPS video: How to knit steeks and cut open

Should you prefer to work back and forth instead of in the round, you may of course adjust the pattern so you work the pieces separately and then assemble them at the end. Divide the stitches for the body in 2, add 1 edge stitch in each side (for sewing) and work the front and back pieces separately.

See DROPS lesson: Can I adapt a pattern for circular needles into straight needles?

Pattern repeats can vary slightly in the different sizes, in order to get the correct proportions. If you’re not working the exact same size as the garment in the photo, yours might deviate slightly. This has been carefully developed and adjusted so that the complete impression of the garment is the same in all sizes.

Make sure to follow instructions and diagrams for your size!

If you have found a pattern you like which is available in women’s size it’s not very difficult to convert it to men’s size. The biggest difference will be the length of sleeves and body. Start working on the women size that you think would fit across the chest. The additional length will be worked right before you cast off for the armhole/sleeve cap. If the pattern is worked top-down you can add the length right after the armhole or before the first decrease on sleeve.

Regarding additional yarn amount, this will depend on how much length you add, but it is better with a skein too many than too few.

All yarns will have excess fibres (from production) that might come off as lint or shedding. Brushed yarns (ie hairier yarns) have more of these loose, excess fibres, causing more shedding.

Shedding also depends on what is worn under or over the garment, and whether this pulls at the yarn fibres. It’s therefore not possible to guarantee that there will be no shedding

Below are some tips on how to get the best result when working with hairier yarns:

1. When the garment is finished (before you wash it) shake it vigorously so the looser hairs come off. NOTE: do NOT use a lint roller, brush or any method that pulls at the yarn.

2. Place the garment in a plastic bag and put it in your freezer - the temperature will cause the fibres to become less attached to each other, and excess fibres will come off easier.

3. Leave in the freezer for a few hours before taking it out and shaking it again.

4. Wash the garment according to the instructions on the yarn label.

Pilling is a natural process that happens to even the most exclusive of fibers. It's a natural sign of wear and tear that is hard to avoid, and that is most visible in high friction areas of your garment like a sweater's arms and cuffs.

You can make your garment look as new by removing the pilling, using a fabric comb or a pill/lint remover.

Still can't find the answer you need? Then scroll down and leave your question so one of our experts can try to help you. This will be done normally within 5 to 10 working days.
In the meantime, you can read the questions and answers that others have left to this pattern or join the DROPS Workshop on Facebook to get help from fellow knitters/crocheters!

You might also like...

Post a comment to pattern DROPS 153-23

We would love to hear what you have to say about this pattern!

If you want to leave a question, please make sure you select the correct category in the form below, to speed up the answering process. Required fields are marked *.

Comments / Questions (33)

country flag Kerstin wrote:

Hej! Nu har jag stickat de 12 varven i diagrammet en gång och min fråga är : ska jag börja om på varv 1 i diagrammet eller bara sticka varv 11 och 12?

26.02.2024 - 18:13

DROPS Design answered:

Hei Kerstin. Du gjentar hele diagrammet (A.1 / A.2). mvh DROPS Design

04.03.2024 - 10:35

country flag Lise Nielsen wrote:

Hej! Jeg har stadig ikke fået et svar på mit spørgsmål fra den 30. maj 2022. Vil I være sød og svare på det? Tak, Lise

12.07.2022 - 14:55

DROPS Design answered:

Hej Lise. Beklagar det, det är för att du har lagt den som "kommentar" och inte "spørgsmål". Ja du ska alltså inte öka mer än en gång och det gör du på p 5, efter det fortsätter snoningerne över 4 maskor hela tiden. Mvh DROPS Design

13.07.2022 - 14:10

country flag Lise Nielsen wrote:

Hej! Der står: OBS: På 5.p i A.1/A.2 tages der 1 m ud (= 2 nye m) - se diag = 160-168-184-200-224-240 m på p. Der tages kun ud 1 gang i A.1/A.2, derefter fortsætte snoningerne over 4 m som vist på næst sidste p i A.1/A.2. Vil det sige, at når man har strikket de første 12 pinde med mønster A1/A2, skal man starte ved række 1 igen og strikke de samme 12 pinde mønster igen, på nær pind 5, som man skal strikke som pind 11 ? På forhånd tak for svar.

30.05.2022 - 11:21

country flag Patricia Hölzle wrote:

Guten Tag gibt es auch ein Foto von der Rückansicht?? Besten Dank Freundliche Grüsse Patricia

23.03.2022 - 07:31

DROPS Design answered:

Liebe Frau Hölzle, sowas haben wir leider nicht und diese Jacke haben wir auch nicht mehr; aber der Rückenteil wird einfach glatt rechts (mit den krausrechten Maschen beidseitig, wie beschrieben) gestrickt, dh ohne Zopf. Viel Spaß beim stricken!

23.03.2022 - 07:53

country flag Anne-Marie Silven wrote:

Hej, jag kämpar på med västen och har en fråga under rubriken "Fram- och bakstycke", en bit in i stycket står det OBS: på 5:e v i A1/A2 ökas det 1m......se idag. Ok, tittar i diagrammet, där ser det ut som det ska ökas 3 maskor ( 3 omslag). Om jag nu ska öka enbart 1 maska på 5:e varvet, varför är det inte ändrat i diagrammet? Och var ska den ökningen vara i såfall? Mvh Anne-Marie S

05.04.2021 - 00:43

DROPS Design answered:

Hej Anne-Marie, den er tegnet ind i diagrammet, det er det midterste omslag som er økningen, de to andre udligner de 3 masker som strikkes sammen. God fornøjelse!

28.04.2021 - 14:31

country flag Anne-Marie wrote:

Hej igen, tack för svar 23 Mars. Men jag undrar igen över framkanten på västen, alltså den långa framkanten under den tvinnade snodden hela vägen ned. Se bilden där kvinnan håller sin hand, den kanten ser ut som den består av enbart tre eller fyra räta maskor till skillnad mot framkanten högst upp som består av 7 maskor helt klart. Läst beskrivningen flera gånger men fattar inte hur det kan vara 7 maskor hela vägen ner. Kan du förklara igen ,tack Mvh Anne-Marie S ilven

25.03.2021 - 08:33

DROPS Design answered:

Hej Anne-Marie, du strikker 7 kantmasker til arbejdet måler 20-20-24-26-26-26 cm. Så står det: Klipp av tråden. Sedan stickas det så här från rätsidan: Lägg upp 3 m, sticka 1 m rätst, sticka A.1 (= 6 m) över de 6 nästa rätst m, sticka slätst tills det återstår 7 m, A.2 (= 6 m) över de nästa 6 m, 1 m rätst, lägg upp 3 m = 158-166-182-198-222-238 m på st. Lycka till :)

25.03.2021 - 09:24

country flag Anne-Marie Silven wrote:

Hej, jag undrar om framkanterna består av 3 räta maskor?\r\nMvh Anne-Marie

21.03.2021 - 15:22

DROPS Design answered:

Hej Anne-Marie, nej forkanten består af 7 masker som strikkes ret på hver pind. God fornøjelse!

23.03.2021 - 13:48

country flag Madlenka wrote:

Jak píše Bea z Německa přede mnou - v té páté řadě je to nějaké divné, jedu přesně podle návodu a vzniká mi tam takový divný zub, vnější řada dírek není souvislá, ale poskočí směrem ven, a ve vnitřní řadě dírek je mezi třetí a čtvrtou dírkou nějak moc nití. A mám na jehlici o dvě očka méně, než se píše v návodu. Zdá se mi divné, že v ř. 5 i v ř. 7 vzoru A.1 a A.2 jsou mezi okrajem a nahozením shodně dvě oka.

09.01.2021 - 05:15

country flag Bea wrote:

DIe Reihe 5 im Mustersatz A1 und 2 ist mir unklar: Dass auf jeden Fall eine Zunahme zu viel ist an der Stelle, ist klar. Aber welcher Umschlag fällt denn nun weg? Bzw. wieso sollen zwei Zunahmen des Diagramm jeweils bei A1 und A2 wegfallen (so jedenfalls nach der Angabe der Gesamtzahl der Maschen)?

03.01.2021 - 23:28

DROPS Design answered:

Liebe Bea, stricken Sie genau wie im Diagram beschrieben = es sind 3 Umschläge und 2 Abnahmen = 1 Masche wird zugnommen. A.1 = 2 re, 1 Umschlag, 2 M auf eine Hilfsnadel hinter die Arb legen, 1 re, 1 Umschlag, 2 re von der Hilfsnadel, 1 Umschlag, 3 M re verschränkt zs. A.2 = 3 M re zs, 1 Umschlag, 2 M auf eine Hilfsnadel vor die Arb legen, 1 re, 1 Umschlag, 2 re von der Hilfsnadel, 1 Umschlag, 2 M re. Viel Spaß beim stricken!

05.01.2021 - 10:06

country flag Jeanette wrote:

How do I continue the cable pattern after the first graph? Do I just keep moving one stitch along?

08.05.2019 - 05:04

DROPS Design answered:

Dear Jeanette, yes right, continue diagram as shown, the cable should be worked every 6th row as before - and keep moving the pattern as before. Happy knitting!

08.05.2019 - 08:08