DROPS Muskat
DROPS Muskat
100% Cotton
from 3.90 CAD /50g
Get the yarn to make this pattern from 46.80CAD.

The yarn cost is calculated from the pattern’s smallest size and the yarn’s cheapest product type. Looking for an even better price? You might find it on the DROPS Deals!

DROPS SS24

Yours Truly

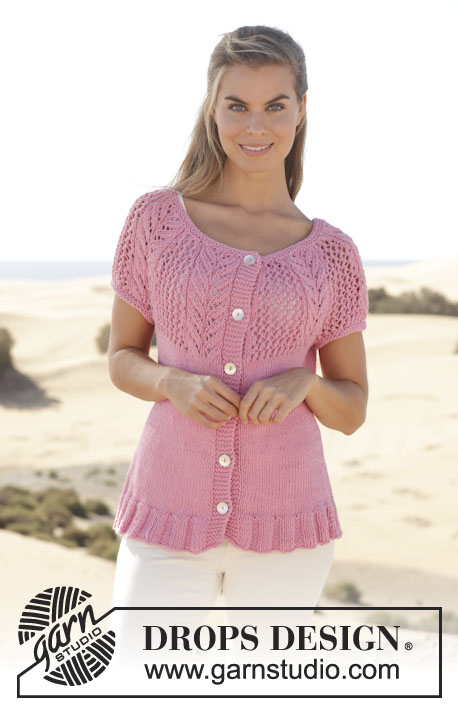
Knitted DROPS dress with lace pattern and round yoke in ”Muskat”. Size: S - XXXL.

DROPS 155-2
DROPS design: Pattern no r-647
Yarn group B
-----------------------------------------------------------
Size: S - M - L - XL - XXL - XXXL
Finished measurements:
Bust: 80-88-96-106-120-130 cm / 31½"-34⅝"-37¾"-41¾"-47¼"-51"
Full length: 80-82-84-86-88-90 cm / 31½"-32¼"-33"-33⅞"-34⅝"-35½"

Materials:
DROPS MUSKAT from Garnstudio
600-650-750-800-850-950 g color no 29, old pink

DROPS DOUBLE POINTED NEEDLES AND CIRCULAR NEEDLE (40, 60 and 80 cm / 16", 24" and 32") SIZE 3.5 mm / US 4 - or size needed to get 21 sts x 28 rows lace pattern = 4" x 4" (10 x 10 cm).

1.5-2 meters/ 1.75-2.25 yds pink silk ribbon for waist, approx. 7 mm/1/4" in width.

-------------------------------------------------------

Alternative Yarn – See how to change yarns here
Yarn Groups A to F – Use the same pattern and change the yarn here
Yarn usage using an alternative yarn – Use our yarn converter here

-------------------------------------------------------

DROPS Muskat
DROPS Muskat
100% Cotton
from 3.90 CAD /50g
Get the yarn to make this pattern from 46.80CAD.

The yarn cost is calculated from the pattern’s smallest size and the yarn’s cheapest product type. Looking for an even better price? You might find it on the DROPS Deals!

Pattern instructions

NOTE: This pattern is written in American English. All measurements in charts are in cm. For conversion from inches to cm - click here. There are different terms for crocheting in American and British English. If this pattern includes crochet, click for "crochet terms" here. For this pattern in British English, please click here.
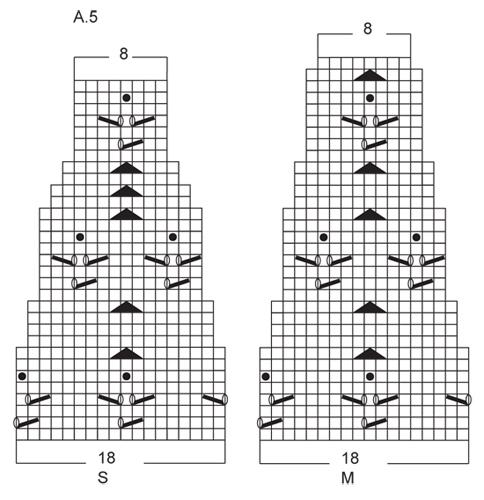
GARTER ST (in the round on circular needle):
* K 1 round and P 1 round *, repeat from *-*. 1 ridge = 2 rounds.

PATTERN:
See diagrams A.1-A.5. See diagrams for correct size.

DECREASE TIP:
Dec 1 st before 1st and 3rd marker as follows: Work until 2 sts remain before marker, slip 1 st as if to K, K 1, psso.
Dec 1 st after 2nd and 4th marker as follows: K 2 tog.
----------------------------------------------------------

BODY:
Worked in the round on circular needle. Cast on 420-460-480-500-540-580 sts on circular needle size 3.5 mm / US 4 with Muskat. P 1 round. On next round work pattern A.1 (= 20 sts) over all sts (21-23-24-25-27-29 times in width). Continue pattern like this. When A.1 has been worked 1 time vertically, 252-276-288-300-324-348 sts remain on needle and piece measures approx. 8 cm / 3". Then work pattern according to diagram A.2 (= 12 sts) 21-23-24-25-27-29 times in width. When A.2 has been worked 1 time vertically, piece measures approx. 13 cm / 5". Now continue piece in stockinette st. Work in stockinette st until piece measures 25-24-23-22-22-21 cm / 9¾"-9½"-9"-8¾"-8¾"-8¼".

Now insert 4 markers in the piece as follows: Work 40-46-48-50-55-60 sts, insert 1st marker, work 46-46-48-50-52-54 sts, insert 2nd marker, work 80-92-96-100-110-120 sts, insert 3rd marker, work 46-46-48-50-52-54 sts, insert 4th marker, work the remaining 40-46-48-50-55-60 sts. Marker 1 and 2 are on front piece, and marker 3 and 4 are on back piece. Move the markers upwards when working. On next round, dec 1 st at every marker – Read DECREASE TIP = 4 sts dec on needle. NOTE: No of sts mid front and mid back is the same, dec in side sts. Repeat dec every 6th round 2-2-2-3-3-3 more times, then every 4th round 9-8-9-11-12-13 times in total, then every other round 12-16-15-9-8-7 times in total (= 24-27-27-24-24-24 dec in total) = 156-168-180-204-228-252 sts remain on needle. K 4 rounds. Piece now measures approx. 53 cm / 21". Then work A.3 (= 6 sts) over all sts 1 time vertically. On next round, inc 12-18-20-18-22-20 sts evenly = 168-186-200-222-250-272 sts on needle. Then work next round as follows: Work 6-6-5-6-4-5 sts in stockinette st, pattern A.4 (= 9 sts) over the next 72-81-90-99-117-126 sts (= 8-9-10-11-13-14 times in width), stockinette st over the next 12-12-10-12-8-10 sts, pattern A.4 (= 9 sts) over the next 72-81-90-99-117-126 sts (= 8-9-10-11-13-14 times in width), finish with 6-6-5-6-4-5 sts in stockinette st. Work A.4 1 time vertically, repeat the pattern 1 more time, until shown with arrow, AT THE SAME TIME on round with bobble (i.e. 9th round in diagram A.4) work as follows: 4-4-4-5-5-5 sts in GARTER ST – see explanation above (NOTE: In size XXL work pattern over 2 sts less because of ridges in garter st to be bind off for sleeve later), 2-2-1-1-0-0 sts in stockinette st, pattern A.4 (= 9 sts) over the next 72-81-90-99-115-126 sts, 2-2-1-1-0-0 sts in stockinette st, 8-8-8-10-10-10 sts in garter st (NOTE: In size XXL work pattern over 2 sts less because of ridges in garter st to be bind off for sleeve later), 2-2-1-1-0-0 sts in stockinette st, pattern A.4 (= 9 sts) over the next 72-81-90-99-115-126 sts, 2-2-1-1-0-0 sts in stockinette st, finish with 4-4-4-5-5-5 sts in garter st. Repeat this round 1 more time. Now bind off for armholes as follows: bind off the first 4-4-4-5-5-5 sts in garter st, work 2-2-1-1-0-0 sts in stockinette st, pattern A.4 (= 9 sts) over the next 72-81-90-99-115-126 sts as before, 2-2-1-1-0-0 sts in stockinette st, bind off the next 8-8-8-10-10-10 sts in garter st, 2-2-1-1-0-0 sts in stockinette st, pattern A.4 (= 9 sts) over the next 72-81-90-99-115-126 sts as before, 2-2-1-1-0-0 sts in stockinette st, finish by binding off the 4-4-4-5-5-5 sts in garter st = 76-85-92-101-115-126 sts on front piece and 76-85-92-101-115-126 sts on back piece. Cut and fasten the yarn. Beg next round at 1st st on front piece.

Work stockinette st in each side in some of the sizes over front piece as before and pattern A.4, cast on 50-41-52-61-65-63 sts for sleeve, work pattern A.4 and stockinette st in each side in some of the sizes over back piece as before, cast on 50-41-52-61-65-63 sts for sleeve = 252-252-288-324-360-378 sts on needle. Work next round as follows: Work stockinette st and pattern A.4 over front piece as before, P 50-41-52-61-65-63, pattern A.4 over back piece as before, P 50-41-52-61-65-63. On next round work as before but work K over P sts in each side (= sleeves). Repeat first round 1 more time (i.e P over sleeve sts).

Then work pattern A.5 (= 18 sts) over all sts, beg from 1st st on front piece (= 14-14-16-18-20-21 times in width). Work and dec according to diagram A.5. When A.5 has been worked 1 time vertically, 112-112-128-144-160-168 sts remain on needle. K 1 round while AT THE SAME TIME dec 12-6-18-30-42-46 sts evenly = 100-106-110-114-118-122 sts remain on needle. P 1 round and K 1 round. Then bind off with K from WS (i.e. turn piece).

SILK RIBBON:
Thread a silk ribbon in eyelet row (= A.3) under yoke.

Diagram

symbols = K
symbols = P
symbols = 1 bobble: Work 5 sts in same st by working alternately in front and back loop of st, slip sts back on left needle (hold yarn behind piece), K the 5 sts, pass 2nd st over 1st st, pass 3rd st over 1st st etc. until 1 st remains, then continue as before
symbols = 1 YO between 2 sts
symbols = K 2 tog
symbols = slip 1 st as if to K, K 1, psso
symbols = slip 1 st as if to K, K 2 tog, psso
symbols = finish diagram at arrow
diagram
diagram
diagram
diagram
Do you have a question? See a list of frequently asked questions (FAQ)

Knitting tension is what determines the final measurements of your work, and is usually measured per 10 x 10 cm. It is provided like so: number of stitches in width x number of rows in height - eg: 19 stitches x 26 rows = 10 x 10 cm.

The knitting tension is very individual; some people knit/crochet loosely while others work tightly. You adjust the knitting tension with the needle size, which is why the suggested needle size only serve as a guide! You need to adjust this (up or down) to ensure that YOUR knitting tension matches the knitting tension provided in the pattern. If you work with a different knitting tension than provided you will have a different yarn consumption, and your work will have different measurements than what the pattern suggests.

The knitting tension also determines which yarns can replace each other. As long as you achieve the same knitting tension you can replace one yarn with another.

See DROPS lesson: How to measure your tension/gauge

See DROPS video: How to make a gauge tension swatch

The required amount of yarn is provided in grams, eg: 450 g. To calculate how many balls you’ll need you first need to know how many grams are in 1 ball (25g, 50g or 100g). This information is available if you click on the individual yarn quality on our pages. Divide the amount required with the amount of each ball. For example, if each ball is 50g (the most common amount), the calculation will be as follows: 450 / 50 = 9 balls.

The important thing when changing from one yarn to another is that the knitting/crochet tension remains the same. This is so that the measurements of the finished piece will be the same as on the sketch provided. It is easier to achieve the same knitting tension using yarns from the same yarn group. It is also possible to work with multiple strands of a thinner yarn to achieve the knitting tension of a thicker one. Please try our yarn converter. We recommend you to always work a test swatch.

Please NOTE: when changing yarn the garment might have a different look and feel to the garment in the photo, due to individual properties and qualities of each yarn.

See DROPS lesson: Can I use a different yarn than the one mentioned in the pattern?

All our yarns are categorised into yarn groups (from A to F) according to thickness and knitting tension – group A contains the thinnest yarns and group F the thickest. This makes it easier for you to find alternative yarns to our patterns, should you wish to switch yarn. All yarns within the same group have a similar knitting tension and can easily replace each other. However, different yarn qualities have different structures and properties which will give the finished work a unique look and feel.

Click here for an overview of the yarns in each yarn group

At the top of all our patterns you’ll find a link to our yarn converter, which is a helpful tool should you wish to use a different yarn than suggested. By filling in the yarn quality you wish to replace, the amount (in your size) and number of strands, the converter will present good alternative yarns with the same knitting tension. Additionally it will tell you how much you’ll require in the new qualities and whether you’ll need to work with multiple strands. Most skeins are 50g (some are 25g or 100g).

If the pattern is worked with multiple colours, every colour will have to be converted separately. Similarly, if the pattern is worked with several strands of different yarns (for example 1 strand Alpaca and 1 strand Kid-Silk) you will have to find alternatives for each, individually.

Click here to see our yarn converter

Since different yarns have different qualities and textures we have chosen to keep the original yarn in our patterns. However, you can easily find options among our available qualities by using our yarn converter, or simply pick a yarn from the same yarn group.

It is possible that some retailers still have discontinued yarns in stock, or that someone has a few skeins at home that they would like to find patterns for.

The yarn converter will provide both alternative yarn as well as required amount in the new quality.

If you think it's hard to decide what size to make, it can be a good idea to measure a garment you own already and like the size of. Then you can pick the size by comparing those measures with the ones available in the pattern's size chart.

You'll find the size chart at the bottom of the pattern.

See DROPS lesson: How to read size chart

The needle size provided in the pattern serves only as a guide, the important thing is to follow the knitting tension. And since knitting tension is very individual, you will have to adjust the needle size to ensure that YOUR tension is the same as in the pattern – maybe you’ll have to adjust 1, or even 2 needle sizes, up or down to achieve the correct tension. For this, we recommend that you work test swatches.

Should you work with a different knitting tension than the one provided, the measurements of the finished garment might deviate from the measurement sketch.

See DROPS lesson: How to measure your tension/gauge

See DROPS video: How to make a gauge tension swatch

Working a garment top-down provides more flexibility and room for personal adjustment. For example it is easier to try the garment on while working, as well as making adjustments to length of yoke and shoulder caps.

The instructions are carefully explaining every step, in the correct order. Diagrams are adjusted to the knitting direction and are worked as usual.

The diagram depicts all rows/rounds, and every stitch seen from the right side. It is read from bottom to top, from right to left. 1 square = 1 stitch.

When working back and forth, every other row is worked from the right side and every other row is worked from the wrong side. When working from the wrong side, the diagram will have to be worked reversed: from left to right, knit stitches are purled, purl stitches are knit etc.

When working in the round every round is worked from the right side and the diagram are worked from right to left on all rounds.

See DROPS lesson: How to read knitting diagrams

The diagram depicts all rows/rounds, and every stitch seen from the right side. It is worked from bottom to top, from right to left.

When working back and forth every other row is worked from the right side: from right to left and every other row is worked from the wrong side: from left to right.

When working in the round, every row in the diagram are worked from the right side, from right to left.

When working a circular diagram you start in the middle and work your way outwards, counter clockwise, row by row.

The rows usually start with a given number of chain stitches (equivalent to the height of the following stitch), this will either be depicted in the diagram or explained in the pattern.

See DROPS lesson: How to read crochet diagrams

Instructions for working several diagrams after each other on the same row/round, will often be written like so: “work A.1, A.2, A.3 a total of 0-0-2-3-4 times". This means you work A.1 once, then A.2 is worked once, and A.3 is repeated (in width) the number of times provided for your size – in this case like so: S = 0 times, M = 0 times, L=2 times, XL= 3 times and XXL = 4 times.

The diagrams are worked as usual: begin with the first row in A.1, then work the first row in A.2 etc.

See DROPS lesson: How to read knitting diagrams

See DROPS lesson: How to read crochet diagrams

The total width of the garment (from wrist-to-wrist) will be larger in the larger sizes, despite the actual sleeves being shorter. The larger sizes have longer sleeve caps and wider shoulders, so there will be a good fit in all sizes.

The measurement sketch/schematic drawing provides information regarding the full length of the garment. If it’s a jumper or a jacket the length is measured from the highest point on the shoulder (usually closest to the neckline), and straight down to the bottom of the garment. It is NOT measured from the tip of shoulder. Similarly, the length of yoke is measured from the highest point on the shoulder and down to where yoke is split into body and sleeves.

See DROPS lesson: How to read a schematic drawing

Diagrams are often repeated on the round or in height. 1 repeat is the diagram the way it appears in the pattern. If it says to work 5 repeats of A.1 in the round, then you work A.1 a total of 5 times after/next to each other in the round. If it says to work 2 repeats of A.1 vertically/in height you work the entire diagram once, then begin again at the start and work the entire diagram one more time.

Chain stitches are slightly narrower than other stitches and to avoid working the cast-on edge too tight, we simply chain more stitches to begin with. The stitch count will be adjusted on the following row to fit the pattern and measurement sketch.

The rib edge is more elastic and will contract slightly compared to, for example, stocking stitch. By increasing before the rib edge, you avoid a visible difference in width between the rib edge and the rest of the body.

It’s very easy to cast off too tightly, and by making yarn overs while casting off (and simultaneously casting these off) you avoid a too tight cast off edge.

See DROPS video: How to bind off with yarn overs (yo)

To achieve an even increase (or decrease) you can increase on, for example: every 3rd and 4th row alternately, like so: work 2 rows and increase on the 3rd row, work 3 rows and increase on the 4th. Repeat this until the increase is complete.

See DROPS lesson: Increase or decrease 1 st on every 3rd and 4th row alternately

Should you prefer to work in the round instead of back and forth, you may of course adjust the pattern. You’ll need to add steeks mid-front (usually 5 stitches), and follow the instructions. When you would normally turn and work from the wrong side, simply work across the steek and continue in the round. At the end you’ll cut the piece open, pick up stitches to work bands, and cover the cut edges.

See DROPS video: How to knit steeks and cut open

Should you prefer to work back and forth instead of in the round, you may of course adjust the pattern so you work the pieces separately and then assemble them at the end. Divide the stitches for the body in 2, add 1 edge stitch in each side (for sewing) and work the front and back pieces separately.

See DROPS lesson: Can I adapt a pattern for circular needles into straight needles?

Pattern repeats can vary slightly in the different sizes, in order to get the correct proportions. If you’re not working the exact same size as the garment in the photo, yours might deviate slightly. This has been carefully developed and adjusted so that the complete impression of the garment is the same in all sizes.

Make sure to follow instructions and diagrams for your size!

If you have found a pattern you like which is available in women’s size it’s not very difficult to convert it to men’s size. The biggest difference will be the length of sleeves and body. Start working on the women size that you think would fit across the chest. The additional length will be worked right before you cast off for the armhole/sleeve cap. If the pattern is worked top-down you can add the length right after the armhole or before the first decrease on sleeve.

Regarding additional yarn amount, this will depend on how much length you add, but it is better with a skein too many than too few.

All yarns will have excess fibres (from production) that might come off as lint or shedding. Brushed yarns (ie hairier yarns) have more of these loose, excess fibres, causing more shedding.

Shedding also depends on what is worn under or over the garment, and whether this pulls at the yarn fibres. It’s therefore not possible to guarantee that there will be no shedding

Below are some tips on how to get the best result when working with hairier yarns:

1. When the garment is finished (before you wash it) shake it vigorously so the looser hairs come off. NOTE: do NOT use a lint roller, brush or any method that pulls at the yarn.

2. Place the garment in a plastic bag and put it in your freezer - the temperature will cause the fibres to become less attached to each other, and excess fibres will come off easier.

3. Leave in the freezer for a few hours before taking it out and shaking it again.

4. Wash the garment according to the instructions on the yarn label.

Pilling is a natural process that happens to even the most exclusive of fibers. It's a natural sign of wear and tear that is hard to avoid, and that is most visible in high friction areas of your garment like a sweater's arms and cuffs.

You can make your garment look as new by removing the pilling, using a fabric comb or a pill/lint remover.

Still can't find the answer you need? Then scroll down and leave your question so one of our experts can try to help you. This will be done normally within 5 to 10 working days.
In the meantime, you can read the questions and answers that others have left to this pattern or join the DROPS Workshop on Facebook to get help from fellow knitters/crocheters!

You might also like...

Post a comment to pattern DROPS 155-2

We would love to hear what you have to say about this pattern!

If you want to leave a question, please make sure you select the correct category in the form below, to speed up the answering process. Required fields are marked *.

Comments / Questions (40)

country flag Morrisric wrote:

Chloroquine phosphate buy online usa

29.12.2022 - 06:06

country flag JohnMorrison wrote:

If we get a report of a potential error, we will review the pattern and make the correction if necessary. Garnstudio this will be done normally within 7 to 10 working days.

28.05.2018 - 12:02

country flag Miriam wrote:

Ich habe die 8. Rd im Diagramm A.4 abgeschlossen. Nun soll an den Seiten Kraus-re gestrickt werden; heißt das, ich stricke die 9. Rd an den Seiten re und in der 10. Rd an den betreffenden M li? Werden die krausen M nur in der 9., 21., und 9. Rd, des 2. Durchgangs gestrickt oder ab der 9. Rd durchgängig? Mir ist nicht ganz klar, weshalb dort kraus gestrickt wird. Vielen vielen lieben Dank für eine Antwort, das Kleid sieht einfach toll aus und ich bin gerade so ratlos :)

02.04.2018 - 11:45

country flag Sonja Coenraads wrote:

Wat wordt bedoeld met het kantpatroon? Is dit telpatroon A1, A2, A3, A4 of A5? Is van belang om met juiste naalddikte te starten om de genoemde stekenverhouding van 21 steken en 28 naalden te krijgen.

22.03.2018 - 13:44

DROPS Design answered:

Hallo Sonja, Met het kantpatroon wordt A.1 t/m A.5 bedoeld, dus allemaal. Voor het maken van een proeflapje voor de sekenverhouding kun je een van de 5 kantpatronen kiezen.

26.03.2018 - 10:47

country flag Essay Writing Service Uk wrote:

This will be perfect for any one...Thanks for posting such good collections

22.02.2018 - 09:43

country flag Hanne Grimstad Hansen wrote:

Hei. En nydelig modell Drops 155-2. Ser i et kommentarfelt at en har strikket denne i baby alpaca slik, drops. I mønsteret er det brukt muskat. Er det mulig å bruke baby alpaca slik? Vil resultatet bli like bra, og hvilke endringer må jeg eventuelt gjøre.mvh Hanne

21.06.2016 - 11:09

DROPS Design answered:

Hej Hanne. BabyAlpaca Silk er tyndere end Muskat, men denne kjole er strikket paa tyndere pinde, som gör du nemmere kan strikke med BabyAlpaca Silk (Du behöver ikke at beregne mönstret paany). Men glem ikke at strikke en pröve og sörg for din strikkefasthed er korrekt.

21.06.2016 - 12:54

Martin wrote:

I'm very confused by chart A1. over 20 stitches in a small size, you start with 420 stitches, if you times all the decreases in the chart by 21, you decrease 588 stitches!! How is that possible? what am I doing wrong?!! Do I ignore the slip 1, knit 2 together and psso every 3 rows? help me!!! thanks :)

31.05.2016 - 00:21

DROPS Design answered:

Dear Martin, you are repeating A.1 a total of 21 times in width, ie 21x 20 sts = 420 sts. After A.1 has been worked 1 time in height, 12 sts remain in each A.1: 12 sts x 21 = 252 sts remain. Work each row in diagram starting at the very bottom corner on the right side and read towards the left every round. Happy knitting!

31.05.2016 - 08:57

Lukisan wrote:

Hello, I already work A.3 (= 6 sts) over all sts 1 time vertically. On next round, how to do inc 18 sts evenly on needle? thank you very much

16.09.2015 - 16:20

DROPS Design answered:

Dear Mrs Lukisan, please click here to calculate how to inc evenly. Happy knitting!

17.09.2015 - 08:52

country flag Chantal wrote:

Bonjour Je viens de tricoter cette jolie robe en coton Muskat (coton recommandé pour ce modèle) à ma fille en taille S mais j'ai du racheter 2 pelotes pour la terminer. Ma maman a fait une tunique en Muskat (s15-6 Tunic and hat knitted with a lace pattern) et a du aussi en racheter. Y a-t-il un nouveau métrage pour ce coton? Cordialement

10.05.2015 - 08:56

DROPS Design answered:

Bonjour Chantal, pensez toujours à bien vérifier votre échantillon et surtout à bien conserver la même tension pendant la réalisation de votre ouvrage. Bon tricot!

11.05.2015 - 11:17

country flag Bente Beukel wrote:

Jeg ville strikke den i lys lilla

20.07.2014 - 20:41