
Popular categories
Looking for a yarn?


|
|
DROPS 73-9 |
|
|
|
|
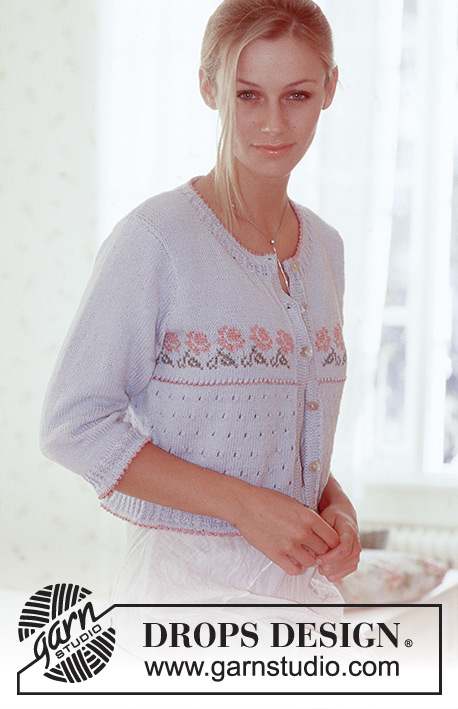
Jacket in DROPS Angora-Tweed or Lima or Soft tweed.
DROPS 73-9 |
|
|
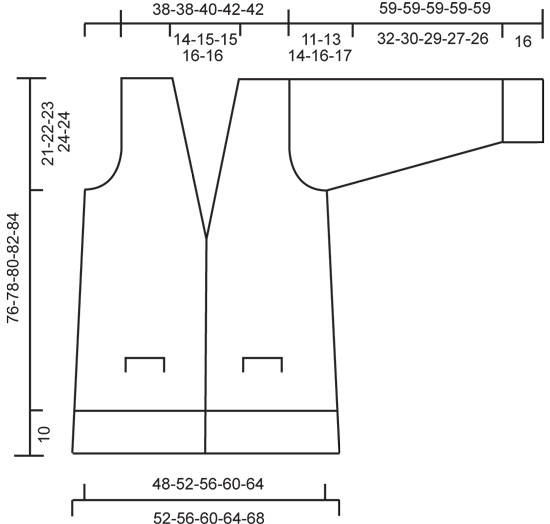
Gauge: 19 sts x 25 rows = 10 x 10 cm in stockinette st. Rib: * K 2, P 2*, repeat from * - *. Garter st, when knitting flat: Knit all sts, all rows. Knitting tips (for neck shaping): All decs are made on right side rows. Dec 1 st inside of 1 edge st as follows:After 1 edge st: Slip 1 as if to knit, K 1, psso. Before 1 edge st: K 2 tog. Back: Cast on 124-132-140-152-160 sts in Angora-Tweed or Lima. Knit rib, beginning and ending right side rows with K 1 (edge st knit in garter st throughout), P 2. When the piece measures 10 cm change to stockinette st, decreasing 24-24-24-28-28 sts evenly distributed on the first row = 100-108-116-124-132 sts. When the piece measures 25 cm dec 1 st at each side every 10 cm a total of 3 times = 94-102-110-118-126 sts. When the piece measures 55-56-57-58-60 cm bind off for armhole at each side every other row: 4 sts 1 time, 3 sts 1-1-1-2-2 times, 2 sts 1-2-4-4-5 times and 1 st 3-4-3-3-4 times = 70-72-74-76-78 sts. When the piece measures 74-76-78-80-82 cm bind off the center 24-26-26-28-28 sts for the neck. Then bind off 1 st at each neck edge on the next row = 22-22-23-23-24 sts remain on each shoulder. Bind off when the piece measures 76-78-80-82-84 cm. Pocket lining: Cast on 26 sts in Angora-Tweed or Lima and knit stockinette st for 24 cm. Put sts on a st holder and knit a second pocket lining. Right front: Cast on 85-89-93-97-101 sts in Angora-Tweed or Lima. Knit rib as follows from center front edge (right side row): K 2 (edge sts knit in garter st throughout), * K 2, P 2 *, repeat from * - * and end with K 2 + K 1 (edge st knit in garter st throughout). When the piece measures 10 cm establish pattern as follows from center front edge (right side row): K 2 (edge sts knit in garter st throughout), 20 sts rib and stockinette st over the remaining sts, decreasing 13 sts evenly distributed over the stockinette sts on the first row = 72-76-80-84-88 sts. When the piece measures 20-21-22-23-24 cm knit the next row as follows from center front edge: K 2 (edge sts knit in garter st), 20 sts rib, 8-10-11-12-14 sts in stockinette st, put the next 26 sts on a st holder for pocket opening, and slip 26 sts from one pocket lining onto right hand needle, 16-18-21-24-26 sts in stockinette st. Read the entire next section before knitting: Continue in stockinette st with 20 sts rib and 2 sts in garter st at the center front. At the same time when the piece measures 25 cm dec 1 st at the side every 10 cm a total of 3 times. At the same time when the piece measures 36-38-40-42-44 cm put the 22 edge st at the center front on a st holder (the collar will be knit and sewn to body later). Cast on 1 new sts at the center front edge (knit this edge st in garter st throughout). Continue with stockinette st, and dec 1 st for the neck inside the edge st every 6 rows 14-15-15-16-16 times - see knitting tips. At the same time when the piece measures 55-56-57-58-60 cm bind off for armhole at the side as on back. After all armhole and neck shaping is complete 22-22-23-23-24 sts remain on each shoulder. Bind off when the piece measures 76-78-80-82-84 cm. Collar: Put sts on st holder back on needles = 22 sts. Continue in established rib keeping 2 sts at the center front edge in garter st throughout. At the same time on 1st right side row inc 1 st inside 5 edge sts at each side (inc by pulling up a st from the previous row). Inc 1 st at each side every 6 rows a total of 16 times = 54 sts on needles - the increased sts are knit in the rib as you go along. When the collar measures approx. 38 cm put all sts on a st holder. Sew collar to edge sts on front from right side. Pocket-edge: Put sts from st holder for pocket opening (26 sts) back on needles. Knit rib (with 2 sts at each edge in garter st) for 3 cm, bind off. Fold pocket lining double and sew cast-on edge to bottom edge of pocket edge. Sew sides of pockets. Left front: Cast on and knit the same as the right reversing shaping. Sleeve: Cast on 46-50-50-54-54 sts in Angora-Tweed or Lima. Knit rib for 16 cm. Change to stockinette st - and inc 1 st at each side every 5-5-4-4-4 rows a total of 15-15-16-16-16 times = 76-80-82-86-86 sts. When sleeve measures 48-47-45-43-42 cm bind off for sleeve cap at each side every other row: 3 sts 1 time, 2 sts 4-4-4-3-3 times, 1 st 4-5-8-13-14 times, then bind off 2 sts each side until the piece measures 58 cm and then 3 sts 1 time. The piece measures approx. 59 cm, bind off the remaining sts. Belt: Cast on 14 sts and knit rib with 2 sts in garter st at each side. Bind off when belt measures approx. 120-150 cm. Assembly: Sew shoulder seams. Collar: Pick up all sts from st holders on fronts + 26 sts over back = 134 sts. Knit rib over all sts - match up rib on fronts - at the same time inc 1 st inside the 5 outermost sts at each side at the center front as before every 6 rows 4 times - knit the increased sts in the rib. Bind off in rib when the collar measures approx. 10 cm at center back. Sew in sleeves. Sew sleeve and side seams using edge sts as a seam allowance. Belt loops: Make 2 small twisted cords with double strands of yarn approx. 5 cm long. Sew to side seams at each side on the cardigan approx. 30-40 cm from lower edge. |
|
|
|
|
Have you made this or any other of our designs? Tag your pictures in social media with #dropsdesign so we can see them! Do you need help with this pattern?You'll find tutorial videos, a Comments/Questions area and more by visiting the pattern on garnstudio.com. © 1982-2024 DROPS Design A/S. We reserve all rights. This document, including all its sub-sections, has copyrights. Read more about what you can do with our patterns at the bottom of each pattern on our site. |


With over 40 years in knitting and crochet design, DROPS Design offers one of the most extensive collections of free patterns on the internet - translated to 17 languages. As of today we count 304 catalogues and 11422 patterns - 11422 of which are translated into English (UK/cm).
We work hard to bring you the best knitting and crochet have to offer, inspiration and advice as well as great quality yarns at incredible prices! Would you like to use our patterns for other than personal use? You can read what you are allowed to do in the Copyright text at the bottom of all our patterns. Happy crafting!
Comments / Questions (5)
Bonjour, Vous devriez proposer à nouveau l'angora tweed. Elle est superbe !
03.01.2021 - 02:17Bom dia, tenho duvidas na gola....uma vez que se aumenta 2 malhas em cada carreira a 5m do rebordo e sendo o canelado 2 meia e 2 tricot o padrão não vai bater certo...podem explicar?
10.10.2020 - 11:31DROPS Design answered:
Boa tarde, Os aumentos são feitos antes/depois do canelado. Sendo assim, depois de se aumentar 1 malha, tricota-se essa malha em meia ou em liga, consoante a malha anterior do canelado (Ezemplo: a última malha do canelado é a 2.ª malha liga. Tricota a nova malha em meia). Vai criar um canelado em diagonal. Bons tricôs!
12.10.2020 - 16:12Hallo liebes Drops-Team, Bitte, können Sie sagen, wo finde ich die Tabelle mit den Körpermassen, die konkret SIE benurzem, damit ich richtige Kleidungsgröße ermitteln kann. Da es auch die Zugabe für die Bequemlichkeit überall gibt, ist es schwierig nur anhand den cm angaben auf der Schema zu folgen. Ich brauche für meine Mutter, die Brustoberweite 110 hat L..oder XL..? im internet bei jedem Hersteller eigene Bestimmung) Vielen Dank!
30.04.2019 - 16:08DROPS Design answered:
Liebe Viktoriya, am besten messen Sie eine ähnliche Jacke die Sie gerne haben, diese Massen vergleichen Sie mit den von der Maßskizze, so können Sie die richtige Größe wählen. Mehr über Größen lesen Sie hier. Viel Spaß beim stricken!
30.04.2019 - 16:58Guten Tag. Ich komme mit ihrer Beschreibung nicht weiter. Es geht immer noch um den Kragen. Wie stricke ich weiter wenn ich die 22 Maschen vom Hilfsfaden zurück auf die Nadel genommen habe. In der ersten Reihe meine ich. Wenn ich nur eine Masche innerhalb von 5 Maschen zunehmen soll,verschiebt sich doch das ganze Muster.Vielen Dank Peggy
07.09.2016 - 16:01DROPS Design answered:
Liebe Peggy, Sie müssen 1 M. auf beiden Seiten zunehmen (nicht nur auf 1 Seite sondern auf beiden, dh nach den 5 ersten Maschen und vor den 5 letzen Maschen. Diese Zunahmen werden in Bündchen gestrickt: die erste Zunahme stricken Sie li., die 2. Zunahmen stricken Sie auch li. (= 2. ZunahmeR) = nach 12 R. haben Sie wieder 2 re./2 li. Dann stricken Sie die nächste 2 Zunahme re. = nach weitere 12 R haben Sie wieder 2 re./2 li. und so weiter zunehmen: die 2 nächste li, die 2 nächste re, usw.
08.09.2016 - 08:46Können Sie mir bitte den Teil mit dem Kragen erklären,nachdem man die 22 Maschen von dem Hilfsfaden auf die Nadel zurückgelegt hat? Ich verstehe das mit den Aufnahmen nicht .Hab schon mit der 1.Reihe wo man innerhalb der 5 M.die 6M.aufnehmen soll . Und wie geht dann das Bündchenmuster auf? Hänge total in der Luft und kann nicht weiter stricken. Danke für die schnelle Hilfe.
05.09.2016 - 12:32DROPS Design answered:
Liebe Peggy, die aufgenommenen Maschen sollen in Bündchen gestrickt werden: die 2 ersten M. werden li. gestrickt die 2 nächsten M. rechts u.s.w.
05.09.2016 - 13:40