DROPS Bomull-Lin
DROPS Bomull-Lin
53% Cotton, 47% Linen
from 3.45 $ /50g
Get the yarn to make this pattern from 17.25$.

The yarn cost is calculated from the pattern’s smallest size and the yarn’s cheapest product type. Looking for an even better price? You might find it on the DROPS Deals!

DROPS SS24

Amanda

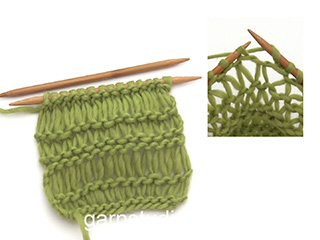
Knitted DROPS top in garter st with wave pattern in ”Bomull-Lin” or "Paris". Size: XS - XXXL.

DROPS 153-34
DROPS design: Pattern no l-126
Yarn group C or A + A
-----------------------------------------------------------
Size: XS – S/M – L/XL - XXL /XXXL.
Finished measurements:
Bust: 80-100-120-140 cm / 31½"-39½"-47"-55"
Full length: 50-54-58-62 cm / 19¾"-21¼"-22¾"-24½"
The garment will stretch approx. 5 cm / 2" in length after wash.

Materials:
DROPS BOMULL-LIN from Garnstudio
250-300-300-350 g color no 03, light beige
Or:
DROPS PARIS from Garnstudio
300-300-350-400 g color no 26, dark beige

DROPS CIRCULAR NEEDLE (60 or 80 cm / 24" or 32") SIZE 6 mm / US 10 - or size needed to get 14 sts pattern = 10 cm / 4" in width or 15 sts x 29 rows in garter st = 4" x 4" (10 x 10 cm).

-------------------------------------------------------

Alternative Yarn – See how to change yarns here
Yarn Groups A to F – Use the same pattern and change the yarn here
Yarn usage using an alternative yarn – Use our yarn converter here

-------------------------------------------------------

DROPS Bomull-Lin
DROPS Bomull-Lin
53% Cotton, 47% Linen
from 3.45 $ /50g
Get the yarn to make this pattern from 17.25$.

The yarn cost is calculated from the pattern’s smallest size and the yarn’s cheapest product type. Looking for an even better price? You might find it on the DROPS Deals!

Pattern instructions

NOTE: This pattern is written in American English. All measurements in charts are in cm. For conversion from inches to cm - click here. There are different terms for crocheting in American and British English. If this pattern includes crochet, click for "crochet terms" here. For this pattern in British English, please click here.
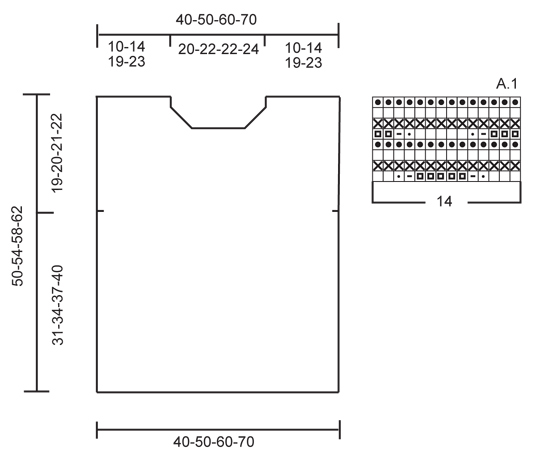
KNITTING TIP:
To make the pattern fit, work 1 edge st in right side of piece seen from RS.

GARTER ST (back and forth on needle):
K all rows. 1 ridge = K2 rows.

PATTERN:
See diagram A.1. The diagram shows all rows in pattern seen from RS.

INCREASE TIP:
Inc 1 st by picking up yarn between 2 sts from previous row.
K this st twisted, i.e. work in back loop of st instead of front to avoid holes.

DECREASE TIP:
Dec inside 1 edge st in garter st. All dec are done from WS!
Dec before 1 edge st as follows: K 2 tog.
Dec after 1 edge st as follows: Slip 1 st as if to K, K 1, psso.

TIP:
Bomull-Lin will be more even and look better after it has been washed. When the garment is finished, soak it, stretch it to correct measurements - see chart, and leave it to dry flat. The garment will stretch approx. 5 cm / 2" in length after wash.
----------------------------------------------------------

BACK PIECE:
Worked back and forth on circular needle with 1 edge st in garter st in right side seen from RS - READ KNITTING TIP!
Cast on 57-71-85-99 sts on circular needle size 6 mm / US 10 with Bomull-Lin. Work 1 ridge in GARTER ST - see explanation above. Continue to work PATTERN from RS as follows: 1 edge st in garter st, A.1 (= 14 sts) 4-5-6-7 times in total.
Continue back and forth with pattern and 1 edge st in garter st in right side of piece. REMEMBER THE GAUGE! When piece measures 31-34-37-40 cm / 12¼"-13½"-14½"-15¾", insert a marker in each side to mark armholes. When piece measures 39-42-46-49 cm / 15¼"-16½"-18"-19¼", continue in garter st AT THE SAME TIME on first row inc 3-4-5-6 sts evenly - READ INCREASE TIP (= 60-75-90-105 sts on needle). When piece measures 47-51-55-59 cm / 18½"-20"-21½"-23¼", bind off the middle 28-29-32-33 sts on next row from WS and finish each shoulder separately. On next row from WS, dec 1 st for neck - READ DECREASE TIP = 15-22-28-35 sts remain on shoulder. Bind off when piece measures 50-54-58-62 cm / 19¾"-21¼"-22¾"-24½". Work the other shoulder the same way.

FRONT PIECE:
Cast on and work as back piece. When piece measures 42-45-49-52 cm / 16½"-17¾"-19¼"-20½", bind off the middle 20-21-22-23 sts on next row from WS and finish each shoulder separately. Then work in garter st and dec 1 st for neck on next row from WS - READ DECREASE TIP. Repeat dec on every row from WS 4-4-5-5 more times (i.e. 5-5-6-6 dec in total) = 15-22-28-35 sts remain on shoulder. Bind off when piece measures 50-54-58-62 cm / 19¾"-21¼"-22¾"-24½". Work the other shoulder the same way.

ASSEMBLY:
Sew shoulder seams and side seams tog in outer loops of edge sts. Side seam should beg 31-34-37-40 cm / 12¼"-13½"-14½"-15¾" from cast-on edge.
When the garment is finished and assembled, soak it, stretch it to correct measurements - see chart, and leave it to dry flat.


Diagram

All measurements in charts are in cm.

symbols = K from RS
symbols = 1 YO, K 1
symbols = 2 YO, K 1
symbols = 3 YO, K 1
symbols = K from WS, do not work YOs but drop them off the needle (= dropped sts)
symbols = K from WS
diagram
Do you have a question? See a list of frequently asked questions (FAQ)

Knitting tension is what determines the final measurements of your work, and is usually measured per 10 x 10 cm. It is provided like so: number of stitches in width x number of rows in height - eg: 19 stitches x 26 rows = 10 x 10 cm.

The knitting tension is very individual; some people knit/crochet loosely while others work tightly. You adjust the knitting tension with the needle size, which is why the suggested needle size only serve as a guide! You need to adjust this (up or down) to ensure that YOUR knitting tension matches the knitting tension provided in the pattern. If you work with a different knitting tension than provided you will have a different yarn consumption, and your work will have different measurements than what the pattern suggests.

The knitting tension also determines which yarns can replace each other. As long as you achieve the same knitting tension you can replace one yarn with another.

See DROPS lesson: How to measure your tension/gauge

See DROPS video: How to make a gauge tension swatch

The required amount of yarn is provided in grams, eg: 450 g. To calculate how many balls you’ll need you first need to know how many grams are in 1 ball (25g, 50g or 100g). This information is available if you click on the individual yarn quality on our pages. Divide the amount required with the amount of each ball. For example, if each ball is 50g (the most common amount), the calculation will be as follows: 450 / 50 = 9 balls.

The important thing when changing from one yarn to another is that the knitting/crochet tension remains the same. This is so that the measurements of the finished piece will be the same as on the sketch provided. It is easier to achieve the same knitting tension using yarns from the same yarn group. It is also possible to work with multiple strands of a thinner yarn to achieve the knitting tension of a thicker one. Please try our yarn converter. We recommend you to always work a test swatch.

Please NOTE: when changing yarn the garment might have a different look and feel to the garment in the photo, due to individual properties and qualities of each yarn.

See DROPS lesson: Can I use a different yarn than the one mentioned in the pattern?

All our yarns are categorised into yarn groups (from A to F) according to thickness and knitting tension – group A contains the thinnest yarns and group F the thickest. This makes it easier for you to find alternative yarns to our patterns, should you wish to switch yarn. All yarns within the same group have a similar knitting tension and can easily replace each other. However, different yarn qualities have different structures and properties which will give the finished work a unique look and feel.

Click here for an overview of the yarns in each yarn group

At the top of all our patterns you’ll find a link to our yarn converter, which is a helpful tool should you wish to use a different yarn than suggested. By filling in the yarn quality you wish to replace, the amount (in your size) and number of strands, the converter will present good alternative yarns with the same knitting tension. Additionally it will tell you how much you’ll require in the new qualities and whether you’ll need to work with multiple strands. Most skeins are 50g (some are 25g or 100g).

If the pattern is worked with multiple colours, every colour will have to be converted separately. Similarly, if the pattern is worked with several strands of different yarns (for example 1 strand Alpaca and 1 strand Kid-Silk) you will have to find alternatives for each, individually.

Click here to see our yarn converter

Since different yarns have different qualities and textures we have chosen to keep the original yarn in our patterns. However, you can easily find options among our available qualities by using our yarn converter, or simply pick a yarn from the same yarn group.

It is possible that some retailers still have discontinued yarns in stock, or that someone has a few skeins at home that they would like to find patterns for.

The yarn converter will provide both alternative yarn as well as required amount in the new quality.

If you think it's hard to decide what size to make, it can be a good idea to measure a garment you own already and like the size of. Then you can pick the size by comparing those measures with the ones available in the pattern's size chart.

You'll find the size chart at the bottom of the pattern.

See DROPS lesson: How to read size chart

The needle size provided in the pattern serves only as a guide, the important thing is to follow the knitting tension. And since knitting tension is very individual, you will have to adjust the needle size to ensure that YOUR tension is the same as in the pattern – maybe you’ll have to adjust 1, or even 2 needle sizes, up or down to achieve the correct tension. For this, we recommend that you work test swatches.

Should you work with a different knitting tension than the one provided, the measurements of the finished garment might deviate from the measurement sketch.

See DROPS lesson: How to measure your tension/gauge

See DROPS video: How to make a gauge tension swatch

Working a garment top-down provides more flexibility and room for personal adjustment. For example it is easier to try the garment on while working, as well as making adjustments to length of yoke and shoulder caps.

The instructions are carefully explaining every step, in the correct order. Diagrams are adjusted to the knitting direction and are worked as usual.

The diagram depicts all rows/rounds, and every stitch seen from the right side. It is read from bottom to top, from right to left. 1 square = 1 stitch.

When working back and forth, every other row is worked from the right side and every other row is worked from the wrong side. When working from the wrong side, the diagram will have to be worked reversed: from left to right, knit stitches are purled, purl stitches are knit etc.

When working in the round every round is worked from the right side and the diagram are worked from right to left on all rounds.

See DROPS lesson: How to read knitting diagrams

The diagram depicts all rows/rounds, and every stitch seen from the right side. It is worked from bottom to top, from right to left.

When working back and forth every other row is worked from the right side: from right to left and every other row is worked from the wrong side: from left to right.

When working in the round, every row in the diagram are worked from the right side, from right to left.

When working a circular diagram you start in the middle and work your way outwards, counter clockwise, row by row.

The rows usually start with a given number of chain stitches (equivalent to the height of the following stitch), this will either be depicted in the diagram or explained in the pattern.

See DROPS lesson: How to read crochet diagrams

Instructions for working several diagrams after each other on the same row/round, will often be written like so: “work A.1, A.2, A.3 a total of 0-0-2-3-4 times". This means you work A.1 once, then A.2 is worked once, and A.3 is repeated (in width) the number of times provided for your size – in this case like so: S = 0 times, M = 0 times, L=2 times, XL= 3 times and XXL = 4 times.

The diagrams are worked as usual: begin with the first row in A.1, then work the first row in A.2 etc.

See DROPS lesson: How to read knitting diagrams

See DROPS lesson: How to read crochet diagrams

The total width of the garment (from wrist-to-wrist) will be larger in the larger sizes, despite the actual sleeves being shorter. The larger sizes have longer sleeve caps and wider shoulders, so there will be a good fit in all sizes.

The measurement sketch/schematic drawing provides information regarding the full length of the garment. If it’s a jumper or a jacket the length is measured from the highest point on the shoulder (usually closest to the neckline), and straight down to the bottom of the garment. It is NOT measured from the tip of shoulder. Similarly, the length of yoke is measured from the highest point on the shoulder and down to where yoke is split into body and sleeves.

See DROPS lesson: How to read a schematic drawing

Diagrams are often repeated on the round or in height. 1 repeat is the diagram the way it appears in the pattern. If it says to work 5 repeats of A.1 in the round, then you work A.1 a total of 5 times after/next to each other in the round. If it says to work 2 repeats of A.1 vertically/in height you work the entire diagram once, then begin again at the start and work the entire diagram one more time.

Chain stitches are slightly narrower than other stitches and to avoid working the cast-on edge too tight, we simply chain more stitches to begin with. The stitch count will be adjusted on the following row to fit the pattern and measurement sketch.

The rib edge is more elastic and will contract slightly compared to, for example, stocking stitch. By increasing before the rib edge, you avoid a visible difference in width between the rib edge and the rest of the body.

It’s very easy to cast off too tightly, and by making yarn overs while casting off (and simultaneously casting these off) you avoid a too tight cast off edge.

See DROPS video: How to bind off with yarn overs (yo)

To achieve an even increase (or decrease) you can increase on, for example: every 3rd and 4th row alternately, like so: work 2 rows and increase on the 3rd row, work 3 rows and increase on the 4th. Repeat this until the increase is complete.

See DROPS lesson: Increase or decrease 1 st on every 3rd and 4th row alternately

Should you prefer to work in the round instead of back and forth, you may of course adjust the pattern. You’ll need to add steeks mid-front (usually 5 stitches), and follow the instructions. When you would normally turn and work from the wrong side, simply work across the steek and continue in the round. At the end you’ll cut the piece open, pick up stitches to work bands, and cover the cut edges.

See DROPS video: How to knit steeks and cut open

Should you prefer to work back and forth instead of in the round, you may of course adjust the pattern so you work the pieces separately and then assemble them at the end. Divide the stitches for the body in 2, add 1 edge stitch in each side (for sewing) and work the front and back pieces separately.

See DROPS lesson: Can I adapt a pattern for circular needles into straight needles?

Pattern repeats can vary slightly in the different sizes, in order to get the correct proportions. If you’re not working the exact same size as the garment in the photo, yours might deviate slightly. This has been carefully developed and adjusted so that the complete impression of the garment is the same in all sizes.

Make sure to follow instructions and diagrams for your size!

If you have found a pattern you like which is available in women’s size it’s not very difficult to convert it to men’s size. The biggest difference will be the length of sleeves and body. Start working on the women size that you think would fit across the chest. The additional length will be worked right before you cast off for the armhole/sleeve cap. If the pattern is worked top-down you can add the length right after the armhole or before the first decrease on sleeve.

Regarding additional yarn amount, this will depend on how much length you add, but it is better with a skein too many than too few.

All yarns will have excess fibres (from production) that might come off as lint or shedding. Brushed yarns (ie hairier yarns) have more of these loose, excess fibres, causing more shedding.

Shedding also depends on what is worn under or over the garment, and whether this pulls at the yarn fibres. It’s therefore not possible to guarantee that there will be no shedding

Below are some tips on how to get the best result when working with hairier yarns:

1. When the garment is finished (before you wash it) shake it vigorously so the looser hairs come off. NOTE: do NOT use a lint roller, brush or any method that pulls at the yarn.

2. Place the garment in a plastic bag and put it in your freezer - the temperature will cause the fibres to become less attached to each other, and excess fibres will come off easier.

3. Leave in the freezer for a few hours before taking it out and shaking it again.

4. Wash the garment according to the instructions on the yarn label.

Pilling is a natural process that happens to even the most exclusive of fibers. It's a natural sign of wear and tear that is hard to avoid, and that is most visible in high friction areas of your garment like a sweater's arms and cuffs.

You can make your garment look as new by removing the pilling, using a fabric comb or a pill/lint remover.

Still can't find the answer you need? Then scroll down and leave your question so one of our experts can try to help you. This will be done normally within 5 to 10 working days.
In the meantime, you can read the questions and answers that others have left to this pattern or join the DROPS Workshop on Facebook to get help from fellow knitters/crocheters!

You might also like...

Post a comment to pattern DROPS 153-34

We would love to hear what you have to say about this pattern!

If you want to leave a question, please make sure you select the correct category in the form below, to speed up the answering process. Required fields are marked *.

Comments / Questions (37)

country flag Andrea wrote:

Hallo, habe gerade angefangen das Top zu stricken. Wie stricke ich einen neuen Wollknäul ein? Wie Fäden einweben? Das Vernähen der Fäden scheint mir etwas schwierig zu sein bei den Fallmaschen. LG Andrea

20.03.2014 - 22:35

DROPS Design answered:

Liebe Andrea, ich würde empfehlen, den Faden an den Stellen zu wechseln, an denen es keine Fallmaschen gibt (also in der Mitte des Rapports), in einer R, die kraus rechts ohne Umschläge gestrickt wird. Sie können die Fäden an diesen Stellen einweben oder an dieser Stelle die Fäden hinterher vernähen:

21.03.2014 - 09:56

country flag Anneleen wrote:

Hallo ik ben op zoek naar de maattabel van de patronen. Ik ben er zeker van dat jullie die ergens staan hebben, alleen kan ik ze niet vinden. Kunnen jullie me helpen aub? Dan kan ik gauw wol bestellen... Alvast dank!

03.03.2014 - 01:23

DROPS Design answered:

Hoi Anneleen. De maattabel staat onderaan het patroon. Hier vind je de afmetingen per maat in cm. Je kan hier vergelijken met je eigen afmetingen en je maat kiezen. Veel breiplezier

03.03.2014 - 10:08

country flag Lea wrote:

Hallo, ich beginne gerade mit dem top und ich stehe gerade vor 2 fragen. 1. wenn ich bei Gr. M 71 Maschen anschlage, kann ich das Muster nicht komplett auf eine Reihe hintereinander machen. 2. in der musterbeschreibung steht symbol ... steht für 1 M re in der Rück-R würde bei beginn mit dem muster in der Hin-R müssten die maschen der ersten Reihe des musters doch links gestrickt werden? oder muss man im muster mit der 2. reihe beginnen?

15.02.2014 - 22:08

DROPS Design answered:

Liebe Lea, das Muster geht auf, Sie müssen am Anfang der Hin-R 1 Rand-M kraus re stricken (siehe Anleitung). Es bleiben noch 70 M für das Muster, 70 M geteilt durch 14 M (A.1) = 5 Rapporte. Man beginnt mit der 1. Muster-R und strickt im gesamten Muster nur rechte M (+ ggf. Umschläge), nie li M. Das Symbol mit dem kleinen Punkt in der 1. + 5. R bedeutet "1 Umschlag, 1 M re", das Symbol mit dem großen Punkt erscheint nur in Rück-R und bedeutet "1 M re".

15.02.2014 - 23:09

country flag Svenja wrote:

Okay, das zusammennähen war einfacher als gedacht. ;-) Das Top ist fertig und sieht super aus!!!In welcher Farbe könnte ich es noch stricken? :-)

14.02.2014 - 08:50

country flag Svenja wrote:

Hallo, das Rückenteil habe ich jetzt fast fertig. Und ich frage mich wie ich wenn das Vorderteil fertig ist ich diese zusammen nähen soll. Matratzenstich, okay aber bei den Fallmaschen? Ist es möglich ein Video zu machen wie Spezial dieses Muster zusammen genäht wird? LG Svenja

12.02.2014 - 15:31

country flag Svenja wrote:

Ich möchte das Top auch Stricken. Habe vorher eine Frage, die 5 cm mehr nach dem Waschen liegt das am Muster? Oder an der Wolle? (Habe mit Paris schon gestrickt, da wurd nix länger nach dem Waschen). LG Svenja

08.02.2014 - 10:05

DROPS Design answered:

Liebe Svenja, ja, durch die Fallmaschen deht sich das Muster.

08.02.2014 - 14:18

country flag Dorte Petersen wrote:

Er der en fejl i opskriften mht pinde størrelse ? Jeg har prøvet med str 6, så 4 og nu er jeg endt på pinde 3 hvor strikkefastheden passer ??

04.02.2014 - 09:55

DROPS Design answered:

Hej Dorte, vi og vore strikkedamer får till strikkefastheten med en p 6 mm när vi bruker det rekommenderte garn. Hvis du strikker mye lösere, så trenger du en tynnere p. Pinde 3 virker tynnt, men det som er viktigt er att du finner en pinne str der du får 15 m x 29 p på en pröve i rillestrik som måler 10 x 10 cm.

06.02.2014 - 00:13

country flag Ingunn wrote:

I oppskrift står det pinne str 6? Dette må være feil.Har prøvd diverse str. Strikker nå i pinne str 2,5 for å få riktig mål.Hva er riktig pinne.

31.01.2014 - 16:52

DROPS Design answered:

Du skal få 15 m i retstrik eller 14 m i mønster på 10 cm i bredden med DROPS Bomull-lin eller Paris og da er det normalt at bruge pind nr 6!

06.02.2014 - 09:44

country flag Barbro Roos-Mattsson wrote:

Perfekt för sommaren. Hoppas mönstret kommer snart

20.01.2014 - 20:22

Hallgunnur Skaptason wrote:

Smukk

17.01.2014 - 16:33