
Popular categories
Looking for a yarn?


|
||||||||||||||||||||||
DROPS 73-4 |
||||||||||||||||||||||
 |
 |
|||||||||||||||||||||
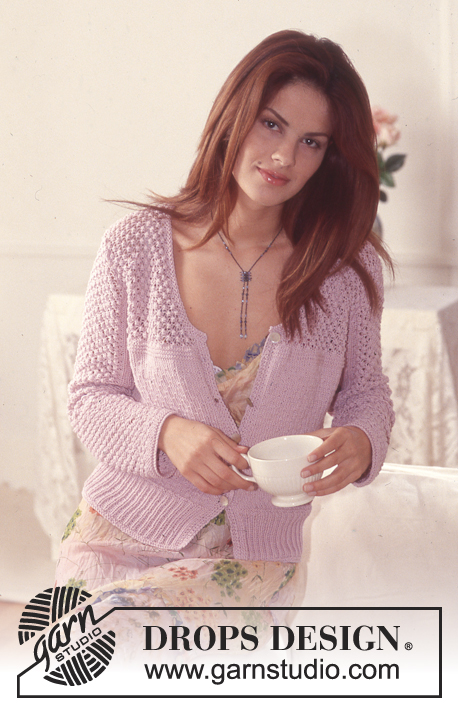
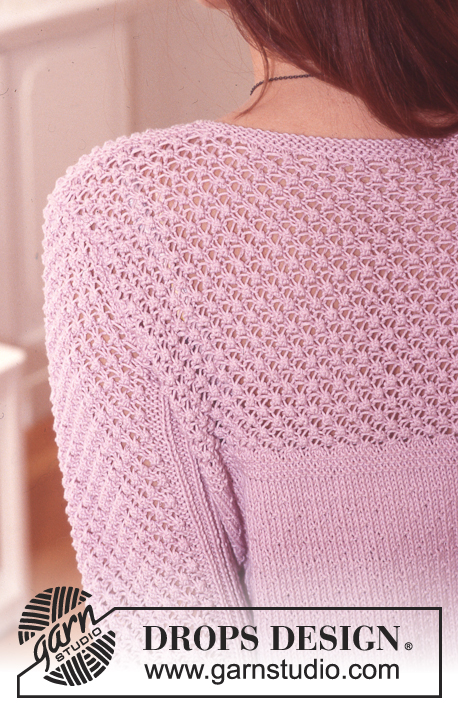
DROPS Cardigan in Safran
DROPS 73-4 |
||||||||||||||||||||||
|
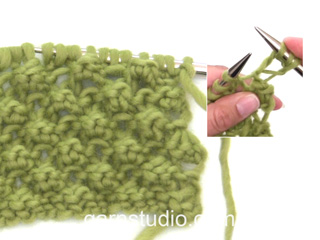
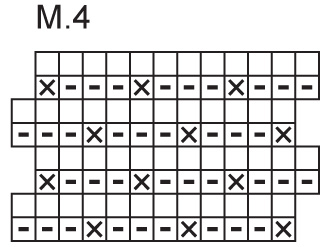
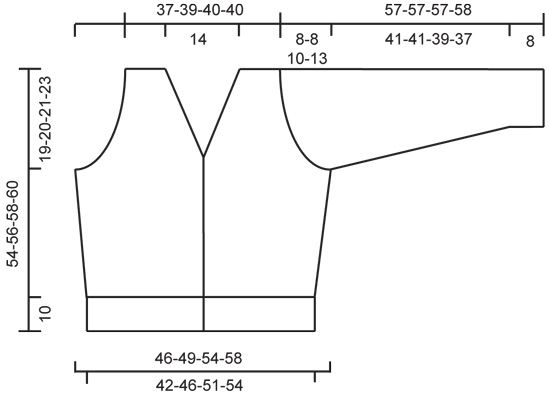
Gauge: 23 sts x 30 rows = 10 x 10 cm in stockinette st. Garter st, when knitting flat: Knit all sts, all rows. Rib: * K 1, P 2 *, repeat from * - *. Seed Stitch (on an even number of sts): Row 1: * K 1, P 1 * Row 2: * P 1, K 1 * Repeat Rows 1-2. Pattern: See charts. M1, M2 and M3 show diagram from RS M4, M5 and M6 show diagram from WS, ie 1st row is worked from WS Knitting tips for decreasing: It is difficult to bind off sts in this pattern. Bind off 3 sts as follows: sl 1, P 3 tog, psso, do not inc 3 sts in the next st. Bind off 2 sts as follows: P 3 tog without inc 3 sts in the next st. Dec 1 st as follows: slip 1, K 1, psso Buttonhole: 1 buttonhole = bind off the center st on buttonband and on the next row yo over bound off st. Make buttonholes when the piece measures: Size S: 5, 11, 17, 23 and 29 cm. Size M: 5, 11, 17, 23 and 30 cm. Size L + XL: 4, 11, 18, 25 and 31 cm. Note: there will also be a buttonhole in the neckband. ------------------------------------------------------------------- BACK Cast on 99-108-120-129 sts and knit Pattern 1 (4 rows). Then knit rib keeping 1 edge st at each side in garter st and begin rib with K 1. When the piece measures 9 cm after the rib knit Pattern 1 again, decreasing 0-1-1-2 sts on last row = 99-107-119-127 sts. Continue with Pattern 2, but keep 1 edge st at each side not in the pattern. At the same time when the piece measures 11 cm inc 1 st at each side every 5-5-6-6 cm a total of 4 times = 107-115-127-135 sts - knit the increased sts in Pattern 2 as you go along. When the piece measures approx. 32-33-34-34 cm knit Pattern 3 - adjust so that the 1st row is a wrong side row. After Pattern 3 knit Pattern 4 to finished measurements, keeping 1 st at each side not in pattern. Note: the 1st row of Pattern 4 must be a wrong side row. At the same time when the piece measures approx. 35-36-37-37 cm (adjust to end after 4 rows of Pattern 4), bind off for armhole at each side every other row - see knitting tips: 3 sts 1-1-2-2 times, 2 sts 2-2-3-4 times and 1 st 3-5-6-6 times = 87-91-91-95 sts. Continue in pattern keeping 1 edge st at each side not in pattern. When the piece measures 52-54-56-58 cm bind off the center 29 sts for the neck. Then bind off 1 sts at each neck edge on the next row = 28-30-30-32 sts remain on each shoulder. Bind off when the piece measures 54-56-58-60 cm. RIGHT FRONT Cast on 54-57-66-69 sts and knit Pattern 1 (4 rows) - but knit the 5 sts for buttonband at center front edge in seed st throughout. Then knit rib as follows from center front: 5 buttonband sts, * K 1, P 2 *, repeat from * - * end with K 1 (edge st). Make buttonholes along buttonband - see instructions above. When the piece measures 9 cm knit Pattern 1 again, and on the last row inc 1 st for sizes M + XL = 54-58-66-70 sts. Change to Pattern 2. When the piece measures 11 cm inc 1 st at side every 5-5-6-6 cm a total of 4 times = 58-62-70-74 sts. When the piece measures approx. 32-33-34-34 cm knit Pattern 3 - adjust so that the 1st row is a wrong side row. After Pattern 3 knit Pattern 4 to finished measurements. Read the entire next section before knitting: When the piece measures approx. 35-36-37-37 cm - adjust to match back - dec at the same time for armhole and neck shaping. Armhole: bind off every other row - see knitting tips: 3 sts 1-1-2-2 times, 2 sts 2-2-4-5 times and 1 st 3-5-6-6 times. V-neck: Bind off the 4 first edge sts at the center front, then shape V-neck according to Pattern 5 - (knit the remaining sts as before following Pattern 4). Dec a total of 16 sts for V-neck in Pattern 5 = 28-30-30-32 sts remain on shoulder. Continue with Pattern 6 for the neck to finished measurements (knit the remaining sts in Pattern 4). Bind off when the piece measures 54-56-58-60 cm. LEFT FRONT Cast on and knit the same as the right reversing shaping, and knitting Pattern 2 as a mirror image. SLEEVES Cast on 53-57-57-61 sts and knit Pattern 3. Knit the next row as follows (right side row): K 1 (edge st), P 2, K 1, P 2, 40-44-44-48 sts Pattern 4, P 2, K 1, P 2, K 1 and K 1 (edge st). Continue with pattern as established. When the piece measures 8 cm inc 1 st at each side a total of 14-14-17-19 times: Sizes S and M: alternately every 8th and 9th row. Size L: alternately every 6th and 7th row. Size XL: alternately every 5th and 6th row = 81-85-91-99 sts. Knit the increased sts in rib as you go along. When sleeve measures 49-49-47-45 cm bind off for sleeve cap at each side every other row - see knitting tips: 4 sts 2-2-1-1 times, 3 sts 2-3-3-3 times, 2 sts 2-2-3-2 times, 1 st 4-2-5-9 times, then 2 sts at each side until the piece measures 56-56-56-57 cm and then bind off 3 sts 1 time. Bind off the remaining sts, the piece measures approx. 57-57-57-58 cm. ASSEMBLY Sew shoulder seams. Collar: Pick up approx. 120-140 sts around the neck (including over button bands) and knit 4 rows garter st, and on the second row make a buttonhole over the others on the buttonband. Bind off. Sew in sleeves. Sew sleeve and side seams using edge sts as a seam allowance. Sew on buttons. |
||||||||||||||||||||||
Diagram explanations |
||||||||||||||||||||||
|
||||||||||||||||||||||
|
||||||||||||||||||||||

|
||||||||||||||||||||||
|
||||||||||||||||||||||
|
Have you made this or any other of our designs? Tag your pictures in social media with #dropsdesign so we can see them! Do you need help with this pattern?You'll find tutorial videos, a Comments/Questions area and more by visiting the pattern on garnstudio.com. © 1982-2024 DROPS Design A/S. We reserve all rights. This document, including all its sub-sections, has copyrights. Read more about what you can do with our patterns at the bottom of each pattern on our site. |
||||||||||||||||||||||


With over 40 years in knitting and crochet design, DROPS Design offers one of the most extensive collections of free patterns on the internet - translated to 17 languages. As of today we count 304 catalogues and 11422 patterns - 11422 of which are translated into English (UK/cm).
We work hard to bring you the best knitting and crochet have to offer, inspiration and advice as well as great quality yarns at incredible prices! Would you like to use our patterns for other than personal use? You can read what you are allowed to do in the Copyright text at the bottom of all our patterns. Happy crafting!
Comments / Questions (14)
Guten Abend, Ich habe ja schon viele Ihrer Anleitungen gestrickt. Diese ist mit Abstand die schwierigste. Ich benötige leider schon wieder Hilfe. Bin bei dem V-Ausschnitt angekommen, verstehe aber die Anleitung eines Diagramms nicht. Ich habe keinen Schimmer, was ich hier machen soll: 1 li,3 li zusammen, die andere M auf der rechten Ndl über die 1.M ziehen, 1 M re stricken und die andere M über die 1. M ziehen (Zitat Anleitung). Können Sie mir helfen?
11.06.2021 - 22:23DROPS Design answered:
Liebe Frau Prüne, ja genau, bei M.5 (rechtes Vorderteil) stricken Sie zuerst 1 M links, dann das Muster weiter, dh abwechslungsweise (= 3 M aus einer Masche, 3 M links zusammen) - könnte Ihnen dieses Video helfen? Viel Spaß beim stricken!
14.06.2021 - 08:18Ich bin es nocheinmal. In der deutschen Anleitung steht bei den Zunahmen am Rückenteil man hätte 62 Maschen zunehmen sollen. Das wären dann insgesamt 169 Maschen bei Größe M. In der englischen Anleitung sind es nach den Zunahmen sind insgesamt 115 Maschen. Was ist denn jetzt richtig? LG Katharina Prüne
26.05.2021 - 20:24DROPS Design answered:
Liebe Frau Prüne, in M beginnen Sie M.2 mit 107 Maschen dann nehmen Sie 1 Masche beidseitig (= 2 M pro Zunahmenreihe) insgesamt 4 Mal = 2 Maschen x 4 = 8 Zunahmen + 107 Maschen = 115 Maschen. Also genauso bei der Englischen Anleitung, oder misverstehe ich vielleicht was Sie hier meinen?
27.05.2021 - 08:40Vielen Dank für Ihre erste Antwort. Wann ich zunehmen muss, hatte ich schon verstanden. Wieviel Maschen pro Reihe muss ich denn zunehmen? Vor jedem Rapport M2 jeweils 1 Masche? Oder wie? LG Katharina Prüne
26.05.2021 - 18:00Vielen Dank für Ihre erste Antwort. Wann ich zunehmen muss, hatte ich schon verstanden. Wieviel Maschen pro Reihe muss ich denn zunehmen? Vor jedem Rapport M2 jeweils 1 Masche? Oder wie? LG Katharina Prüne
26.05.2021 - 17:20DROPS Design answered:
Liebe Frau Prüne, es wird jeweils 1 Masche zugenommen die neuen Maschen werden im M.2 gestrickt, dh die erste Zunahmme am Anfang der Reihe stricken Sie wie die letzte im M.2 (= ein neues Rapport von links nach rechts) und die letzte Zunahmme am Ende der Reihe stricken Sie in M.2 weiter, so haben Sie immer 1 linke Masche mit je 3 rechte Maschen dazwischen. Viel Spaß beim stricken!
27.05.2021 - 08:37Guten Abend, Ich brauche Ihre Hilfe! Ich soll laut Anleitung beim Rückenteil nach 11 cm alle 5 cm (Größe M) an jeder Seite je 1 Masche zunehmen. Wie komme ich da auf insgesamt 62 zugenommene Maschen?
25.05.2021 - 21:02DROPS Design answered:
Liebe Frau Prüne, die 1. Zunahmen stricken Sie wenn die Arbeit 11 cm misst, die 2. nach 5 weitere cm = 16 cm, die 3. = + 5 cm = 21 cm und die letzte + 5 cm = 26 cm. Viel Spaß beim stricken!
26.05.2021 - 10:29Hej. Hvad er den sorte udfyldte rubrik i mønstret.? Mvh Linda
01.10.2020 - 20:23DROPS Design answered:
Hej Linda, Tak for info, vi skal få et af symbolerne rettet :)
02.10.2020 - 09:54Bonjour, je suis en train de tricoter ce superbe modèle mais je bloque que niveau du diagramme M4. Je ne comprends pas pourquoi il est en décroche de chaque côté alors qu'il n'y a pas de diminutions. Faut il ommencer le rang par des mailles envers ou bien endroit ? Quand j'arriverai à M5 et M6 ce sera le même problème... Enfin, je suis perdue. Je vous remercie de votre précieuse aide. Cordialement.
23.04.2020 - 17:09DROPS Design answered:
Bonjour Mme Topzab, on a un décalé dans M.4 car la première maille en bas à droite par exemple va se tricoter 3 fois, pour que celle du milieu soit alignée avec la maille que l'on va tricoter 3 fois, on doit avoir 1 m en plus à droite, et le rang se trouve ainsi décalé car on va tricoter les 3 m suivantes ensemble (1 m au-dessus de 3). Ce sera la même chose dans M.5 et M.6, tricotez bien le point d'astrakan pour que les mailles soient toujours bien alignées en hauteur, et diminuez comme indiqué dans le diagramme. Bon tricot!
23.04.2020 - 17:21Bonjour comment tricoter 3 fois la même maille de ce modèle?
28.09.2018 - 09:58Avec quel grosseur de broche dois-je tricoter ce gilet. ??
08.04.2018 - 05:21DROPS Design answered:
Bonjour Pascale, ce gilet se tricote avec des aiguilles 3,5 ou celles qu'il vous faudra en fonction de votre façon de tricoter, pour obtenir un échantillon de 23 m x 30 rangs = 10 x 10 cm en jersey. Bon tricot!
09.04.2018 - 10:02Hi can you please tell me what this means.....pass 2nd st on right needle over the first st, K 1 and pull 2nd st over first st. Does this mean pass stitch over PSO ? Because I have seen this alot written this way. What happens if you have five stitches how can you pass one over the first? Again the charts are not easy to follow is this what you have on patterns in American? If you are going to translate to UK english then please do away with the charts and use Uk english. What does seed mean?
13.04.2015 - 21:23DROPS Design answered:
Dear Dana, the last symbol in diagram text means to work over the next 5 sts as follows: P1, P3 tog, K1, pull 2nd sts on right needle over last st worked. Happy knitting!
14.04.2015 - 10:23