DROPS Cotton Light
DROPS Cotton Light
50% Cotton, 50% Polyester
from 1.15 £ /50g
Get the yarn to make this pattern from 6.90£.

The yarn cost is calculated from the pattern’s smallest size and the yarn’s cheapest product type. Looking for an even better price? You might find it on the DROPS Deals!

DROPS SS24

Framboise

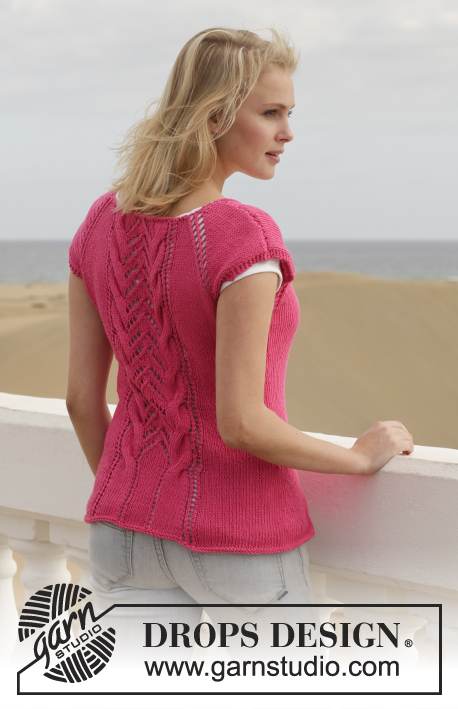
Knitted DROPS jacket with cables and lace pattern in ”Cotton Light”. Size: S - XXXL.

DROPS 154-19
DROPS design: Pattern no cl-033
Yarn group B
-----------------------------------------------------------
Size: S - M - L - XL - XXL - XXXL
Materials:
DROPS COTTON LIGHT from Garnstudio
300-350-350-400-450-450 g colour no 18, pink

DROPS CIRCULAR NEEDLE SIZE 4 mm: length 80 cm.
DROPS CIRCULAR NEEDLE SIZE 3.5 mm: length 80 cm.
DROPS CABLE NEEDLE – for cable

DROPS MOTHER-OF-PEARL BUTTON NO 521: 7 pieces for all sizes

KNITTING TENSION:
21 stitches in width and 28 rows in height with stocking stitch = 10 x 10 cm.
NOTE: Needle size is only a guide. If you get too many stitches on 10 cm, change to a larger needle size. If you get too few stitches on 10 cm, change to a smaller needle size.

-------------------------------------------------------

Alternative Yarn – See how to change yarns here
Yarn Groups A to F – Use the same pattern and change the yarn here
Yarn usage using an alternative yarn – Use our yarn converter here

-------------------------------------------------------

DROPS Cotton Light
DROPS Cotton Light
50% Cotton, 50% Polyester
from 1.15 £ /50g
Get the yarn to make this pattern from 6.90£.

The yarn cost is calculated from the pattern’s smallest size and the yarn’s cheapest product type. Looking for an even better price? You might find it on the DROPS Deals!

Pattern instructions

NOTE: This pattern is written in British English. All measurements in charts are in cm. For conversion from cm to inches - click here. There are different terms for crocheting in British and American English. If this pattern includes crochet, click for "crochet terms" here. For this pattern in American English, please click here.
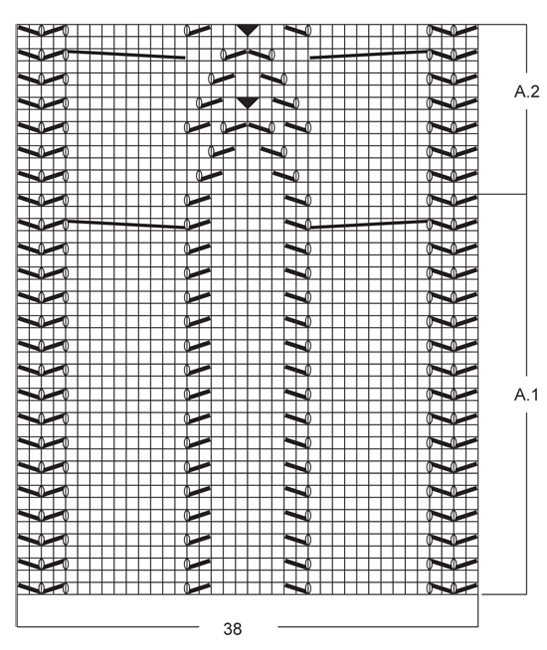
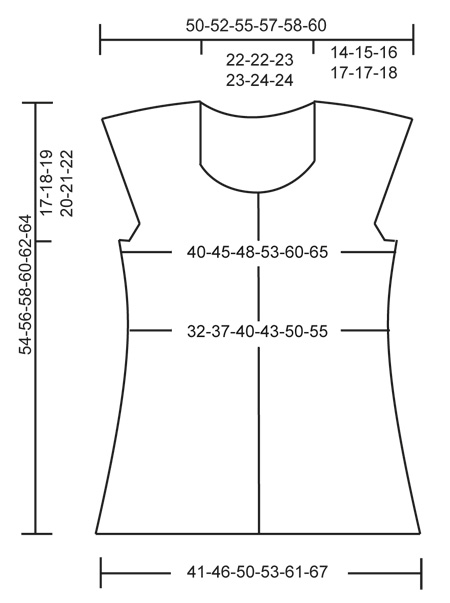
GARTER ST (back and forth on needle):
K all rows. 1 ridge = 2 rows K.

PATTERN:
See diagrams A.1-A.7. The diagrams show all rows in pattern seen from RS.

DECREASE TIP:
Dec from RS. Dec as follows before 1st and 3rd marker: Work until 2 sts remain before marker, slip 1 st as if to K, K 1, psso.
Dec as follows after 2nd and 4th marker: K 2 tog.

INCREASE TIP:
Inc from RS. Inc as follows before 1st and 3rd marker: Work sts until marker, make 1 YO.
Inc as follows after 2nd and 4th marker: Work sts until marker, make 1 YO.
On next row work YOs twisted to avoid holes.

BUTTONHOLES:
Dec for buttonholes on right band. 1 buttonhole = K tog second and third st from edge and make 1 YO.
Dec for buttonholes when piece measures:
SIZE S: 5, 11, 17, 23, 29, 35 and 41 cm
SIZE M: 7, 13, 19, 25, 31, 37 and 43 cm
SIZE L: 8, 14, 20, 26, 32, 39 and 45 cm
SIZE XL: 8, 14, 20, 26, 32, 39 and 45 cm
SIZE XXL: 5, 12, 19, 26, 33, 40 and 47 cm
SIZE XXXL: 7, 14, 21, 28, 35, 42 and 49 cm
----------------------------------------------------------

BODY:
Worked back and forth on circular needle to make room for all the sts.
Cast on 184-204-222-232-268-292 sts (incl 5 band sts in each side) on circular needle size 3.5 mm with Cotton Light. Work 1 ridge in GARTER ST - see explanation above. Switch to circular needle size 4 mm. Then work first row as follows from RS: Work 5 sts in garter st (= band), A.5 (= 8 sts), stocking st over the next 60-70-79-84-102-114 sts, A.1 (= 38 sts), stocking st over the next 60-70-79-84-102-114 sts, A.5 (= 8 sts), finish with 5 sts in garter st. REMEMBER THE KNITTING TENSION! Continue in garter st, with pattern and in stocking st until piece measures 6 cm. NOTE: A.2 (= 38 sts) is worked over A.1 when A.1 has been worked 1 time vertically (work pattern A.2 until finished measurements). Work pattern A.5 until finished measurements. Remember BUTTONHOLES on right band. Now insert 4 markers in the piece as follows: Work 5 sts in garter st, A.5, 32-37-41-44-53-59 sts in stocking st, insert 1st marker, 3 sts in stocking st, insert 2nd marker, 25-30-35-37-46-52 sts in stocking st, A.2, 25-30-35-37-46-52 sts in stocking st, insert 3rd marker, 3 sts in stocking st, insert 4th marker, 32-37-41-44-53-59 sts in stocking st, A.5, finish with 5 band sts in garter st. Move the markers upwards when working. On next row from RS dec 1 st before 1st and 3rd marker and after 2nd and 4th marker (= 4 sts dec) – see explanation above. I.e. there are 3 sts between every dec the entire way upwards. Repeat dec every 1½-1½-1½-1½-1-1 cm 6-6-7-6-8-9 more times (= 7-7-8-7-9-10 times in total) AT THE SAME TIME on 2nd-4th and 6th dec, dec after A.5 (right front piece), in each side of A.2 and before A.5 (left front piece), i.e. work 3 sts tog instead of 2 sts (= 8 sts dec every other dec) = 144-164-178-192-220-240 sts remain on needle. When piece measures 25-25-25-26-26-26 cm, inc on next row from RS 1 st at every marker (= 4 sts inc) – see explanation above = 148-168-182-196-224-244 sts.

Then inc differently in each size:
SIZE S: Repeat inc every 1½ cm 5 more times (= 6 times in total) AT THE SAME TIME on 2nd and 4th inc, inc 1 st after A.5 (right front piece), in each side of A.2 and before A.5 (left front piece), inc by making a YO straight before/after A.2/A.5, work YO twisted on next row = 176 sts on needle.
SIZE M-L-XL-XXL-XXL: Repeat inc every 1½ cm 5-5-6-6-7 more times (= 6-6-7-7-8 times in total) AT THE SAME TIME on 2nd-4th and 6th inc, inc 1 st after A.5 (right front piece), in each side of A.2 and before A.5 (left front piece), inc by making a YO straight before/after A.2/A.5, work YO twisted on next row (= 8 sts inc on every other inc) = 200-214-232-260-284 sts on needle. When piece measures 37-38-39-40-41-42 cm, work next row from RS as follows: 5 band sts in garter st, A.5, stocking st over the next 24-30-34-38-45-51 sts, 14 sts in garter st, 18-24-27-32-39-45 sts in stocking st, A.2 (= 38 sts), 18-24-27-32-39-45 sts in stocking st, 14 sts in garter st, stocking st over the next 24-30-34-38-45-51 sts, A.5, finish with 5 sts in garter st. Repeat this row 1 more time from WS.

Then (from RS) cast off for armholes as follows: 5 band sts in garter st, A.5, stocking st over the next 24-30-34-38-45-51 sts, 3 sts in garter st, cast off the next 8 sts, 3 sts in garter st, 18-24-27-32-39-45 sts in stocking st, A.2 (= 38 sts), 18-24-27-32-39-45 sts in stocking st, 3 sts in garter st, cast off the next 8 sts, 3 sts in garter st, stocking st over the next 24-30-34-38-45-51 sts, A.5, finish with 5 sts in garter st = 80-92-98-108-122-134 sts on back piece and 40-46-50-54-61-67 sts on each front piece and finish each part separately.

LEFT FRONT PIECE:
= 40-46-50-54-61-67 sts. Work from WS. 5 sts in garter st, A.5 (= 8 sts), 24-30-34-38-45-51 sts in stocking st, finish with 3 sts in garter st. On next row (= RS) work the first 2 sts in stocking st twisted tog after the 3 sts in garter st for armhole, repeat dec on every row from RS 0-3-5-5-6-7 more times (= 1-4-6-6-7-8 times in total) = 39-42-44-48-54-59 sts remain on needle. Work next row from RS as follows: 3 sts in garter st, pattern A.4 (= 4 sts) (NOTE: Pattern A.4 is displaced 1 st on every row from RS in towards middle AT THE SAME TIME inc 1 st in A.4 for sleeve on every row from RS (as shown in diagram)), 19-22-24-28-34-39 sts in stocking st, A.5, finish with 5 sts in garter st. Continue with A.4 until 13-13-13-12-7-4 sts for sleeve have been inc (inc 1 st on every row from RS, SEE YO in diagram) = 52-55-57-60-61-63 sts on needle. Then work A.7 over A.4 until finished measurements. Continue with pattern, in stocking st and in garter st upwards until piece measures 40-42-44-44-46-48 cm. Then on next row from WS work 1 ridge over the first 16-16-17-17-18-18 sts, work the other sts as before. Then cast off the first 14-14-15-15-16-16 sts for neck = 38-41-42-45-45-47 sts remain on needle. Then work in garter st over the 2 outermost sts towards the neck, in stocking st and with pattern as before AT THE SAME TIME dec sts at beg of every row from neck (= WS) inside the 2 sts in garter st as follows: K 2 tog (= 1 st dec), repeat dec 8 more times (= 9 times in total) = 29-32-33-36-36-38 sts remain on shoulder (after all inc for sleeve). Work in stocking st and garter st until piece measures 54-56-58-60-62-64 cm. Work 1 ridge in garter st. Loosely cast off.

RIGHT FRONT PIECE:
Work as left front piece but dec for armhole before 3 sts in garter st by K 2 tog, and cast off for neck at beg of row from RS. REMEMBER BUTTONHOLES! Work diagram A.3 and A.6 instead of A.4 and A.7.
Note, the 2 yo in chart A.3 works opposite on next row, i.e P the 1st yo twisted, P the 2nd yo, i.e the 1 st yo will be a st, the 2nd yo will also be a st but will create a hole.


BACK PIECE:
= 80-92-98-108-122-134 sts. Dec for armholes as on front piece = 78-84-88-96-108-118 sts remain on needle. Work next row from RS as follows: 3 sts in garter st, A.3 over the next 4 sts (A.3 is displaced in towards middle), 13-16-18-22-28-33 sts in stocking st, A.2 over the middle 38 sts as before, 13-16-18-22-28-33 sts in stocking st, A.4 over the next 4 sts, finish with 3 sts in garter st. NOTE: A.3/A.4 is displaced towards the neck. Continue displacement until 13-13-13-12-7-4 sts have been inc in both diagram A.3 and A.4 for sleeves = 104-110-114-120-122-126 sts. Then continue displacement by working A.6 over A.3 and A.7 over A.4. Continue with pattern, in stocking st and in garter st upwards until piece measures 51-53-55-57-59-61 cm. On next row from RS K all cable sts in A.2 tog 2 by 2 = 94-100-104-110-112-116 sts on needle. Work 1 ridge over the middle 40-40-42-42-44-44 sts, work the other sts as before. Then cast off the middle 36-36-38-38-40-40 sts (= 2 sts in garter st in each side) = 29-32-33-36-36-38 sts in each side. Work each shoulder separately. Work in stocking st and garter st over the 2 outermost sts towards the neck until piece measures 54-56-58-60-62-64 cm. Work 1 ridge in garter st. Loosely cast off.

ASSEMBLY:
Sew shoulder seams tog edge to edge. Sew on buttons.

This pattern has been corrected.

Updated online: 26.02.2016
Error in number of sts in size L, edited on body and under left front piece.

Diagram

symbols = K from RS, P from WS
symbols = slip 1 sts on cable needle behind piece, K 1, K 1 from cable needle
symbols = slip 1 st as if to K, K 1, psso
symbols = K 2 tog
symbols = 1 YO between 2 sts
symbols = slip 5 sts in front of piece, K 5, K 5 from cable needle
symbols = slip 5 sts behind piece, K 5, K 5 from cable needle
symbols = = 2 YO, on next row P 1st YO, P 2nd YO twisted, i.e. 1st YO will be a st that creates a hole, and the 2nd YO will be a st.
diagram
diagram
diagram

Each of our patterns has specific tutorial videos to help you.

Do you have a question? See a list of frequently asked questions (FAQ)

Knitting tension is what determines the final measurements of your work, and is usually measured per 10 x 10 cm. It is provided like so: number of stitches in width x number of rows in height - eg: 19 stitches x 26 rows = 10 x 10 cm.

The knitting tension is very individual; some people knit/crochet loosely while others work tightly. You adjust the knitting tension with the needle size, which is why the suggested needle size is only meant as a guide! You need to adjust this (up or down) to ensure that YOUR knitting tension matches the knitting tension provided in the pattern. If you work with a different knitting tension than provided you will have a different yarn consumption, and your work will have different measurements than what the pattern suggests.

The knitting tension also determines which yarns can replace each other. As long as you achieve the same knitting tension you can replace one yarn with another.

See DROPS lesson: How to measure your tension/gauge

See DROPS video: How to make a gauge tension swatch

The required amount of yarn is provided in grams, eg: 450 g. To calculate how many balls you’ll need you first need to know how many grams are in 1 ball (25g, 50g or 100g). This information is available if you click on the individual yarn quality on our pages. Divide the amount required with the amount of each ball. For example, if each ball is 50g (the most common amount), the calculation will be as follows: 450 / 50 = 9 balls.

The important thing when changing from one yarn to another is that the knitting/crochet tension remains the same. This is so that the measurements of the finished piece will be the same as on the sketch provided. It is easier to achieve the same knitting tension using yarns from the same yarn group. It is also possible to work with multiple strands of a thinner yarn to achieve the knitting tension of a thicker one. Please try our yarn converter. We recommend you to always work a test swatch.

Please NOTE: when changing yarn the garment might have a different look and feel to the garment in the photo, due to individual properties and qualities of each yarn.

See DROPS lesson: Can I use a different yarn than the one mentioned in the pattern?

All our yarns are categorised into yarn groups (from A to F) according to thickness and knitting tension – group A contains the thinnest yarns and group F the thickest. This makes it easier for you to find alternative yarns to our patterns, should you wish to switch yarn. All yarns within the same group have a similar knitting tension and can easily replace each other. However, different yarn qualities have different structures and properties which will give the finished work a unique look and feel.

Click here for an overview of the yarns in each yarn group

At the top of all our patterns you’ll find a link to our yarn calculator, which is a helpful tool should you wish to use a different yarn than suggested. By filling in the yarn quality you wish to replace, the amount (in your size) and number of strands, the calculator will present good alternative yarns with the same knitting tension. Additionally it will tell you how much you’ll require in the new qualities and whether you’ll need to work with multiple strands. Most skeins are 50g (some are 25g or 100g).

If the pattern is worked with multiple colours, every colour will have to be calculated separately. Similarly, if the pattern is worked with several strands of different yarns (for example 1 strand Alpaca and 1 strand Kid-Silk) you will have to find alternatives for each, individually.

Click here to see our yarn calculator

Since different yarns have different qualities and textures we have chosen to keep the original yarn in our patterns. However, you can easily find options among our available qualities by using our yarn calculator, or simply pick a yarn from the same yarn group.

It is possible that some retailers still have discontinued yarns in stock, or that someone has a few skeins at home that they would like to find patterns for.

The yarn calculator will provide both alternative yarn as well as required amount in the new quality.

If you think it's hard to decide what size to make, it can be a good idea to measure a garment you own already and like the size of. Then you can pick the size by comparing those measures with the ones available in the pattern's size chart.

You'll find the size chart at the bottom of the pattern.

See DROPS lesson: How to read size chart

The needle size provided in the pattern serves only as a guide, the important thing is to follow the knitting tension. And since knitting tension is very individual, you will have to adjust the needle size to ensure that YOUR tension is the same as in the pattern – maybe you’ll have to adjust 1, or even 2 needle sizes, up or down to achieve the correct tension. For this, we recommend that you work test swatches.

Should you work with a different knitting tension than the one provided, the measurements of the finished garment might deviate from the measurement sketch.

See DROPS lesson: How to measure your tension/gauge

See DROPS video: How to make a tension/gauge swatch

Working a garment top-down provides more flexibility and room for personal adjustment. For example it is easier to try the garment on while working, as well as making adjustments to length of yoke and shoulder caps.

The instructions are carefully explaining every step, in the correct order. Diagrams are adjusted to the knitting direction and are worked as usual.

The diagram depicts all rows/rounds, and every stitch seen from the right side. It is read from bottom to top, from right to left. 1 square = 1 stitch.

When working back and forth, every other row is worked from the right side and every other row is worked from the wrong side. When working from the wrong side, the diagram will have to be worked reversed: from left to right, knit stitches are purled, purl stitches are knit etc.

When working in the round every round is worked from the right side and the diagram are worked from right to left on all rounds.

See DROPS lesson: How to read knitting diagrams

The diagram depicts all rows/rounds, and every stitch seen from the right side. It is worked from bottom to top, from right to left.

When working back and forth every other row is worked from the right side: from right to left and every other row is worked from the wrong side: from left to right.

When working in the round, every row in the diagram are worked from the right side, from right to left.

When working a circular diagram you start in the middle and work your way outwards, counter clockwise, row by row.

The rows usually start with a given number of chain stitches (equivalent to the height of the following stitch), this will either be depicted in the diagram or explained in the pattern.

See DROPS lesson: How to read crochet diagrams

Instructions for working several diagrams after each other on the same row/round, will often be written like so: “work A.1, A.2, A.3 a total of 0-0-2-3-4 times". This means you work A.1 once, then A.2 is worked once, and A.3 is repeated (in width) the number of times provided for your size – in this case like so: S = 0 times, M = 0 times, L=2 times, XL= 3 times and XXL = 4 times.

The diagrams are worked as usual: begin with the first row in A.1, then work the first row in A.2 etc.

See DROPS lesson: How to read knitting diagrams

See DROPS lesson: How to read crochet diagrams

The total width of the garment (from wrist-to-wrist) will be larger in the larger sizes, despite the actual sleeves being shorter. The larger sizes have longer sleeve caps and wider shoulders, so there will be a good fit in all sizes.

The measurement sketch/schematic drawing provides information regarding the full length of the garment. If it’s a jumper or a jacket the length is measured from the highest point on the shoulder closest to the neckline, and straight down to the bottom of the garment. It is NOT measured from the tip of shoulder. Similarly, the length of yoke is measured from the highest point on the shoulder and down to where yoke is split into body and sleeves.

On a jacket measures are never taken along bands, unless specifically stated. Always measure inside band stitches when measuring the length.

See DROPS lesson: How to read a schematic drawing

Diagrams are often repeated on the round or in height. 1 repeat is the diagram the way it appears in the pattern. If it says to work 5 repeats of A.1 in the round, then you work A.1 a total of 5 times after/next to each other in the round. If it says to work 2 repeats of A.1 vertically/in height you work the entire diagram once, then begin again at the start and work the entire diagram one more time.

Chain stitches are slightly narrower than other stitches and to avoid working the cast-on edge too tight, we simply chain more stitches to begin with. The stitch count will be adjusted on the following row to fit the pattern and measurement sketch.

The rib edge is more elastic and will contract slightly compared to, for example, stocking stitch. By increasing before the rib edge, you avoid a visible difference in width between the rib edge and the rest of the body.

It’s very easy to cast off too tightly, and by making yarn overs while casting off (and simultaneously casting these off) you avoid a too tight cast off edge.

See DROPS video: How to bind off with yarn overs (yo)

To achieve an even increase (or decrease) you can increase on, for example: every 3rd and 4th row alternately, like so: work 2 rows and increase on the 3rd row, work 3 rows and increase on the 4th. Repeat this until the increase is complete.

See DROPS lesson: Increase or decrease 1 st on every 3rd and 4th row alternately

Should you prefer to work in the round instead of back and forth, you may of course adjust the pattern. You’ll need to add steeks mid-front (usually 5 stitches), and follow the instructions. When you would normally turn and work from the wrong side, simply work across the steek and continue in the round. At the end you’ll cut the piece open, pick up stitches to work bands, and cover the cut edges.

See DROPS video: How to knit steeks and cut open

Should you prefer to work back and forth instead of in the round, you may of course adjust the pattern so you work the pieces separately and then assemble them at the end. Divide the stitches for the body in 2, add 1 edge stitch in each side (for sewing) and work the front and back pieces separately.

See DROPS lesson: Can I adapt a pattern for circular needles into straight needles?

Pattern repeats can vary slightly in the different sizes, in order to get the correct proportions. If you’re not working the exact same size as the garment in the photo, yours might deviate slightly. This has been carefully developed and adjusted so that the complete impression of the garment is the same in all sizes.

Make sure to follow instructions and diagrams for your size!

If you have found a pattern you like which is available in women’s size it’s not very difficult to convert it to men’s size. The biggest difference will be the length of sleeves and body. Start working on the women size that you think would fit across the chest. The additional length will be worked right before you cast off for the armhole/sleeve cap. If the pattern is worked top-down you can add the length right after the armhole or before the first decrease on sleeve.

Regarding additional yarn amount, this will depend on how much length you add, but it is better with a skein too many than too few.

All yarns will have excess fibres (from production) that might come off as lint or shedding. Brushed yarns (ie hairier yarns) have more of these loose, excess fibres, causing more shedding.

Shedding also depends on what is worn under or over the garment, and whether this pulls at the yarn fibres. It’s therefore not possible to guarantee that there will be no shedding

Below are some tips on how to get the best result when working with hairier yarns:

1. When the garment is finished (before you wash it) shake it vigorously so the looser hairs come off. NOTE: do NOT use a lint roller, brush or any method that pulls at the yarn.

2. Place the garment in a plastic bag and put it in your freezer - the temperature will cause the fibres to become less attached to each other, and excess fibres will come off easier.

3. Leave in the freezer for a few hours before taking it out and shaking it again.

4. Wash the garment according to the instructions on the yarn label.

Pilling is a natural process that happens to even the most exclusive of fibers. It's a natural sign of wear and tear that is hard to avoid, and that is most visible in high friction areas of your garment like a sweater's arms and cuffs.

You can make your garment look as new by removing the pilling, using a fabric comb or a pill/lint remover.

Still can't find the answer you need? Then scroll down and leave your question so one of our experts can try to help you. This will be done normally within 5 to 10 working days.
In the meantime, you can read the questions and answers that others have left to this pattern or join the DROPS Workshop on Facebook to get help from fellow knitters/crocheters!

You might also like...

Post a comment to pattern DROPS 154-19

We would love to hear what you have to say about this pattern!

If you want to leave a question, please make sure you select the correct category in the form below, to speed up the answering process. Required fields are marked *.

Comments / Questions (32)

country flag Laetitia wrote:

Bonjour, Je ne comprends pas comment au niveau de l'encolure on peut être à 42 cm de hauteur en taille M dans les demis-devant alors que l'on a tricoté déjà 38 cm avant les 13 augmentations (26 rangs en plus au total)? J'en suis à 52 cm après mes augmentations et je vais devoir rajouter une boutonnière du coup avant de rabattre... Est-ce qu'il n'y aurait pas une erreur?

05.05.2023 - 22:22

DROPS Design answered:

Bonjour Laetitia, l'encolure se commence en taille M à 42 cm de hauteur totale: on tricote les 16 mailles de l'encolure au point mousse pendant 2 rangs et on rabat ensuite les 14 mailles de l'encolure, en même temps, continuez à augmenter sur le côté comme avant, ces augmentations se font sur le côté, elles n'influencent pas l'encolure. Bon tricot!

08.05.2023 - 07:38

country flag Gaby wrote:

Hallo, ich habe die Anleitung erstmal gelesen und verstehe nicht, an welcher Stelle ich das Nadelspiel jeweils einsetzen soll, habe ich was übersehen? LG Gaby

25.01.2021 - 21:58

DROPS Design answered:

Liebe Gaby, es sieht tatsächlich aus, daß die Nadelspiel nicht benutzt werden, danke für den Hinweis. Viel Spaß beim stricken!

26.01.2021 - 08:54

country flag Joëlle Gac wrote:

Bonjour , Je suis au début de ce modèle ,très joli . Quand mon ouvrage mesure 6 cm , je n'ai pas terminé A1 , or l'explication me dit de placer les marqueurs et de tricoter A2 et de diminuer avant ou après les marqueurs. Dois-je commencer les diminutions alors que A1 n'est pas terminé ? Merci de votre réponse et de tous les beaux modèles que vous nous proposez. .

27.01.2019 - 16:24

DROPS Design answered:

Bonjour Mme Gac, vous placez vos marqueurs à 6 cm pour commencer à diminuer mais continuez A.1 jusqu'à ce qu'il soit tricoté 1 fois en hauteur, puis vous tricoterez A.2 au-dessus de A.1. Bon tricot!

28.01.2019 - 11:30

country flag Annika Sorokin wrote:

Järgmisel töö PP real kahanda 1 silmus enne 1. ja 3. SM-i ja pärast 2. ja 4. SM-i (= 4 kahandatud silmust) – vaata ülevalt, st. iga kahanduse vahel on 3 silmust kuni üles välja. Korda kasvatamist iga 1,5-1,5-1,4-1,4-1-1 cm järel veel 6-6-7-6-8-9 korda (= 7-7-8-7-9-10 korda kokku) Tekkis küsimus, kas kasvatada ja kahandada korraga? Ilma kasvatuseta jääb 164 s , koos kasvatusega 180? Kus ma valesti loen

27.09.2018 - 17:55

DROPS Design answered:

Tere Annika! Viga on parandatud, Kahandamist tuleb korrata, mitte kasvatamist. Head kudumist!

14.10.2018 - 00:51

country flag Sussi Beck wrote:

Hej. Hvornår kommer der svar fra Design? Venter på at få strikket blusen færdig.

07.10.2015 - 08:07

DROPS Design answered:

Hej Sussi, Nu endelig har vi fået tid til at se på den og der er lagt en rettelse ud. God dag!

29.02.2016 - 10:50

country flag Sussi Beck wrote:

Hej igen. Har lige et spørgsmål igen, som jeg regner med i kan svare på ved samme lejlighed. Hvordan kan der blive 212m efter udtagning i str. L. 178m + udt 6 gange (24m) + extra udt 3 gange (12m) = 214m. Er der fejl i opskriften eller kan jeg ikke regne?

19.08.2015 - 22:00

DROPS Design answered:

Hej Sussi, Jeg får det også til 214 m, så jeg sender lige spørgsmålet videre til Design, så må vi se om vi tænker helt forkert :) Vi kommer tilbage!

21.08.2015 - 10:07

country flag Sussi Beck wrote:

Hej. Ved ekstra indtagning og udtagning på (2.-4. og 6. indt og udt) er det lige efter de 8p i A.5, eller er det efter A.5 og glatstrikmasker. Altså 1. mærketråd. På billedet ser det ud til at det er lige efter A.5, men hvis der skal strikkes 3m sammen må det være ved mæketråden??

14.08.2015 - 07:36

DROPS Design answered:

Hej Sussi, De ekstra indtagninger sker ved at strikke 3 m sammen istedet for 2 sammen i hver side af A.2. God fornöjelse!

09.09.2015 - 08:13

country flag Montse wrote:

Creo que la explicación correspondiente al aumento de puntos en A4 está mal taducida. La frase en inglés dice "2 YO, on next row P 1st YO, P 2nd YO twisted" y se ha taducido como "tejer la primera hebra retorcida Y DEJAR la 2a hebra". Esto hace que el cómputo de puntos no sea correcto.

01.03.2014 - 17:26

country flag Ines wrote:

Hallo, konnten Sie Ihre Designerinnen fragen? Wie ist das nun mit A5? Hinreihen rechts, Rückreihe Muster? Bei den anderen ist Hinreihe Muster. Ines

18.02.2014 - 18:21

DROPS Design answered:

Liebe Ines, das Diagramm A.5 wurde nun korrigiert, es war tatsächlich um eine Reihe "verschoben". Die Muster werden immer in Hin-R gestrickt, in den Rück-R werden alle M li gestrickt. Weiterhin gutes Gelingen!

19.02.2014 - 14:45

country flag Kerstin wrote:

Hallo, kann es sein das das angegebene Muster(Rücken) nicht dem Bild entspricht? VG Kerstin

18.02.2014 - 11:03

DROPS Design answered:

Liebe Kerstin, Muster und Foto stimmen überein. A.2 wird nach A.1 fortlaufend wiederholt und A.2 passt zum Foto. Viel Spaß beim Stricken!

18.02.2014 - 12:59