
Popular categories
Looking for a yarn?


|
|
Dublin |
|
 |
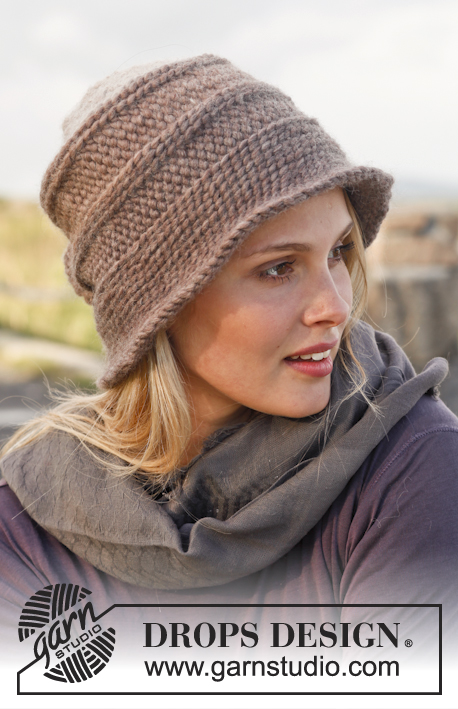 |
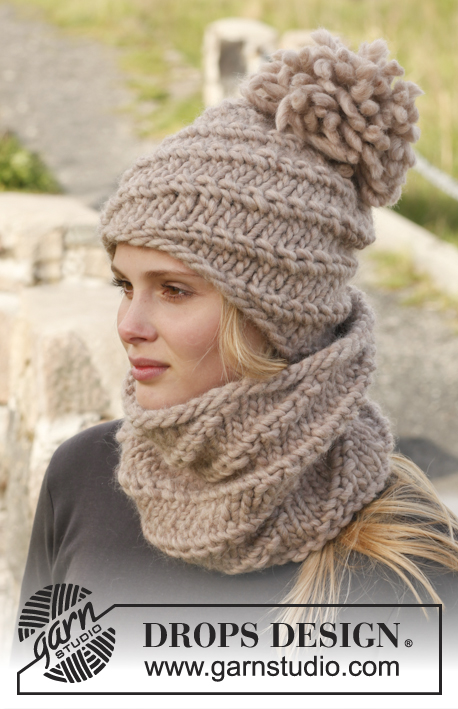
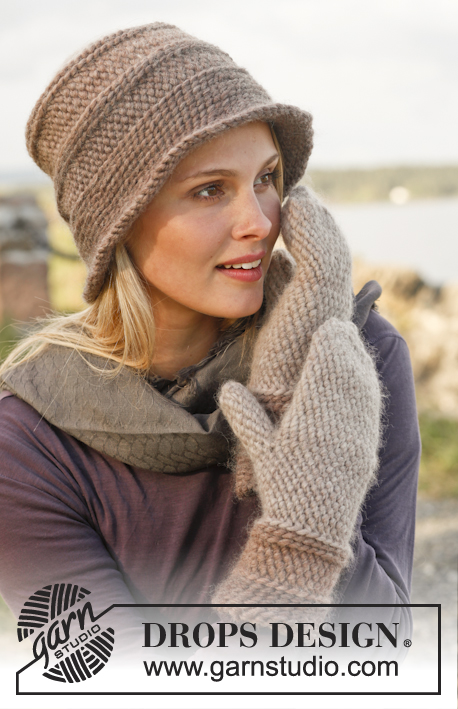
Bosnian crochet DROPS hat and mittens in ”Snow”.
DROPS 151-32 |
|
|
WORK IN THE ROUND IN A CIRCLE: After last st on the round, continue to next round with 1 st in next st (= first st on next round). NOTE: Insert a marker at the beg of round between last st and first st on the round, move the marker upwards. ---------------------------------------------------------- HAT: The piece is worked top down. Work 4 ch on hook size 7 mm with light beige and form a ring with 1 sl st in first ch. REMEMBER THE CROCHET TENSION! Work in front loop of sts unless something else is described on round. ROUND 1: READ WORK IN THE ROUND IN A CIRCLE! Work 9-9 dc in ch-ring. ROUND 2: Work 1 sl st in every dc the entire round. ROUND 3: Work 1 sl st and 1 ch in every sl st the entire round = 18-18 sts. ROUND 4: Work 1 sl st in every sl st and 1 sl st in every ch the entire round = 18-18 sl sts. ROUND 5: * 1 sl st in first sl st, in next sl st work 1 sl st and 1 ch * repeat from *-* the entire round = 27-27 sts. ROUND 6: Work 1 sl st in every sl st and 1 sl st in every ch the entire round = 27-27 sl sts. ROUND 7: * 1 sl st in each of the first 2 sl sts, in next sl st work 1 sl st and 1 ch *, repeat from *-* the entire round = 36-36 sts. ROUND 8: Work 1 sl st in every sl st and 1 sl st in every ch the entire round = 36-36 sl sts. ROUND 9: * 1 sl st in each of the first 3 sl sts, in next sl st work 1 sl st and 1 ch *, repeat from *-* the entire round = 45-45 sts. ROUND 10: Work 1 sl st in every sl st and 1 sl st in every ch the entire round = 45-45 sl sts. ROUND 11: * 1 sl st in each of the first 4 sl sts, in next sl st work 1 sl st and 1 ch *, repeat from *-* the entire round = 54-54 sts. ROUND 12: Work 1 sl st in every sl st and 1 sl st in every ch the entire round = 54-54 sl sts. ROUND 13: * 1 sl st in each of the first 5 sl sts, in next sl st work 1 sl st and 1 ch *, repeat from *-* the entire round = 63-63 sts. ROUND 14: Work 1 sl st in every sl st and 1 sl st in every ch the entire round = 63-63 sl sts. EXTRA ROUND, ONLY WORKED IN SIZE L/XL: * 1 sl st in each of the first 6 sl sts, in next sl st work 1 sl st and 1 ch *, repeat from *-* the entire round = 72 sts. ROUND 15: Switch to beige and work 1 sl st in back loop of st in every sl st and 1 sl st in every ch the entire round = 63-72 sl sts. ROUND 16-17: Work 1 sl st in back loop of every sl st the entire round. ROUND 18: : * 1 sl st in each of the first 6-7 sl sts, in next sl st work 1 sl st and 1 ch *, repeat from *-* the entire round = 72-81 sts. ROUND 19: Work 1 sl st in every sl st and 1 sl st in every ch the entire round = 72-81 sl sts. ROUND 20: * 1 sl st in each of the first 7-8 sl sts, in next sl st work 1 sl st and 1 ch *, repeat from *-* the entire round = 81-90 sts. ROUND 21: Work 1 sl st in every sl st and 1 sl st in every ch the entire round = 81-90 sl sts. ROUND 22: Switch to taupe and work 1 sl st in back loop of st in every sl st and 1 sl st in every ch the entire round. ROUND 23-24: Work 1 sl st in back loop of every sl st the entire round. ROUND 25-28: Work 1 sl st in front loop of every sl st the entire round. ROUND 29-31: Work 1 sl st in back loop of every sl st the entire round. ROUND 32: Work * 1 sl st in back loop in each of the first 8-9 sl sts, in back loop of next sl st work 1 sl st and 1 ch *, repeat from *-* the entire round = 90-99 sts. ROUND 33: Work 1 sl st in back loop of every sl st and 1 sl st in every ch the entire round = 90-99 sl sts. ROUND 34: Work * 1 sl st in back loop in each of the first 9-10 sl sts, in back loop of next sl st work 1 sl st and 1 ch *, repeat from *-* the entire round = 99-108 sts. ROUND 35-40: Work 1 sl st in back loop of every sl st and 1 sl st in every ch the entire round = 99-108 sl sts. Fasten off. ---------------------------------------------------------- MITTENS: Worked in the round from cuff and up to fingers. READ WORK IN THE ROUND IN A CIRCLE! Work in front loop of sts unless something else is described on round. Work 28-32 loose ch on hook size 7 mm with taupe (ch-row should measure approx. 26-30 cm, or work until desired length, the mitten will be approx. 5/6 cm more narrow than ch-row) and form 1 ring with 1 sl st in first ch. Work 1 round with sl sts in loops on the back of ch-row. Then work 1 sl st in back loop of every sl st the entire round until piece measures approx. 4-4 cm = 28-32 sl sts. Switch to beige and work 2 rounds with sl sts in back loop of every sl st. Then work 1 sl st in front loop of every sl st the entire round until piece measures 8-8 cm. Work 2 rounds with sl sts in back loop of every sl st. Switch to light beige and work 2 rounds more the same way. Then work 1 sl st in front loop of every sl st. When piece measures 15-15 cm, make an opening for thumb by working 5-7 loose ch at beg of round, skip the next 5-7 sl sts and continue with sl st in the round as before (opening for thumb will be approx. 4-6 cm, but can be made larger or smaller by inc or dec no of ch, skip in that case same no of sl sts as ch worked). On next round work 1 sl st in each of the 5-7 ch worked for thumb opening = 28-32 sl sts. Continue in the round the same way until piece measures 26-27 cm, or to desired length (approx. 2-2 cm remain until finished measurements). Now decrease by skipping every other sl st the entire round = 14-16 sl sts. Work 1 round without dec, then work 1 round while AT THE SAME TIME dec by skipping every other sl st the entire round = 7-8 sl sts. Work 1 round more with dec the same way. Cut the yarn and pull it through the remaining sts. Tighten tog and fasten. THUMB: Work 10-14 sl sts around the opening on thumb with light beige (1 sl st in each of the 5-7 skipped and 1 sl st in each of the 5-7 ch worked). Work sl sts in the round as before. When thumb measures approx. 5-6 cm (or desired length), work 1 round with sl sts while AT THE SAME TIME dec by skipping every other sl st = 5-7 sl sts remain. Cut the yarn and pull it through the remaining sts. Tighten tog and fasten. |
|
|
Have you made this or any other of our designs? Tag your pictures in social media with #dropsdesign so we can see them! Do you need help with this pattern?You'll find tutorial videos, a Comments/Questions area and more by visiting the pattern on garnstudio.com. © 1982-2024 DROPS Design A/S. We reserve all rights. This document, including all its sub-sections, has copyrights. Read more about what you can do with our patterns at the bottom of each pattern on our site. |
|


With over 40 years in knitting and crochet design, DROPS Design offers one of the most extensive collections of free patterns on the internet - translated to 17 languages. As of today we count 304 catalogues and 11422 patterns - 11422 of which are translated into English (UK/cm).
We work hard to bring you the best knitting and crochet have to offer, inspiration and advice as well as great quality yarns at incredible prices! Would you like to use our patterns for other than personal use? You can read what you are allowed to do in the Copyright text at the bottom of all our patterns. Happy crafting!
Comments / Questions (78)
Annabelle Frank wrote:
This pattern has some serious mistakes-I have managed to make it but only with a lot of common sense! The gauge is off-I used a 8mm hook and completely ignored the gauge. To keep the hat flat on top-I skipped the non increase rows, and the added the non increase rows before making the hat sides.After this I followed the pattern,adding a few extra rows here and there for size. I still am huge fan of drops wool and patterns...!
08.08.2016 - 10:05DROPS Design answered:
Dear Mrs Frank, each crocheter has a different way of crocheting that can play on the crochet hook size, remember to check your own tension to keep correct number of sts in width, adjusting crochet hook size. Happy crocheting!
08.08.2016 - 10:39I have tried a size 7mm for the gauge and it seems that I can get the 10cm only by using a size 4mm? Is there a mistake or I am getting that wrong? I am quite a tight crocheter... Thanks for letting me know if others had the same issue?
08.03.2016 - 15:06DROPS Design answered:
Dear Gabrielle, every crocheter has a different way to crochet either tight or loose that's why it is important to check tension, but DROPS Eskimo is a bulky yarn - see here - remember that you will get the best result using the original yarn. Happy crocheting!
08.03.2016 - 18:07Hallo, also ich weiß ja nicht, ich habe jetzt Nadelstärke 5 ausprobiert und bin immer noch nicht bei den 10 Zentimetern auf 14 feste Maschen...Das kann doch nicht sein, oder? Ich traue mich gar nicht, loszulegen. Ich freue mich auf schnelle Antwort, vielen Dank!
23.11.2015 - 21:31DROPS Design answered:
Wie viel cm haben Sie denn bzw. wie viele M bei 10 cm? Wenn Sie mehr M als 14 feste M benötigen, müssen Sie eine größere Nadel wählen.
24.11.2015 - 22:48Ich kann nur Glorias Kommentar bestätigen: Ich habe fast 100g von der letzten Farbe gebraucht. Auch ist er etwas weit geworden. Wahrscheinlich hätte ich fester häkeln müssen, obwohl bei der Videoanleitung stand, man müsse unbedingt locker häkeln.
11.01.2015 - 23:51In riferimento al cappello, il punto usato è molto bello e anche il modello in foto lo è. Peccato che seguendo le istruzioni non si ottenga lo stesso risultato! La calottina superiore risulta più appuntita e meno piatta, il cappello è più aderente alla testa e calza diversamente. Inoltre la lana color "talpa" non mi è bastata e ho dovuto terminare con gli altri due colori avanzati.
27.10.2014 - 12:47Bel modello, ma è lavorato a maglia bassissima o c'è un errore nelle abbreviazioni? Non ho mai trovato modelli a maglia bassissima... Grazie.
17.10.2014 - 09:01DROPS Design answered:
Buongiorno Gloria. Il modello è lavorato a m.bss, ma con la tecnica bosniaca, che consiste nel puntare l’uncinetto o nel filo anteriore o in quello posteriore della m sottostante. Nelle spiegazioni del modello viene indicato quando lavorare nel filo anteriore della m e quando in quello posteriore. Il video che le proponiamo, mostra come lavorare m.bss con la tecnica bosniaca. Buon lavoro!
17.10.2014 - 10:06Toujours trop petit même avec un crochet en taille 10 :-(
28.09.2014 - 22:04DROPS Design answered:
Bonjour Mme Cogez, avez-vous bien l'échantillon de 14 ms = 10 cm de large ? Pensez à bien conserver cette même tension pendant la réalisation. Bon crochet!
29.09.2014 - 10:19Salve, poichè non sono molto esperta vorrei sapere cosa significa 9-9 riferito alle maglie. Grazie
12.01.2014 - 11:49DROPS Design answered:
Buongiorno Simona, sia nel cappello che nei guanti vengono date due taglie e le doppie misure, es. 9-9 indicano proprio quelle, la prima fa riferimento alla taglia 54/56, la seconda alla taglia 56/58. e così per tutto il modello e per tutti i modelli DROPS. Ci riscriva se non è chiaro. Buon lavoro!
12.01.2014 - 12:06I am having problem printing the patterns using the "Print Pattern" function. It doesn't seem to be working. Thanks
05.12.2013 - 13:44DROPS Design answered:
Dear Mrs David, first be sure your browser accept pop'up windows, then click on "Print pattern", a new windo will open with an add about Alpaca Party, then click on the top right corner on "Print the pattern" to launch printing. Happy knitting!
05.12.2013 - 13:48Är det meningen att det ska bli en liten "plutt" av de första varven? Jag har försökt virka olika hårt med olika nålar men kan inte få en slät rund "platta" utan det blir som en liten boll av de första varven. Ska det verkligen vara så? Framgår inte riktigt av bilderna heller..
02.12.2013 - 20:23DROPS Design answered:
Du får en lidten rundning som du ser på bild nr 2, men annars skall den vara ganska så platt :)
05.12.2013 - 08:48