
Popular categories
Looking for a yarn?


|
|
Dublin |
|
 |
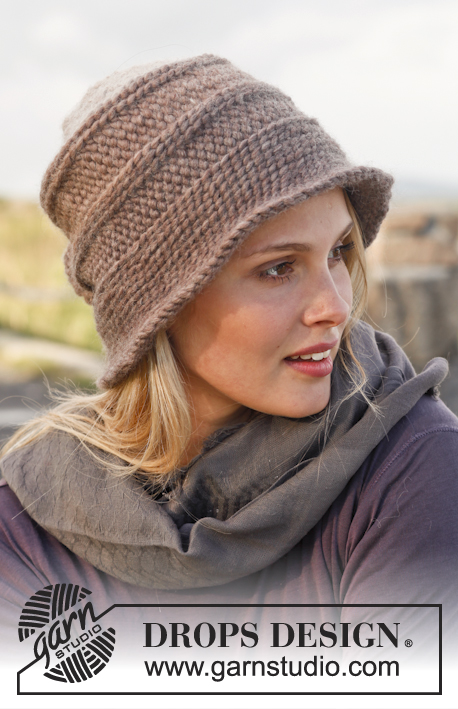 |
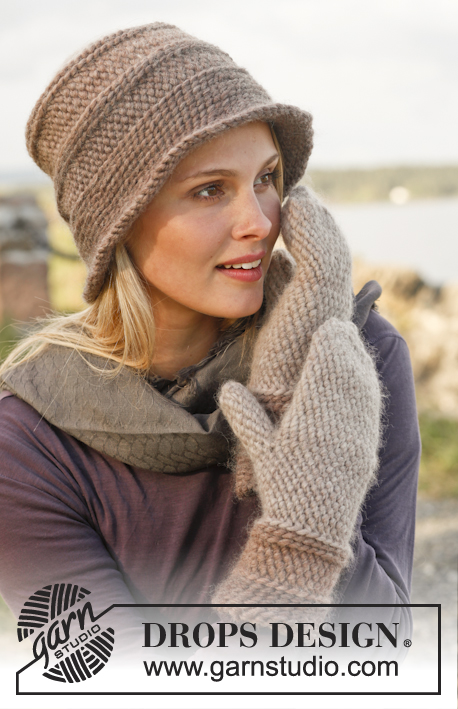
Bosnian crochet DROPS hat and mittens in ”Snow”.
DROPS 151-32 |
|
|
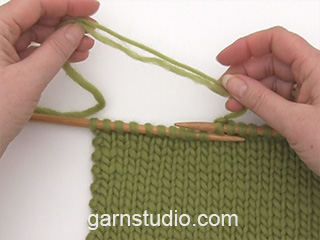
WORK IN THE ROUND IN A CIRCLE: After last st on the round, continue to next round with 1 st in next st (= first st on next round). NOTE: Insert a marker at the beg of round between last st and first st on the round, move the marker upwards. ---------------------------------------------------------- HAT: The piece is worked top down. Work 4 ch on hook size 7 mm with light beige and form a ring with 1 sl st in first ch. REMEMBER THE CROCHET TENSION! Work in front loop of sts unless something else is described on round. ROUND 1: READ WORK IN THE ROUND IN A CIRCLE! Work 9-9 dc in ch-ring. ROUND 2: Work 1 sl st in every dc the entire round. ROUND 3: Work 1 sl st and 1 ch in every sl st the entire round = 18-18 sts. ROUND 4: Work 1 sl st in every sl st and 1 sl st in every ch the entire round = 18-18 sl sts. ROUND 5: * 1 sl st in first sl st, in next sl st work 1 sl st and 1 ch * repeat from *-* the entire round = 27-27 sts. ROUND 6: Work 1 sl st in every sl st and 1 sl st in every ch the entire round = 27-27 sl sts. ROUND 7: * 1 sl st in each of the first 2 sl sts, in next sl st work 1 sl st and 1 ch *, repeat from *-* the entire round = 36-36 sts. ROUND 8: Work 1 sl st in every sl st and 1 sl st in every ch the entire round = 36-36 sl sts. ROUND 9: * 1 sl st in each of the first 3 sl sts, in next sl st work 1 sl st and 1 ch *, repeat from *-* the entire round = 45-45 sts. ROUND 10: Work 1 sl st in every sl st and 1 sl st in every ch the entire round = 45-45 sl sts. ROUND 11: * 1 sl st in each of the first 4 sl sts, in next sl st work 1 sl st and 1 ch *, repeat from *-* the entire round = 54-54 sts. ROUND 12: Work 1 sl st in every sl st and 1 sl st in every ch the entire round = 54-54 sl sts. ROUND 13: * 1 sl st in each of the first 5 sl sts, in next sl st work 1 sl st and 1 ch *, repeat from *-* the entire round = 63-63 sts. ROUND 14: Work 1 sl st in every sl st and 1 sl st in every ch the entire round = 63-63 sl sts. EXTRA ROUND, ONLY WORKED IN SIZE L/XL: * 1 sl st in each of the first 6 sl sts, in next sl st work 1 sl st and 1 ch *, repeat from *-* the entire round = 72 sts. ROUND 15: Switch to beige and work 1 sl st in back loop of st in every sl st and 1 sl st in every ch the entire round = 63-72 sl sts. ROUND 16-17: Work 1 sl st in back loop of every sl st the entire round. ROUND 18: : * 1 sl st in each of the first 6-7 sl sts, in next sl st work 1 sl st and 1 ch *, repeat from *-* the entire round = 72-81 sts. ROUND 19: Work 1 sl st in every sl st and 1 sl st in every ch the entire round = 72-81 sl sts. ROUND 20: * 1 sl st in each of the first 7-8 sl sts, in next sl st work 1 sl st and 1 ch *, repeat from *-* the entire round = 81-90 sts. ROUND 21: Work 1 sl st in every sl st and 1 sl st in every ch the entire round = 81-90 sl sts. ROUND 22: Switch to taupe and work 1 sl st in back loop of st in every sl st and 1 sl st in every ch the entire round. ROUND 23-24: Work 1 sl st in back loop of every sl st the entire round. ROUND 25-28: Work 1 sl st in front loop of every sl st the entire round. ROUND 29-31: Work 1 sl st in back loop of every sl st the entire round. ROUND 32: Work * 1 sl st in back loop in each of the first 8-9 sl sts, in back loop of next sl st work 1 sl st and 1 ch *, repeat from *-* the entire round = 90-99 sts. ROUND 33: Work 1 sl st in back loop of every sl st and 1 sl st in every ch the entire round = 90-99 sl sts. ROUND 34: Work * 1 sl st in back loop in each of the first 9-10 sl sts, in back loop of next sl st work 1 sl st and 1 ch *, repeat from *-* the entire round = 99-108 sts. ROUND 35-40: Work 1 sl st in back loop of every sl st and 1 sl st in every ch the entire round = 99-108 sl sts. Fasten off. ---------------------------------------------------------- MITTENS: Worked in the round from cuff and up to fingers. READ WORK IN THE ROUND IN A CIRCLE! Work in front loop of sts unless something else is described on round. Work 28-32 loose ch on hook size 7 mm with taupe (ch-row should measure approx. 26-30 cm, or work until desired length, the mitten will be approx. 5/6 cm more narrow than ch-row) and form 1 ring with 1 sl st in first ch. Work 1 round with sl sts in loops on the back of ch-row. Then work 1 sl st in back loop of every sl st the entire round until piece measures approx. 4-4 cm = 28-32 sl sts. Switch to beige and work 2 rounds with sl sts in back loop of every sl st. Then work 1 sl st in front loop of every sl st the entire round until piece measures 8-8 cm. Work 2 rounds with sl sts in back loop of every sl st. Switch to light beige and work 2 rounds more the same way. Then work 1 sl st in front loop of every sl st. When piece measures 15-15 cm, make an opening for thumb by working 5-7 loose ch at beg of round, skip the next 5-7 sl sts and continue with sl st in the round as before (opening for thumb will be approx. 4-6 cm, but can be made larger or smaller by inc or dec no of ch, skip in that case same no of sl sts as ch worked). On next round work 1 sl st in each of the 5-7 ch worked for thumb opening = 28-32 sl sts. Continue in the round the same way until piece measures 26-27 cm, or to desired length (approx. 2-2 cm remain until finished measurements). Now decrease by skipping every other sl st the entire round = 14-16 sl sts. Work 1 round without dec, then work 1 round while AT THE SAME TIME dec by skipping every other sl st the entire round = 7-8 sl sts. Work 1 round more with dec the same way. Cut the yarn and pull it through the remaining sts. Tighten tog and fasten. THUMB: Work 10-14 sl sts around the opening on thumb with light beige (1 sl st in each of the 5-7 skipped and 1 sl st in each of the 5-7 ch worked). Work sl sts in the round as before. When thumb measures approx. 5-6 cm (or desired length), work 1 round with sl sts while AT THE SAME TIME dec by skipping every other sl st = 5-7 sl sts remain. Cut the yarn and pull it through the remaining sts. Tighten tog and fasten. |
|
|
Have you made this or any other of our designs? Tag your pictures in social media with #dropsdesign so we can see them! Do you need help with this pattern?You'll find tutorial videos, a Comments/Questions area and more by visiting the pattern on garnstudio.com. © 1982-2024 DROPS Design A/S. We reserve all rights. This document, including all its sub-sections, has copyrights. Read more about what you can do with our patterns at the bottom of each pattern on our site. |
|


With over 40 years in knitting and crochet design, DROPS Design offers one of the most extensive collections of free patterns on the internet - translated to 17 languages. As of today we count 304 catalogues and 11422 patterns - 11422 of which are translated into English (UK/cm).
We work hard to bring you the best knitting and crochet have to offer, inspiration and advice as well as great quality yarns at incredible prices! Would you like to use our patterns for other than personal use? You can read what you are allowed to do in the Copyright text at the bottom of all our patterns. Happy crafting!
Comments / Questions (78)
Hay un fallo en las instrucciones. Vuelta 25 a 28 el punto enano se debe trabajar en la hebra delantera del punto.
26.01.2019 - 21:52Annette Petersen wrote:
Er det ikke en fejl, at huen er hæklet i kædemasker? Det giver mere mening at bruge fastmasker. Huen bliver alt for lille og tænker at den kun vil passe en dukke
21.11.2018 - 21:00DROPS Design answered:
Hei Annette. det stemmer at du hekler i kjedemasker hele veien. Du hekler med tykt garn og tykk heklenål så hatten blir i de målene som er oppgitt. God fornøyelse.
22.11.2018 - 08:27Annette Petersen wrote:
Er det ikke en fejl, at huen er hæklet i kædemasker? Det giver mere mening at bruge fastmasker. Huen bliver alt for lille og tænker at den kun vil passe en dukke
21.11.2018 - 20:59Hallo, die Anleitung enttäuscht mich leider. Um keinen spitzen Hut zu bekommen habe ich bis auf zwei Runden mittendrin nur Zunahme-Runden gehäkelt um eine glatte Fläche zu erhalten. Jetzt bin ich aber schon bei 99 Maschen in Runde 12, egal. Ich muss nur wissen welchen Durchmesser muss ich für den oberen Kreis des Hutes haben bevor es mit hintengestochenen Maschen weitergeht?? Vielen Dank für die Hilfe!
20.11.2018 - 18:34DROPS Design answered:
Liebe Emma, stimmt Ihre Maschenprobe? Sie müssen 14 fM = 10 cm haben - der Hut wird ganz mit Kett-Maschen gehäkelt. Der Kopfumfang vom Hut muss etwas enger als Ihr Kopfumfang so dass der Hut richtig im Platz bleibt. Viel Spaß beim häkeln!
21.11.2018 - 08:29Kan du lägga ut en video över de första fem varven, så att man kommer igång på rätt sätt? Jag får det inte heller till en platt platta. Det blir en böjd liten skål. Är det fel på det svenska mönstret?
02.12.2017 - 20:06DROPS Design answered:
Hei Angeli. Oppskriften skal være riktig, men husk å sjekke din heklefasthet. Hekler du for stramt, er det fort gjort at det blir en liten skål. God Fornøyelse!
05.12.2017 - 11:37Hej Drops! hvor meget skal cirklen måle i diameter, før man begynder at hækle i beige, dvs. efter de 14 omg.? de tegningerne der normal er i alle opskrifter hjælper meget for at se om man har gjort det rigtigt eller ej, men der er ikke en tenging i dette opskrift. på forhånd tak!
02.11.2017 - 13:20Toer 7: wat betekent 1hv in elke van de 2e hv? Moet je dan steeds 1 hv overslaan? Als daarna 1 hv + 1 l gehaakt moet worden kom je toch uit op 27 st. Net zoals in toer 6 en niet 36 zoals er in het patroon vermeldt staat. Wat doe ik fout?
20.10.2017 - 16:04DROPS Design answered:
Hoi Lonnie, In de eerste vaste haak je een vaste en in de 2e vaste haak je een vaste (= haak 1 hv in elk van de eerste 2 vasten), in de derde vaste haak je 1 vaste en 1 losse. Dat herhaal je steeds (zonder steken van de vorige toer over te slaan) Daardoor meerder je elke 4 steken 1 steek, door 1 losse er tussen te haken en kom je op een totaal van 36 steken.
04.11.2017 - 14:13Die Designabteilung scheint die Frage aus 2013, ob wirklich Kettmaschen und nicht eher feste Maschen gehäkelt werden sollen, eingeschlafen zu sein. Wenn man das Foto vergrößert sieht es eher nach festen Maschen aus. Schade, dass hier nicht nachgebessert wird. Auch die Probleme mit der Maschenprobe/Nadelgrösse kann ich nur bestätigen. Dieses Mal bin ich von der Anleitung wirklich enttäuscht.
16.09.2017 - 18:23DROPS Design answered:
Liebe Inge, diese Anleitung wird mit Kettmaschen gehäkelt, dieses Video zeigt wie man dieses Muster arbeitet. Viel Spaß beim häkeln!.
18.09.2017 - 09:41Il modello realizzato non corrisponde alle foto. Molto appuntito nella parte superiore e il colore talpa è insufficiente. Ho dovuto utilizzare gli altri colori per terminarlo. Anche la misura più grande risulta piccolo ed è impossibile utilizzarlo. Peccato perché l'idea del modello è molto bella.
18.05.2017 - 22:06No sé a que se refieren cuando dicen un p.e. Deberían poner el significado de las abreviaturas. Muchas gracias por su respuesta y atención.
01.09.2016 - 21:40DROPS Design answered:
Hola Elena. P.e. = punto enano. Todas las abreviaturas se pueden consultar aquí: https://www.garnstudio.com/glossary.php?langf=es&langt=en
04.09.2016 - 22:19