DROPS Nepal
DROPS Nepal
65% Wool, 35% Alpaca
from 2.40 £ /50g
DROPS Kid-Silk
DROPS Kid-Silk
75% Mohair, 25% Silk
from 4.60 £ /25g
Get the yarn to make this pattern from 51.80£.

The yarn cost is calculated from the pattern’s smallest size and the yarn’s cheapest product type. Looking for an even better price? You might find it on the DROPS Deals!

DROPS SS24

Dove

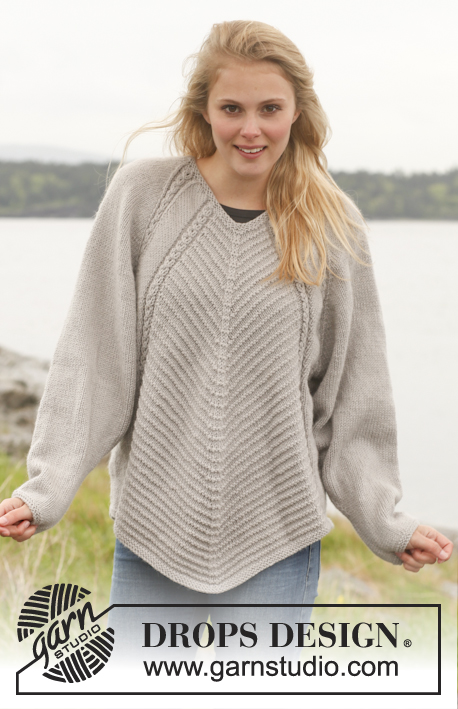
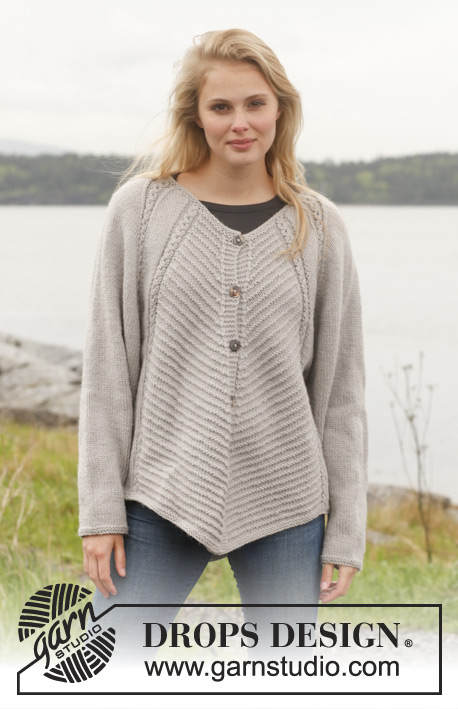
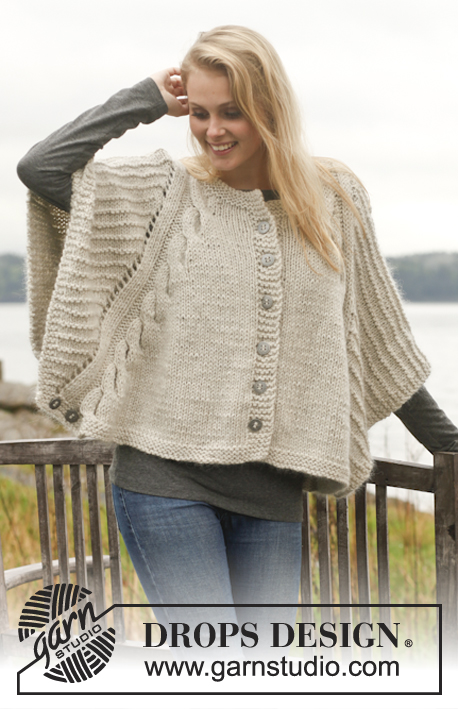
Knitted DROPS poncho with cables and textured pattern in "Nepal" and "Kid-Silk". Size: S - XXXL.

DROPS 150-12
DROPS design: Pattern no ne-117
Yarn group C and A
-----------------------------------------------------------
Size: S/M - L - XL/XXL - XXXL
Materials:
DROPS NEPAL from Garnstudio
600-650-700-750 g colour no 0500, light grey
and use:
DROPS KID-SILK from Garnstudio
175-175-200-225 g colour no 01, off white

DROPS CIRCULAR NEEDLE (80 cm) SIZE 7 mm – or size needed to get 12 sts x 16 rows in stocking st with 1 strand of each yarn = 10 x 10 cm.
DROPS CIRCULAR NEEDLE (80 cm) SIZE 6 mm – for garter st.
DROPS METAL BUTTON, NO 542: 10 pieces for all sizes

-------------------------------------------------------

Alternative Yarn – See how to change yarns here
Yarn Groups A to F – Use the same pattern and change the yarn here
Yarn usage using an alternative yarn – Use our yarn converter here

-------------------------------------------------------

DROPS Nepal
DROPS Nepal
65% Wool, 35% Alpaca
from 2.40 £ /50g
DROPS Kid-Silk
DROPS Kid-Silk
75% Mohair, 25% Silk
from 4.60 £ /25g
Get the yarn to make this pattern from 51.80£.

The yarn cost is calculated from the pattern’s smallest size and the yarn’s cheapest product type. Looking for an even better price? You might find it on the DROPS Deals!

Pattern instructions

NOTE: This pattern is written in British English. All measurements in charts are in cm. For conversion from cm to inches - click here. There are different terms for crocheting in British and American English. If this pattern includes crochet, click for "crochet terms" here. For this pattern in American English, please click here.
GARTER ST (back and forth on circular needle):
K all rows. 1 ridge = 2 rows K.

PATTERN:
See diagrams A.1 and A.2. The diagrams show all rows in pattern seen from RS.

BUTTONHOLE:
Dec for buttonholes on right band. 1 buttonhole = K tog third and fourth st from mid front and make 1 YO.
Dec for buttonholes when piece measures:
SIZE S/M: 7, 15, 23, 31, 39 and 47 cm.
SIZE L: 8, 16, 25, 33, 42 and 50 cm.
SIZE XL/XXL: 7, 16, 25, 34, 43 and 52 cm.
SIZE XXXL: 8, 18, 27, 37, 46 and 55 cm.
----------------------------------------------------------

BACK PIECE:
Worked back and forth on circular needle.
Cast on 108-112-118-122 sts on circular needle size 6 mm with 1 strand of each yarn (= 2 strands). Work 3 ridges in GARTER ST - see explanation above.
Switch to circular needle size 7 mm and work next row from RS as follows: Work 4 sts in garter st, K 3, P 3, 88-92-98-102 sts in stocking st, AT THE SAME TIME inc 12 sts by working 2 sts in each of the first 6 sts and 2 sts in each of the last 6 sts in stocking st (= 12 sts inc), P 3, K 3, 4 sts in garter st = 120-124-130-134 sts in total on needle.
Work 1 row as follows from WS: 4 sts in garter st, P 3, K 3, 100-104-110-114 sts in stocking st, K 3, P 3, 4 sts in garter st.
On next row from RS work as follows: Work A.1 (= 22 sts), work 76-80-86-90 sts in stocking st and work A.2 (= 22 sts).
Continue pattern like this, i.e. on every other row the section in stocking st in the middle gets smaller while A.1 and A.2 get bigger – no of sts does not vary. When A.1 and A.2 have been worked 10-11-11-12 times in total vertically in each side, continue A.1 and A.2 without YOs and cable (work sts over cable in stocking st).
When piece measures 53-56-59-62 cm, cast off the middle 16-18-18-20 sts for neck and finish each shoulder separately. Continue to cast off 1 st on the next row towards the neckline = 51-52-55-56 sts remain on each shoulder. Continue until piece measures 55-58-61-64 cm and cast off. Repeat on the other shoulder.

RIGHT FRONT PIECE:
Cast on 59-61-64-66 sts (incl 5 band sts towards mid front) on circular needle size 6 mm with 1 strand of each yarn. Work 3 ridges in garter st. Switch to circular needle size 7 mm and
work as follows from RS: 5 band sts in garter st, work 44-46-49-51 sts in stocking st, AT THE SAME TIME inc 6 sts by working 2 sts in each of the last 6 sts in stocking st (= 6 sts inc), P 3, K 3, 4 sts in garter st = 65-67-70-72 sts in total on needle. Work 1 row as follows from WS: 4 sts in garter st, P 3, K 3, 50-52-55-57 sts in stocking st, 5 band sts in garter st.
On next row from RS work as follows: 5 band sts in garter st, 38-40-43-45 sts in stocking st and then pattern according to diagram A.2 (= 22 sts).
Continue pattern like this, i.e. section in stocking st towards mid front gets smaller while A.2 gets bigger (no of sts does not vary). Remember BUTTONHOLES on band - see explanation above. NOTE: When A.2 have been worked 9-10-10-11 times in total vertically, continue A.2 without cable (work sts over cable in stocking st) until A.2 has been worked for as many row as for back piece with increases, then continue without the increase, just as on back piece. AT THE SAME TIME when piece measures approx. 47-50-52-55 cm (adjust so that 1 row has been worked after last buttonhole and plaiting in A.2 has been finished), slip the first 10-11-11-12 sts towards mid front on 1 stitch holder for neck (work sts before slipping them on stitch holder to avoid cutting the yarn in piece). Then cast off at beg of every row from neck: 2 sts 1 time and 1 st 2 times = 51-52-55-56 sts remain on shoulder. Continue until piece measures 55-58-61-64 cm - adjust according to back piece, cast off.

LEFT FRONT PIECE:
Cast on and work as right but reversed. Work pattern according to diagram A.1 instead of A.2.

ASSEMBLY:
Sew the shoulder seams. Sew 2 decorative buttons at the bottom of edge in garter st, 3 and 9 cm from edge in each side (sew through both layers so that front and back piece is tog at the edge in each side at the bottom of garment).

NECK EDGE:
Pick up approx. 60 to 70 sts from RS around the neck (incl sts on stitch holders mid front) with 1 strand of each yarn on circular needle size 6 mm. Work 3 ridges in garter st back and forth. Loosely cast off with K from WS.

This pattern has been corrected.

Updated online: 23.11.2016
RIGHT FRONT PIECE:...NOTE: When A.2 have been plaited 9-10-10-11 times in total vertically, continue A.2 without YOs (work sts over cable in stocking st)...

Diagram

symbols = K from RS, P from WS
symbols = P from RS, K from WS
symbols = 1 YO between 2 sts
symbols = slip 8 sts on cable needle behind piece, K 4, then K the 8 sts from cable needle twisted tog 2 by 2
symbols = slip 4 sts on cable needle in front of piece, K the next 8 sts tog 2 by 2, K 4 from cable needle
diagram
diagram
diagram

Each of our patterns has specific tutorial videos to help you.

Do you have a question? See a list of frequently asked questions (FAQ)

Knitting tension is what determines the final measurements of your work, and is usually measured per 10 x 10 cm. It is provided like so: number of stitches in width x number of rows in height - eg: 19 stitches x 26 rows = 10 x 10 cm.

The knitting tension is very individual; some people knit/crochet loosely while others work tightly. You adjust the knitting tension with the needle size, which is why the suggested needle size is only meant as a guide! You need to adjust this (up or down) to ensure that YOUR knitting tension matches the knitting tension provided in the pattern. If you work with a different knitting tension than provided you will have a different yarn consumption, and your work will have different measurements than what the pattern suggests.

The knitting tension also determines which yarns can replace each other. As long as you achieve the same knitting tension you can replace one yarn with another.

See DROPS lesson: How to measure your tension/gauge

See DROPS video: How to make a gauge tension swatch

The required amount of yarn is provided in grams, eg: 450 g. To calculate how many balls you’ll need you first need to know how many grams are in 1 ball (25g, 50g or 100g). This information is available if you click on the individual yarn quality on our pages. Divide the amount required with the amount of each ball. For example, if each ball is 50g (the most common amount), the calculation will be as follows: 450 / 50 = 9 balls.

The important thing when changing from one yarn to another is that the knitting/crochet tension remains the same. This is so that the measurements of the finished piece will be the same as on the sketch provided. It is easier to achieve the same knitting tension using yarns from the same yarn group. It is also possible to work with multiple strands of a thinner yarn to achieve the knitting tension of a thicker one. Please try our yarn converter. We recommend you to always work a test swatch.

Please NOTE: when changing yarn the garment might have a different look and feel to the garment in the photo, due to individual properties and qualities of each yarn.

See DROPS lesson: Can I use a different yarn than the one mentioned in the pattern?

All our yarns are categorised into yarn groups (from A to F) according to thickness and knitting tension – group A contains the thinnest yarns and group F the thickest. This makes it easier for you to find alternative yarns to our patterns, should you wish to switch yarn. All yarns within the same group have a similar knitting tension and can easily replace each other. However, different yarn qualities have different structures and properties which will give the finished work a unique look and feel.

Click here for an overview of the yarns in each yarn group

At the top of all our patterns you’ll find a link to our yarn calculator, which is a helpful tool should you wish to use a different yarn than suggested. By filling in the yarn quality you wish to replace, the amount (in your size) and number of strands, the calculator will present good alternative yarns with the same knitting tension. Additionally it will tell you how much you’ll require in the new qualities and whether you’ll need to work with multiple strands. Most skeins are 50g (some are 25g or 100g).

If the pattern is worked with multiple colours, every colour will have to be calculated separately. Similarly, if the pattern is worked with several strands of different yarns (for example 1 strand Alpaca and 1 strand Kid-Silk) you will have to find alternatives for each, individually.

Click here to see our yarn calculator

Since different yarns have different qualities and textures we have chosen to keep the original yarn in our patterns. However, you can easily find options among our available qualities by using our yarn calculator, or simply pick a yarn from the same yarn group.

It is possible that some retailers still have discontinued yarns in stock, or that someone has a few skeins at home that they would like to find patterns for.

The yarn calculator will provide both alternative yarn as well as required amount in the new quality.

If you think it's hard to decide what size to make, it can be a good idea to measure a garment you own already and like the size of. Then you can pick the size by comparing those measures with the ones available in the pattern's size chart.

You'll find the size chart at the bottom of the pattern.

See DROPS lesson: How to read size chart

The needle size provided in the pattern serves only as a guide, the important thing is to follow the knitting tension. And since knitting tension is very individual, you will have to adjust the needle size to ensure that YOUR tension is the same as in the pattern – maybe you’ll have to adjust 1, or even 2 needle sizes, up or down to achieve the correct tension. For this, we recommend that you work test swatches.

Should you work with a different knitting tension than the one provided, the measurements of the finished garment might deviate from the measurement sketch.

See DROPS lesson: How to measure your tension/gauge

See DROPS video: How to make a tension/gauge swatch

Working a garment top-down provides more flexibility and room for personal adjustment. For example it is easier to try the garment on while working, as well as making adjustments to length of yoke and shoulder caps.

The instructions are carefully explaining every step, in the correct order. Diagrams are adjusted to the knitting direction and are worked as usual.

The diagram depicts all rows/rounds, and every stitch seen from the right side. It is read from bottom to top, from right to left. 1 square = 1 stitch.

When working back and forth, every other row is worked from the right side and every other row is worked from the wrong side. When working from the wrong side, the diagram will have to be worked reversed: from left to right, knit stitches are purled, purl stitches are knit etc.

When working in the round every round is worked from the right side and the diagram are worked from right to left on all rounds.

See DROPS lesson: How to read knitting diagrams

The diagram depicts all rows/rounds, and every stitch seen from the right side. It is worked from bottom to top, from right to left.

When working back and forth every other row is worked from the right side: from right to left and every other row is worked from the wrong side: from left to right.

When working in the round, every row in the diagram are worked from the right side, from right to left.

When working a circular diagram you start in the middle and work your way outwards, counter clockwise, row by row.

The rows usually start with a given number of chain stitches (equivalent to the height of the following stitch), this will either be depicted in the diagram or explained in the pattern.

See DROPS lesson: How to read crochet diagrams

Instructions for working several diagrams after each other on the same row/round, will often be written like so: “work A.1, A.2, A.3 a total of 0-0-2-3-4 times". This means you work A.1 once, then A.2 is worked once, and A.3 is repeated (in width) the number of times provided for your size – in this case like so: S = 0 times, M = 0 times, L=2 times, XL= 3 times and XXL = 4 times.

The diagrams are worked as usual: begin with the first row in A.1, then work the first row in A.2 etc.

See DROPS lesson: How to read knitting diagrams

See DROPS lesson: How to read crochet diagrams

The total width of the garment (from wrist-to-wrist) will be larger in the larger sizes, despite the actual sleeves being shorter. The larger sizes have longer sleeve caps and wider shoulders, so there will be a good fit in all sizes.

The measurement sketch/schematic drawing provides information regarding the full length of the garment. If it’s a jumper or a jacket the length is measured from the highest point on the shoulder closest to the neckline, and straight down to the bottom of the garment. It is NOT measured from the tip of shoulder. Similarly, the length of yoke is measured from the highest point on the shoulder and down to where yoke is split into body and sleeves.

On a jacket measures are never taken along bands, unless specifically stated. Always measure inside band stitches when measuring the length.

See DROPS lesson: How to read a schematic drawing

Diagrams are often repeated on the round or in height. 1 repeat is the diagram the way it appears in the pattern. If it says to work 5 repeats of A.1 in the round, then you work A.1 a total of 5 times after/next to each other in the round. If it says to work 2 repeats of A.1 vertically/in height you work the entire diagram once, then begin again at the start and work the entire diagram one more time.

Chain stitches are slightly narrower than other stitches and to avoid working the cast-on edge too tight, we simply chain more stitches to begin with. The stitch count will be adjusted on the following row to fit the pattern and measurement sketch.

The rib edge is more elastic and will contract slightly compared to, for example, stocking stitch. By increasing before the rib edge, you avoid a visible difference in width between the rib edge and the rest of the body.

It’s very easy to cast off too tightly, and by making yarn overs while casting off (and simultaneously casting these off) you avoid a too tight cast off edge.

See DROPS video: How to bind off with yarn overs (yo)

To achieve an even increase (or decrease) you can increase on, for example: every 3rd and 4th row alternately, like so: work 2 rows and increase on the 3rd row, work 3 rows and increase on the 4th. Repeat this until the increase is complete.

See DROPS lesson: Increase or decrease 1 st on every 3rd and 4th row alternately

Should you prefer to work in the round instead of back and forth, you may of course adjust the pattern. You’ll need to add steeks mid-front (usually 5 stitches), and follow the instructions. When you would normally turn and work from the wrong side, simply work across the steek and continue in the round. At the end you’ll cut the piece open, pick up stitches to work bands, and cover the cut edges.

See DROPS video: How to knit steeks and cut open

Should you prefer to work back and forth instead of in the round, you may of course adjust the pattern so you work the pieces separately and then assemble them at the end. Divide the stitches for the body in 2, add 1 edge stitch in each side (for sewing) and work the front and back pieces separately.

See DROPS lesson: Can I adapt a pattern for circular needles into straight needles?

Pattern repeats can vary slightly in the different sizes, in order to get the correct proportions. If you’re not working the exact same size as the garment in the photo, yours might deviate slightly. This has been carefully developed and adjusted so that the complete impression of the garment is the same in all sizes.

Make sure to follow instructions and diagrams for your size!

If you have found a pattern you like which is available in women’s size it’s not very difficult to convert it to men’s size. The biggest difference will be the length of sleeves and body. Start working on the women size that you think would fit across the chest. The additional length will be worked right before you cast off for the armhole/sleeve cap. If the pattern is worked top-down you can add the length right after the armhole or before the first decrease on sleeve.

Regarding additional yarn amount, this will depend on how much length you add, but it is better with a skein too many than too few.

All yarns will have excess fibres (from production) that might come off as lint or shedding. Brushed yarns (ie hairier yarns) have more of these loose, excess fibres, causing more shedding.

Shedding also depends on what is worn under or over the garment, and whether this pulls at the yarn fibres. It’s therefore not possible to guarantee that there will be no shedding

Below are some tips on how to get the best result when working with hairier yarns:

1. When the garment is finished (before you wash it) shake it vigorously so the looser hairs come off. NOTE: do NOT use a lint roller, brush or any method that pulls at the yarn.

2. Place the garment in a plastic bag and put it in your freezer - the temperature will cause the fibres to become less attached to each other, and excess fibres will come off easier.

3. Leave in the freezer for a few hours before taking it out and shaking it again.

4. Wash the garment according to the instructions on the yarn label.

Pilling is a natural process that happens to even the most exclusive of fibers. It's a natural sign of wear and tear that is hard to avoid, and that is most visible in high friction areas of your garment like a sweater's arms and cuffs.

You can make your garment look as new by removing the pilling, using a fabric comb or a pill/lint remover.

Still can't find the answer you need? Then scroll down and leave your question so one of our experts can try to help you. This will be done normally within 5 to 10 working days.
In the meantime, you can read the questions and answers that others have left to this pattern or join the DROPS Workshop on Facebook to get help from fellow knitters/crocheters!

You might also like...

Post a comment to pattern DROPS 150-12

We would love to hear what you have to say about this pattern!

If you want to leave a question, please make sure you select the correct category in the form below, to speed up the answering process. Required fields are marked *.

Comments / Questions (108)

country flag Mandy Proß wrote:

Was macht man mit den Umschlägen, die in den Hinreihen zu machen sind,dann in den Rückreihen?

06.10.2022 - 21:35

DROPS Design answered:

Liebe Frau Proß, die Umschläge im Diagram stricken Sie bei den Rückreihen wie im Diagram gezeigt (sie werden immer links bein den Rückreihen gestrickt). Vielleicht kann Ihnen auch dieses Video mal helfen? Viel Spaß beim stricken!

07.10.2022 - 08:49

country flag Chantal ALZATE wrote:

Bonjour,\r\nÀ quel endroit doit on diminuer pour garder le même nombre de mailles. On fait 2 jetés = 2 augmentations mais je ne comprend pas ou diminuer.\r\n\r\nMerci de votre retour

18.08.2022 - 18:12

DROPS Design answered:

Bonjour Mme ALZATE, pour les augmentations du béret procédez comme indiqué sous AUGMENTATIONS au début des explications autrement dit, vous placez 7 marqueurs et augmentez 1 maille avant chaque marqueur - cette vidéo montre comment augmenter en faisant 1 jeté. Bon tricot!

19.08.2022 - 09:07

country flag Annie wrote:

Bonjour, Je souhaiterai tricoter le modèle Poncho DROPS avec torsades et point texturé en "Nepal" et "Kid-Silk" avec le fil NEPAL, coloris n° 4434 - mauve/violet mix. Quel coloris de fil KID-SILK me recommanderiez-vous pour l'association ? Merci d'avance Annie

31.07.2022 - 15:09

DROPS Design answered:

Bonjour, nous vous recommandons d'utiliser Kid-Silk nº 05 ou 16, selon si vous voulez un violet plus fort ou plus doux. Bon tricot!

31.07.2022 - 18:55

country flag Krisztina Kovács wrote:

A 8/4-es csavarások fordításában annyit helyesbítenék, hogy a nyolc szemet kettesével nem megcsavarni hanem összekötni kell. Valamint a második csavarás : 4szem a munka elé, 8 szem kettesével összeköt, a 4 szemet simán leköt. Köszönöm!

11.10.2021 - 08:57

country flag DAGUET wrote:

BONJOUR merci de votre réponse sur votre site je voudrais commander des aiguilles circulaires TAILLE n° 6 - 7 -8 SUR 80 CM dites moi ou je peux les trouver merci

18.09.2020 - 15:05

DROPS Design answered:

Bonjour Mme Daguet, vous trouverez ici la liste des magasins DROPS proposant les aiguilles - consultez les différentes boutiques en ligne pour trouver le modèle et la taille souhaités, et n'hésitez pas à les contacter pour plus d'infos. Bon tricot!

18.09.2020 - 16:01

country flag DAGUET wrote:

BONJOUR, pourquoi pour ce modèle 150-12 je suis obligée de prendre des aiguilles circulaires est ce que je peux prendre des aiguilles normales ? merci de votre réponse

18.09.2020 - 10:25

DROPS Design answered:

Bonjour Mme Daguet, on utilise ici des aiguilles circulaires pour avoir suffisamment de place pour y loger toutes les mailles, mais on va tricoter en allers et retours. Vous pouvez tricoter sur aiguilles droites mais pensez à bien vérifier votre tension car vos mailles seront plus serrées. Plus d'infos ici sur les aiguilles circulaires. Bon tricot!

18.09.2020 - 13:21

country flag Rosemarie wrote:

Stricke ich nach den Verzopfungen am Rückenteil wirklich ohne Umschlag weiter? Leider sieht man auf dem Foto nur das Vorderteil . Und Da sieht es aus, ob das Lochmuster ( Umschlag) bis nach oben durchgeht.

26.04.2020 - 20:35

DROPS Design answered:

Liebe Rosemarie, ja genau, es sind dann keine Umschläge mehr für nur ein paar Reihe. Viel Spaß beim stricken!

12.05.2020 - 10:26

country flag Monic wrote:

Könnte ich die Anleitung per PDF erhalten? Dankeschön

27.10.2019 - 00:07

DROPS Design answered:

Liebe Monic, unsere Anleitungen können nur gedruckt werden, aber mit einem virtuellen Drucker können Sie die Anleitung als .PDF speichern. Viel Spaß beim stricken!

05.11.2019 - 09:53

country flag Laurendrine wrote:

Bonjour J’ai terminé le dos et les devants. Du fait que l’on doit arrêter les croisements à 9 fois pour le devant à la place de 10 fois pour le dos (taille S).. Le coté extérieur (côtes en mousse) est plus large sur le dos que sur le devant (avant les jours : décalage de 4 mailles) et ils ne sont en face pour être cousu. Est ce normal ? Avec mes remerciements Laurendrine

29.09.2019 - 16:45

DROPS Design answered:

Bonjour Laurendrine, on doit continuer avec A.2 comme on a fait pour le dos, cette phrase a été ajoutée dans le devant droit pour que ce soit plus simple à comprendre. Bon tricot!

01.10.2019 - 09:44

country flag Maria Helena wrote:

São lindos os seus trabalhos !!!!! Só que tem que as receitas tem que ser em português do Brasil . Ficaria muito feliz em fazer seus trabalhos que são de extremo bom gosto . Beijos

27.07.2019 - 03:45