
Popular categories
Looking for a yarn?


|
|||||||||||||||||||
Little Sophie |
|||||||||||||||||||
|
|
|||||||||||||||||||
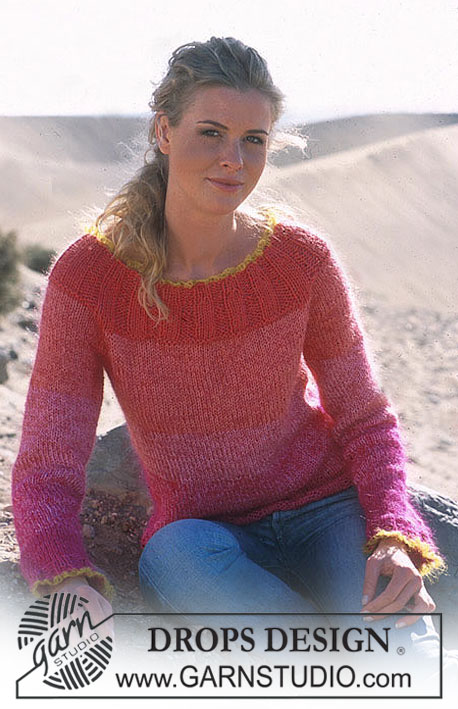
DROPS Girl’s Crocheted Poncho in Paris with blossom in Safran
DROPS 89-6 |
|||||||||||||||||||
|
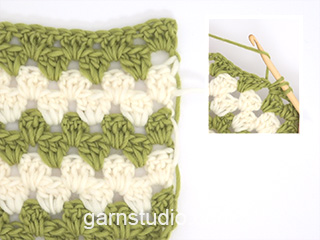
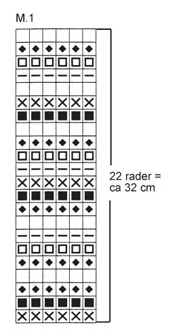
PONCHO: Crochet gauge: 4 dc-groups in width and 7 rows in height = approx. 10 x 10 cm. Stripe Pattern: See chart. 1 row of the chart = 1 crochet row. Crochet info (for points at center front and center back: increased dc-group = 3 dc, ch 1, 3 dc in the same ch-loop. Crochet tips: When changing colors, crochet over the ends of the last color and the new color to fasten them. Poncho: The poncho is crocheted from the neck down. Ch 88-98-108 with hot pink (the chain should measure approx. 54-57-61 cm) and join into a ring with 1 sl st. 1st row: 1 sc in each ch and finish with 1 sl st in 1st sc at start of row = 88-98-108 sc. Follow crochet instructions below in stripes on chart, starting at bottom of chart. 2nd row: The start of the row will be one side (shoulder). Ch 3 (= 1 dc), 1 dc in each of the next 2 sc, ch 1, skip over 2 sc, * 1 dc in each of the next 3 sc, ch 1, skip over 2 sc *, repeat * - * a total of 3-3-4 times (= 4-4-5 dc-groups), 3 dc in the next sc, ch 1 (= center front point), 3 dc in the next sc, ch 1, skip over 2 sc, * 1 dc in each of the next 3 sc, ch 1, skip over 2 sc *, repeat * - * a total of 8-9-10 times, 3 dc in the next sc, ch 1 (= center back point), 3 dc in the next sc, ch 1, skip over 2 sc, * 1 dc in each of the next 3 sc, ch 1, skip over 2 sc *, repeat * - * a total of 4-5-5 times and finish with 1 sl st in ch 3 at start of row = 8-9-10 dc-groups between each point. Then 1 sl st in each of the first 2 dc and the first ch-loop. 3rd row: Ch 3, 2 dc in same ch-loop, ch 1, * 3 dc in the next ch-loop, ch 1 *, repeat * - * a total of 3-3-4 times, crochet an increased dc-group (see instructions above) in ch-loop at center front point, ch 1, * 3 dc in the next ch-loop, ch 1 *, repeat * - * a total of 9-10-11 times, crochet an increased dc-group in ch-loop at center back point, ch 1, * 3 dc in the next ch-loop, ch 1 *, repeat * - * a total of 5-6-6 times and finish with 1 sl st in ch 3 at start of row = 9-10-11 dc-groups between each point. Then 1 sl st in each of the first 2 dc and the first ch-loop. From 4th row to finished measurements: Continue in the same manner as 3rd row – there will be 1 dc-group more between each point after every row. When the piece measures approx. 32-37-44 cm from neck along shoulder (= approx. 22-26-31 rows) – or to desired length – cut yarn and fasten. The piece measures approx. 44-52-62 cm from neck down at center front. BLOSSOM: Materials: SAFRAN Small amount nr 02, pink DROPS 3 mm [US C] crochet hook, or size needed to obtain correct gauge. Crocheted blossom: Ch 4 with Safran and join into a ring with 1 sl st. 1st row: 6 sc in ring, finish with 1 sl st in 1st sc. 2nd row: 1 sc in first sc, * ch 3, 1 sc in the next sc *, repeat * - * a total of 5 times and finish with ch 3 and 1 sl st in first sc at start of row = 6 ch-loops. Ch 1, turn piece and crochet from back side. 3rd row: Crochet as follows in each ch-loop: 1 sc, ch 1, 3 dc, ch 1, 1 sc, finish with 1 sl st in 1st sc at start of row. 4th row: * 1 sc in sc from 2nd row (crochet on back side of petal around sts from previous row, pull yarn tight), ch 4 *, repeat * - * a total of 6 times and finish with 1 sl st in 1st sc at start of row. 5th row: Ch 1, crochet as follows in each ch-loop: 1 sc, ch 1, 5 dc, ch 1, 1 sc, finish with 1 sl st in 1st sc at start of row. 6th row: * 1 sc in sc from 4th row (crochet on back side of the 2 petals around sts from previous row, pull yarn tight), ch 5 *, repeat * - * a total of 6 times and finish with 1 sl st in 1st sc at start of row. 7th row: Ch 1, crochet as follows in each ch-loop: 1 sc, ch 1, 1 dc, 5 tc, 1 dc, ch 1, 1 sc, finish with 1 sl st in 1st sc at start of row. Cut yarn and fasten – sew a small safety pin to back. |
|||||||||||||||||||
Diagram explanations |
|||||||||||||||||||
|
|||||||||||||||||||
|
|||||||||||||||||||
|
Have you made this or any other of our designs? Tag your pictures in social media with #dropsdesign so we can see them! Do you need help with this pattern?You'll find tutorial videos, a Comments/Questions area and more by visiting the pattern on garnstudio.com. © 1982-2024 DROPS Design A/S. We reserve all rights. This document, including all its sub-sections, has copyrights. Read more about what you can do with our patterns at the bottom of each pattern on our site. |
|||||||||||||||||||


With over 40 years in knitting and crochet design, DROPS Design offers one of the most extensive collections of free patterns on the internet - translated to 17 languages. As of today we count 304 catalogs and 11422 patterns - 11417 of which are translated into English (US/in).
We work hard to bring you the best knitting and crochet have to offer, inspiration and advice as well as great quality yarns at incredible prices! Would you like to use our patterns for other than personal use? You can read what you are allowed to do in the Copyright text at the bottom of all our patterns. Happy crafting!
Comments / Questions (63)
Dit is een opmerking geplaatst in 2006. Daarna is het patroon volledig aangepast. Stk-cluster is geen goed woord, dat heb ik nu veranderd in stk-groep. Het patroon zoals het nu staat klopt. Als de maat niet klopt, dan kan het aan de stekenverhouding liggen. Daarom raad mijn collega aan om naar het verkooppunt te gaan. Persoonlijke uitleg is vaak beter dan via een mail.
14.02.2012 - 13:06Ik denk niet dat het aan de katoen ligt dat is nl. de katoen ook beschreven in het patroon. Kunt u mij uitleggen wat er bedoeld wordt met Ik heb het patroon gewijzigd, en ik heb de term "vermeerderde stk-groep" veranderd naar "stk-groep + 1". In info haken staat er dat dit is 3 stk + 1 l + 1 stk. Dwz dat je meerdert 1 stk in elke punt per toer. Het is nl. verwarrend want er staat in het patroon iets anders! Graag verneem ik nog van u.
13.02.2012 - 11:35De punten middenvoor en middenachter zijn gelijk. Als uw werk niet de gewenste maat heeft, raden we u aan om bij uw DROPS verkooppunt langs te gaan met uw werk, wij kunnen vanaf hier niet zien waarom uw maat niet klopt.
13.02.2012 - 09:36Ik ben begonnen met de poncho maar ben nu op de helft en deze past een pop of beer ik doe iets fout met meerderen, ik heb wel elke toer een stekengroep extra tussen de punten maar wat moet er nu precies gebeuren bij de achterpunt elke toer.......ik begrijp het niet. er staat= haak een gemeerderde stk/groep in de l lus van de punt middenachter. doe je achter iets anders dan bij de voor punt in de toeren groeten petra
12.02.2012 - 11:00Har netop gjort denne færdig i str 5/7 - garnforbrug passer ikke med det som står i opskriften. Har kun brugt 50g af farve 27 og 01.
22.07.2011 - 06:05Hoi. Kijk ook op de foto en u kunt zien hoe de stokjes liggen in de punt. Gr. Tine
26.11.2010 - 14:47Hoi Ans. In toer 3 heeft u al 1 extra stk groep gehaakt in de punten. Vanaf toer 4 moet u dat eigenlijk blijven doen. Dwz, in de boog (1 l) tussen de 2 stk groepen in de punten haakt u weer 3 st, 1 l en 3 stk. Op deze manier zou er geen prop komen - maar netjes naast elkaar? Gr. Tine
26.11.2010 - 14:47Ik ben deze poncho aan het haken,maar kom niet uit de vierde toer. Er staat namelijk in de vierde toer, dat er iedere volgende toer een stokjes groep gemeerderd moet worden in de punten. Maar als ik dat doe in het zelfde boogje ,krijg je een hele dikke prop, dus waarschijnlijk doe ik iets niet goed,heb van alles geprobeerd ,maar kom er niet uit. Misschien kunt u mij verder helpen.
26.11.2010 - 14:42Hoi Lonneke. Je kunt ook gerust met de verkooppunten bellen voor meer informatie of stel je vraag hier of in een ander handwerkforum. Om bepaalde steken of technieken te zien kan je ook in onze instructievideo's kijken. De link vind je hier op het patroon. Succes. Tine.
01.09.2010 - 13:27Wat een geweldige poncho! Ik zou er zo aan willen beginnen, maar ik ben een beginner. Ik kan wel alle basissteken, maar ik ben bang dat de beschrijvingen in het patroon me weinig zeggen. Ik weet gewoon niet hoe ik sommige dingen moet interpreteren. Helaas zijn de verkoopadressen ook niet echt in de buurt, anders kon ik daar vragen. Heeft iemand een idee waar ik hiermee terecht kan? - Lonneke
31.08.2010 - 15:39