DROPS Karisma
DROPS Karisma
100% Wool
from 2.30 £ /50g
Get the yarn to make this pattern from 32.20£.

The yarn cost is calculated from the pattern’s smallest size and the yarn’s cheapest product type. Looking for an even better price? You might find it on the DROPS Deals!

DROPS SS24

Gwendolen

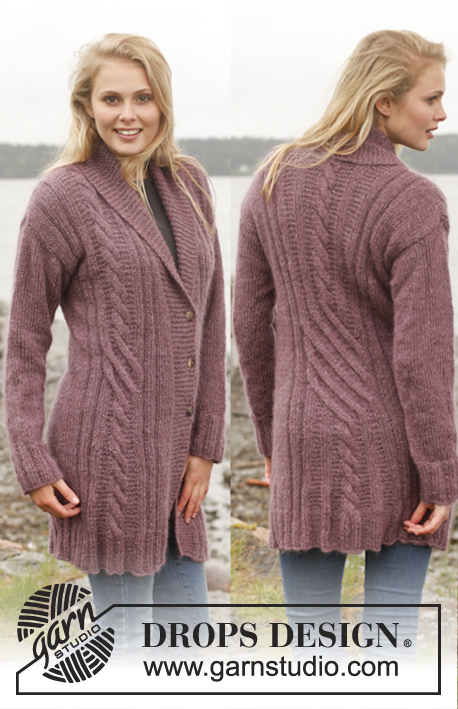
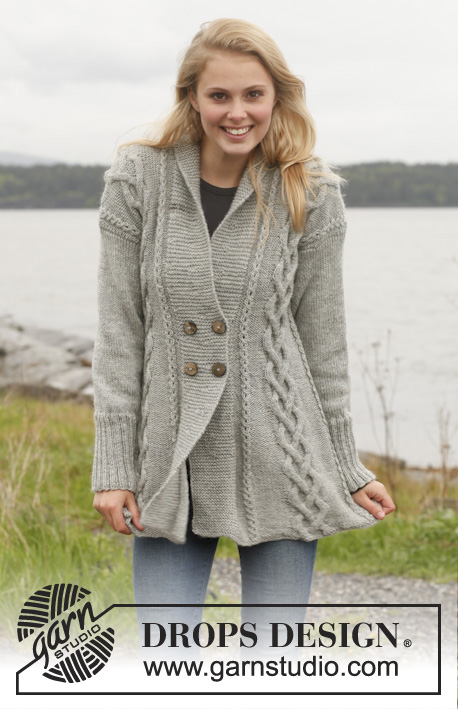
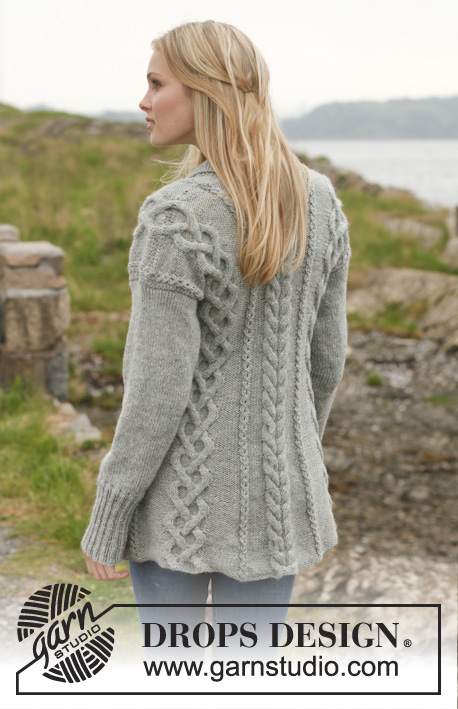
Knitted DROPS jacket with cables and shawl collar in ”Karisma”. Size: S - XXXL.

DROPS 151-1
DROPS design: Pattern no u-707
Yarn group B
-----------------------------------------------------------
Size: S - M/L - XL - XXL/XXXL
Materials:
DROPS KARISMA from Garnstudio
700-800-900-1000 g colour no 44, light grey

DROPS DOUBLE POINTED NEEDLES and CIRCULAR NEEDLE (80 cm) SIZE 4 mm - or size needed to get 21 sts x 28 rows in stocking st = 10 x 10 cm.
DROPS DOUBLE POINTED NEEDLES SIZE 3.5 mm – for rib
DROPS ANGULAR BUFFELHORN BUTTON NO 538: 4 pieces

-------------------------------------------------------

Alternative Yarn – See how to change yarns here
Yarn Groups A to F – Use the same pattern and change the yarn here
Yarn usage using an alternative yarn – Use our yarn converter here

-------------------------------------------------------

DROPS Karisma
DROPS Karisma
100% Wool
from 2.30 £ /50g
Get the yarn to make this pattern from 32.20£.

The yarn cost is calculated from the pattern’s smallest size and the yarn’s cheapest product type. Looking for an even better price? You might find it on the DROPS Deals!

Pattern instructions

NOTE: This pattern is written in British English. All measurements in charts are in cm. For conversion from cm to inches - click here. There are different terms for crocheting in British and American English. If this pattern includes crochet, click for "crochet terms" here. For this pattern in American English, please click here.
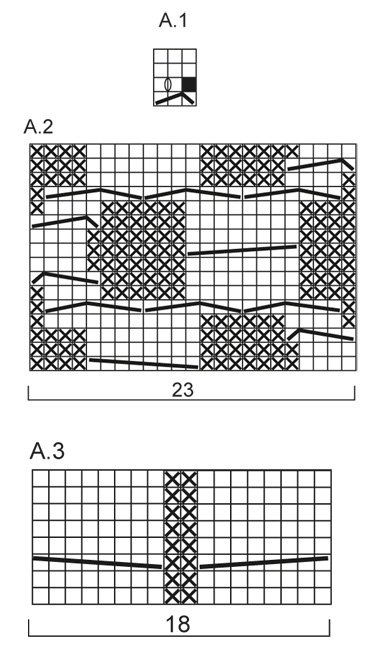
GARTER ST (back and forth on needle):
K all rows. 1 ridge = 2 rows K.

PATTERN:
See diagrams A.1 to A.3. Diagrams show all rows in pattern from RS.

SHORT ROWS IN BAND:
Work short rows over sts in band to avoid it contracting vertically. Work like this every 10th row – from RS: Work 18 sts (= right band), turn and work back. Work 1 row over all sts as before. Turn and work 18 sts (= left band), turn and work back. Turn and work 1 row over all sts as before.

BUTTONHOLES:
Dec for buttonholes on right band. 1 buttonhole = K tog 3rd and 4th st from mid front, make 1 YO, K 8, K tog 13th and 14th st from mid front, make 1 YO (= 2 buttonholes).
Dec for buttonholes when piece measures:
SIZE S: 29 and 37 cm.
SIZE M/L: 30 and 38 cm.
SIZE XL: 31 and 39 cm.
SIZE XXL/XXXL: 33 and 41 cm.
----------------------------------------------------------

BODY:
Worked back and forth on circular needle to make room for all the sts. Cast on 266-290-350-386 sts (incl 18 band sts in each side towards mid front) on circular needle size 4 mm with Karisma. Work 2 RIDGES in garter st - see explanation above AT THE SAME TIME on last row inc 40 sts evenly = 306-330-390-426 sts. Then work as follows from RS: 18 sts in garter st (= band), P 8-8-8-10, * A.1 (= 3 sts), P 10-12-12-14 *, repeat from *-* 1-1-2-2 times in total, A.2 (= 23 sts), P 10-12-12-14, * A.1, P 10-12-12-14 *, repeat from *-* 2-2-2-2 times in total, A.2, * P 10-12-12-14, A.1 *, repeat from *-* 1-1-2-2 times in total, P 10-12-12-14, A.3 (= 18 sts), P 10-12-12-14, * A.1, P 10-12-12-14 *, repeat from *-* 1-1-2-2 times in total, A.2, P 10-12-12-14, * A.1, P 10-12-12-14 *, repeat from *-* 2 times in total, A.2, * P 10-12-12-14, A.1 *, repeat from *-* 1-1-2-2 times in total, P 8-8-8-10, 18 sts in garter st (= band).

Continue this pattern AT THE SAME TIME work short rows over sts in band – see explanation above. AT THE SAME TIME when piece measures 8 cm, dec 1 st at beg of every P-section, P the first 2 sts tog (= 14-14-18-18 dec sts). Repeat dec every 5-5½-5½-6 cm, dec alternately at beg and end of all P-sections 5 more times (= 6 dec in total) = 222-246-282-318 sts. Remember to dec for BUTTONHOLES on right band - see explanation above. When piece measures 40-41-42-44 cm, on next RS row inc 1 st at beg of every P-section, inc with a YO and K yo twisted on next row from WS (= 14-14-18-18 inc sts). Repeat inc but at the end of every P-section when piece measures 50-52-53-55 cm = 250-274-318-354 sts. When piece measures 56-58-59-61 cm, divide the piece, finish front and back piece separately as follows: Slip the first and last 66-71-82-91 sts on a stitch holder for front piece, cut the yarn, then work only over the middle 118-132-154-172 sts (= back piece).

BACK PIECE:
= 118-132-154-172 sts. Continue pattern as before. When piece measures 72-76-78-82 cm, cast off the middle 22-26-26-26 sts for neck = 48-53-64-73 sts remain on each shoulder. Finish each part separately. Continue with pattern until piece measures 74-78-80-84 cm, cast off.

RIGHT FRONT PIECE:
Slip the first 66-71-82-91 sts back on needle. Continue pattern as before. When piece measures 74-78-80-84 cm, cast off the first 48-53-64-73 sts from WS for shoulder = 18 sts remain on needle. Work the rest of row. Then work short rows over the 18 sts as follows - beg from RS: * Work 2 rows back and forth over the first 9 sts, work 2 rows over all sts *, repeat from *-* until neck edge measures 7-8-8-8 cm at the shortest. Cast off.

LEFT FRONT PIECE:
Work as right but reversed. Cast off for shoulder from RS and beg short rows from WS.

SLEEVE:
Worked in the round on double pointed needles. Cast on 56-60-64-68 sts on double pointed needles size 3.5 mm with Karisma. Work rib = K 2/P 2. When piece measures 16-16-16-14 cm, switch to double pointed needles size 4 mm, continue in stocking st AT THE SAME TIME on 1st round dec 8-8-10-10 sts evenly = 48-52-54-58 sts. Insert 1 marker at the beg of round. AT THE SAME TIME inc 1 st on each side of marker, repeat inc every 2½-2-1½-1½ cm 13-15-16-18 more times (14-16-17-19 inc in total) = 76-84-88-96 sts. When piece measures 52-51-47-44 cm (shorter measurements in the larger sizes because of wider shoulders), cast off all sts. Knit another sleeve.

ASSEMBLY:
Sew the shoulder seams. Sew in sleeves. Sew the collar tog mid back and sew it to the neckline. Sew the buttons on to left band.

Diagram

symbols = K from RS, P from WS
symbols = P from RS, K from WS
symbols = this st has been cast off
symbols = 1 YO between 2 sts
symbols = slip 1 st as if to K, K 2, psso the 2 K sts
symbols = slip 4 sts on cable needle in front of piece, K 4, K 4 from cable needle
symbols = slip 4 sts on cable needle behind piece, K 4, K 4 from cable needle
symbols = slip 1 st on cable needle behind piece, K 4, P 1 from cable needle
symbols = slip 4 sts on cable needle in front of piece, P 1, K 4 from cable needle
symbols = slip 3 sts on cable needle behind piece, K 4, P 3 from cable needle
symbols = slip 4 sts on cable needle in front of piece, P 3, K 4 from cable needle
diagram
diagram

Each of our patterns has specific tutorial videos to help you.

Do you have a question? See a list of frequently asked questions (FAQ)

Knitting tension is what determines the final measurements of your work, and is usually measured per 10 x 10 cm. It is provided like so: number of stitches in width x number of rows in height - eg: 19 stitches x 26 rows = 10 x 10 cm.

The knitting tension is very individual; some people knit/crochet loosely while others work tightly. You adjust the knitting tension with the needle size, which is why the suggested needle size is only meant as a guide! You need to adjust this (up or down) to ensure that YOUR knitting tension matches the knitting tension provided in the pattern. If you work with a different knitting tension than provided you will have a different yarn consumption, and your work will have different measurements than what the pattern suggests.

The knitting tension also determines which yarns can replace each other. As long as you achieve the same knitting tension you can replace one yarn with another.

See DROPS lesson: How to measure your tension/gauge

See DROPS video: How to make a gauge tension swatch

The required amount of yarn is provided in grams, eg: 450 g. To calculate how many balls you’ll need you first need to know how many grams are in 1 ball (25g, 50g or 100g). This information is available if you click on the individual yarn quality on our pages. Divide the amount required with the amount of each ball. For example, if each ball is 50g (the most common amount), the calculation will be as follows: 450 / 50 = 9 balls.

The important thing when changing from one yarn to another is that the knitting/crochet tension remains the same. This is so that the measurements of the finished piece will be the same as on the sketch provided. It is easier to achieve the same knitting tension using yarns from the same yarn group. It is also possible to work with multiple strands of a thinner yarn to achieve the knitting tension of a thicker one. Please try our yarn converter. We recommend you to always work a test swatch.

Please NOTE: when changing yarn the garment might have a different look and feel to the garment in the photo, due to individual properties and qualities of each yarn.

See DROPS lesson: Can I use a different yarn than the one mentioned in the pattern?

All our yarns are categorised into yarn groups (from A to F) according to thickness and knitting tension – group A contains the thinnest yarns and group F the thickest. This makes it easier for you to find alternative yarns to our patterns, should you wish to switch yarn. All yarns within the same group have a similar knitting tension and can easily replace each other. However, different yarn qualities have different structures and properties which will give the finished work a unique look and feel.

Click here for an overview of the yarns in each yarn group

At the top of all our patterns you’ll find a link to our yarn calculator, which is a helpful tool should you wish to use a different yarn than suggested. By filling in the yarn quality you wish to replace, the amount (in your size) and number of strands, the calculator will present good alternative yarns with the same knitting tension. Additionally it will tell you how much you’ll require in the new qualities and whether you’ll need to work with multiple strands. Most skeins are 50g (some are 25g or 100g).

If the pattern is worked with multiple colours, every colour will have to be calculated separately. Similarly, if the pattern is worked with several strands of different yarns (for example 1 strand Alpaca and 1 strand Kid-Silk) you will have to find alternatives for each, individually.

Click here to see our yarn calculator

Since different yarns have different qualities and textures we have chosen to keep the original yarn in our patterns. However, you can easily find options among our available qualities by using our yarn calculator, or simply pick a yarn from the same yarn group.

It is possible that some retailers still have discontinued yarns in stock, or that someone has a few skeins at home that they would like to find patterns for.

The yarn calculator will provide both alternative yarn as well as required amount in the new quality.

If you think it's hard to decide what size to make, it can be a good idea to measure a garment you own already and like the size of. Then you can pick the size by comparing those measures with the ones available in the pattern's size chart.

You'll find the size chart at the bottom of the pattern.

See DROPS lesson: How to read size chart

The needle size provided in the pattern serves only as a guide, the important thing is to follow the knitting tension. And since knitting tension is very individual, you will have to adjust the needle size to ensure that YOUR tension is the same as in the pattern – maybe you’ll have to adjust 1, or even 2 needle sizes, up or down to achieve the correct tension. For this, we recommend that you work test swatches.

Should you work with a different knitting tension than the one provided, the measurements of the finished garment might deviate from the measurement sketch.

See DROPS lesson: How to measure your tension/gauge

See DROPS video: How to make a tension/gauge swatch

Working a garment top-down provides more flexibility and room for personal adjustment. For example it is easier to try the garment on while working, as well as making adjustments to length of yoke and shoulder caps.

The instructions are carefully explaining every step, in the correct order. Diagrams are adjusted to the knitting direction and are worked as usual.

The diagram depicts all rows/rounds, and every stitch seen from the right side. It is read from bottom to top, from right to left. 1 square = 1 stitch.

When working back and forth, every other row is worked from the right side and every other row is worked from the wrong side. When working from the wrong side, the diagram will have to be worked reversed: from left to right, knit stitches are purled, purl stitches are knit etc.

When working in the round every round is worked from the right side and the diagram are worked from right to left on all rounds.

See DROPS lesson: How to read knitting diagrams

The diagram depicts all rows/rounds, and every stitch seen from the right side. It is worked from bottom to top, from right to left.

When working back and forth every other row is worked from the right side: from right to left and every other row is worked from the wrong side: from left to right.

When working in the round, every row in the diagram are worked from the right side, from right to left.

When working a circular diagram you start in the middle and work your way outwards, counter clockwise, row by row.

The rows usually start with a given number of chain stitches (equivalent to the height of the following stitch), this will either be depicted in the diagram or explained in the pattern.

See DROPS lesson: How to read crochet diagrams

Instructions for working several diagrams after each other on the same row/round, will often be written like so: “work A.1, A.2, A.3 a total of 0-0-2-3-4 times". This means you work A.1 once, then A.2 is worked once, and A.3 is repeated (in width) the number of times provided for your size – in this case like so: S = 0 times, M = 0 times, L=2 times, XL= 3 times and XXL = 4 times.

The diagrams are worked as usual: begin with the first row in A.1, then work the first row in A.2 etc.

See DROPS lesson: How to read knitting diagrams

See DROPS lesson: How to read crochet diagrams

The total width of the garment (from wrist-to-wrist) will be larger in the larger sizes, despite the actual sleeves being shorter. The larger sizes have longer sleeve caps and wider shoulders, so there will be a good fit in all sizes.

The measurement sketch/schematic drawing provides information regarding the full length of the garment. If it’s a jumper or a jacket the length is measured from the highest point on the shoulder closest to the neckline, and straight down to the bottom of the garment. It is NOT measured from the tip of shoulder. Similarly, the length of yoke is measured from the highest point on the shoulder and down to where yoke is split into body and sleeves.

On a jacket measures are never taken along bands, unless specifically stated. Always measure inside band stitches when measuring the length.

See DROPS lesson: How to read a schematic drawing

Diagrams are often repeated on the round or in height. 1 repeat is the diagram the way it appears in the pattern. If it says to work 5 repeats of A.1 in the round, then you work A.1 a total of 5 times after/next to each other in the round. If it says to work 2 repeats of A.1 vertically/in height you work the entire diagram once, then begin again at the start and work the entire diagram one more time.

Chain stitches are slightly narrower than other stitches and to avoid working the cast-on edge too tight, we simply chain more stitches to begin with. The stitch count will be adjusted on the following row to fit the pattern and measurement sketch.

The rib edge is more elastic and will contract slightly compared to, for example, stocking stitch. By increasing before the rib edge, you avoid a visible difference in width between the rib edge and the rest of the body.

It’s very easy to cast off too tightly, and by making yarn overs while casting off (and simultaneously casting these off) you avoid a too tight cast off edge.

See DROPS video: How to bind off with yarn overs (yo)

To achieve an even increase (or decrease) you can increase on, for example: every 3rd and 4th row alternately, like so: work 2 rows and increase on the 3rd row, work 3 rows and increase on the 4th. Repeat this until the increase is complete.

See DROPS lesson: Increase or decrease 1 st on every 3rd and 4th row alternately

Should you prefer to work in the round instead of back and forth, you may of course adjust the pattern. You’ll need to add steeks mid-front (usually 5 stitches), and follow the instructions. When you would normally turn and work from the wrong side, simply work across the steek and continue in the round. At the end you’ll cut the piece open, pick up stitches to work bands, and cover the cut edges.

See DROPS video: How to knit steeks and cut open

Should you prefer to work back and forth instead of in the round, you may of course adjust the pattern so you work the pieces separately and then assemble them at the end. Divide the stitches for the body in 2, add 1 edge stitch in each side (for sewing) and work the front and back pieces separately.

See DROPS lesson: Can I adapt a pattern for circular needles into straight needles?

Pattern repeats can vary slightly in the different sizes, in order to get the correct proportions. If you’re not working the exact same size as the garment in the photo, yours might deviate slightly. This has been carefully developed and adjusted so that the complete impression of the garment is the same in all sizes.

Make sure to follow instructions and diagrams for your size!

If you have found a pattern you like which is available in women’s size it’s not very difficult to convert it to men’s size. The biggest difference will be the length of sleeves and body. Start working on the women size that you think would fit across the chest. The additional length will be worked right before you cast off for the armhole/sleeve cap. If the pattern is worked top-down you can add the length right after the armhole or before the first decrease on sleeve.

Regarding additional yarn amount, this will depend on how much length you add, but it is better with a skein too many than too few.

All yarns will have excess fibres (from production) that might come off as lint or shedding. Brushed yarns (ie hairier yarns) have more of these loose, excess fibres, causing more shedding.

Shedding also depends on what is worn under or over the garment, and whether this pulls at the yarn fibres. It’s therefore not possible to guarantee that there will be no shedding

Below are some tips on how to get the best result when working with hairier yarns:

1. When the garment is finished (before you wash it) shake it vigorously so the looser hairs come off. NOTE: do NOT use a lint roller, brush or any method that pulls at the yarn.

2. Place the garment in a plastic bag and put it in your freezer - the temperature will cause the fibres to become less attached to each other, and excess fibres will come off easier.

3. Leave in the freezer for a few hours before taking it out and shaking it again.

4. Wash the garment according to the instructions on the yarn label.

Pilling is a natural process that happens to even the most exclusive of fibers. It's a natural sign of wear and tear that is hard to avoid, and that is most visible in high friction areas of your garment like a sweater's arms and cuffs.

You can make your garment look as new by removing the pilling, using a fabric comb or a pill/lint remover.

Still can't find the answer you need? Then scroll down and leave your question so one of our experts can try to help you. This will be done normally within 5 to 10 working days.
In the meantime, you can read the questions and answers that others have left to this pattern or join the DROPS Workshop on Facebook to get help from fellow knitters/crocheters!

You might also like...

Post a comment to pattern DROPS 151-1

We would love to hear what you have to say about this pattern!

If you want to leave a question, please make sure you select the correct category in the form below, to speed up the answering process. Required fields are marked *.

Comments / Questions (184)

Diane Desrosiers wrote:

Moi aussi le compte des mailles ne concorde pas… ça fait trois fois que je recommence...

05.11.2013 - 23:18

DROPS Design answered:

Bonjour Mme Desrosiers, repérez bien votre taille et ré-écrivez ou surlignez les indications s'y rapportant. Pour toute aide complémentaire, n'hésitez pas à vous enregistrer sur le forum DROPS où une aide plus détaillée pourra vous être apportée. Bon tricot!

06.11.2013 - 09:41

country flag Ursula Hartmann-Scholz wrote:

Wie stricke oder nähe ich linke und rechte Maschen unsichtbar zusammen?

30.10.2013 - 23:05

DROPS Design answered:

Liebe Ursula, Sie schliessen die Naht, indem Sie bie jeder Masche das äussere Maschenglied erfassen, unabhängig ob es eine linke oder rechte Masche ist.

31.10.2013 - 07:24

country flag Marine wrote:

Bonjour, J'ai une question concernant ce magnifique modèle.... Pour dos & devant, concernant les sections de mailles envers (qu'il faut faire par groupe de 8 ou 10.), faut il faire de l envers aussi sur l'envers du travail? Vous ne parlez pas de jersey donc je serais tenté de dire oui, mais je souhaite être sure Merci bcp pr vos mmagnifiques modeles.. Marine

29.10.2013 - 14:50

DROPS Design answered:

Bonjour Marine, les sections indiquées à tricoter en m env - vues sur l'endroit - se tricotent en jersey env (= à l'env sur l'end, à l'end sur l'env). Bon tricot!

29.10.2013 - 16:11

country flag Silvia wrote:

Molto bello... poi se fatto con lana merinos, sarebbe il massimo!!

25.10.2013 - 01:14

country flag Margrith Wösten wrote:

Klopt het dat de steken tussen de kabels averecht aan de goede kant zijn? Moet dit niet gewoon tricotsteek zijn?

18.10.2013 - 22:31

DROPS Design answered:

De steken tussen de kabels zijn inderdaad av aan de goede kant en recht aan de verkeerde kant, dit is correct.

21.10.2013 - 08:29

country flag Danielle wrote:

I love your patterns, but the ones I like the most are almost always knitted in the round. I am not particularly found of that type of knitting, except for the finishing of a project (collar, collar band, etc.) Would it be possible to have these patterns adapted for regular straight needles? Thank you!

18.10.2013 - 17:32

DROPS Design answered:

Dear Danielle, This jacket is worked back and forth on circular needle to get enough room for all sts. You can adapt to work each piece separately by dividng nber of sts for each piece (back piece and both front pieces) adding edge sts for seams. Happy knitting!

19.10.2013 - 10:09

country flag Joanne Wilson wrote:

As I look at the picture it appears that between the cables it is knit on the right side and purled on the wrong side, yet the pattern says just the opposite and the sleeves are done in stockinette. What am I seeing and doing that is wrong?

07.10.2013 - 11:54

DROPS Design answered:

Dear Mrs Wilson, the sts between cables are worked in reverse st st (P from RS and K from WS) and sleeves are worked in st st (K from RS and P from WS). Happy knitting!

07.10.2013 - 13:17

country flag Kirsten Marie Finstad wrote:

Hei jeg har prøvd å strikke denne jakken og jeg får ikke mønster a 2 til å stemme? Jeg har strikket 4 rapporter med denne mønsterbiten og jeg får ikke en flette som vist på bildet? Er mønsteret riktig?

07.09.2013 - 09:20

country flag Larher wrote:

Très joli modèle! Mais en suivant pourtant de manière précise les explications du début en taille S,je n'arrive pas au bon compte de mailles. Le fait de répéter de * à * ne me semble pas clair. N'y-a-t-il pas une erreur? Pouvez-vous m'aider s'il vous plait? Si je suis les explications, j'arrive à 348 mailles au lieu de 306 ( sans compter les bordures...) Merci d'avance pour votre réponse

02.09.2013 - 21:38

DROPS Design answered:

Bonjour Mme Larher, en taille S, tricotez ainsi : 18 m point mousse + 8 m env + (A1 = 3 m + 10 m env) + A.2 (=23 m) + 10 m env + (A.1 + 10 m env)x 2 + A.2 + (10 m env, A.1) + 10 m env + A.3 (=18 m) + 10 m env + (A.1 + 10 m env) + A.2 + 10 m env + (A.1 + 10 m env)x 2 + A.2 + (10 m env + A.1) + 8 m env + 18 m point mousse = 306 m. N'hésitez pas à mettre des marqueurs entre chaque rapport(diag) pour bien vous repérer, surtout au début. Bon tricot!

03.09.2013 - 10:46

country flag Letestu wrote:

Bonjour, j'aime énormément ce pull et je vais le faire pour cet hiver merci bonne journée

26.08.2013 - 17:00