
Popular categories
Looking for a yarn?


|
||||||||||||||||
DROPS Children 5-8 |
||||||||||||||||
 |
 |
|||||||||||||||
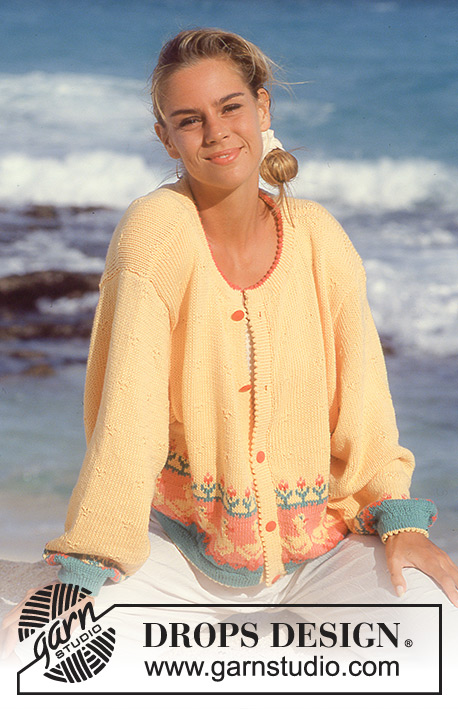
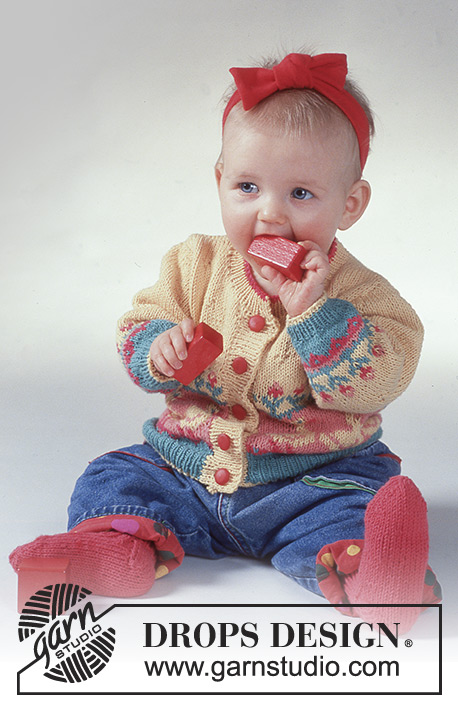
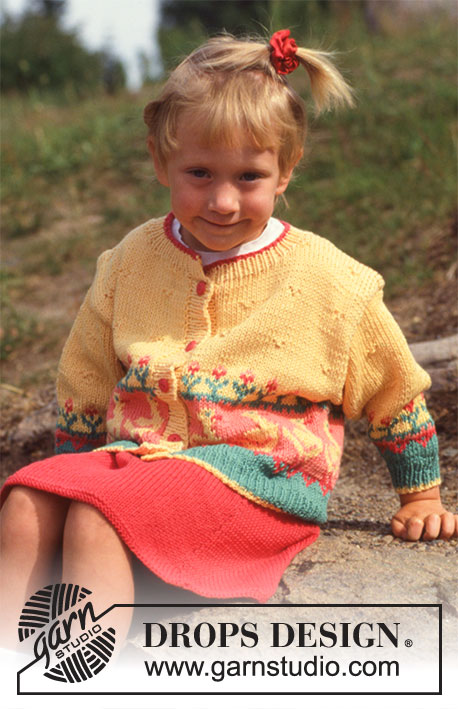
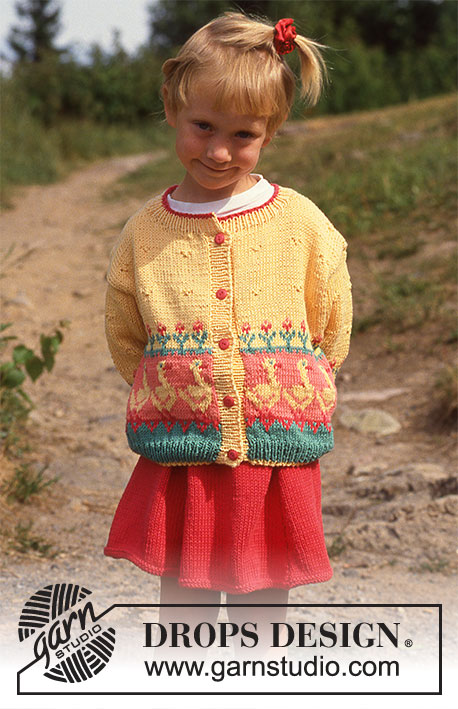
Cardigan and Skirt in Muskat with Ducks and Flowers.
DROPS Children 5-8 |
||||||||||||||||
|
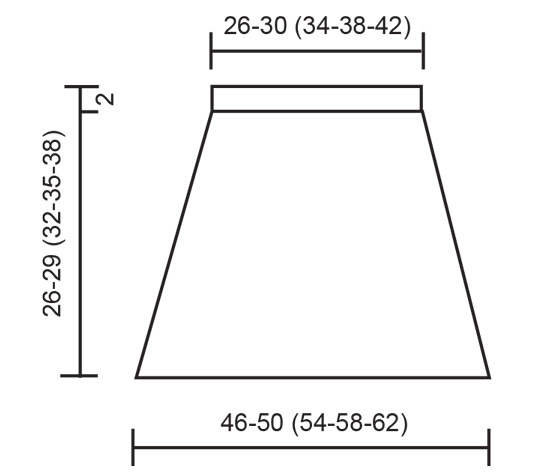
Gauge: 20 sts x 26 rows on larger needles in pattern = 10 x 10 cm [4" x 4"]. Rib: * K 1, P 1 * Pattern: See charts (1 chart = 1 repeat). The pattern is seen from the right side. Body: Cast on 132-140 (144-152-160) sts on smaller circular needles with yellow and knit 4 cm [1.5"] rib, but after 1 cm [3/8"] change to green. Change to larger circular needles and stockinette st, increasing 26-30 (38-42-46) sts evenly distributed on the 1st row = 158-170 (182-194-206) sts. When the work measures 5 cm [2"], knit Pattern 1, keeping 1 edge st at each center front edge (not knit in pattern). After Pattern 1 knit the rest with Pattern 2. When the work measures 19-20 (22-24-24) cm [7.5" - 7-⅞" (8-⅝" - 9.5" - 9.5")], divide for armholes and knit the rest of each part separately. Fronts = 40-43 (46-49-52) sts each, back = 78-84 (90-96-102) sts. Fronts: = 40-43 (46-49-52) sts. Continue Pattern 2. When the work measures 32-34 (38-40-42) cm [12-⅝" - 13-⅜" (14-⅞" - 15.75" - 16.5")], bind off 12-12 (13-14-14) sts at the center front for the neck. Then bind off at each neck edge every other row 2 sts 2 times, 1 st 2 times. Bind off when the work measures 38-40 (44-46-48) cm [14-⅞" - 15.75" (17.25" - 18-⅛" - 18-⅞")]. Back: = 78-84 (90-96-102) sts. Continue Pattern 2. When the work measures 37-39 (43-45-47) cm [14.5" - 15.25" (16-⅞" - 17.75" - 18.5")], bind off the center 34-34 (36-38-38) sts for the neck and knit the rest of each side separately. On the next row dec 1 st at each neck edge. Bind off the remaining sts for the shoulder when the work measures 38-40 (44-46-48) cm [14-⅞" - 15.75" (17.25" - 18-⅛" - 18-⅞")]. Sleeves: Cast on 32-36 (36-36-40) sts on smaller double pointed needles with yellow; join and place a marker at the join. Knit 4 cm [1.5"] rib, but after 1 cm [3/8"] change to green. Change to larger double pointed needles and knit 1 cm [3/8"] stockinette st, increasing 8-4 (8-12-10) sts evenly distributed on the 1st row = 40-40 (44-48-50) sts. Knit Pattern 3, then Pattern 4 (center the patterns across the sleeve). At the same time, inc 1 st each side of marker 18-20 (22-20-23) times: Sizes 3/4 + 5/6 + 7/8: alternately every 2nd and 3rd row Sizes 9/10 + 11/12: alternately every 3rd and 4th row = 76-80 (88-88-96) sts. After Pattern 4 knit the rest with Pattern 2. When the work measures 24-27 (31-34-38) cm [9.5" - 10-⅝" (12.25" - 13-⅜" - 14-⅞")], bind off 3 sts each side of marker. Then bind off at each side for sleeve caps every other row 6 sts 3 times. Bind off the remaining sts when the work measures 27-30 (34-37-41) cm [10-⅝" - 11.75" (13-⅜" - 14.5" - 16-⅛")]. Assembly: Sew shoulder seams. Pick up approx. 84-100 on smaller needles with yellow along the left front for button band. Knit 3 cm [1.25"] rib. Repeat along the right front, but after 1 cm [3/8"] make 5 buttonholes evenly distributed across the row. (1 buttonhole = bind off 2 sts, cast on 2 new sts on the next row.) Pick up approx. 88-98 sts around the neck on smaller double pointed needles with yellow and knit 2 cm [0.75"] rib. Change to coral and knit 1 row rib. Bind off. Sew the sleeves to the body. SKIRT: Sizes: 3/4 - 5/6 (7/8 - 9/10 - 11/12) years Finished measurements: Waist: 52-60 (68-76-84) cm [20.5" - 23-⅝" (26.75" - 29-⅞" - 33")] Hem: 92-100 (108-116-124) cm [36.25" - 39-⅜" (42.5" - 45-⅝" - 48-⅞")] Materials: DROPS MUSKAT from Garnstudio 100% mercerized Egyptian cotton (50 g./109 yds) 150-200 (200-250-250) g col. 40, coral DROPS 2.5 mm [US 1], 3.5 mm [US 4] and 4 mm [US 6] circular and double pointed needles, or sizes needed to obtain correct gauge. Gauge: 20 cm x 26 rows on largest needles in pattern = 10 x 10 cm [4" x 4"]. Skirt: Cast on 184-200 (216-232-248) sts on mid-size circular needles with coral; join and P 1 row, K 1 row, P 1 row. Change to largest circular needles and place a marker at the center front, the center back and at each side. Then dec 1 st at each side of each marker 10-10 (10-10-10) times: Size 3/4: every 6th row Size 5/6: every 7th row Size 7/8: alternately every 7th and 8th row Size 9/10: every 8th row Size 11/12: every 10th row = 104-120 (136-152-168) sts. When the work measures 24-27 (30-33-36) cm [9.5" - 10-⅝" (11.75" - 13" - 14-⅛")], change to smallest needles. Knit 2 cm [0.75"] stockinette st, P 1 row (for the folding edge), 2 cm [0.75"] stockinette st, bind off. Fold the edge over double against the wrong side and sew. Pull a cord through the hem. |
||||||||||||||||
Diagram explanations |
||||||||||||||||
|
||||||||||||||||

|
||||||||||||||||

|
||||||||||||||||
|
||||||||||||||||
|
Have you made this or any other of our designs? Tag your pictures in social media with #dropsdesign so we can see them! Do you need help with this pattern?You'll find tutorial videos, a Comments/Questions area and more by visiting the pattern on garnstudio.com. © 1982-2024 DROPS Design A/S. We reserve all rights. This document, including all its sub-sections, has copyrights. Read more about what you can do with our patterns at the bottom of each pattern on our site. |
||||||||||||||||


With over 40 years in knitting and crochet design, DROPS Design offers one of the most extensive collections of free patterns on the internet - translated to 17 languages. As of today we count 304 catalogs and 11422 patterns - 11417 of which are translated into English (US/in).
We work hard to bring you the best knitting and crochet have to offer, inspiration and advice as well as great quality yarns at incredible prices! Would you like to use our patterns for other than personal use? You can read what you are allowed to do in the Copyright text at the bottom of all our patterns. Happy crafting!
Comments / Questions (13)
On the binding off of the sleeve, how do you bind off at each side for sleeve caps every other row 6 sts. 3 times when you're knitting in the round? Should I change over to knitting rows when I begin the first bind off of three sts. each side of marker?
17.03.2024 - 13:45DROPS Design answered:
Dear Patty, yes, when you start binding off for the sleeve caps, you should knit back and forth. Happy Knitting!
17.03.2024 - 14:49Regarding the M-2 chart in the Children’s 5-8 Cardigan. On the M.2 chart, counting the rows going up from the bottom, in rows 10 & 11, the symbol for “purl (as seen from the right side)” is on row 10 & row 11. Row 1 is a purl row from where chart M.1 stopped, so row 10 is a knit row & the symbol is correct. Since I have to turn the work I am now purling. When I get to the symbol as stated above, am I now going to knit those 2 stitches from the purl symbol instead of purling them as before?
06.03.2024 - 10:56DROPS Design answered:
Dear Mrs Castenada, the 3 sts (black triangle) in M;2 should be worked in reversed stocking stitch to appear as Purled , seen from RS, this means they will be knitted from wrong side and purled from right side. Happy knitting!
06.03.2024 - 11:52Hello! I have a question regarding the knitting gauge on this Children’s 5-8 pattern. The pattern says the gauge is “20cm x 26 rows on larger needles in pattern = 10cm x10cm (4” x4”).” You can’t have 20cm over 10cm of knitting 😃 do have a stitch count (number of stitches) instead of the 20cm?
29.02.2024 - 00:04DROPS Design answered:
Dear Mrs Castaneda, thanks for noticing, pattern is now with "20 sts" edited. Happy knitting!
29.02.2024 - 08:28In the directions for the duckling sweater Uber the body section it says “ knit pattern 1, keeping 1 edge stitch at each center front edge (not in pattern) “ What does that mean? Thank you for your help.
21.02.2024 - 11:07DROPS Design answered:
Dear Mrs Walk, work as follows: 1 edge stitch, repeat the 12 stitches in diagram M.1 (see on the left side of the diagram = all rows, from the bottom towards the top) until 1 stitch remains (= a total of 13-14 (15-16-17) times in width) and finish with 1 edge stitch. Happy knitting!
21.02.2024 - 15:01When I go to print this darling pattern, the diagram doesn't show up. How can I get the diagram for the ducks?
08.02.2024 - 07:31DROPS Design answered:
Dear Mrs Walk, just make sure that all pages will be printed when launching printing, so that diagrams will appear. Happy knitting!
08.02.2024 - 08:47Hello! I have a name suggestion. “Ducks in a row”. 😃🩷
08.02.2024 - 04:43I made this for my granddaughter and its adorable. There were some changes I had to make, however. I increased both the needle size and the number of stitches on the ribbing, as it was too tight, particularly on the wrists. The sleeves were too small to knit comfortably on a circular needle, and so I knit back and forth and sewed in a seam. I ran out of yellow yarn and had to add pattern work to the sleeves in order to stretch out the yellow (size 9 requires 300 gms and not 250).
09.04.2023 - 16:13I made this for my granddaughter and its adorable. There were some changes I had to make, however. I increased both the needle size and the number of stitches on the ribbing, as it was too tight, particularly on the wrists. The sleeves were too small to knit comfortably on a circular needle, and so I knit back and forth and sewed in a seam. I ran out of yellow yarn and had to add pattern work to the sleeves in order to stretch out the yellow (size 9 requires 300 gms and not 250).
09.04.2023 - 16:07Heeft U dit patroon van het rokje i.p.v. met een rondbreinaald dat het met 2 naalden gemaakt kan, want ik kan niet met een rondbreinaald omgaan. In afwachting op u antwoord verblijf ik ,et vriendelijke groet. Ria.
08.11.2022 - 06:58DROPS Design answered:
Dag Ria,
Helaas is dit rokje niet zo geschikt om met rechte naalden te breien omdat je heel veel steken op de naald hebt. Je zou wel 2 zijnaden kunnen maken in de rok.
Om een patroon aan te passen om op rechte naalden te breien hebben we een instructie gemaakt. Deze vind je hier.
08.11.2022 - 19:39I wrote before to ask about putting in the sleeves without holes in the underarm area. I followed your directions, no holes. 😁 Now I have a new question. Why is the sleeve so much larger than the armhole? I’ve taken it out a few times, but haven’t been able to work it in without it looking gathered. I’ve even ripped it back to the pattern design and made it a few stitches smaller, but it’s still too large. My gauge is ok. Is it supposed to be fluffy? Thanks again.
15.08.2022 - 17:45DROPS Design answered:
Dear June, the armholes should be 18-20-22-22-22-24 cm from the division at the end of body to the last stitches cast off for shoulders on back and front pieces. For sleeves you finish with 76-80-88-88-96 sts, if your tension is right you should have then a total of 19-20-22-22-24 cm when sleeve is folded double along the armhole. Use first pins can help you to place the sleeve along the armhole, they should fit nicely. Hope it can help. Happy knitting!
16.08.2022 - 08:26