DROPS Fabel uni colour 75% Wool, 25% Polyamide |
3.00 $ /50g |
Order | |
DROPS Fabel 75% Wool, 25% Polyamide |
3.25 $ /50g |
Order | |
DROPS Fabel long print 75% Wool, 25% Polyamide |
3.50 $ /50g |
Order |
Clicking the ORDER button will redirect you to Wool Warehouse Direct Ltd website
-------------------------------------------------------
Alternative Yarn – See how to change yarns here
Yarn Groups A to F – Use the same pattern and change the yarn here
Yarn usage using an alternative yarn – Use our yarn converter here
-------------------------------------------------------
DROPS Fabel uni colour 75% Wool, 25% Polyamide 3.00 $ /50g Order |
|
DROPS Fabel print 75% Wool, 25% Polyamide 3.25 $ /50g Order |
|
DROPS Fabel long print 75% Wool, 25% Polyamide 3.50 $ /50g Order |
Clicking the ORDER button will redirect you to Wool Warehouse Direct Ltd website
All measurements in charts are in cm.
= 1 sc | |
= 1 sl st | |
= 1 ch | |
= 1 dc |
Each of our patterns has specific tutorial videos to help you.
These step-by-step tutorials might also help you:
Why is the knitting/crochet tension so important?
Knitting tension is what determines the final measurements of your work, and is usually measured per 10 x 10 cm. It is provided like so: number of stitches in width x number of rows in height - eg: 19 stitches x 26 rows = 10 x 10 cm.
The knitting tension is very individual; some people knit/crochet loosely while others work tightly. You adjust the knitting tension with the needle size, which is why the suggested needle size only serve as a guide! You need to adjust this (up or down) to ensure that YOUR knitting tension matches the knitting tension provided in the pattern. If you work with a different knitting tension than provided you will have a different yarn consumption, and your work will have different measurements than what the pattern suggests.
The knitting tension also determines which yarns can replace each other. As long as you achieve the same knitting tension you can replace one yarn with another.
See DROPS lesson: How to measure your tension/gauge
See DROPS video: How to make a gauge tension swatch
How do I know how many balls of yarn I need?
The required amount of yarn is provided in grams, eg: 450 g. To calculate how many balls you’ll need you first need to know how many grams are in 1 ball (25g, 50g or 100g). This information is available if you click on the individual yarn quality on our pages. Divide the amount required with the amount of each ball. For example, if each ball is 50g (the most common amount), the calculation will be as follows: 450 / 50 = 9 balls.
Can I use a different yarn than what the pattern suggests?
The important thing when changing from one yarn to another is that the knitting/crochet tension remains the same. This is so that the measurements of the finished piece will be the same as on the sketch provided. It is easier to achieve the same knitting tension using yarns from the same yarn group. It is also possible to work with multiple strands of a thinner yarn to achieve the knitting tension of a thicker one. Please try our yarn converter. We recommend you to always work a test swatch.
Please NOTE: when changing yarn the garment might have a different look and feel to the garment in the photo, due to individual properties and qualities of each yarn.
See DROPS lesson: Can I use a different yarn than the one mentioned in the pattern?
What are the yarn groups?
All our yarns are categorised into yarn groups (from A to F) according to thickness and knitting tension – group A contains the thinnest yarns and group F the thickest. This makes it easier for you to find alternative yarns to our patterns, should you wish to switch yarn. All yarns within the same group have a similar knitting tension and can easily replace each other. However, different yarn qualities have different structures and properties which will give the finished work a unique look and feel.
How do I use the yarn converter?
At the top of all our patterns you’ll find a link to our yarn converter, which is a helpful tool should you wish to use a different yarn than suggested. By filling in the yarn quality you wish to replace, the amount (in your size) and number of strands, the converter will present good alternative yarns with the same knitting tension. Additionally it will tell you how much you’ll require in the new qualities and whether you’ll need to work with multiple strands. Most skeins are 50g (some are 25g or 100g).
If the pattern is worked with multiple colours, every colour will have to be converted separately. Similarly, if the pattern is worked with several strands of different yarns (for example 1 strand Alpaca and 1 strand Kid-Silk) you will have to find alternatives for each, individually.
Why do you show discontinued yarns in the patterns?
Since different yarns have different qualities and textures we have chosen to keep the original yarn in our patterns. However, you can easily find options among our available qualities by using our yarn converter, or simply pick a yarn from the same yarn group.
It is possible that some retailers still have discontinued yarns in stock, or that someone has a few skeins at home that they would like to find patterns for.
The yarn converter will provide both alternative yarn as well as required amount in the new quality.
What size should I knit?
If you think it's hard to decide what size to make, it can be a good idea to measure a garment you own already and like the size of. Then you can pick the size by comparing those measures with the ones available in the pattern's size chart.
You'll find the size chart at the bottom of the pattern.
See DROPS lesson: How to read size chart
Why do I get the wrong knitting tension with the suggested needle size?
The needle size provided in the pattern serves only as a guide, the important thing is to follow the knitting tension. And since knitting tension is very individual, you will have to adjust the needle size to ensure that YOUR tension is the same as in the pattern – maybe you’ll have to adjust 1, or even 2 needle sizes, up or down to achieve the correct tension. For this, we recommend that you work test swatches.
Should you work with a different knitting tension than the one provided, the measurements of the finished garment might deviate from the measurement sketch.
See DROPS lesson: How to measure your tension/gauge
See DROPS video: How to make a gauge tension swatch
Why is the pattern worked top-down?
Working a garment top-down provides more flexibility and room for personal adjustment. For example it is easier to try the garment on while working, as well as making adjustments to length of yoke and shoulder caps.
The instructions are carefully explaining every step, in the correct order. Diagrams are adjusted to the knitting direction and are worked as usual.
How do I work according to a knitting diagram?
The diagram depicts all rows/rounds, and every stitch seen from the right side. It is read from bottom to top, from right to left. 1 square = 1 stitch.
When working back and forth, every other row is worked from the right side and every other row is worked from the wrong side. When working from the wrong side, the diagram will have to be worked reversed: from left to right, knit stitches are purled, purl stitches are knit etc.
When working in the round every round is worked from the right side and the diagram are worked from right to left on all rounds.
See DROPS lesson: How to read knitting diagrams
How do I work according to a crochet diagram?
The diagram depicts all rows/rounds, and every stitch seen from the right side. It is worked from bottom to top, from right to left.
When working back and forth every other row is worked from the right side: from right to left and every other row is worked from the wrong side: from left to right.
When working in the round, every row in the diagram are worked from the right side, from right to left.
When working a circular diagram you start in the middle and work your way outwards, counter clockwise, row by row.
The rows usually start with a given number of chain stitches (equivalent to the height of the following stitch), this will either be depicted in the diagram or explained in the pattern.
See DROPS lesson: How to read crochet diagrams
How do I work several diagrams simultaneously on the same row/round?
Instructions for working several diagrams after each other on the same row/round, will often be written like so: “work A.1, A.2, A.3 a total of 0-0-2-3-4 times". This means you work A.1 once, then A.2 is worked once, and A.3 is repeated (in width) the number of times provided for your size – in this case like so: S = 0 times, M = 0 times, L=2 times, XL= 3 times and XXL = 4 times.
The diagrams are worked as usual: begin with the first row in A.1, then work the first row in A.2 etc.
See DROPS lesson: How to read knitting diagrams
See DROPS lesson: How to read crochet diagrams
Why are the sleeves shorter in larger sizes?
The total width of the garment (from wrist-to-wrist) will be larger in the larger sizes, despite the actual sleeves being shorter. The larger sizes have longer sleeve caps and wider shoulders, so there will be a good fit in all sizes.
Where on the garment is the length measured?
The measurement sketch/schematic drawing provides information regarding the full length of the garment. If it’s a jumper or a jacket the length is measured from the highest point on the shoulder (usually closest to the neckline), and straight down to the bottom of the garment. It is NOT measured from the tip of shoulder. Similarly, the length of yoke is measured from the highest point on the shoulder and down to where yoke is split into body and sleeves.
See DROPS lesson: How to read a schematic drawing
What is a repeat?
Diagrams are often repeated on the round or in height. 1 repeat is the diagram the way it appears in the pattern. If it says to work 5 repeats of A.1 in the round, then you work A.1 a total of 5 times after/next to each other in the round. If it says to work 2 repeats of A.1 vertically/in height you work the entire diagram once, then begin again at the start and work the entire diagram one more time.
Why does the piece start with more chain stitches than it’s worked with?
Chain stitches are slightly narrower than other stitches and to avoid working the cast-on edge too tight, we simply chain more stitches to begin with. The stitch count will be adjusted on the following row to fit the pattern and measurement sketch.
Why increase before the rib edge when the piece is worked top-down?
The rib edge is more elastic and will contract slightly compared to, for example, stocking stitch. By increasing before the rib edge, you avoid a visible difference in width between the rib edge and the rest of the body.
Why increase in the cast-off edge?
It’s very easy to cast off too tightly, and by making yarn overs while casting off (and simultaneously casting these off) you avoid a too tight cast off edge.
See DROPS video: How to bind off with yarn overs (yo)
How do I increase/decrease on every 3rd and 4th row/round alternately?
To achieve an even increase (or decrease) you can increase on, for example: every 3rd and 4th row alternately, like so: work 2 rows and increase on the 3rd row, work 3 rows and increase on the 4th. Repeat this until the increase is complete.
See DROPS lesson: Increase or decrease 1 st on every 3rd and 4th row alternately
How can I work a jacket in the round instead of back and forth?
Should you prefer to work in the round instead of back and forth, you may of course adjust the pattern. You’ll need to add steeks mid-front (usually 5 stitches), and follow the instructions. When you would normally turn and work from the wrong side, simply work across the steek and continue in the round. At the end you’ll cut the piece open, pick up stitches to work bands, and cover the cut edges.
See DROPS video: How to knit steeks and cut open
Can I work a jumper back and forth instead of in the round?
Should you prefer to work back and forth instead of in the round, you may of course adjust the pattern so you work the pieces separately and then assemble them at the end. Divide the stitches for the body in 2, add 1 edge stitch in each side (for sewing) and work the front and back pieces separately.
See DROPS lesson: Can I adapt a pattern for circular needles into straight needles?
Why is the pattern slightly different than what I see in the photo?
Pattern repeats can vary slightly in the different sizes, in order to get the correct proportions. If you’re not working the exact same size as the garment in the photo, yours might deviate slightly. This has been carefully developed and adjusted so that the complete impression of the garment is the same in all sizes.
Make sure to follow instructions and diagrams for your size!
How do I make a women’s size garment into a men’s size one?
If you have found a pattern you like which is available in women’s size it’s not very difficult to convert it to men’s size. The biggest difference will be the length of sleeves and body. Start working on the women size that you think would fit across the chest. The additional length will be worked right before you cast off for the armhole/sleeve cap. If the pattern is worked top-down you can add the length right after the armhole or before the first decrease on sleeve.
Regarding additional yarn amount, this will depend on how much length you add, but it is better with a skein too many than too few.
How do I prevent a hairy garment from shedding?
All yarns will have excess fibres (from production) that might come off as lint or shedding. Brushed yarns (ie hairier yarns) have more of these loose, excess fibres, causing more shedding.
Shedding also depends on what is worn under or over the garment, and whether this pulls at the yarn fibres. It’s therefore not possible to guarantee that there will be no shedding
Below are some tips on how to get the best result when working with hairier yarns:
1. When the garment is finished (before you wash it) shake it vigorously so the looser hairs come off. NOTE: do NOT use a lint roller, brush or any method that pulls at the yarn.
2. Place the garment in a plastic bag and put it in your freezer - the temperature will cause the fibres to become less attached to each other, and excess fibres will come off easier.
3. Leave in the freezer for a few hours before taking it out and shaking it again.
4. Wash the garment according to the instructions on the yarn label.
Why does my garment pill?
Pilling is a natural process that happens to even the most exclusive of fibers. It's a natural sign of wear and tear that is hard to avoid, and that is most visible in high friction areas of your garment like a sweater's arms and cuffs.
You can make your garment look as new by removing the pilling, using a fabric comb or a pill/lint remover.
Summer Nights |
|||||||||||||
|
|||||||||||||
Crochet DROPS blanket in ”Delight” and “Fabel”.
DROPS 150-49 |
|||||||||||||
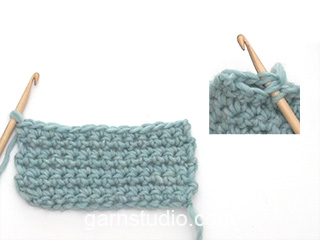
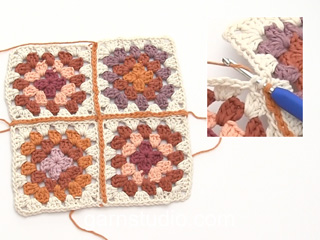
COLOR CHANGE TIP: To get a nice transition between the color changes, work last sl st on round with the new color as follows: Insert hook in ch at beg of round, get the new color with hook and pull yarn back through ch and st on hook. COLOR COMBINATION: SQUARE 1: ROUND 1-3: Delight no 11, lilac/green ROUND 4-5: Fabel no 800, off white/beige ROUND 6-7: Delight no 11 ROUND 8: Fabel no 310, sunset ROUND 9: Delight no 11 ROUND 10: Fabel no 310 ROUND 11: Fabel no 800 SQUARE 2: ROUND 1-3: Delight no 15, turquoise/burgundy/beige ROUND 4-5: Fabel no 800, off white/beige ROUND 6-7: Delight no 15 ROUND 8: Fabel no 310, sunset ROUND 9: Delight no 15 ROUND 10: Fabel no 310 ROUND 11: Fabel no 800 ---------------------------------------------------------- BLANKET: Work squares as explained below. Work 14 squares in every color combination - see explanation above - 28 squares in total. CROCHET SQUARE: READ COLOR CHANGE TIP AND COLOR COMBINATION. Ch 6 on hook size 6 mm / J/10 with Delight and form a ring with 1 sl st in first ch. Then work according to diagram A.1, i.e. work as follows: ROUND 1: ch 1, work 7 sc in ch-ring and finish with 1 sl st in ch from beg of round = 8 sts. ROUND 2: ch 6 (= 1 dc + 3 ch), * 1 dc in next sc, 3 ch *, repeat from *-* a total of 7 times and finish round with 1 sl st in 3rd ch from beg of round = 8 dc with 3 ch between each. ROUND 3: 1 sl st in first ch-space, ch 3 (= 1 dc), 3 dc in same ch-space, * ch 2, 4 dc in next ch-space *, repeat from *-* 7 times in total, work 2 ch and finish round with 1 sl st in 3rd ch from beg of round = 8 dc-groups with 2 ch between each. Fasten off. ROUND 4: Switch to Fabel and beg with 1 sc in any ch-space. ch 3 (= 1 dc), 2 dc in same ch-space, ch 3, 3 dc in same ch-space, * ch 3, 2 sc in next ch-space, ch 3, in next ch-space work: 3 dc + ch 3 + 3 dc *, repeat from *-* 3 times in total, ch 3, 2 sc in next ch-space, ch 3 and finish round with 1 sl st in 3rd ch from beg of round. ROUND 5: 1 ch (= 1 sc), 1 sc in each of the next 2 dc, 3 sc in ch-space in the corner, 1 sc in each of the next 3 dc, * 4 sc in ch-space, 1 sc between the next 2 sc, 4 sc in ch-space, 1 sc in each of the next 3 dc, 3 sc in ch-space in the corner, 1 sc in each of the next 3 dc *, repeat from *-* 3 times in total, 4 sc in next ch-space, 1 sc between the next 2 sc, 4 sc in next ch-space, switch to Delight and finish round with 1 sl st in ch from beg of round. ROUND 6: ch 3 with Delight (= 1 dc), then work 1 dc in every sc from previous round but in the middle sc in every corner work 2 dc + ch 2 + 2 dc = 21 dc between every ch-space, finish round with 1 sl st in 3rd ch from beg of round. ROUND 7: ch 1 (= 1 sc), then work 1 sc in every dc from previous round but in ch-space in every corner work 3 sc, finish round with 1 sl st in ch from beg of round = 96 sc on round. Fasten off. ROUND 8: Switch to Fabel and beg with 1 sl st in the middle sc in any corner. ch 3 (= 1 dc), 3 dc in same st, ch 2, 4 dc in same st, * (1 ch, skip 5 sc, 4 dc in next sc), repeat from (-) 3 times in total, work ch 1, skip 5 sc, in next sc (i.e. sc in the corner) work 4 dc + ch 2 + 4 dc *, repeat from *-* 3 times in total, repeat from (-) 1 more time, work ch 1, switch to Delight and finish round with 1 sl st in 3rd ch from beg of round. ROUND 9: Turn piece and ch 3 with Delight (= 1 dc), work 3 dc in same ch, then work 4 dc in every ch and ch 1 between every dc-group. In ch-space in every corner work 4 dc + ch 2 + 4 dc, switch to Fabel at end of round and finish with 1 sl st in 3rd ch from beg of round. ROUND 10: Work as round 9 but with Fabel. ROUND 11: Work as round 9 but with Fabel. Fasten off. ASSEMBLY: Place the squares with 4 squares in width and 7 squares in height. Work squares tog edge to edge with off white/beige Fabel as shown in diagram A.2, i.e. place 2 squares tog and work 1 sc in ch-space in the corner on one square, ch 1, 1 sc in ch-space in the corner on the other square, * ch 4, 1 sc in next ch-space on both squares (work in both ch-spaces at the same time) *, repeat from *-* and finish with ch 4, 1 sc in ch-space in the corner on the first square, 1 ch and 1 sl st in ch-space in the corner on the other square. NOTE: First crochet squares tog alongside and then across. CROCHET EDGE AROUND BLANKET: Work a finishing edge around the entire blanket on hook size 6 mm / J/10 with off white/beige Fabel as shown in diagram A.3, i.e. work as follows: ROUND 1: Beg from RS in a corner on blanket and work with off white/beige Fabel as follows: ch 3 (= 1 dc), 3 dc in same ch, ch 2, 4 dc in same ch-space, then work 4 dc in every ch and 1 ch between every dc-group. In ch-space in every corner work 4 dc + ch 2 + 4 dc, finish round with 1 sl st in 3rd ch from beg of round. ROUND 2: ch 1 (= 1 sc), then work 1 sc in every st the entire round (i.e. 1 sc in every dc, 1 sc in every ch, 1 sc in each corner on the squares, 4 sc in every transition between every square and 2 sc in each corner on the blanket), finish round with 1 sl st in first ch from beg of round. ROUND 3: ch 3, (= 1 dc), then work 1 dc in every sc the entire round but in each of the 2 sc in every corner on the blanket work 2 dc = 4 dc in the corners, finish round with 1 sl st in 3rd ch from beg of round. ROUND 4: ch 3 (= 1 dc), then work 1 dc in every dc but in each of the 4 dc in every corner on the blanket work 2 dc = 8 dc in each corner, finish round with 1 sl st in 3rd ch from beg of round. ROUND 5: ch 3 (= 1 dc), * skip 3 dc, 1 sc in next dc, skip 3 dc, 10 dc in next dc *, repeat from *-* the entire round - adjust so that there is one dc-group with 10 dc in the middle of every corner and finish with 1 sl st in 3rd ch on round. |
|||||||||||||
Diagram explanations |
|||||||||||||
|
|||||||||||||
Have you made this or any other of our designs? Tag your pictures in social media with #dropsdesign so we can see them! Do you need help with this pattern?You'll find tutorial videos, a Comments/Questions area and more by visiting the pattern on garnstudio.com. © 1982-2024 DROPS Design A/S. We reserve all rights. This document, including all its sub-sections, has copyrights. Read more about what you can do with our patterns at the bottom of each pattern on our site. |
With over 40 years in knitting and crochet design, DROPS Design offers one of the most extensive collections of free patterns on the internet - translated to 17 languages. As of today we count 304 catalogs and 11422 patterns - 11417 of which are translated into English (US/in).
We work hard to bring you the best knitting and crochet have to offer, inspiration and advice as well as great quality yarns at incredible prices! Would you like to use our patterns for other than personal use? You can read what you are allowed to do in the Copyright text at the bottom of all our patterns. Happy crafting!
Comments / Questions (31)
Jaana Leontjev wrote:
Miten ohje kuva näe selvä kuva isompi T.Jaana leontjev
10.10.2014 - 19:53DROPS Design answered:
Kuva suurenee kun viet hiiren, eli kursorin, kuvan päälle.
13.10.2014 - 16:18Jolanda Ketting wrote:
Met het in elkaar zetten leg je de blokken dan met de goede of verkeerde kant op elkaar
17.09.2014 - 13:26DROPS Design answered:
Hoi Jolanda. Je haakt van de goede kant van de vierkantjes.
17.09.2014 - 14:49Esther wrote:
Por favor: tengo una duda. en el patrón dicen que se trabaje con aguja de ganchillo nº 6, sin embargo la lana es indicada para agujas del 2,5-3. Me pueden aclarar qué grosor de aguja tengo que utilizar. Muchas gracias
20.02.2014 - 16:02DROPS Design answered:
Hola Esther. Este patrón se trabaja con la aguja indicada, nº 6 para que quede más flojo y más amplio. Mide el cuadrado y comprueba que te de aprox 23 x 23 cm.
21.02.2014 - 20:14Marthe wrote:
Bonjour, Je suis en train de finir cette couverture. Avez-vous des conseils pour éviter que la bordure "tournicote" ? J'ai peur d'écraser les mailles si je repasse... Merci pour votre aide !
12.12.2013 - 12:49DROPS Design answered:
Bonjour Marthe, quand elle est terminée, vous pouvez la laver (en suivant bien les consignes d'entretien des étiquettes) et la faire sécher bien à plat en l'épinglant si nécessaire. Bon crochet!
12.12.2013 - 13:48Monique Burger wrote:
Ik vind deze plaid ontzettend mooi, maar de aangegeven garen zijn niet dezelfde als pp de afbeelding. Naar mijn weten zijn dat effen kleuren, en zijn de aangegeven bollen gemengde kleuren... Hoeveel bollen van de effen kleuren heb ik nidig?
09.10.2013 - 12:47DROPS Design answered:
Hoi Monique. Het klopt met de aangegeven garens. Je wisselt van garen per toer. Het is ook te zien op de grote foto dat er vaak verschillen in de kleur binnen één toer zijn. Dus je kan gerust het garen bestellen zoals vermeld hier in het patroon.
09.10.2013 - 15:19Adrie Oldenhuis wrote:
Goedemiddag. Ik heb een vraag over patroon nr 150-49. Er wordt in het patroon niet duidelijk beschreven dat er met 3 draden tegelijk gehaakt moet worden. Is het de bedoeling dat met de 3 bollen van 1 kleur de blokken worden gehaakt? Vriendelijke groetjes van Adrie Elings.
31.08.2013 - 17:05DROPS Design answered:
Hoi Adrie. Je haakt de vierkantjes met 1 draad. Het wisselen van kleur in vierkant-1 en -2 zie je aan het begin van het patroon onder KLEURCOMBINATIES.
04.09.2013 - 11:00Marthe wrote:
Bonjour, Je voudrais réaliser cette couverture avec de la Drops Safran. Quelle taille de crochet dois-je utiliser sachant que la taille recommandée pour ce coton est 3,5. Si je cherche à avoir la même taille de carré (23x23cm) cela risque d'être raide, non? Merci pour votre aide !!
08.07.2013 - 10:51DROPS Design answered:
Bonjour Marthe, la couverture se réalise entièrement volontairement souplement, avec un crochet 6, ou la taille adéquate pour obtenir un carré de 23 x 23 cm avec 1 fil Fabel ou 1 fil Delight (groupe A comme Safran). Bon crochet !
08.07.2013 - 12:17Anna wrote:
Jeg har startet med dette teppet og syns det blir så mørkt med delight nr. 15 i forhold til bildet. Er det virkelig den som er brukt? :)
24.06.2013 - 10:53DROPS Design answered:
Hej Anna. Det er den som er brugt. Delight er en "magic-print" - dvs, at farveovergangene er flydende og gentagelserne varierer - ikke ét nöste er helt ens. Saa du faar et helt eget og unikt teppe ;o)
24.06.2013 - 12:09Josy wrote:
Bonjour, cette couverture est magnifique. Vu que Drops delight se crochète avec crochet 2,5 et que c'est le crochet 6 qui est utilisé, faut-il prendre 2 fils ? Merci pour la réponse.
20.06.2013 - 10:03DROPS Design answered:
Bonjour Josy, cette couverture se réalise avec 1 seul fil et un crochet n°6 ou celui qui vous sera nécessaire pour avoir 1 carré = 23 x 23 cm, volontairement réalisée en "déjaugé" pour un résultat plus souple. Bon crochet!
20.06.2013 - 10:09Sissel wrote:
Nydelig god gammel klasikker, fargene tar du selvsagt helt etter ditt eget ønske,det samme med hvor mange runder du vil ha i hv enkelt rute.Det er diam på helheten som teller.. Men denne stemmer jeg ikke frem da,den finnes overalt på alle typer oppskrifter,Men nydelig er den har selv.. i nydelige serise blå-lilla- brun og eggeskals farger. Se ditt eget interiør,og lag et teppe etter det,jeg kan love degat, du vil få mange flotte komentarer.
16.06.2013 - 13:37