
Oblíbené kategorie
Hledáte přízi?


|
|
Candy Crush Gloves |
|
 |
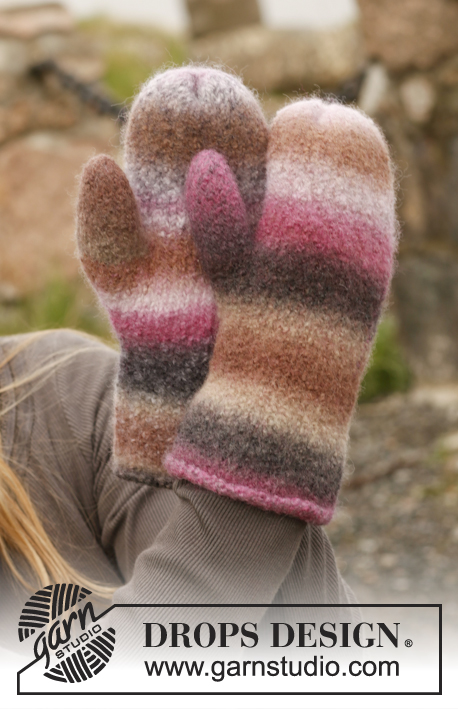 |
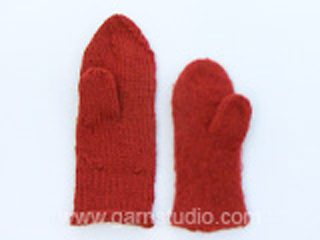
Plstěné rukavice palčáky pletené z příze Big Delight.
DROPS 151-23 |
|
|
TIP - PŘIDÁVÁNÍ: Přidáváme rozpletením 1 oka na 2. ---------------------------------------------------------- RUKAVICE: Pleteme v řadách lícovým žerzejem. Na jehlice č. 5,5 nahodíme přízí Big Delight 52-52-56 ok. Ve výši 8 cm ujmeme rovnoměrně 8 ok = 44-44-48 ok. Ve výši 15-16-17 cm si označíme 22.-22.-24. oko v řadě (= palec). Pak přidáme 1 oko na každé straně označeného oka a toto přidávání opakujeme v každé 2. řadě – přidáváme vždy na vnější straně už přidaných ok (mezi přidáními vzniká klín) – celkem 6-7-8x – viz TIP - PŘIDÁVÁNÍ = 56-58-64 ok. Po posledním přidání odložíme přidaná oka + označené oko + 1 oko na každé straně těchto ok (klínu) na pomocnou jehlici = 15-17-19 ok palce. V další řadě nahodíme za odloženými oky 3 oka nová = 44-44-48 ok. Díl měří asi 21-23-25 cm. Pokračujeme v řadách lícovým žerzejem. Ve výši asi 34-37-41 cm spleteme každá 2 oka hladce = 22-22-24 ok. Ve výši asi 36-39-43 cm opět spleteme každá 2 oka hladce = v řadě zbývá 11-11-12 ok. Přízi odstřihneme, protáhneme zbylými oky, stáhneme a zapošijeme. PALEC: Pleteme v kruhových řadách na ponožkových jehlicích lícovým žerzejem. Odložených 15-17-19 ok palce vrátíme z pomocné jehlice zpět na ponožkové jehlice č. 5,5 a navíc k nim nabereme 5 nových ok z okraje za nimi (tj. ze 3 přidaných ok na dlani) = 20-22-24 ok. Když je palec vysoký asi 6-6-6,5 cm od klínu, ujmeme rovnoměrně 4-4-6 ok (ujímáme spletením 2 ok hladce) = 16-18-18 ok. Upleteme 2 kruhové řady. V následující kruhové řadě ujmeme rovnoměrně 4 oka = 12-14-14 ok. Ve výši asi 8,5-8,5-9 cm spleteme každá 2 oka hladce = 6-7-7 ok. Přízi odstřihneme, protáhneme zbylými oky, stáhneme a zapošijeme. Palec je vysoký asi 9-9-9,5 cm. DOKONČENÍ: Rukavici na boku sešijeme. Stejným způsobem upleteme i druhou rukavici. PLSTĚNÍ: Upletenou rukavici převrátíme rubem ven a do palce vložíme igelitový sáček, aby se nezplstil dohromady. Sáček přichytíme pomocí zavíracího špendlíku – POZN.: špendlík zapíchneme svisle směrem ke špičce palce, abychom jej mohli po zplstění rukavice snadno odstranit. Rukavici opět převrátíme lícem ven. Rukavice vložíme do pračky. Teplotu nastavíme na 40 stupňů, přidáme prací prášek bez enzymů a bělidel a pereme běžným programem vč. odstředění, nepředepíráme. Po vyprání vytvarujeme mokrou rukavici do požadovaného tvaru a necháme uschnout. Při opakovaném praní pereme programem pro jemné/vlněné prádlo. PO ZPLSTĚNÍ: Pokud se výrobek dostatečně nezplstil (tj. nesrazil) hned napoprvé a je stále moc velký, vyperte jej v pračce ještě jednou. Pro zesílení účinku můžete přidat froté ručník (cca 50 x 70 cm), který zvýší tření během praní. - POZOR: Nepoužívejte zkrácený program. Pokud se výrobek zplstil (tj. srazil) až příliš a je teď moc malý, můžete jej znovu namočit a zkusit vypnout do potřebných rozměrů. Je-li výrobek už suchý, nejprve jej namočte. Pamatujte ale – každé další praní už se řídí obecnými pokyny pro šetrné praní vlněných výrobků. |
|
|
Vyrobili jste si tento nebo nějaký jiný z našich modelů? Přidejte ke svým fotkám na sociálních sítích tag #dropsdesign - díky tomu je uvidíme i my! Potřebujete s tímto návodem poradit?Otevřete-li si návod na stránce garnstudio.com, najdete tam výukových video-ukázek, Komentáře/Dotazy a další užitečné informace. © 1982-2024 DROPS Design A/S. Vyhrazujeme si veškerá práva. Tento dokument, včetně všech jeho dílčích částí, podléhá autorským právům. Podrobnější komentář k možnostem užití našich návodů najdete dole pod každým návodem na našich stránkách. |
|


V oblasti pletené a háčkované módy působí DROPS Design více než 40 let. Díky tomu vám můžeme nabídnout jednu z nejrozsáhlejších kolekcí modelů s bezplatnými návody dostupnými na internetu - navíc v 17 jazycích. K dnešnímu dni máme na 304 katalogů a 11422 návodů celkem - z nich je už 6284 dostupných v češtině.
Komentáře / Otázky (18)
Hej! När man stickat 8 cm och ska minska 8 m jämnt fördelat är det en gång på ett varv man ska minska 8 m då eller är det på varje varv fram till dess att arbetet mäter 15-16-17 cm? Förstår inte mönstret, tacksam för förtydligande.
30.05.2023 - 12:43DROPS Design answered:
Hei Charlotta Når arbeidet måler 8 cm felles det 8 masker jevnt fordelt på neste omgang = 44, 44 eller 48 masker (avhengig av hvilken str. du strikker). Deretter strikker du til arbeidet måler15, 16 eller 17 cm. mvh DROPS Design
30.05.2023 - 13:28If the entire mitten for the Candy Crush pattern is knit in the round using the double pointed needles (like the Polar Stripes pattern) rather than straight needles as this pattern calls for, will the number of cast on stitches be the same ? I made the Polar Stripes mittens and they came out terrific. I`d like to try using the Big Delight yarn combo now.
13.02.2021 - 12:46DROPS Design answered:
Dear Anne, Well the Polar Stripes mittens are worked with DROPS Lima, a yarn group B (= 20 sts = 10 cm) while these mittens are worked with DROPS Big Delight, a yarn group C (= 16 sts = 10 cm) - you cannot use the same pattern since tension is not the same - maybe Touch of Gold could then help you = worked in the round with a yarn group C (Alaska) you can replace with Big Delight. Hope this helps. Happy knititng!
15.02.2021 - 07:35In der Beschreibung ist der Daumenkeil 9 bis 9,5 cm lang zu stricken, oben steht als Größe vor dem Filzen 15 bis 18 cm. Woher kommt der Unterschied?
11.11.2020 - 13:02DROPS Design answered:
Liebe Konny, die 9-9-9.5 cm sind von Anfang dem Teil "DAUMEN" gemessen, nicht von Anfang der Zunahmen für Daumen bei der Handschuh. Viel Spaß beim stricken!
11.11.2020 - 14:21Avez -vous des modeles pull camionneur femme?
28.02.2020 - 17:32DROPS Design answered:
Bonjour Mme Zorattisolange, nous vous invitons à parcourir nos très nombreux modèles de pulls (en choisissant une technique pour affiner votre recherche si besoin ) . Bon tricot!
02.03.2020 - 08:50Hoi hoe kan het dat vilten in wasmachine soms mislukt? ik gebruik groene zeep ,misschien te weinig? want soms vervilt het niet genoeg.
02.02.2016 - 15:32DROPS Design answered:
Hoi Ria. Wol is een natuurproduct, dus soms reageert het anders afhankelijk van temperatuur, de machine enzovoort. Denk ook om om misschien een spijkerbroek of tennisballen erbij te doen. De "wrijving" is ook een deel van het vilten. Het is handig om eerst een proeflapje te breien en vilten - dan weet je precies wat nodig is om de juiste resultaat te krijgen :-)
03.02.2016 - 17:35Hei! Onko olemassa jokin huovutuksellinen syy siihen, miksi nämä lapaset neulotaan tasona vai voinko neuloa ne suljettuna neuleena? En ole ennen kokeillut huovutusta. Kiitos vastauksesta, lanka näyttää ja tuntuu ihanalta!
05.09.2015 - 20:57DROPS Design answered:
Hei! Voit tietysti halutessasi neuloa käsineet suljettuna neuleena!
07.09.2015 - 16:56Ich habe diese Wolle gekauft, sie wurde mir empfohlen, um Babyschuhe zu stricken und zu verfilzen. Ich habe die Schuhe nach Anleitung gestrickt und verfilzt, nur leider haben sie nicht gefilzt. Sie sind so groß (laut Anleitung für Neugeborene) dass ich sie einem 1 jährigen Kind als Schuhe anziehen könnte. Was kann ich tun? Ich habe natürlich gleich 6 Knäuel gekauft. Bitte um schnelle Antwort, da was sich um Weihnachtsgeschenke handelt. Anke Pomp
17.12.2013 - 06:40DROPS Design answered:
Liebe Anke, Big Delight eignet sich zum Filzen, aber es ist schwierig etwas zu der Grösse zu sagen, wenn Sie eine andere Anleitung benutzt haben.
17.12.2013 - 09:14Danke für den Tipp, liebe Brigitte!
16.12.2013 - 07:53Gerade habe ich das 8. Paar Handschuhe aus Big Delight nach dieser Anleitung beendet. Ich habe keinen Fehler gefunden, aber ich möchte mitteilen, das ich seit dem zweiten Mal die Handschuhe mit eine, Nadelspiel in Runden stricke, weil mir die Seitennähte nicht so gut gefielen. Viele Grüße Brigitte
13.12.2013 - 21:28Jolande wrote:
Hej, nej det var omöjligt, dem kunde inte blir större. Tyvärr, men om jag skulle sticka ett nytt par igen och tvätta dem på fin tvätt program har jag kanske bättre resultat.
30.10.2013 - 16:32