
Popular categories
Looking for a yarn?


|
|
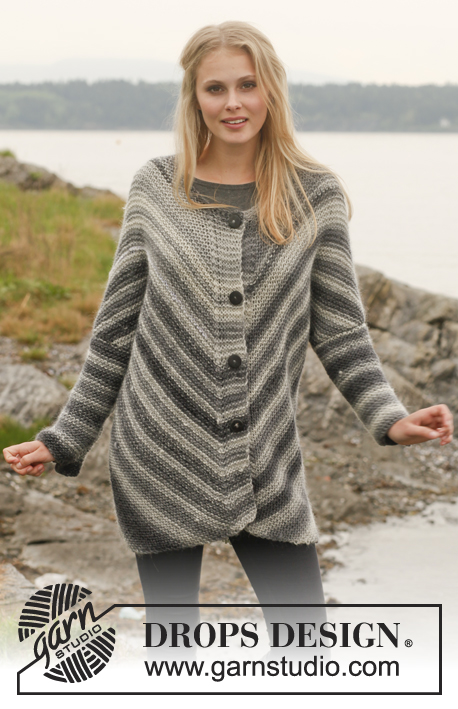
Svenja |
|
 |
 |
Knitted DROPS jacket with short sleeves worked sideways in ”Delight”. Size: S - XXXL.
DROPS 149-34 |
|
|
GARTER ST (back and forth on circular needle): K all rows. 1 ridge = 2 rows K. STRIPE PATTERN: * 4 ridges (i.e. 8 rows K), 4 rows in stockinette st *, repeat from *-*. INCREASE TIP: Inc 1 st by making 1 YO. On next row P YO when working in stockinette st and K when working in garter st. ---------------------------------------------------------- JACKET: Piece is worked in parts. The piece is worked back and forth on circular needle because of no of sts. LEFT SLEEVE + FRONT PIECE: Beg at the edge of sleeve, cast on new sts for front piece and work until mid front. Cast on 58-58-58-66-66-66 sts (includes 1 edge st in each side) on circular needle size 3 mm / US 2.5 with Delight. Work 2 RIDGES in garter st - see explanation above (1st row = RS). Switch to circular needle size 3.5 mm / US 4 and work next row from RS as follows: 1 edge st in garter st, 2 sts in stockinette st, * 4 sts in garter st, 4 sts in stockinette st *, repeat from *-* 6-6-6-7-7-7 times in total and finish with 4 sts in garter st, 2 sts in stockinette st and 1 edge st in garter st. Continue the pattern like this. When piece measures 3 cm / 1", inc 1 st inside 1 edge st in left side of piece (seen from RS – NOTE: Inc 1 st by working 2 sts in same st and work the inc sts in pattern). Repeat inc every 4th row 7 more times (= 8 inc in total under sleeve) = 66-66-66-74-74-74 sts. When piece measures 15 cm / 6", work in stockinette st while AT THE SAME TIME on 1st row from RS casting on 21-21-20-12-10-7 new sts at the end of row = 87-87-86-86-84-81 sts. P 1 row back with 1 edge st in garter st in each side. Then work in stockinette st as follows: Row 1 (= RS): 1 edge st in garter st, K until 1 st remains and work 2 sts in last st (= 1 st inc) = 88-88-87-87-85-82 sts. Row 2 (= WS): P with 1 edge st in garter st in each side. Row 3 (= RS): 1 edge st in garter st, K until 2 sts remain, 1 YO, K 1 (insert 1 marker in this st), 1 YO, K 1. Row 4: P all sts and YOs with 1 edge st in garter st in each side. Then work in stockinette st with 1 edge st in garter st in each side while AT THE SAME TIME on every row from RS inc 1 st on each side of st with marker – READ INCREASE TIP (= 2 sts inc per inc row). When piece measures 26-28-30-30-33-36 cm / 10¼"-11"-11¾"-11¾"-13"-14¼" measured from the edge on sleeve at the longest (piece measures approx. 11-13-15-15-18-21 cm / 4⅜"-5⅛"-6"-6"-7"-8¼" from where new sts were cast on), work STRIPE PATTERN – see explanation above, with 1 edge st in garter st in each side – NOTE: Continue inc on each side of st with marker as before. AT THE SAME TIME when piece measures 31-33-34-37-39-42 cm / 12¼"-13"-13⅜"-14½"-15¼"-16½" from edge of sleeve, bind off for neck on every other row (i.e. at beg of every row from RS) as follows: bind off 12-12-12-13-13-13 sts 1 time and 1 st 2-2-2-3-3-3 times, then bind off 1 st every 4th row (i.e. on every other row from RS) 2 times in total. Continue with STRIPE PATTERN, 1 edge st in garter st in each side and inc as before until piece measures approx. 38-40-42-45-48-51 cm / 15"-15¾"-16½"-17¾"-19"-20" from edge of sleeve – adjust after 7 rows K (piece measures approx. 23-25-27-30-33-36 cm / 9"-9¾"-10⅝"-11¾"-13"-14¼" from where new sts were cast on and edge with STRIPE PATTERN measures approx. 12-12-12-15-15-15 cm / 4¾"-4¾"-4¾"-6"-6"-6"). On next row from WS bind off sts at beg of row and to and with st with marker (= bottom edge on jacket) = approx. 122-126-132-134-138-142 sts remain on row. Switch to circular needle size 3 mm / US 2.5 and work in garter st back and forth for 2 cm / ¾" for band, then loosely bind off. RIGHT SLEEVE + FRONT PIECE: Cast on and work as left front piece but reversed. I.e. inc under sleeve in right side of piece (seen from RS) and when casting on new sts on row (for side on front piece), cast on at the end of row from WS (instead of RS). K 1 row from RS. Then work as follows: Row 1 (= WS): 1 edge st in garter st, P until 1 st remains and work 2 sts in last st (= 1 st inc towards bottom edge) = 88-88-87-87-85-82 sts. Row 2 (= RS): 1 edge st in garter st, 1 YO, K 1 (insert 1 marker in this st), 1 YO and K the rest of row. Row 3 (= WS): P with 1 edge st in garter st in each side. Then work in stockinette st with 1 edge st in garter st in each side while AT THE SAME TIME on every row from RS inc 1 st on each side of st with marker as on left front piece. When casting/binding off for neck, bind off at beg of every row from WS (instead of RS) and bind off sts in bottom edge on jacket from RS instead of WS. In addition when band measures approx. ½-1 cm / ¼"-½", bind off for 6-6-6-7-7-7 buttonholes evenly. Upper buttonhole should be max. 0.5 cm / ¼" from neck edge, and bottom hole approx. 10 cm / 4" from bottom edge. 1 buttonhole = bind off 2 sts and cast on 2 new sts on next row over these sts. LEFT SLEEVE + BACK PIECE: Work as right sleeve + front piece but when piece measures 31-33-34-37-39-42 cm / 12¼"-13"-13⅜"-14½"-15¼"-16½", bind off for neck at beg of every row from WS as follows: bind off 1 st 4 times in total. When sts in bottom edge have been bind off, approx. 134-138-142-148-152-156 sts remain on needle. Work 1 ridge in garter st and loosely bind off (= mid back). RIGHT SLEEVE + BACK PIECE: Cast on and work as left sleeve + front piece but bind off for neck as on left back piece (and bind off at beg of every row from RS). ASSEMBLY: Sew the back piece tog mid back inside bind-off edge. Sew shoulder seams inside 1 edge st. Sew underarm and side seams in one inside 1 edge st. Sew on buttons. NECK EDGE: Pick up from RS approx. 94 to 116 sts around the neck on circular needle size 3 mm / US 2.5 with Delight. K 4 rows (1st row = WS) and loosely bind off with K from WS. |
|

|
|
|
Have you made this or any other of our designs? Tag your pictures in social media with #dropsdesign so we can see them! Do you need help with this pattern?You'll find tutorial videos, a Comments/Questions area and more by visiting the pattern on garnstudio.com. © 1982-2024 DROPS Design A/S. We reserve all rights. This document, including all its sub-sections, has copyrights. Read more about what you can do with our patterns at the bottom of each pattern on our site. |
|


With over 40 years in knitting and crochet design, DROPS Design offers one of the most extensive collections of free patterns on the internet - translated to 17 languages. As of today we count 304 catalogs and 11422 patterns - 11417 of which are translated into English (US/in).
We work hard to bring you the best knitting and crochet have to offer, inspiration and advice as well as great quality yarns at incredible prices! Would you like to use our patterns for other than personal use? You can read what you are allowed to do in the Copyright text at the bottom of all our patterns. Happy crafting!
Comments / Questions (29)
Hallo Würde dieses Muster gerne in glatt rechts stricken Ob das ausschaut?
02.08.2023 - 09:51DROPS Design answered:
Liebe Manuela, Ihre Maschenprobe in der Höhe würde dann unterschiedlich sein, und die Anleitung sollten Sie dann entsprechend anpassen, am besten stricken Sie diese Jacke krausrechts, genauso wie bei der Anleitung. Hier finden Sie sonst unsere glattrechts gestrickte Jacken. Viel Spaß beim stricken!
02.08.2023 - 11:42Cómo puedo tener en dos agujas, está chaqueta no sé tener con agujas circulares. Gracias y felicitaciones está bellísimo.
13.02.2023 - 22:25DROPS Design answered:
Hola Rosalba, puedes tejer con agujas rectas. Nosotros usamos agujas circulares por el elevado número de puntos; si te entran en las agujas rectas puedes trabajar con ellas.
16.02.2023 - 22:33Tem um vídeo ensinando esse trabalho por favor?
15.02.2022 - 13:38DROPS Design answered:
Boa tarde, Se descer até ao fundo da receita, irá encontrar uma secção com os vídeos que ensinam as técnicas utilizadas neste modelo. Pode ver no link abaixo: https://www.garnstudio.com/video.php?patternid=6197&lang=pt Bons tricôs!
15.02.2022 - 15:40Podría hacer un vídeo de esta chaqueta. Gracias
12.12.2020 - 21:39Bonjour, Merci pour la réponse qui confirme ce que j'avais, enfin, compris. J'ai hâte de commencer, mais la laine n'est pas encore arrivée (à cause du covid !). Cordialement
06.06.2020 - 11:01Bonjour, Merci de votre réponse très rapide. Pour les 8rg, c'est le point fantaisie : 8 rgs point mousse et 4 rgs jersey - le 8ème rg étant à l'endroit, doit-on commencer le 1er rg jersey par des mailles à l'envers ou à l'endroit ?. Je ne manquerai pas de mettre une photo de mon ouvrage . Sincères salutations.
02.06.2020 - 11:58DROPS Design answered:
Bonjour Françoise062b, oui bien sûr, pardon :) on va tricoter ainsi, en commençant sur l'endroit: pour les 4 côtes mousse: 8 rangs endroit, puis pour les 4 rangs jersey: 1 rang endroit sur l'endroit, 1 rang envers sur l'envers, 1 rang endroit sur l'endroit et 1 rang envers sur l'envers (= et on aura bien 4 côtes mousse et 4 rangs jersey). Bon tricot!
02.06.2020 - 14:24Bonjour, Vous parlez de 4m point mousse et 4 m en jersey : après les 4m endroit, doit-on commencer avec 4m envers ? dans ce cas, le motif, sur l'endroit, n'est pas jersey, mais petit point mousse. Que doit-voir ? De même, après les 8 rgs endroit, le 1er rg jersey commence par mailles endroit ou envers ? Merci de me préciser cela car je vais recevoir très prochainement la laine et j'aimerais bien commencer cet ouvrage. Cordialement de France.
30.05.2020 - 13:57DROPS Design answered:
Bonjour Françoise062b, les 4 m jersey se tricotent en jersey endroit, donc à l'endroit sur l'endroit mais à l'envers sur l'envers. La manche gauche/devant gauche va donc avoir 2 m jersey endroit de chaque côté et des côtes (4 m point mousse, 4 m jersey end) au milieu. Je ne vois ps de quels 8 rangs endroit vous parlez, pouvez-vous m'éclairer? Merci!
02.06.2020 - 09:18Når man strikker glatstrikning 15 cm = 45 pinde iflg. strikkefasthed og så tager man ud ved at slå om pinden det bliver til 23 masker på hver side af markeret maske men 23 masker = 10 cm det bliver altså skævt skal man trække det i facon eller skal man tage en maske ud indenfor kantmasken f.eks på hver 4. Pind
04.09.2017 - 12:10DROPS Design answered:
Hej Anne Marie, jeg kan ikke regne ud hvor i opskriften du er. Vil du skrive hvor langt du er kommet og nøjagtig hvad der bliver skævt. Tak :)
13.09.2017 - 11:59Er det rigtig forstået, at den første pind efter de 4 pinde retstrik, er på retsiden og at det er ene retmasker der skal strikkes?
01.09.2017 - 18:00DROPS Design answered:
Hej Anne Marie, den første pind efter de 4 pinde retstrik, strikkes således: Skift til rundp 3,5 og strik næste p således fra retsiden: 1 kant-m retstrik, 2 m glatstrik, * 4 m retstrik, 4 m glatstrik *, gentag fra *-* totalt 6-6-6-7-7-7 gange og afslut med 4 m retstrik, 2 m glatstrik og 1 kant-m retstrik. Fortsæt mønsteret således.God fornøjelse!
12.09.2017 - 15:46Bonjour, Ce gilet me plait beaucoup mais avant de me lancer, je me pose des p'ti'questions: Toute la beauté de ce gilet réside dans la symétrie des rayures. Ne risque-t-on pas de la perdre au changement de pelote? Et lors de l'assemblage des différentes "pièces", les rayures sont-elles automatiquement parallèles?? Amicalement
30.01.2014 - 08:58DROPS Design answered:
Bonjour Mme Woro, pour une transition plus douce entre les pelotes, commencez la nouvelle par la même couleur que la fin de la précédente. Les différentes parties se tricotent en vis à vis, les rayures seront donc parallèles à l'assemblage. Bon tricot!
30.01.2014 - 11:04