DROPS Paris
DROPS Paris
100% Cotton
from 1.10 £ /50g
Get the yarn to make this pattern from 12.10£.

The yarn cost is calculated from the pattern’s smallest size and the yarn’s cheapest product type. Looking for an even better price? You might find it on the DROPS Deals!

DROPS SS24
DROPS Children 24-37
DROPS design: Pattern no w-051-bn
Yarn group C
--------------------------------------------------------
Size: 3/4 - 5/6 - 7/8 - 9/10 - 11/12 years
Size in cm: 98/104 - 110/116 - 122/128 - 134/140 - 146/152

Materials:
DROPS PARIS from Garnstudio
550-600-650-700-800 g colour no 12, red

DROPS CROCHET HOOK SIZE 6 mm – or size needed to get 12 tr x 6 rows = 10 x 10 cm. When working pattern A.1, approx. 2 repetitions of b in width = 8 cm.

DROPS BUTTONS NO 532, INKA W/LOOP: 5-5-5-6-6 pieces

-------------------------------------------------------

Alternative Yarn – See how to change yarns here
Yarn Groups A to F – Use the same pattern and change the yarn here
Yarn usage using an alternative yarn – Use our yarn converter here

-------------------------------------------------------

DROPS Paris
DROPS Paris
100% Cotton
from 1.10 £ /50g
Get the yarn to make this pattern from 12.10£.

The yarn cost is calculated from the pattern’s smallest size and the yarn’s cheapest product type. Looking for an even better price? You might find it on the DROPS Deals!

Pattern instructions

NOTE: This pattern is written in British English. All measurements in charts are in cm. For conversion from cm to inches - click here. There are different terms for crocheting in British and American English. If this pattern includes crochet, click for "crochet terms" here. For this pattern in American English, please click here.
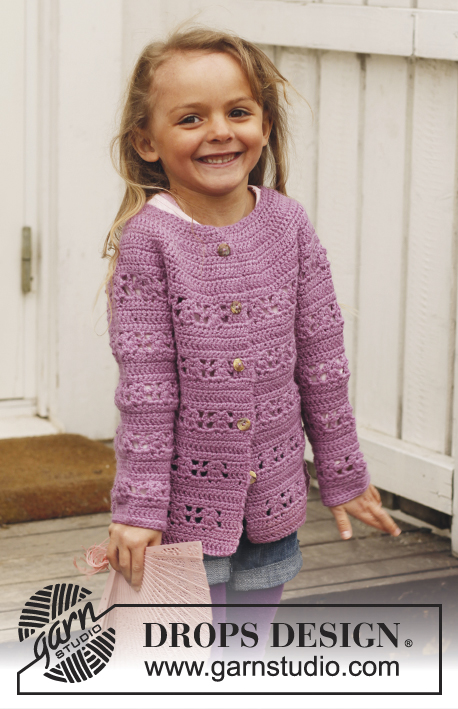
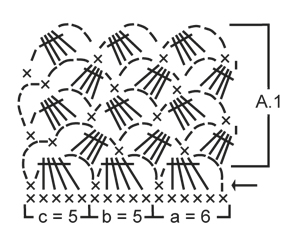
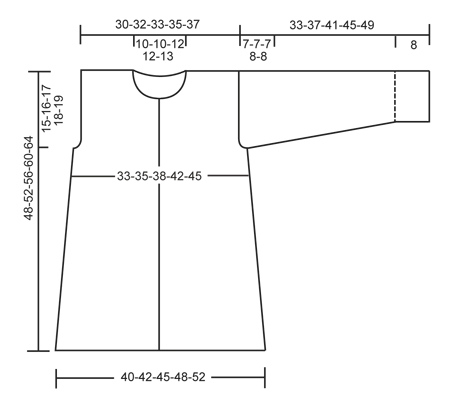
CROCHET INFO:
Replace first tr on row with 3 ch.

PATTERN (also see diagram A.1):
ROW 1 (= row marked with 1 arrow in diagram):
1 ch up from 1st dc on previous row, [3 ch, then work 4 tr tog as follows (= 1 tr-group): * Work 1 tr in next dc but wait with last pull through *, repeat from *-* 4 times in total, make a YO and pull yarn through all 5 loops on hook, 1 ch, 1 dc in next dc], repeat from [-] the entire row. Turn piece.
ROW 2: 5 ch up from first dc, 1 dc at the top of first tr-group, * 3 ch, 1 tr-group in 3-ch-space on previous row, 1 ch, 1 dc at the top of next tr-group *, repeat from *-*, finish with 3 ch and 4 tr tog in last ch-space. Turn piece.
ROW 3: 1 ch, 1 dc at the top of first tr-group, * 3 ch, 1 tr-group in 3-ch-space on previous row, 1 ch, 1 dc at the top of next tr-group *, repeat from *-*, work last dc on row in 5-ch-space from previous row. Turn piece.
Repeat rows 2 and 3.

DECREASE TIP:
Dec 1 tr by working 2 tr tog as follows:
Work 1 tr in first tr but wait with last pull through, work 1 tr in next tr but on last pull through, pull thread through all 3 loops on hook.
Dec 2 tr by working 3 tr tog as follows:
Work 1 tr in first tr but wait with last pull through, work 1 tr in next tr but wait with last pull through, work 1 tr in next tr but on last pull through, pull thread through all 4 loops on hook.

--------------------------------------------------------

BACK PIECE:
Work 61-63-68-73-78 ch with Paris on hook size 6 mm. Turn and work 1 tr in 4th ch from hook, continue with 1 tr in each of the next 2-4-4-4-4 ch, * skip 1 ch, 1 tr in each of the next 4 ch *, repeat from *-* the entire row = 48-50-54-58-62 tr - READ CROCHET INFO! Continue with tr upwards on all rows.
REMEMBER THE CROCHET TENSION!
When piece measures 15 cm, dec 1 tr in each side by working the second and third tr and the 2 next to last tr tog – SEE DECREASE TIP! Repeat dec every 5-5-6-6-7 cm 3 more times = 40-42-46-50-54 tr. When piece measures 33-36-39-42-45 cm, dec for armholes in each side as follows: Work sl sts over the first 2-2-3-4-5 tr, then work tr until 2-2-3-4-5 tr remain, turn piece. Continue with tr, there are now 36-38-40-42-44 tr on row.
Continue to work until piece measures approx. 47-51-55-59-63 cm. Now work 1 row with tr only over the outermost 12-13-13-14-14 tr in each side for shoulder (the middle 12-12-14-14-16 tr = neck). Fasten off.

RIGHT FRONT PIECE:
Work 34-36-38-41-43 ch with Paris on hook size 6 mm. Turn and work 1 tr in 4th ch from hook, continue with 1 tr in each of the next 5-2-4-2-4 ch, * skip 1 ch, 1 tr in each of the next 4 ch *, repeat from *-* the entire row = 27-28-30-32-34 tr.
Continue with tr upwards on all rows (the 3 outermost tr towards mid front = band). When piece measures 15 cm, beg dec in the side as on back piece. When dec are done, 23-24-26-28-30 tr remain on row. When piece measures 33-36-39-42-45 cm, the outermost 2-2-3-4-5 tr towards the side are no longer worked. Continue with tr over the remaining 21-22-23-24-25 tr. When piece measures 43-47-50-54-57 cm, the outermost 7-7-8-8-9 tr towards mid front are no longer worked. Then dec 1 tr towards mid front on the next 2 rows by working the 2 next to last tr towards mid front tog = 12-13-13-14-14 tr remain on shoulder. Fasten off when piece measures 48-52-56-60-64 cm.

LEFT FRONT PIECE:
Work as right but reversed.

SLEEVE:
Work 32-32-32-39-39 ch with Paris on hook size 6 mm. Turn and work 1 dc in 2nd ch from hook, then work 1 dc in each of the next 5-5-5-2-2 ch, * skip 1 ch, work 1 dc in each of the next 4 ch *, repeat from *-* the entire row = 26-26-26-31-31 dc (first ch on row does NOT count as 1 dc). Continue with PATTERN as follows - also see explanation above and diagram A.1: Diagram a over the first 6 dc, diagram b 3-3-3-4-4 times and diagram c over the last 5 dc – beg with row marked with arrow. When 5 rows of diagram have been worked, piece measures approx. 8 cm. Continue with tr as follows: 3 ch (= 1 tr), * 1 tr at the top of first tr-group, 3 tr in 3-ch-space, 1 tr in dc *, repeat from *-* the entire row but finish with 3 tr in last 3-ch-space (do not work 1 tr in last dc) = 25-25-25-30-30 tr. Continue with 1 tr in every tr upwards. AT THE SAME TIME when piece measures 10 cm, inc 1 tr in each side by working 2 tr in second and next to last tr. Repeat inc every 2nd-2nd-2nd-3rd-3rd row 3-4-5-4-5 more times = 33-35-37-40-42 tr.
When piece measures 26-30-34-37-41 cm, beg dec for sleeve cap. Work sl sts over the first 3 tr, then work tr until 3 tr remain, turn piece. Work 3 ch, then work the next 3 tr tog – SEE DECREASE TIP! Work tr until 4 tr remain, work the next 3 tr tog, then 1 tr in last tr. Continue like this by working the 3 next to last tr on every row tog until piece measures 33-37-41-45-49 cm, fasten off.

ASSEMBLY:
Sew shoulder seams, side seams and sleeve seams edge to edge to avoid a chunky seam. Sew in the sleeves in body.

HOOD:
Work (from RS) approx. 30 to 40 dc around the neckline with Paris on hook size 6 mm. Turn and work dc while at the same time inc evenly (by working 2 dc in 1 dc) to 51-51-51-61-61 dc. Continue with PATTERN as follows - also see explanation above and diagram A.1: a over the first 6 dc, b until 5 dc remain and c over the last dc – beg with row marked with 1 arrow.
Continue pattern until hood measures approx. 28-29-30-31-32 cm. Fasten off and sew the hood tog at the top.

BAND:
Work an edge around the opening on jacket, beg at the bottom on right front piece, work up and around the hood and down along left front piece. Work with Paris on hook size 6 mm: Work approx. 181-191-201-211-221 dc, no of sts should be divisible by 5 + 11. Turn piece and continue with PATTERN according to diagram A.1: A.1a over the first 6 dc, A.1b until 5 dc remain and A.1c over the last dc – beg on row marked with arrow. Fasten off when A.1 has been worked 1 time vertically.

ASSEMBLY:
Fasten the buttons on left front piece, the top button approx. 2 cm from neck, the bottom button approx. 8 cm from bottom edge. Place the rest of the buttons evenly between these 2 buttons. Button through band on right front piece.

This pattern has been corrected.

Updated online: 05.08.2013
BACK PIECE:
Work 61-63-68-73-78 ch with Paris on hook size 6 mm. Turn and work 1 tr in 4th ch from hook, continue with 1 tr in each of the next 2-4-4-4-4 ch, * skip 1 ch, 1 tr in each of the next 4 ch *, repeat from *-* the entire row = 48-50-54-58-62 tr...

RIGHT FRONT PIECE:
Work 34-36-38-41-43 ch with Paris on hook size 6 mm. Turn and work 1 tr in 4th ch from hook, continue with 1 tr in each of the next 5-2-4-2-4 ch, * skip 1 ch, 1 tr in each of the next 4 ch *, repeat from *-* the entire row = 27-28-30-32-34 tr.

Diagram

symbols = 1 dc
symbols = 1 ch
symbols = 1 tr
diagram
diagram
Do you have a question? See a list of frequently asked questions (FAQ)

Knitting tension is what determines the final measurements of your work, and is usually measured per 10 x 10 cm. It is provided like so: number of stitches in width x number of rows in height - eg: 19 stitches x 26 rows = 10 x 10 cm.

The knitting tension is very individual; some people knit/crochet loosely while others work tightly. You adjust the knitting tension with the needle size, which is why the suggested needle size is only meant as a guide! You need to adjust this (up or down) to ensure that YOUR knitting tension matches the knitting tension provided in the pattern. If you work with a different knitting tension than provided you will have a different yarn consumption, and your work will have different measurements than what the pattern suggests.

The knitting tension also determines which yarns can replace each other. As long as you achieve the same knitting tension you can replace one yarn with another.

See DROPS lesson: How to measure your tension/gauge

See DROPS video: How to make a gauge tension swatch

The required amount of yarn is provided in grams, eg: 450 g. To calculate how many balls you’ll need you first need to know how many grams are in 1 ball (25g, 50g or 100g). This information is available if you click on the individual yarn quality on our pages. Divide the amount required with the amount of each ball. For example, if each ball is 50g (the most common amount), the calculation will be as follows: 450 / 50 = 9 balls.

The important thing when changing from one yarn to another is that the knitting/crochet tension remains the same. This is so that the measurements of the finished piece will be the same as on the sketch provided. It is easier to achieve the same knitting tension using yarns from the same yarn group. It is also possible to work with multiple strands of a thinner yarn to achieve the knitting tension of a thicker one. Please try our yarn converter. We recommend you to always work a test swatch.

Please NOTE: when changing yarn the garment might have a different look and feel to the garment in the photo, due to individual properties and qualities of each yarn.

See DROPS lesson: Can I use a different yarn than the one mentioned in the pattern?

All our yarns are categorised into yarn groups (from A to F) according to thickness and knitting tension – group A contains the thinnest yarns and group F the thickest. This makes it easier for you to find alternative yarns to our patterns, should you wish to switch yarn. All yarns within the same group have a similar knitting tension and can easily replace each other. However, different yarn qualities have different structures and properties which will give the finished work a unique look and feel.

Click here for an overview of the yarns in each yarn group

At the top of all our patterns you’ll find a link to our yarn calculator, which is a helpful tool should you wish to use a different yarn than suggested. By filling in the yarn quality you wish to replace, the amount (in your size) and number of strands, the calculator will present good alternative yarns with the same knitting tension. Additionally it will tell you how much you’ll require in the new qualities and whether you’ll need to work with multiple strands. Most skeins are 50g (some are 25g or 100g).

If the pattern is worked with multiple colours, every colour will have to be calculated separately. Similarly, if the pattern is worked with several strands of different yarns (for example 1 strand Alpaca and 1 strand Kid-Silk) you will have to find alternatives for each, individually.

Click here to see our yarn calculator

Since different yarns have different qualities and textures we have chosen to keep the original yarn in our patterns. However, you can easily find options among our available qualities by using our yarn calculator, or simply pick a yarn from the same yarn group.

It is possible that some retailers still have discontinued yarns in stock, or that someone has a few skeins at home that they would like to find patterns for.

The yarn calculator will provide both alternative yarn as well as required amount in the new quality.

If you think it's hard to decide what size to make, it can be a good idea to measure a garment you own already and like the size of. Then you can pick the size by comparing those measures with the ones available in the pattern's size chart.

You'll find the size chart at the bottom of the pattern.

See DROPS lesson: How to read size chart

The needle size provided in the pattern serves only as a guide, the important thing is to follow the knitting tension. And since knitting tension is very individual, you will have to adjust the needle size to ensure that YOUR tension is the same as in the pattern – maybe you’ll have to adjust 1, or even 2 needle sizes, up or down to achieve the correct tension. For this, we recommend that you work test swatches.

Should you work with a different knitting tension than the one provided, the measurements of the finished garment might deviate from the measurement sketch.

See DROPS lesson: How to measure your tension/gauge

See DROPS video: How to make a tension/gauge swatch

Working a garment top-down provides more flexibility and room for personal adjustment. For example it is easier to try the garment on while working, as well as making adjustments to length of yoke and shoulder caps.

The instructions are carefully explaining every step, in the correct order. Diagrams are adjusted to the knitting direction and are worked as usual.

The diagram depicts all rows/rounds, and every stitch seen from the right side. It is read from bottom to top, from right to left. 1 square = 1 stitch.

When working back and forth, every other row is worked from the right side and every other row is worked from the wrong side. When working from the wrong side, the diagram will have to be worked reversed: from left to right, knit stitches are purled, purl stitches are knit etc.

When working in the round every round is worked from the right side and the diagram are worked from right to left on all rounds.

See DROPS lesson: How to read knitting diagrams

The diagram depicts all rows/rounds, and every stitch seen from the right side. It is worked from bottom to top, from right to left.

When working back and forth every other row is worked from the right side: from right to left and every other row is worked from the wrong side: from left to right.

When working in the round, every row in the diagram are worked from the right side, from right to left.

When working a circular diagram you start in the middle and work your way outwards, counter clockwise, row by row.

The rows usually start with a given number of chain stitches (equivalent to the height of the following stitch), this will either be depicted in the diagram or explained in the pattern.

See DROPS lesson: How to read crochet diagrams

Instructions for working several diagrams after each other on the same row/round, will often be written like so: “work A.1, A.2, A.3 a total of 0-0-2-3-4 times". This means you work A.1 once, then A.2 is worked once, and A.3 is repeated (in width) the number of times provided for your size – in this case like so: S = 0 times, M = 0 times, L=2 times, XL= 3 times and XXL = 4 times.

The diagrams are worked as usual: begin with the first row in A.1, then work the first row in A.2 etc.

See DROPS lesson: How to read knitting diagrams

See DROPS lesson: How to read crochet diagrams

The total width of the garment (from wrist-to-wrist) will be larger in the larger sizes, despite the actual sleeves being shorter. The larger sizes have longer sleeve caps and wider shoulders, so there will be a good fit in all sizes.

The measurement sketch/schematic drawing provides information regarding the full length of the garment. If it’s a jumper or a jacket the length is measured from the highest point on the shoulder closest to the neckline, and straight down to the bottom of the garment. It is NOT measured from the tip of shoulder. Similarly, the length of yoke is measured from the highest point on the shoulder and down to where yoke is split into body and sleeves.

On a jacket measures are never taken along bands, unless specifically stated. Always measure inside band stitches when measuring the length.

See DROPS lesson: How to read a schematic drawing

Diagrams are often repeated on the round or in height. 1 repeat is the diagram the way it appears in the pattern. If it says to work 5 repeats of A.1 in the round, then you work A.1 a total of 5 times after/next to each other in the round. If it says to work 2 repeats of A.1 vertically/in height you work the entire diagram once, then begin again at the start and work the entire diagram one more time.

Chain stitches are slightly narrower than other stitches and to avoid working the cast-on edge too tight, we simply chain more stitches to begin with. The stitch count will be adjusted on the following row to fit the pattern and measurement sketch.

The rib edge is more elastic and will contract slightly compared to, for example, stocking stitch. By increasing before the rib edge, you avoid a visible difference in width between the rib edge and the rest of the body.

It’s very easy to cast off too tightly, and by making yarn overs while casting off (and simultaneously casting these off) you avoid a too tight cast off edge.

See DROPS video: How to bind off with yarn overs (yo)

To achieve an even increase (or decrease) you can increase on, for example: every 3rd and 4th row alternately, like so: work 2 rows and increase on the 3rd row, work 3 rows and increase on the 4th. Repeat this until the increase is complete.

See DROPS lesson: Increase or decrease 1 st on every 3rd and 4th row alternately

Should you prefer to work in the round instead of back and forth, you may of course adjust the pattern. You’ll need to add steeks mid-front (usually 5 stitches), and follow the instructions. When you would normally turn and work from the wrong side, simply work across the steek and continue in the round. At the end you’ll cut the piece open, pick up stitches to work bands, and cover the cut edges.

See DROPS video: How to knit steeks and cut open

Should you prefer to work back and forth instead of in the round, you may of course adjust the pattern so you work the pieces separately and then assemble them at the end. Divide the stitches for the body in 2, add 1 edge stitch in each side (for sewing) and work the front and back pieces separately.

See DROPS lesson: Can I adapt a pattern for circular needles into straight needles?

Pattern repeats can vary slightly in the different sizes, in order to get the correct proportions. If you’re not working the exact same size as the garment in the photo, yours might deviate slightly. This has been carefully developed and adjusted so that the complete impression of the garment is the same in all sizes.

Make sure to follow instructions and diagrams for your size!

If you have found a pattern you like which is available in women’s size it’s not very difficult to convert it to men’s size. The biggest difference will be the length of sleeves and body. Start working on the women size that you think would fit across the chest. The additional length will be worked right before you cast off for the armhole/sleeve cap. If the pattern is worked top-down you can add the length right after the armhole or before the first decrease on sleeve.

Regarding additional yarn amount, this will depend on how much length you add, but it is better with a skein too many than too few.

All yarns will have excess fibres (from production) that might come off as lint or shedding. Brushed yarns (ie hairier yarns) have more of these loose, excess fibres, causing more shedding.

Shedding also depends on what is worn under or over the garment, and whether this pulls at the yarn fibres. It’s therefore not possible to guarantee that there will be no shedding

Below are some tips on how to get the best result when working with hairier yarns:

1. When the garment is finished (before you wash it) shake it vigorously so the looser hairs come off. NOTE: do NOT use a lint roller, brush or any method that pulls at the yarn.

2. Place the garment in a plastic bag and put it in your freezer - the temperature will cause the fibres to become less attached to each other, and excess fibres will come off easier.

3. Leave in the freezer for a few hours before taking it out and shaking it again.

4. Wash the garment according to the instructions on the yarn label.

Pilling is a natural process that happens to even the most exclusive of fibers. It's a natural sign of wear and tear that is hard to avoid, and that is most visible in high friction areas of your garment like a sweater's arms and cuffs.

You can make your garment look as new by removing the pilling, using a fabric comb or a pill/lint remover.

Still can't find the answer you need? Then scroll down and leave your question so one of our experts can try to help you. This will be done normally within 5 to 10 working days.
In the meantime, you can read the questions and answers that others have left to this pattern or join the DROPS Workshop on Facebook to get help from fellow knitters/crocheters!

You might also like...

Post a comment to pattern DROPS Children 24-37

We would love to hear what you have to say about this pattern!

If you want to leave a question, please make sure you select the correct category in the form below, to speed up the answering process. Required fields are marked *.

Comments / Questions (31)

country flag Sheila wrote:

Ich bin grade mit der Jacke fertig geworden, auf Wunsch meiner Tochter aus einer anderen Wolle, aber wir sind beide schwer verliebt in das Ergebnis. Danke für die tolle Anleitung. ♡

07.11.2023 - 14:59

country flag Amy wrote:

I don't understand how the instructions for the hood are to be worked. It says to pick up 30-40 around the neckline but if I pick up stitches around the whole neck it's much more than 40 stitches. Can I get clarification on how this part is to be worked to start the hood?

25.09.2022 - 21:16

DROPS Design answered:

Dear Amy, we initially pick up less stitches (40) so that the hood won't be bulky initially. For this, we pick up stitches that are evenly spaced around the whole neckline. Later on, we will increase stitches to get the right amount to work with (51-61dc). Happy crochetting!

25.09.2022 - 22:52

country flag Liina Kaev wrote:

Tere! “ Pööra ja tee 1 sm neljandasse ahels-sse heegelnõelast, jätka tehes 1 sm igasse järgmisesse 2-4-4-4-4 ahels-sse, * jäta vahele 1 ahels, 1 ks igasse järgmisesse 4 ahels-sse*, korda *kuni* tervel real ” Ma ei saa töö algusest aru… on öeldud, et tee sm igasse järgmisesse 4 as, siis *jäta 1as vahele ja 4ks igasse järgmisesse as*…??? Mis hetkest ma ks tegema pean hakkama? Kumb siis sm või ks? Tänud juba ette abi eest?

26.02.2022 - 21:19

DROPS Design answered:

Tere Liina! Viga parandatud. Sammas peab olema. Tänan teatamast! Head heegeldamist!

08.03.2022 - 22:28

country flag Femke Welvaadt wrote:

IK haak het jasje Little red riding hood. Achter - en voorpanden gingen prima. Ben nu met de mouwen bezig en die vind ik erg lastig. Klopt het dat de mouwen meteen al een rondje vormen?

10.02.2021 - 19:14

DROPS Design answered:

Dag Femke,

Nee, de mouw wordt heen en weer genaaid en op het einde wordt de onderarmnaad dicht genaaid.

12.02.2021 - 13:19

country flag Anni Kirsten Brænd Fuglehaug wrote:

Lager to jakker str 7/8år. Ermene passer ikke i bolen. Har heklet etter oppskriften, men ermene på 41 cm er altfor små til bolen. Hva har jeg gjort galt?

28.05.2020 - 20:53

DROPS Design answered:

Hei Anni. Er heklefastheten som er oppgitt i oppskriften overholdt? mvh DROPS design

03.06.2020 - 10:41

country flag Ana wrote:

No entiendo cuando dice que se realice los puntos altos 4 y se deja 1 cadena

07.07.2019 - 01:08

DROPS Design answered:

Hola Ana. Si te refieres al inicio de la labor, no trabajamos puntos altos en todas las cadenetas del inicio, se trabajan 4 puntos altos y se salta 1 (se deja sin trabajar 1 punto de cadeneta) y así toda la fila. Esto se hace para que el borde de montaje no quede muy tenso.

10.07.2019 - 23:21

country flag Cindy L Magill wrote:

I am working on the hood which seems to be worked along the right front, back and left front all in rows ...i'm not understanding that part at the end that says sew the hood tog at the top. if it's all connected, what am i sewing together?

31.03.2019 - 00:12

DROPS Design answered:

Dear Mrs Magill, when the hood is finished, you have to fold it double to sew the last row together to close the hood (see this video with this knitted hood where the technique will be the same). Happy knitting!

01.04.2019 - 16:10

country flag TEREASA wrote:

I have finished the sweater except the hood and the trim around front and hood. When doing the hood how do I do the corner where the neck and front side connect

05.03.2019 - 18:05

DROPS Design answered:

Dear Tereasa, start first row on hood from RS on the top corner of the right front piece, work along neckline on right front piece, then along neckline on back piece and along neckline on left front piece = you should have approx. 30 to 40 sts. Turn and adjust the number of sts on next row to 51-61 sts. You should now work from edge on right front piece to edge on left front piece (from RS and opposite from WS). Happy crocheting!

06.03.2019 - 09:10

country flag Antje wrote:

Hallo, ondertussen heb ik mijn fout gevonden en is het voorpand zoals het hoort te zijn. Gelukkig! Bedankt voor uw reactie. Groetjes

26.08.2018 - 21:34

country flag Antje wrote:

Ik ben met dit prachtige vest bezig. Alleen heb ik bij het rechtervoorpand een extra "inham" waar ik gemindert heb (tussen de mouwinzet en schouder) Klopt dit of heb ik wat mis gedaan? Groetjes

20.08.2018 - 11:19

DROPS Design answered:

Dag Antje, Nee, je hebt op het rechtervoorpand geen extra 'inhammen' tov het linkervoorpand. Alle armsgaten zouden er ongeveer hetzelfde uit moeten zien. Door het minderen kan er wel enigszins een verspring in zitten omdat je in stokjes haakt, maar geen inham. Controleer het patroon nog even goed om te kijken of je niet per ongeluk een foutje gemaakt hebt.

23.08.2018 - 20:23