
Popular categories
Looking for a yarn?


|
|||||||||||||||||||
Winter Frost |
|||||||||||||||||||
 |
 |
||||||||||||||||||
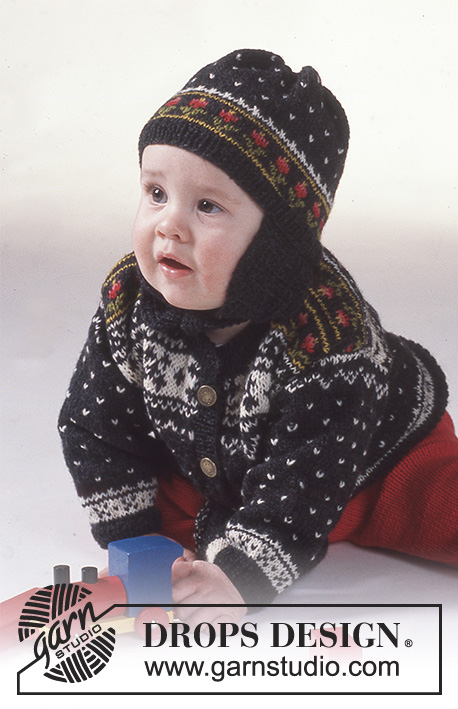
Cardigan in Karisma Superwash with Norwegian pattern. Headband and socks.
DROPS Children 5-2 |
|||||||||||||||||||
|
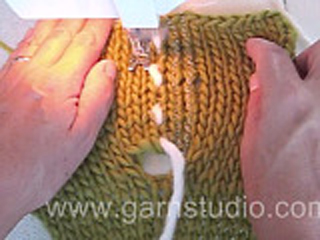
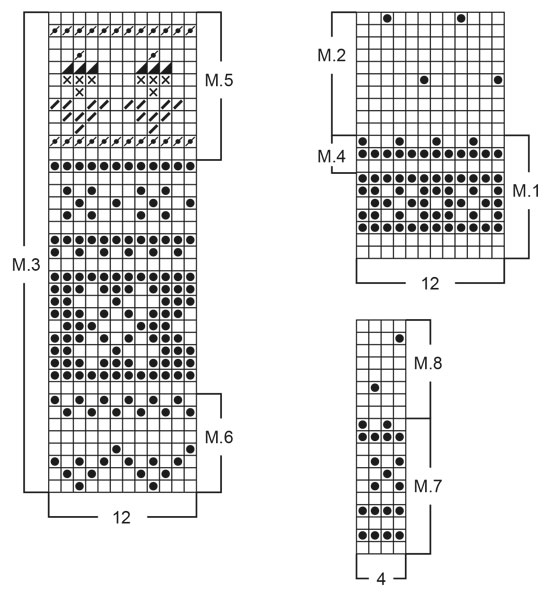
Gauge: 20 sts x 26 rows on larger needles in pattern = 10 x 10 cm . Rib: * K 1, P 1 * Border: K 3 cm stockinette st, P 1 row (= folding edge), 3 cm stockinette st. Pattern: See charts. (1 chart = 1 repeat.) The pattern is seen from the right side and is knit entirely in stockinette st. Body: The cardigan is knit in the round after the rib with steeks for armholes and at the center front. Cast on 132-140 (144-152-160) sts on smaller circular needles with gray and knit 4 cm back and forth on the needles. Change to larger circular needles; join and inc 5 sts at the center front (these sts are for the steek and are not knit into the pattern). Knit Pattern 1, increasing 24-28 (36-40-44) sts evenly distributed on the 1st row = 156-168 (180-192-204) sts (do not increase over the steek sts). After Pattern 1, knit Pattern 2 until the work measures 21-23 (25-27-27) cm . On the next row, inc 5 sts at each side (these sts are for the steek and are not knit into the pattern). Front = 78-84 (90-96-102) sts + 5 steek sts; back = 78-84 (90-96-102) sts; side steeks = 5 sts each. When the work measures 25-28 (32-34-36) cm , knit Pattern 3. When the work measures 36-39 (43-45-47) cm , bind off the center front 28-28 (30-32-32) sts (+ 5 sts) for the neck and knit the rest of the work back and forth on the needles. Bind off on each neck edge every other row: 2 sts 1 time, 1 st 2 times. After Pattern 3 knit the rest with gray. When the work measures 39-42 (46-48-50) cm , bind off the center back 34-34 (36-38-38) sts for the neck and on the next row dec 1 st at each neck edge. Bind off the remaining sts for the shoulders; the work measures 40-43 (47-49-51) cm . Sleeves: Cast on 32-36 (36-36-40) sts on smaller double pointed needles with gray. Join and place a marker at the join. Knit 4 cm rib. Change to larger double pointed needles and knit Pattern 5 once (centering the pattern on the sleeve), increasing 8-4 (8-12-10) sts evenly distributed on the 1st row = 40-40 (44-48-50) sts. After the rib, inc 1 st each side of marker 18-20 (22-20-23) times: Sizes 3/4 + 5/6 + 7/8: every 3rd row Size 9/10: every 4th row Size 11/12: alternately every 3rd and 4th row = 76-80 (88-88-96) sts. After Pattern 5 knit Pattern 4 and then repeat Pattern 2 until the work measures 23-26 (30-33-37) cm . Knit Pattern 6 and then knit the rest with gray. When the work measures 27-30 (34-37-41) cm , knit 2 cm reverse stockinette st for a seam allowance over the cut edge on the body. Bind off. Assembly: Sew a marker thread down into the center of the steek sts at each side. Sew two machine seams around the marker thread, 1st seam = 1/2 st from the marker thread, 2nd seam = 1/2 st from first seam. Cut for armholes and at the center front. Pick up approx. 90-100 sts on smaller needles with gray along the left button band and knit Border. Bind off and fold the edge over double against the wrong side and sew. Repeat along the right button band, but after 1 cm make 6 buttonholes evenly distributed across the row (1 buttonhole = bind off 2 sts and cast on 2 new sts on the next row). Sew shoulder seams. Pick up approx. 84-94 sts around the neck on smaller needles with gray and knit 2 cm stockinette st, change to red, with right side facing knit the next 2 rows (2nd row = folding edge), change to gray, knit 2 cm stockinette st, bind off. Fold the edge over double against the wrong side and sew. Sew the sleeves to the body from the right side as follows: Sew alternately a stitch in the last row of knitting on the sleeve before the seam allowance and a stitch on the body after the machine seam. Turn the sweater inside out and sew the seam allowance from the sleeve over the cut edge on the body by hand. Sew on the buttons. ________________________________________ HEADBAND: Materials: DROPS KARISMA CLASSIC from Garnstudio 100% pure new wool (50 g./120 yards) 50-50 (50-50-50) g col. 53, coal gray 50-50 (50-50-50) g col. 01, natural white + small amounts of other colors remaining from sweater DROPS 4 mm circular or double pointed needles, or size needed to obtain correct gauge. Gauge: 20 sts x 26 rows in stockinette st = 10 x 10 cm . Pattern: See charts (1 chart = 1 repeat). The pattern is seen from the right side and is knit entirely in stockinette st. Headband: Cast on 90-90 (96-96-102) sts with gray; join and place a marker at the join. Knit 5 rows stockinette st, P 1 row on the right side (= folding edge). Then knit for Girl: Pattern 5. Boy: Pattern 4, then 1 row stockinette st, Pattern 6, 1 row stockinette st. Then for both: P 1 row on the right side (= folding edge), 5 rows stockinette st, bind off and weave the cast-on and bind-off edges together. ________________________________________ SOCKS: Foot length of the sock: 17-18 (20-22-24) cm Materials: DROPS KARISMA CLASSIC from Garnstudio 100% pure new wool (50 g./120 yards) 100-100 (150-150-150) g col. 53, coal gray 50-100 (100-100-100) g col. 01, natural white DROPS 2.5 mm and 4 mm double pointed needles, or sizes needed to obtain correct gauge. Gauge: 20 sts x 26 rows on larger needles in stockinette st = 10 x 10 cm . Rib: * K 1, P 1 * Socks: Cast on 44-46 (48-50-52) sts on smaller double pointed needles with gray; join and place a marker at the join. Knit 5 cm rib. Change to larger double pointed needles and knit Pattern 7 once, increasing 0-2 (0-2-0) sts evenly distributed on the 1st row = 44-48 (48-52-52) sts. After Pattern 7 knit and repeat Pattern 8. When the work measures 11-12 (12-13-13) cm , dec 1 st each side of the marker (the center back) 4-5 (4-6-5) times every 4th row = 36-38 (40-40-42) sts. When the work measures 30-32 (34-36-38) cm knit the rest with gray. Heel: Knit 4-4 (5-5-5) cm stockinette st back and forth over 18 sts at the center back (put the remaining 18-20 (22-22-24) on a stitch holder). Turn heel: 1st row: knit 10 sts, K 2 tog into back of st, K 1, turn the work 2nd row: slip 1, P 4, P 2 tog, P 1, turn the work 3rd row: slip 1, K 5, K 2 tog into back of st, K 1, turn the work 4th row: slip 1, P 6, P 2 tog, P 1, turn the work 5th row: slip 1, K 7, K 2 tog into back of st, K 1, turn the work 6th row: slip 1, P 8, P 2 tog, P 1, turn the work 7th row: K 2 tog, K 8, K 2 tog into back of st = 10 sts on the needles. Pick up 8-8 (9-9-9) sts at each side of the heel and put all sts on the same needle = 44-46 (50-50-52) sts. Then dec 1 st on each side of the uppermost 18-20 (22-22-24) sts 3-3 (3-3-3) times every other row = 38-40 (44-44-46) sts - (If the child has a slender foot dec 1 st 5 times instead). When the foot measures 13-14 (16-18-20) cm from the beginning of the heel turning), bind off for the toe. Place a marker at each side, dec 1 st on each side of the marker (4 decs per row) 7-8 (9-9-9) times alternately every row and every other row. Pull a doubled strand of yarn through remaining 10-8 (8-8-10) sts and sew. |
|||||||||||||||||||
Diagram explanations |
|||||||||||||||||||
|
|||||||||||||||||||
|
|||||||||||||||||||

|
|||||||||||||||||||
|
Have you made this or any other of our designs? Tag your pictures in social media with #dropsdesign so we can see them! Do you need help with this pattern?You'll find tutorial videos, a Comments/Questions area and more by visiting the pattern on garnstudio.com. © 1982-2024 DROPS Design A/S. We reserve all rights. This document, including all its sub-sections, has copyrights. Read more about what you can do with our patterns at the bottom of each pattern on our site. |
|||||||||||||||||||


With over 40 years in knitting and crochet design, DROPS Design offers one of the most extensive collections of free patterns on the internet - translated to 17 languages. As of today we count 304 catalogues and 11422 patterns - 11422 of which are translated into English (UK/cm).
We work hard to bring you the best knitting and crochet have to offer, inspiration and advice as well as great quality yarns at incredible prices! Would you like to use our patterns for other than personal use? You can read what you are allowed to do in the Copyright text at the bottom of all our patterns. Happy crafting!
Comments / Questions (4)
Hej,\r\nSka sticka minsta storlek av denna och behöver:\r\nGarn: Grå, vit, gul samt rundsticka 3\r\n\r\nKan ni hjälpa mig att exakt skriva vad/hur jag ska beställa?
05.09.2023 - 14:11Finns det mönster på denna kofta även för vuxna?
06.08.2020 - 18:48DROPS Design answered:
Hei Carina. Vi har ikke mønster akkurat lik, men ta en titt i katalog 47 og 52 så finner du kanskje noen du syns ligner og som du liker. God Fornøyelse!
10.08.2020 - 11:21Mønsteret blir ikke likt på begge sider av stolpen. Skal det være sånn??
27.08.2018 - 13:51DROPS Design answered:
Hei Eva. Mønsteret går opp i hele rapporter på omgangen, så på den ene siden av stolpen vil mønsteret se ut som diagrammene lest fra høyre mot vensteret, mens på den andre siden vil mønsteret se ut som diagrammene lest fra venstre mot høyre. Hadde ikke stolpen vært der ville de altså passet sammen. Du strikker ikke mønster over stolpen og de maskene som legges opp til å klippe ermer i. God fornøyelse
31.08.2018 - 08:43This is definitely an'Eric' pattern!
16.11.2013 - 20:19