
Popular categories
Looking for a yarn?


|
|
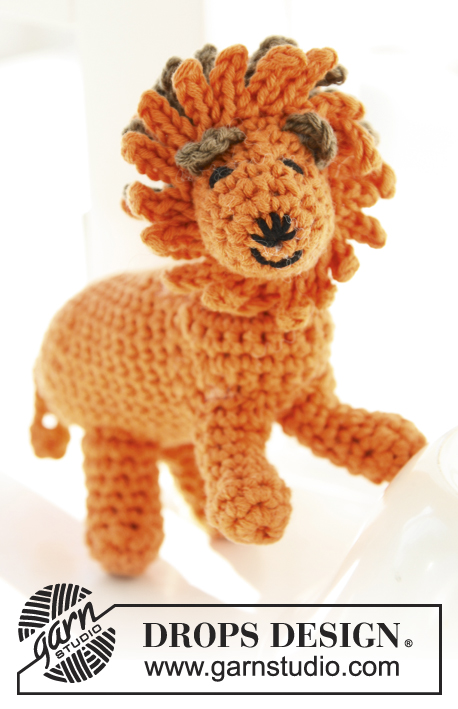
Mufasa |
|
 |
 |
Crochet lion in DROPS Safran or DROPS Paris
DROPS Children 24-10 |
|
|
FILLING TIP: Gradually fill some cotton wool in the animal when working. CROCHET TIP: Beg every dc round with 1 ch (this does not replace first dc) and finish with 1 sl st in first dc from beg of round. Turn every dc row with 1 ch - this ch does not replace first dc on row. DECREASE TIP: Dec 1 dc by working 2 sts tog. This is done as follows: Insert hook in first st and pull thread through, insert hook in next st and pull thread through, make 1 YO and pull thread through all 3 sts on hook. ---------------------------------------------------------- SMALL LION: Piece is worked from back of body and to and with head. Then work fur around the head, ears, legs and tail separately and fasten. READ FILLING TIP! BODY AND HEAD: Work 4 ch on hook size 3 mm with orange and form a ring with 1 sl st in first ch. READ CROCHET TIP! ROUND 1: Work 6 dc in ch-ring - round beg mid under on lion. ROUND 2: Work 2 dc in every dc = 12 dc. ROUND 3: Work * 1 dc in first dc, 2 dc in next dc *, repeat from *-* the entire round = 18 dc. ROUND 4: Work * 1 dc in each of the first 2 dc, 2 dc in next dc *, repeat from *-* the entire round = 24 dc. ROUND 5-14: Work 1 dc in every dc. Then work 1 dc in each of the first 10 dc, turn piece with 1 ch - now work back and forth in one for chest. ROW 15 (WS): Skip the first 2 dc, work 1 dc in each of the next 16 dc, turn with 1 ch. ROW 16 (RS): Skip the first 2 dc, work 1 dc in each of the next 13 dc, turn with 1 ch. ROW 17 (WS): Skip the first 2 dc, work 1 dc in each of the next 10 dc, turn with 1 ch. ROW 18 (RS): Skip the first 2 dc, work 1 dc in each of the next 7 dc, turn with 1 ch. ROW 19 (WS): Skip the first 2 dc, work 1 dc in each of the next 4 dc, turn with 1 ch. ROW 20 (RS): Skip first dc, then work 7 dc, turn with 1 ch. ROW 21 (WS): Skip first dc, then work 10 dc, turn with 1 ch. ROW 22 (RS): Skip first dc, then work 13 dc, turn with 1 ch. ROW 23 (WS): Skip first dc, then work 16 dc, turn with 1 ch, then work in the round again. ROUND 24: Work 22 dc the entire round (now rounds beg mid on top of neck). ROUND 25: Work the first 8 dc tog 2 by 2 – READ DECREASE TIP! Then work 1 dc in each of the next 6 dc, then work the last 8 dc tog 2 by 2 = 14 dc. ROUND 26: Work 2 dc in each of the first 3 dc, then 1 dc in each of the next 8 dc and 2 dc in each of the last 3 dc = 20 dc, then work 1 dc in each of the first 9 dc, turn with 1 ch – now work back and forth in one for head. ROW 27 (WS): Skip the first 2 dc, work 1 dc in each of the next 15 dc, turn with 1 ch. ROW 28 (RS): Skip the first 2 dc, work 1 dc in each of the next 12 dc, turn with 1 ch. ROW 29 (WS): Skip the first 2 dc, work 1 dc in each of the next 9 dc, turn with 1 ch. ROW 30 (RS): Skip the first 2 dc, work 1 dc in each of the next 6 dc, turn with 1 ch. ROW 31 (WS): Skip the first 2 dc, work 1 dc in each of the next 3 dc, turn with 1 ch. ROW 32 (RS): Skip first dc, then work 6 dc, turn with 1 ch. ROW 33 (WS): Skip first dc, then work 9 dc, turn with 1 ch. ROW 34 (RS): Skip first dc, then work 12 dc, turn with 1 ch. ROW 35 (WS): Skip first dc, then work 15 dc, turn with 1 ch, then work in the round again. ROUND 36: Work 21 dc in the round. ROUND 37: Work 1 dc in every dc – insert 1 marker in this round (marks where the mane is worked later). ROUND 38: Work 1 dc in every dc. ROUND 39: * Work the first 2 dc tog, then 1 dc in next dc *, repeat from *-* the entire round = 14 dc. ROUND 40: Work 1 dc in every dc. ROUND 41: Work 1 dc in every dc while at the same time dec 4 dc evenly = 10 dc. ROUND 42: Work 1 dc in every dc. ROUND 43: Work 2 and 2 dc tog the entire round, cut the yarn, baste it around the opening at the front of snout and tighten tog. HIND LEGS: Work 4 ch with orange and form a ring with 1 sl st in first ch. ROUND 1: Work 6 dc in ch-ring. ROUND 2: Work 2 dc in every dc = 12 dc. ROUND 3: Work 1 dc in each of the first 3 dc, then work the next 6 dc tog 2 by 2 – SEE DECREASE TIP, then work 1 dc in each of the last 3 dc = 9 dc. ROUND 4-6: Work 1 dc in every dc. ROUND 7: Work 2 dc in first dc, 1 dc in each of the next 7 dc and 2 dc in last dc = 11 dc. ROUND 8: Work 2 dc in first dc, 1 dc in each of the next 9 dc and 2 dc in last dc = 13 dc. Fasten off. Work another hind leg. Fill them with some cotton wool and fasten to the back of body with the paws pointing forwards. FORE LEGS: Work 4 ch with orange and form a ring with 1 sl st in first ch. ROUND 1: Work 5 dc in ch-ring. ROUND 2: Work 2 dc in every dc = 10 dc. ROUND 3: Work 1 dc in each of the first 2 dc, then work the next 6 dc tog 2 by 2 – SEE DECREASE TIP, then work 1 dc in each of the last 2 dc = 7 dc. ROUND 4-6: Work 1 dc in every dc. ROUND 7: Work 2 dc in first dc, 1 dc in each of the next 5 dc and 2 dc in last dc = 9 dc. ROUND 8: Work 2 dc in first dc, 1 dc in each of the next 7 dc and 2 dc in last dc = 11 dc. Fasten off. Work another fore leg. Fill them with some cotton wool and fasten to the front of body with the paws pointing forwards. TAIL: Work 10 ch with orange, turn and work 2 tr in 3rd ch from hook, then work 2 ch, fasten with 1 sl st in same ch where the 2 tr was worked, then work 1 dc in each of the last 7 ch. Fasten off and fasten the tail to the back of body so that it hangs down. MANE ON HEAD: ROW 1: Work with orange as follows in the 37th round around the head: 1 dc in first dc, * 5 ch, then 1 sl st in 2nd ch from hook and 1 sl st in each of the last 3 ch, fasten with 1 dc in next dc on round *, repeat from *-* around the whole head, fasten off. ROW 2: Now only work along the upper half of head, beg in the side, 2 rounds behind the previous round worked. Work with light brown as follows: 1 dc in first dc, * 5 ch, then 1 sl st in 2nd ch from hook and 1 sl st in each of the last 3 ch, fasten with 1 dc in next dc on round *, repeat from *-* around the other side of head, fasten off. ROW 3: Work in 2nd row behind the previous row worked, now work with orange the same way as on 2nd row. EARS: Work 4 ch with light brown, then work 1 tr in the first ch made, fasten off. Work another ear and sew them on top of the head. Embroider eyes, snout and mouth with black. ---------------------------------------------------------- LARGE LION: Work as small lion, but on hook size 4 mm with Paris. Replace orange with light yellow and replace light brown with dark beige. |
|
|
Have you made this or any other of our designs? Tag your pictures in social media with #dropsdesign so we can see them! Do you need help with this pattern?You'll find tutorial videos, a Comments/Questions area and more by visiting the pattern on garnstudio.com. © 1982-2024 DROPS Design A/S. We reserve all rights. This document, including all its sub-sections, has copyrights. Read more about what you can do with our patterns at the bottom of each pattern on our site. |
|


With over 40 years in knitting and crochet design, DROPS Design offers one of the most extensive collections of free patterns on the internet - translated to 17 languages. As of today we count 304 catalogues and 11422 patterns - 11422 of which are translated into English (UK/cm).
We work hard to bring you the best knitting and crochet have to offer, inspiration and advice as well as great quality yarns at incredible prices! Would you like to use our patterns for other than personal use? You can read what you are allowed to do in the Copyright text at the bottom of all our patterns. Happy crafting!
Comments / Questions (13)
Hej, (mönster Mufasa) från varv 15 ska man jobba med 18 m (Hoppa över de 2 första fm, virka 1 fm i var och en av de 16 nästa fm) Var finns de 18 maskorna? Fr.o.m. varv 5 finns det 24 m och då ska man bara jobba med 10 m för bröstkorgen, det förstår jag, men från varv 15 ska man jobba med 18m, vilka 18m menar ni? Det är ju 24 runt och om jag tar bort de 10 till bröstkorg så blir det bara 14 kvar att jobba med.
04.12.2021 - 19:31DROPS Design answered:
Hei Carina. Du har 24 fastmasker på omgangen, men nå skal det hekles rader frem og tilbake et stykke til brystkasse. Hekle 10 fastmasker, SNU arbeidet med 1 luftmaske og deretter hekles det slik: 15.RAD (vrangen): Hopp over de 2 første fm, hekle 1 fm i hver av de 16 neste fm, SNU med 1 lm. 16.RAD (retten): Hopp over de 2 første fm, hekle 1 fm i hver av de neste 13 fm, SNU med 1 lm. Les i oppskriften hvordan det hekles videre. mvh DROPS Design
07.12.2021 - 13:25Où trouver les explications d'un ancien modèle de veste pour femme Drops ? Veste en laine, modèle Drops, tricotée en Eskimo Tweed, aux aiguilles numéro 8 ? Je sais que Eskimo est remplacé par Snow mais comment avoir les explications ?
08.03.2021 - 19:24DROPS Design answered:
Bonjour Nathalie, retrouvez tous nos modèles de gilets et veste femme tricotés en DROPS Snow ici - ne s'agirait-il pas du modèle Tweed on the town ? Bon tricot!
09.03.2021 - 07:32Où trouver les explications d'un ancien modèle de gilet pour femme Drops ?
08.03.2021 - 19:16DROPS Design answered:
Bonjour Mme Guittard, si vous connaissez le numéro ou son nom, vous pouvez l'indiquer dans la case concernée du moteur de recherche de notre page d'accueil - sinon, vous pouvez retrouvez tous nos modèles de gilets femme ici - filtrez les résultats pour affiner la recherche. Bon tricot!
09.03.2021 - 07:30Ce modèle n'est pas vraiment facile. C'est pire qu'un sudoku :) :) même avec les explications des pcédentes crocheuteuses. le tour 24 fait bien 22 ms (il comprend bien les 16 ms. Je n'arrive pas du tout à m'imaginer la "bestiole". . Merci d'avance
20.04.2020 - 15:57DROPS Design answered:
Bonjour Vanessa, tout à fait le tour 24 fait bien 22 ms. Parfois, tout prend son sens quand on a les mailles sous les yeux, en suivant pas à pas les explications, votre lion va prendre forme petit à petit. Pour toute assistance individuelle complémentaire, n'hésitez pas à contacter le magasin où vous avez acheté votre laine, même par mail ou téléphone. Bon crochet!
20.04.2020 - 16:38Bonjour, je ne comprends pas à partir soir au rang 5 à 14 , fait-on en rond 24 m ? ou seulement 10 m que nous faisons en aller retour ? ensuite pour le rang 15 vous dites : Sauter les 2 premières ms, 1 ms dans chacune des 16 ms suivantes, 1 ml pour tourner. mais où fait-on les augmentations ? je ne comprend pas trop Merci d'avance
17.04.2020 - 15:06DROPS Design answered:
Bonjour Vanessa, du tour 5 au tour 14, vous crochetez 1 ms dans chaque ms. Quand le tour 14 est fait, crochetez 1 ms dans chacune des 10 premières ms du tour, puis 1 maille en l'air, tournez et crochetez maintenant le poitrail en rangs, on a décalé le début des rangs pour que le poitrail soit situé au bon endroit. Aux rangs 15 à 19, vous sautez simplement les 2 premières ms sans les crocheter, aux rangs 20 à 23 vous sautez la 1ère ms et vous continuez en rond à partir du rang 23. Bon crochet!
17.04.2020 - 15:43Merci pour votre réponse mais je ne comprends toujours pas très bien. Je ne fais pas la différence entre rang précédent et rangs précédents. A la fin du rang 23, j'ai un poitrail de 16m, quand vous parlez de tour de 22 m, le poitrail en fait-il partie ? d'avance merci pour votre réponse.
22.02.2016 - 17:23DROPS Design answered:
Bonjour Fanchon, tout à fait, le rang 23 se fait sur l'envers, tournez et crochetez le tour 24 sur l'endroit: 1 m dans les 16 m du rang 23 + 6 ms réparties le long des rangs précédents pour terminer en rond par 1 mc dans la 1ère ms du tour. Bon crochet!
23.02.2016 - 08:43Tout va bien jusqu'au rang 24 mais après, je suis perdue. Merci
21.02.2016 - 19:34DROPS Design answered:
Bonjour Fanchon, au tour 24, crochetez de nouveau en rond (sur l'endroit), 1 m dans chaque m du rang précédent + 1 m dans chaque début/fin des rangs précédents (ajustez si nécessaire le nbe de mailles pour bien avoir 22 ms à la fin de ce tour). Bon crochet!
22.02.2016 - 10:47Möchte den Löwen häkeln. Verstehe nicht die Anleitung ab der 20 Reihe. Wie kann ich aufeinmal wieder 7 fM stricken wenn nur noch 4 fM da sind? Sehr verwirrend. Viele Grüße Monika Schenk
23.01.2016 - 13:58DROPS Design answered:
Sie können in die fM der darunterliegenden R häkeln. Mit den verkürzten Reihen häkeln Sie ja den Brustkorb, danach geht es dann nach und nach wieder über alle M der Rd weiter.
02.02.2016 - 13:1524.omg: hækl 22 fm hele vejen rundt ( omg starter nu midt ovenpå nakken) Hvordan kan det være midt ovenpå nakken, da jeg lige har hæklet brystkassen (frem og tilbage) og slutter den af med de 22 fm?
30.08.2015 - 21:39DROPS Design answered:
Hej LiseLotte, du må om i nakken inden du häkler de 8 fm sammen 2 og 2. God fornöjelse!
04.09.2015 - 13:01Leijonasta : Nyt en ymmärrä ? Mihin lisätään 19 kerroksessa ne 7 silmukkaa kerroksella 20 ??? On vain ne neljä silmukkaa ?
11.03.2015 - 12:04DROPS Design answered:
Voisitko vielä tarkentaa kysymystä? Lisäykset aloitetaan heti kjs-renkaassa.
12.03.2015 - 16:06