
Popular categories
Looking for a yarn?


|
|
Princess Petal |
|
 |
 |
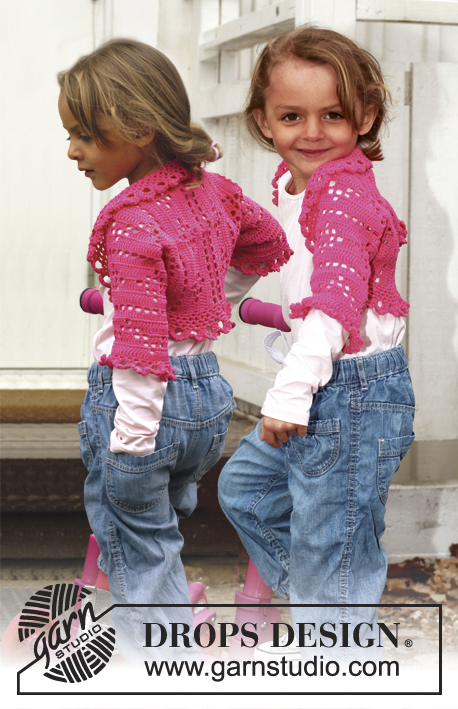
Circle jacket crocheted in 2 threads DROPS BabyAlpaca Silk. Size children 3 - 12 years.
DROPS Children 24-1 |
|
|
STRIPES - BODY: Worked in a circle from mid back. Beg with 2 strands of colour 4088. Continue as follows: 3-3-4-4 rounds with 2 strands of colour 4088. 3-3-4-4 rounds with 1 strand of colour 4088 + 1 strand of colour 3250. 3-4-4-4 rounds with 2 strands of colour 3250. 4-4-4-5 rounds with 1 strand of colour 3250 + 1 strand of colour 3125. 4-4-4-5 rounds with 2 strands of colour 3125. 3-4-4-4 rounds/rows with 1 strand of colour 3125 + 1 strand of colour 0100. 3-3-5-5 rows with 2 strands of colour 0100. STRIPES - SLEEVE: Worked from sleeve cap and down in stripes as follows: Beg with 1 strand of colour 3250 + 1 strand of colour 3125. Work 9-10-11-12 cm with this colour combination. Continue with 9-10-11-12 cm with 2 strands of colour 3250 and 10-10-11-12 cm with 1 strand of colour 4088 + 1 strand of colour 3250. Then finish the sleeve with 2 strands of colour 4088 = approx. 10-11-12-12 cm. CROCHET INFO: Replace first tr on every round/row with 3 ch. Finish every round with 1 sl st in 3rd ch from beg of round. DECREASE TIP 1 (applies to body): Dec as follows: Work tr until 3 tr remain, * in the first of these work 1 htr, in the next 1 dc and in the last 1 sl st, turn with 1 ch, skip sl st, work 1 sl st in dc, 1 dc in htr, 1 htr in first tr, continue with tr until 3 tr remain at the end of row *, repeat from *-* until 6-7-7-7 rows have been worked in total. DECREASE TIP 2 (applies to sleeves): Dec 1 tr at beg and end of row by working the second and third tr tog and the 2 next to last tr tog, this is done as follows: Work 1 tr in first tr but wait with last pull through, work 1 tr in next tr but on last pull through, pull thread through all 3 loops on hook. -------------------------------------------------------- BODY: Worked in the round in a circle from mid back with 2 strands and STRIPES – see explanation above. Crochet 5 ch on hook size 5 mm and form a ring with 1 sl st in first ch. READ CROCHET INFO! ROUND 1: 12 tr in ch-ring. ROUND 2: 1 tr, * 2 ch, 1 tr in next tr *, repeat from *-* the entire round, finish with 2 ch and 1 sl st in 1st tr = 12 tr with 2 ch between each. ROUND 3: 1 tr in every tr and 2 tr in every ch-space the entire round = 36 tr. ROUND 4: * 1 tr in each of the first 2 tr, 2 tr in next tr *, repeat from *-* the entire round = 48 tr. ROUND 5: 1 tr, * 2 ch, skip 1 tr, 1 tr in next tr *, repeat from *-* the entire round, finish with 2 ch and 1 sl st in 1st tr = 24 tr with 2 ch between each. ROUND 6: 1 tr in every tr and 2 tr in every ch-space the entire round = 72 tr. ROUND 7: Work 1 tr in every tr but in every 6th tr work 2 tr = 84 tr. ROUND 8: Work 1 tr in every tr but in every 7th tr work 2 tr = 96 tr. ROUND 9: Work 1 tr in every tr but in every 8th tr work 2 tr = 108 tr. ROUND 10: Work 1 tr in every tr but in every 9th tr work 2 tr = 120 tr. ROUND 11: Work 1 tr in every tr but in every 10th tr work 2 tr = 132 tr. Piece measures approx. 14 cm from centre and outwards. SIZE 3/5 YEARS: ROUND 12: Work 1 tr in each of the first 30 tr (= up towards neck), work 22 loose ch, skip the next 20 tr (= armhole), then work 1 tr in each of the next 62 tr (= down towards back), work 22 loose ch, skip the next 20 tr (= armhole) and fasten with 1 sl st in first tr at beg of round. ROUND 13: Work 1 tr in each of the first 30 tr but inc 2 tr evenly (= 32 tr), then work 22 tr in ch-row over armhole, work 1 tr in each of the next 62 tr but inc 2 tr evenly (= 64 tr), work 22 tr in ch-row over armhole, and fasten with 1 sl st in first tr at beg of round = 140 tr. ROUND 14 to 17: Continue with tr – at the same time inc 10 tr evenly on every round. After 17th round there are 180 tr on round and piece measures approx. 21 cm from centre and outwards. Fasten off. Then work only over 60 tr in each side - i.e. the 30 tr at the top by neck and the 30 tr at the bottom of back are no longer worked. Continue with explanation below front piece. SIZE 6/8 YEARS: ROUND 12: Work 1 tr in every tr but in every 11th tr work 2 tr = 144 tr. ROUND 13: Work 1 tr in each of the first 35 tr (= up towards neck), work 23 loose ch, skip the next 21 tr (= armhole), then work 1 tr in each of the next 67 tr (= down towards back), work 23 loose ch, skip the next 21 tr (= armhole) and fasten with 1 sl st in first tr at beg of round. ROUND 14: Work 1 tr in each of the first 35 tr but inc 3 tr evenly (= 38 tr), then work 23 tr in ch-row over armhole, work 1 tr in each of the next 67 tr but inc 3 tr evenly (= 70 tr), work 23 tr in ch-row over armhole, and fasten with 1 sl st in first tr at beg of round = 154 tr. ROUND 15 to 19: Continue with tr – at the same time inc 10 tr evenly on every round. After 19th round there are 204 tr on round and piece measures approx. 23 cm from centre and outwards. Fasten off. Then work only over 68 tr in each side - i.e. the 34 tr at the top by neck and the 34 tr at the bottom of back are no longer worked. Continue with explanation below front piece. SIZE 9/10 YEARS: ROUND 12: Work 1 tr in every tr but in every 11th tr work 2 tr = 144 tr. ROUND 13: Work 1 tr in every tr but in every 12th tr work 2 tr = 156 tr. ROUND 14: Work 1 tr in each of the first 38 tr (= up towards neck), work 25 loose ch, skip the next 23 tr (= armhole), then work 1 tr in each of the next 72 tr (= down towards back), work 25 loose ch, skip the next 23 tr (= armhole) and fasten with 1 sl st in first tr at beg of round. ROUND 15: Work 1 tr in each of the first 38 tr but inc 3 tr evenly (= 41 tr), then work 25 tr in ch-row over armhole, work 1 tr in each of the next 72 tr but inc 3 tr evenly (= 75 tr), work 25 tr in ch-row over armhole, and fasten with 1 sl st in first tr at beg of round = 166 tr. ROUND 16 to 21: Continue with tr – at the same time inc 10 tr evenly on every round. After 21st round there are 226 tr on round and piece measures approx. 26 cm from centre and outwards. Fasten off. Then work only over 74 tr in each side - i.e. the 39 tr at the top by neck and the 39 tr at the bottom of back are no longer worked. Continue with explanation below front piece. SIZE 11/12 YEARS: ROUND 12: Work 1 tr in every tr but in every 11th tr work 2 tr = 144 tr. ROUND 13: Work 1 tr in every tr but in every 12th tr work 2 tr = 156 tr. ROUND 14: Work 1 tr in every tr but in every 13th tr work 2 tr = 168 tr. ROUND 15: Work 1 tr in each of the first 42 tr (= up towards neck), work 27 loose ch, skip the next 25 tr (= armhole), then work 1 tr in each of the next 76 tr (= down towards back), work 27 loose ch, skip the next 25 tr (= armhole) and fasten with 1 sl st in first tr at beg of round. ROUND 16: Work 1 tr in each of the first 42 tr but inc 4 tr evenly (= 46 tr), then work 27 tr in ch-row over armhole, work 1 tr in each of the next 76 tr but inc 4 tr evenly (= 80 tr), work 27 tr in ch-row over armhole, and fasten with 1 sl st in first tr at beg of round = 180 tr. ROUND 17 to 23: Continue with tr – at the same time inc 10 tr evenly on every round. After 23rd round there are 250 tr on round and piece measures approx. 28 cm from centre and outwards. Fasten off. Then work only over 83 tr in each side - i.e. the 42 tr at the top by neck and the 42 tr at the bottom of back are no longer worked. Continue with explanation below front piece. LEFT FRONT PIECE - ALL SIZES: = 60-68-74-83 tr. Insert 1 marker after 18-20-22-24 sts in from each side (= 24-28-30-35 sts between markers). Then work stripes and tr back and forth while AT THE SAME TIME inc 1 st at each marker on every row (i.e. inc 2 tr on row - inc alternately before and after each marker outwards) until a total of 6-6-8-8 rows have been worked back and forth AT THE SAME TIME work according to DECREASE TIP 1. Fasten off. RIGHT FRONT PIECE: Work same way as on left front piece over 60-68-74-83 tr in right side. SLEEVE: Worked back and forth from sleeve cap and down - see STRIPES - SLEEVE above. Work 24-27-28-34 LOOSE ch with 1 strand of colour 3250 + 1 strand of colour 3125. ROW 1: Turn and work 1 tr in 4th ch from hook (the first 3 ch = 1 tr), then work 1 tr in every ch the entire row = 22-25-26-32 tr. Turn piece. ROW 2: Work 3 ch + 2 tr in first tr, 1 tr in every tr until last tr and 3 tr in last tr = 26-29-30-36 tr. Turn piece. ROW 3: Work 3 ch + 1 tr in first tr, 1 tr in every tr until 1 tr remains and 2 tr in last tr. Turn piece. Work 1-1-2-2 more rows as 3rd row = 30-33-36-42 tr. NEXT ROW: Work 3 ch + 2 tr in first tr, 1 tr in every tr until last tr and 3 tr in last tr = 34-37-40-46 tr. Turn piece. Now work 1 tr in every tr until piece measures 7-8-9-10 cm. Continue with tr while AT THE SAME TIME dec 1 tr in each side - SEE DECREASE TIP! Repeat dec every 8th-6th-5th-4th row 2-3-4-6 more times = 28-29-30-32 tr. Continue with 1 tr in every tr until sleeve measures 38-41-45-48 cm. Fasten off. ASSEMBLY: Sew sleeve seams edge to edge to avoid a chunky seam. Work 1 round around the entire body as follows with 2 strands of colour 0100: 1 sl st in first st, * 3 ch, 1 tr in first ch (= 1 picot), skip 1 tr, fasten with 1 dc in next st *, repeat from *-* the entire round and finish with 1 sl st in first sl st. Sew sleeves in body - make sure that sleeve cap is sewn in at the top of armholes, i.e. where the distance is shortest. Work an edge around the sleeves the same way as around body but with 2 strands of colour 4088. |
|

|
|
|
Have you made this or any other of our designs? Tag your pictures in social media with #dropsdesign so we can see them! Do you need help with this pattern?You'll find tutorial videos, a Comments/Questions area and more by visiting the pattern on garnstudio.com. © 1982-2024 DROPS Design A/S. We reserve all rights. This document, including all its sub-sections, has copyrights. Read more about what you can do with our patterns at the bottom of each pattern on our site. |
|


With over 40 years in knitting and crochet design, DROPS Design offers one of the most extensive collections of free patterns on the internet - translated to 17 languages. As of today we count 304 catalogues and 11422 patterns - 11422 of which are translated into English (UK/cm).
We work hard to bring you the best knitting and crochet have to offer, inspiration and advice as well as great quality yarns at incredible prices! Would you like to use our patterns for other than personal use? You can read what you are allowed to do in the Copyright text at the bottom of all our patterns. Happy crafting!
Comments / Questions (134)
Ærmerne sidder ikke pænt! Rygstykket buer udad (rund) og forstykket buer indad, så derfor bliver der en bule på ærmet mod ryggen, når man skal sy i yderste masker. Kan det ikke gøres bedre? Kan man måske samle masker op rundt i ærmegabet i stedet for?
04.11.2016 - 11:42DROPS Design answered:
Hej Magda. Hvis det ikke passer paa din model, saa kan du naturligvis altid bruge en anden methode som du synes er paenere :)
04.11.2016 - 14:32Hi, I am at the end of the left front piece in a size 9/10. The total number of rows under the Left Front direction paragraph says 8. But the Decrease Tip 1 directions says total rows 7 for the same size. Please tell me which is correct and the stitch count for the last row would be helpful. Perhaps the number of DC would be the most helpful. Thanks.
27.09.2016 - 04:04DROPS Design answered:
Dear Sis, in size 9/10 years, you will dec and inc for 7 rows and on 8th row, only inc at markers. Happy crocheting!
29.09.2016 - 13:24Maria Victoria Estay wrote:
Please please help me! I have just finished the Body (size 3/5 years) and I have 180 tr. I can not figure out the front piece. "insert 1 marker after 18 sts from each side" Which sides?? Left and right from fastening off at row 17? And how an I going to increase before each stitch marker if I am going to increase? I am so confused!
07.06.2016 - 14:14DROPS Design answered:
Dear mrs Estay, when body part is finished, fold piece double so that armholes match and insert markers to locate sleeve sts, ie you will leave unworked the 30 sts on the top and the 30 sts on the bottom and each front piece will be worked over the 60 sts between these markers. Then add 2 markers: 1 after the 18 first sts and 1 before the 18 last sts and inc every row alternately before/after the markers, at the same time dec as explained under "Decreasing tip 1". Happy crocheting!
07.06.2016 - 16:54Chanelle wrote:
Hi, I am having trouble understanding how to complete the front piece. I understand where I need to place the markers, however I don't quite understand what I'm supposed to do from there or how many rows I should end up with. I am making the size 9/10 years. Am I supposed to dc in each side and then reduce to 60?
29.05.2016 - 11:12DROPS Design answered:
Dear Chanelle, in size 9/10 years you will crochet a total of 8 rows inc 2 sts per row and dec at the same time as under "Decrease tip 1". Happy crocheting!
30.05.2016 - 09:54Hallo liebes Dropsteam Ich häkel gerade die Jacke, komme jedoch bei den Ärmeln nicht weiter. Habe es jetzt schon mehrmals versucht aber meine Ärmel sind jedesmal zu klein für den Ausschnitt an der Jacke. Gibt es da auch eine Möglichkeit, das ich die Ärmel direkt an die Jacke häkeln kann also in Rundenreihen häkel? Liebe Grüße Nicole
17.05.2016 - 20:13DROPS Design answered:
Liebe Nicole, Sie können die Ärmel gerne direkt anhäkeln, wenn Sie das möchten.
18.05.2016 - 16:26Are the sleeves worked separately and added on to the body, or are they a continuation from the body? I am a bit confused on where to start. Thank you.
16.05.2016 - 19:18DROPS Design answered:
Dear Lou Ann, sleeves are worked top down separately from body and are then sewn to body. Happy crocheting!
17.05.2016 - 10:59"inc 1 st at each marker on every row (i.e. inc 2 dc on row - inc alternately before and after each marker outwards) " I do not understand the inc alternately before AND after each marker. Would that mean an increase in both or just one at the marker?
11.05.2016 - 18:32DROPS Design answered:
Dear Lou Ann, work 1 row while inc before both markers, 1 row inc after both markers, and repeat these 2 rows: 2 sts inc every row, alternately before and after markers. Happy crocheting!
12.05.2016 - 08:31In welke kleur haak ik de voorpanden? Is dit dan volgens het strepen patroon van het lijf? Dat zou dan betekenen dat alles in de kleur 4088 gehaakt wordt klopt dat? Hoeveel rijen moet ik haken en hoeveel stk moet ik hebben tot ik moet gaan minderen?
26.04.2016 - 14:02DROPS Design answered:
Hoi Wik. Ja, je haakt door volgens de STREPEN-LIJF (de voorpanden komen in "verlenging" van het lijf). Er staat hoeveel toeren je moet haken voor elke kleur en aantal stk, plaatsen van markeerders enzovoort staat allemaal in het patroon onder LINKER VOORPAND - ALLE MATEN.
26.04.2016 - 14:20The sleeve is confusing to me. I get the first 2 rows but then in the row 3 don't understand. What does the Work 1-1-2-2 more rows as 3rd row mean please?
17.04.2016 - 18:49DROPS Design answered:
Dear Sonita, for the sleeves, you've to work the three rows as indicated and then you have to repeat the third row: for example, if you're crocheting size 9/10 you've to repeat row 3 two more times and so on. Happy crocheting!
18.04.2016 - 10:45Hello. For some reason the armhole opening is larger than the top of my sleeve. I checked all of my stitch counts. Can't figure out why this isn't working. I'd appreciate any help. Thanks. Kristi
09.04.2016 - 01:07DROPS Design answered:
Dear Mrs Kilbride, the sleeve is worked top down, with some inc for the sleeve cap - check your number of rows and increase done for the cap before the dec on each side. Happy crocheting!
11.04.2016 - 10:21