
Popular categories
Looking for a yarn?


|
|
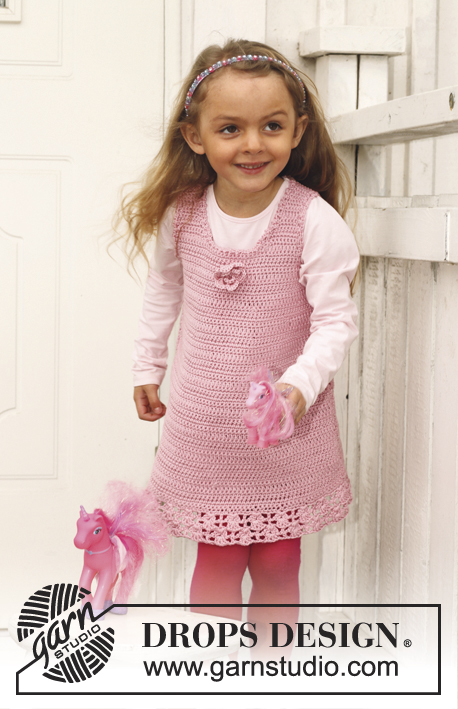
Princess Petal |
|
 |
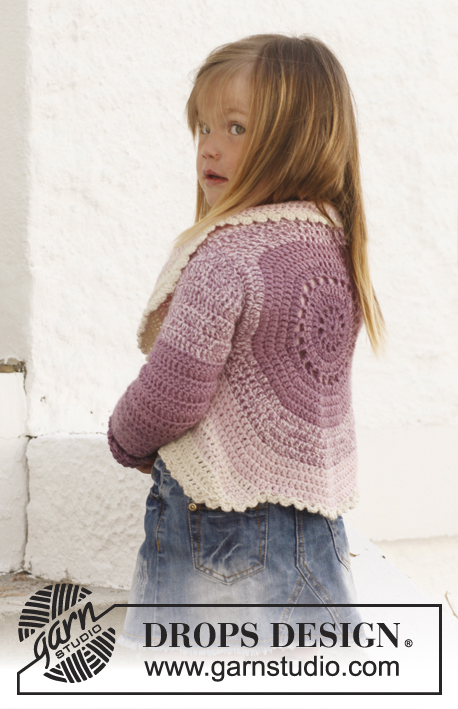 |
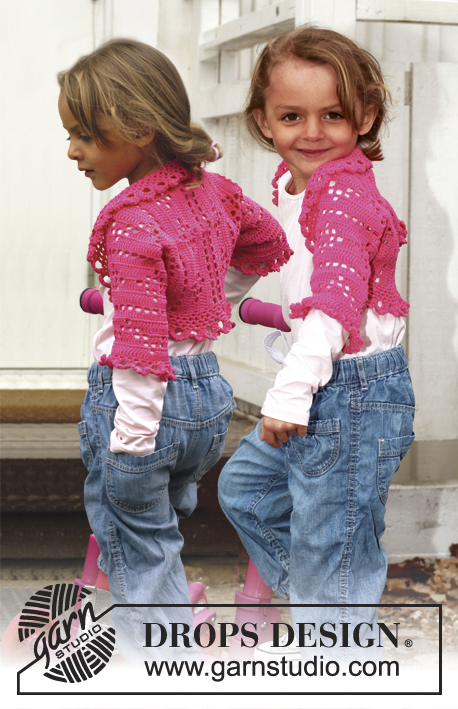
Circle jacket crocheted in 2 strands DROPS BabyAlpaca Silk. Size children 3 - 12 years.
DROPS Children 24-1 |
|
|
STRIPES - BODY: Worked in a circle from mid back. Beg with 2 strands of color 4088. Continue as follows: 3-3-4-4 rounds with 2 strands of color 4088. 3-3-4-4 rounds with 1 strand of color 4088 + 1 strand of color 3250. 3-4-4-4 rounds with 2 strands of color 3250. 4-4-4-5 rounds with 1 strand of color 3250 + 1 strand of color 3125. 4-4-4-5 rounds with 2 strands of color 3125. 3-4-4-4 rounds/rows with 1 strand of color 3125 + 1 strand of color 0100. 3-3-5-5 rows with 2 strands of color 0100. STRIPES - SLEEVE: Worked from sleeve cap and down in stripes as follows: Beg with 1 strand of color 3250 + 1 strand of color 3125. Work 9-10-11-12 cm / 3½"-4"-4½"-4 3/4" with this color combination. Continue with 9-10-11-12 cm / 3½"-4"-4½"-4 3/4" with 2 strands of color 3250 and then 10-10-11-12 cm / 4"-4"-4½"-4 3/4" with 1 strand of color 4088 + 1 strand of color 3250. Then finish the sleeve with 2 strands of color 4088 = approx. 10-11-12-12 cm / 4"-4½"-4 3/4"-4 3/4". CROCHET INFO: Replace first dc on every round/row with 3 ch. Finish every round with 1 sl st in 3rd ch from beg of round. DECREASE TIP 1 (applies to body): Dec as follows: Work dc until 3 dc remain, * in the first of these work 1 hdc, in the next 1 sc and in the last 1 sl st, turn with ch 1, skip sl st, work 1 sl st in sc, 1 sc in hdc, 1 hdc in first dc, continue with dc until 3 dc remain at the end of row *, repeat from *-* until 6-7-7-7 rows have been worked in total. DECREASE TIP 2 (applies to sleeves): Dec 1 dc at beg and end of row by working the second and third dc tog and the 2 next to last dc tog, this is done as follows: Work 1 dc in first dc but wait with last pull through, work 1 dc in next dc but on last pull through, pull yarn through all 3 loops on hook. -------------------------------------------------------- BODY: Worked in the round in a circle from mid back with 2 strands and STRIPES – see explanation above. Ch 5 on hook size 5 mm / H/8 and form a ring with 1 sl st in first ch. READ CROCHET INFO! ROUND 1: 12 dc in ch-ring. ROUND 2: 1 dc, * ch 2, 1 dc in next dc *, repeat from *-* the entire round, finish with 2 ch and 1 sl st in 1st dc = 12 dc with 2 ch between each. ROUND 3: 1 dc in every dc and 2 dc in every ch-space the entire round = 36 dc. ROUND 4: * 1 dc in each of the first 2 dc, 2 dc in next dc *, repeat from *-* the entire round = 48 dc. ROUND 5: 1 dc, * ch 2, skip 1 dc, 1 dc in next dc *, repeat from *-* the entire round, finish with 2 ch and 1 sl st in 1st dc = 24 dc with 2 ch between each. ROUND 6: 1 dc in every dc and 2 dc in every ch-space the entire round = 72 dc. ROUND 7: Work 1 dc in every dc but in every 6th dc work 2 dc = 84 dc. ROUND 8: Work 1 dc in every dc but in every 7th dc work 2 dc = 96 dc. ROUND 9: Work 1 dc in every dc but in every 8th dc work 2 dc = 108 dc. ROUND 10: Work 1 dc in every dc but in every 9th dc work 2 dc = 120 dc. ROUND 11: Work 1 dc in every dc but in every 10th dc work 2 dc = 132 dc. Piece measures approx. 14 cm / 5½'' from the middle to edge. SIZE 3/5 YEARS: ROUND 12: Work 1 dc in each of the first 30 dc (= up towards neck), ch 22 loosely, skip the next 20 dc (= armhole), then work 1 dc in each of the next 62 dc (= down towards back), ch 22 loosely, skip the next 20 dc (= armhole) and fasten with 1 sl st in first dc at beg of round. ROUND 13: Work 1 dc in each of the first 30 dc but inc 2 dc evenly (= 32 dc), then work 22 dc in ch-row over armhole, work 1 dc in each of the next 62 dc but inc 2 dc evenly (= 64 dc), work 22 dc in ch-row over armhole, and fasten with 1 sl st in first dc at beg of round = 140 dc. ROUND 14 to 17: Continue with dc – at the same time inc 10 dc evenly on every round. After 17th round there are 180 dc on round and piece measures approx. 21 cm / 8 1/4'' from the middle to edge. Fasten off. Then work only over 60 dc in each side - i.e. the 30 dc at the top by neck and the 30 dc at the bottom of back are no longer worked. Continue with explanation below front piece. SIZE 6/8 YEARS: ROUND 12: Work 1 dc in every dc but in every 11th dc work 2 dc = 144 dc. ROUND 13: Work 1 dc in each of the first 35 dc (= up towards neck), ch 23 loosely, skip the next 21 dc (= armhole), then work 1 dc in each of the next 67 dc (= down towards back), ch 23 loosely, skip the next 21 dc (= armhole) and fasten with 1 sl st in first dc at beg of round. ROUND 14: Work 1 dc in each of the first 35 dc but inc 3 dc evenly (= 38 dc), then work 23 dc in ch-row over armhole, work 1 dc in each of the next 67 dc but inc 3 dc evenly (= 70 dc), work 23 dc in ch-row over armhole, and fasten with 1 sl st in first dc at beg of round = 154 dc. ROUND 15 to 19: Continue with dc – at the same time inc 10 dc evenly on every round. After 19th round there are 204 dc on round and piece measures approx. 23 cm / 9'' from the middle to edge. Fasten off. Then work only over 68 dc in each side - i.e. the 34 dc at the top by neck and the 34 dc at the bottom of back are no longer worked. Continue with explanation below front piece. SIZE 9/10 YEARS: ROUND 12: Work 1 dc in every dc but in every 11th dc work 2 dc = 144 dc. ROUND 13: Work 1 dc in every dc but in every 12th dc work 2 dc = 156 dc. ROUND 14: Work 1 dc in each of the first 38 dc (= up towards neck), ch 25 loosely, skip the next 23 dc (= armhole), then work 1 dc in each of the next 72 dc (= down towards back), ch 25 loosely, skip the next 23 dc (= armhole) and fasten with 1 sl st in first dc at beg of round. ROUND 15: Work 1 dc in each of the first 38 dc but inc 3 dc evenly (= 41 dc), then work 25 dc in ch-row over armhole, work 1 dc in each of the next 72 dc but inc 3 dc evenly (= 75 dc), work 25 dc in ch-row over armhole, and fasten with 1 sl st in first dc at beg of round = 166 dc. ROUND 16 to 21: Continue with dc – at the same time inc 10 dc evenly on every round. After 21st round there are 226 dc on round and piece measures approx. 26 cm / 10 1/4'' from the middle to edge. Fasten off. Then work only over 74 dc in each side - i.e. the 39 dc at the top by neck and the 39 dc at the bottom of back are no longer worked. Continue with explanation below front piece. SIZE 11/12 YEARS: ROUND 12: Work 1 dc in every dc but in every 11th dc work 2 dc = 144 dc. ROUND 13: Work 1 dc in every dc but in every 12th dc work 2 dc = 156 dc. ROUND 14: Work 1 dc in every dc but in every 13th dc work 2 dc = 168 dc. ROUND 15: Work 1 dc in each of the first 42 dc (= up towards neck), ch 27 loosely, skip the next 25 dc (= armhole), then work 1 dc in each of the next 76 dc (= down towards back), ch 27 loosely, skip the next 25 dc (= armhole) and fasten with 1 sl st in first dc at beg of round. ROUND 16: Work 1 dc in each of the first 42 dc but inc 4 dc evenly (= 46 dc), then work 27 dc in ch-row over armhole, work 1 dc in each of the next 76 dc but inc 4 dc evenly (= 80 dc), work 27 dc in ch-row over armhole, and fasten with 1 sl st in first dc at beg of round = 180 dc. ROUND 17 to 23: Continue with dc – at the same time inc 10 dc evenly on every round. After 23rd round there are 250 dc on round and piece measures approx. 28 cm / 11'' from the middle to edge. Fasten off. Then work only over 83 dc in each side - i.e. the 42 dc at the top by neck and the 42 dc at the bottom of back are no longer worked. Continue with explanation below front piece. LEFT FRONT PIECE - ALL SIZES: = 60-68-74-83 dc. Insert 1 marker after 18-20-22-24 sts in from each side (= 24-28-30-35 sts between markers). Then work stripes and dc back and forth while AT THE SAME TIME inc 1 st at each marker on every row (i.e. inc 2 dc on row - inc alternately before and after each marker outwards) until a total of 6-6-8-8 rows have been worked back and forth and AT THE SAME TIME work according to DECREASE TIP 1 Fasten off. RIGHT FRONT PIECE: Work same way as on left front piece over 60-68-74-83 dc in right side. SLEEVE: Worked back and forth from sleeve cap and down - see STRIPES - SLEEVE above. Ch 24-27-28-34 LOOSELY with 1 strand of color 3250 + 1 strand of color 3125. ROW 1: Turn and work 1 dc in 4th ch from hook (the first 3 ch = 1 dc), then work 1 dc in every ch the entire row = 22-25-26-32 dc. Turn piece. ROW 2: ch 3 + 2 dc in first dc, 1 dc in every dc until last dc and 3 dc in last dc = 26-29-30-36 dc. Turn piece. ROW 3: ch 3 + 1 dc in first dc, 1 dc in every dc until 1 dc remains and 2 dc in last dc. Turn piece. Work 1-1-2-2 more rows as 3rd row = 30-33-36-42 dc. NEXT ROW: ch 3 + 2 dc in first dc, 1 dc in every dc until last dc and 3 dc in last dc = 34-37-40-46 dc. Turn piece. Now work 1 dc in every dc until piece measures 7-8-9-10 cm / 2 3/4"-3"-3½"-4". Continue with dc while AT THE SAME TIME dec 1 dc in each side - SEE DECREASE TIP! Repeat dec every 8th-6th-5th-4th row 2-3-4-6 more times = 28-29-30-32 dc. Continue with 1 dc in every dc until sleeve measures 38-41-45-48 cm / 15"-16"-17 3/4"-19". Fasten off. ASSEMBLY: Sew sleeve seams edge to edge to avoid a chunky seam. Work 1 round around the entire body as follows with 2 strands of color 0100: 1 sl st in first st, * ch 3, 1 dc in first ch (= 1 picot), skip 1 dc, fasten with 1 sc in next st *, repeat from *-* the entire round and finish with 1 sl st in first sl st. Sew sleeves in body - make sure that sleeve cap is sewn in at the top of armholes, i.e. where the distance is shortest. Work an edge around the sleeves the same way as around body but with 2 strands of color 4088. |
|

|
|
|
Have you made this or any other of our designs? Tag your pictures in social media with #dropsdesign so we can see them! Do you need help with this pattern?You'll find tutorial videos, a Comments/Questions area and more by visiting the pattern on garnstudio.com. © 1982-2024 DROPS Design A/S. We reserve all rights. This document, including all its sub-sections, has copyrights. Read more about what you can do with our patterns at the bottom of each pattern on our site. |
|


With over 40 years in knitting and crochet design, DROPS Design offers one of the most extensive collections of free patterns on the internet - translated to 17 languages. As of today we count 304 catalogs and 11422 patterns - 11417 of which are translated into English (US/in).
We work hard to bring you the best knitting and crochet have to offer, inspiration and advice as well as great quality yarns at incredible prices! Would you like to use our patterns for other than personal use? You can read what you are allowed to do in the Copyright text at the bottom of all our patterns. Happy crafting!
Comments / Questions (134)
Is this pattern worked in double crochet or triple crochet, I am making this for my great granddaughter and she is a size 4 i am using the smallest pattern stitches.? Plus i am very confused with the left and right front instructions. It says to increase and also to decrease . I don't understand this.
21.08.2019 - 14:09DROPS Design answered:
Dear Mrs White, make sure you are following the accurate language since UK- and US- have different crochet terms, in US-English you are working double crochets (= treble crochets in UK-English). On the front pieces, you will decrease at the beginning of every row (both from RS and WS) to shape the rounded edge, and at the same time, you will increase at the marker (in the middle of the row) to continue the rounded shape. Happy crocheting!
21.08.2019 - 15:14Bonjour je ne comprend pas très bien ce qui faut faire après le rang 19 (204brides) taille 6/8 ans. Crocheter ensuite au-dessus des 68 B de chaque côté seulement - c'est-à-dire que l'on ne travaille plus au-dessus des 34 B en haut côté encolure ni des 34 B en bas du dos. Continuer les devants
05.07.2019 - 18:40DROPS Design answered:
Bonjour Jess, après le rang 19, vous ne crochetez plus en rond, mais vous allez faire l'arrondi de chaque devant que l'on voit dans le schéma. pliez la veste en double et repérez le milieu du haut et du bas de la veste, placez un marqueur en haut et en bas et délimitez ensuite les 34 brides du haut et du bas (17 b de chaque côté du marqueur), placez de nouveaux marqueurs ici: vous avez 68 brides entre ces nouveaux marqueurs et vous allez maintenant crocheter les devants séparément, entre ces nouveaux marqueurs. Bon crochet!
08.07.2019 - 08:48I have completed rounds 15-19 of the Princess Petal jacket. I am confused as to where/how I work only over 68 stitches in each side. How to I count this and where do I start from - did I miss something??? Is there a picture or tutorial?? Thank you.
25.06.2019 - 23:47DROPS Design answered:
Dear Mrs White, fold your circle double so that armholes are above each other, mark the top and bottom stitch, lay the circle agan and count 17 sts from the middle stitches marked, add a marker to markr these 34 sts on top and bottom of circle = there are now 68 sts on each side for the front pieces, you will then work the front pieces separately over these 68 sts - see also chart. Happy crocheting!
26.06.2019 - 06:37Could you please explain what 3-3-4-4 round means in the Stripes-Body. I think I understand all the other instructions but this baffles me. Thank you.
29.05.2019 - 13:31DROPS Design answered:
Hi Shirley. This refers to the number of rounds you work in each colour, before changing to the next colour. Each number correlates to 1 of the sizes: 3/5 - 6/8 - 9/10 - 11/12 years. After choosing your size, follow this number throughout the pattern. Eg; say you're working size 6/8 years: you follow the 2nd number, and work the stripe for 3 rounds before changing colour. happy crocheting
29.05.2019 - 13:59Super leuk vestje maar ik heb problemen met de beschrijving van de voorpanden, moet daar zoals ik t begrijp, meederen en minderen tegelijk ?? en hoeveel toeren stokjes in totaal ?
02.03.2019 - 14:03DROPS Design answered:
Dag Petra,
Je meerdert en mindert inderdaad tegelijkertijd. Je meerdert bij de markeerdraden en het minderen doe je aan het eind van de toer (volgens tip voor het minderen-1). Dit tegelijkertijd meerderen en minderen wordt gedaan om de ronde vorm in de panden te krijgen.
05.03.2019 - 20:03Szia! Nem ertem az elejet. 18 szemet kéne leszámolnom és elhelyeznem a jelölőt. De mitől számoljam a 18 szemet? Köszönöm
27.01.2019 - 17:09DROPS Design answered:
Kedves Dia, a szemeket az eleje szélétől (vagyis onnan, ahonnan az elejéhez kijelölt 60-68-74-83 szemet is elkezdte kiszámolni. A jelölőkkel a szaporítások helyét határozzuk meg. Sikeres kézimunkázást!
11.02.2019 - 21:12Bonjour, Je ne comprend pas comment faire les devants. Merci pour vos explications.
24.09.2018 - 19:35DROPS Design answered:
Bonjour Gwladys, les devants vont se crocheter en allers et retours sur une partie des mailles - celles du haut et du bas du cercle ne seront plus travaillées - cf schéma. On crochète ensuite sur les mailles indiquées pour la taille (60-83 b) et en même temps, on augmente 1 m à chacun des marqueurs: une fois avant les marqueurs, au rang suivant après les marqueurs et on répète ces 2 rangs pendant 6-8 rangs, en même temps, on diminue pour former l'arrondi du devant comme indiqué sous DIMINUTIONS-1. Bon crochet!
25.09.2018 - 09:58Jeg kan ikke forstå arbejdet med ærmerne det er ikke tydeligt nok for mig
21.09.2018 - 16:48Bonjour, Taille 6/8, tour 14, j'aurai voulu savoir s'il fallait crocheter les 23 brides dans les mailles chaînettes ou autour des mailles chaînettes? Merci
19.09.2018 - 06:56DROPS Design answered:
Bonjour Gwladys, je crochèterai dans les mailles en l'air des emmanchures pour que les coutures des manches soient plus simples à faire par la suite. Bon crochet!
19.09.2018 - 10:09Bonsoir!oui mes emmanchures sont faites!
02.09.2018 - 22:55