
Popular categories
Looking for a yarn?


|
|
Princess Petal |
|
 |
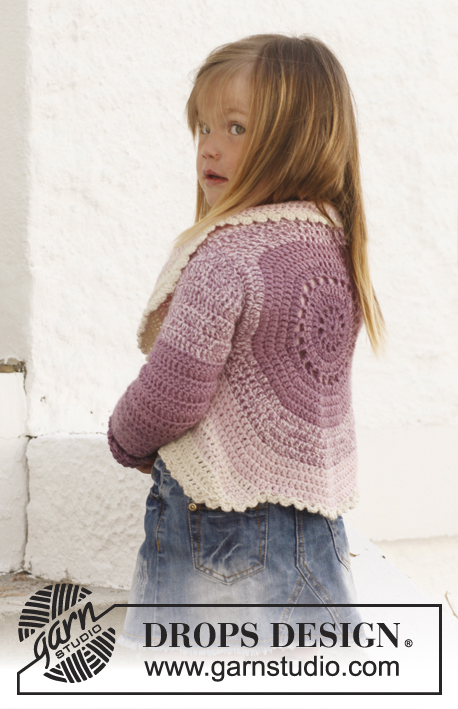 |
Circle jacket crocheted in 2 strands DROPS BabyAlpaca Silk. Size children 3 - 12 years.
DROPS Children 24-1 |
|
|
STRIPES - BODY: Worked in a circle from mid back. Beg with 2 strands of color 4088. Continue as follows: 3-3-4-4 rounds with 2 strands of color 4088. 3-3-4-4 rounds with 1 strand of color 4088 + 1 strand of color 3250. 3-4-4-4 rounds with 2 strands of color 3250. 4-4-4-5 rounds with 1 strand of color 3250 + 1 strand of color 3125. 4-4-4-5 rounds with 2 strands of color 3125. 3-4-4-4 rounds/rows with 1 strand of color 3125 + 1 strand of color 0100. 3-3-5-5 rows with 2 strands of color 0100. STRIPES - SLEEVE: Worked from sleeve cap and down in stripes as follows: Beg with 1 strand of color 3250 + 1 strand of color 3125. Work 9-10-11-12 cm / 3½"-4"-4½"-4 3/4" with this color combination. Continue with 9-10-11-12 cm / 3½"-4"-4½"-4 3/4" with 2 strands of color 3250 and then 10-10-11-12 cm / 4"-4"-4½"-4 3/4" with 1 strand of color 4088 + 1 strand of color 3250. Then finish the sleeve with 2 strands of color 4088 = approx. 10-11-12-12 cm / 4"-4½"-4 3/4"-4 3/4". CROCHET INFO: Replace first dc on every round/row with 3 ch. Finish every round with 1 sl st in 3rd ch from beg of round. DECREASE TIP 1 (applies to body): Dec as follows: Work dc until 3 dc remain, * in the first of these work 1 hdc, in the next 1 sc and in the last 1 sl st, turn with ch 1, skip sl st, work 1 sl st in sc, 1 sc in hdc, 1 hdc in first dc, continue with dc until 3 dc remain at the end of row *, repeat from *-* until 6-7-7-7 rows have been worked in total. DECREASE TIP 2 (applies to sleeves): Dec 1 dc at beg and end of row by working the second and third dc tog and the 2 next to last dc tog, this is done as follows: Work 1 dc in first dc but wait with last pull through, work 1 dc in next dc but on last pull through, pull yarn through all 3 loops on hook. -------------------------------------------------------- BODY: Worked in the round in a circle from mid back with 2 strands and STRIPES – see explanation above. Ch 5 on hook size 5 mm / H/8 and form a ring with 1 sl st in first ch. READ CROCHET INFO! ROUND 1: 12 dc in ch-ring. ROUND 2: 1 dc, * ch 2, 1 dc in next dc *, repeat from *-* the entire round, finish with 2 ch and 1 sl st in 1st dc = 12 dc with 2 ch between each. ROUND 3: 1 dc in every dc and 2 dc in every ch-space the entire round = 36 dc. ROUND 4: * 1 dc in each of the first 2 dc, 2 dc in next dc *, repeat from *-* the entire round = 48 dc. ROUND 5: 1 dc, * ch 2, skip 1 dc, 1 dc in next dc *, repeat from *-* the entire round, finish with 2 ch and 1 sl st in 1st dc = 24 dc with 2 ch between each. ROUND 6: 1 dc in every dc and 2 dc in every ch-space the entire round = 72 dc. ROUND 7: Work 1 dc in every dc but in every 6th dc work 2 dc = 84 dc. ROUND 8: Work 1 dc in every dc but in every 7th dc work 2 dc = 96 dc. ROUND 9: Work 1 dc in every dc but in every 8th dc work 2 dc = 108 dc. ROUND 10: Work 1 dc in every dc but in every 9th dc work 2 dc = 120 dc. ROUND 11: Work 1 dc in every dc but in every 10th dc work 2 dc = 132 dc. Piece measures approx. 14 cm / 5½'' from the middle to edge. SIZE 3/5 YEARS: ROUND 12: Work 1 dc in each of the first 30 dc (= up towards neck), ch 22 loosely, skip the next 20 dc (= armhole), then work 1 dc in each of the next 62 dc (= down towards back), ch 22 loosely, skip the next 20 dc (= armhole) and fasten with 1 sl st in first dc at beg of round. ROUND 13: Work 1 dc in each of the first 30 dc but inc 2 dc evenly (= 32 dc), then work 22 dc in ch-row over armhole, work 1 dc in each of the next 62 dc but inc 2 dc evenly (= 64 dc), work 22 dc in ch-row over armhole, and fasten with 1 sl st in first dc at beg of round = 140 dc. ROUND 14 to 17: Continue with dc – at the same time inc 10 dc evenly on every round. After 17th round there are 180 dc on round and piece measures approx. 21 cm / 8 1/4'' from the middle to edge. Fasten off. Then work only over 60 dc in each side - i.e. the 30 dc at the top by neck and the 30 dc at the bottom of back are no longer worked. Continue with explanation below front piece. SIZE 6/8 YEARS: ROUND 12: Work 1 dc in every dc but in every 11th dc work 2 dc = 144 dc. ROUND 13: Work 1 dc in each of the first 35 dc (= up towards neck), ch 23 loosely, skip the next 21 dc (= armhole), then work 1 dc in each of the next 67 dc (= down towards back), ch 23 loosely, skip the next 21 dc (= armhole) and fasten with 1 sl st in first dc at beg of round. ROUND 14: Work 1 dc in each of the first 35 dc but inc 3 dc evenly (= 38 dc), then work 23 dc in ch-row over armhole, work 1 dc in each of the next 67 dc but inc 3 dc evenly (= 70 dc), work 23 dc in ch-row over armhole, and fasten with 1 sl st in first dc at beg of round = 154 dc. ROUND 15 to 19: Continue with dc – at the same time inc 10 dc evenly on every round. After 19th round there are 204 dc on round and piece measures approx. 23 cm / 9'' from the middle to edge. Fasten off. Then work only over 68 dc in each side - i.e. the 34 dc at the top by neck and the 34 dc at the bottom of back are no longer worked. Continue with explanation below front piece. SIZE 9/10 YEARS: ROUND 12: Work 1 dc in every dc but in every 11th dc work 2 dc = 144 dc. ROUND 13: Work 1 dc in every dc but in every 12th dc work 2 dc = 156 dc. ROUND 14: Work 1 dc in each of the first 38 dc (= up towards neck), ch 25 loosely, skip the next 23 dc (= armhole), then work 1 dc in each of the next 72 dc (= down towards back), ch 25 loosely, skip the next 23 dc (= armhole) and fasten with 1 sl st in first dc at beg of round. ROUND 15: Work 1 dc in each of the first 38 dc but inc 3 dc evenly (= 41 dc), then work 25 dc in ch-row over armhole, work 1 dc in each of the next 72 dc but inc 3 dc evenly (= 75 dc), work 25 dc in ch-row over armhole, and fasten with 1 sl st in first dc at beg of round = 166 dc. ROUND 16 to 21: Continue with dc – at the same time inc 10 dc evenly on every round. After 21st round there are 226 dc on round and piece measures approx. 26 cm / 10 1/4'' from the middle to edge. Fasten off. Then work only over 74 dc in each side - i.e. the 39 dc at the top by neck and the 39 dc at the bottom of back are no longer worked. Continue with explanation below front piece. SIZE 11/12 YEARS: ROUND 12: Work 1 dc in every dc but in every 11th dc work 2 dc = 144 dc. ROUND 13: Work 1 dc in every dc but in every 12th dc work 2 dc = 156 dc. ROUND 14: Work 1 dc in every dc but in every 13th dc work 2 dc = 168 dc. ROUND 15: Work 1 dc in each of the first 42 dc (= up towards neck), ch 27 loosely, skip the next 25 dc (= armhole), then work 1 dc in each of the next 76 dc (= down towards back), ch 27 loosely, skip the next 25 dc (= armhole) and fasten with 1 sl st in first dc at beg of round. ROUND 16: Work 1 dc in each of the first 42 dc but inc 4 dc evenly (= 46 dc), then work 27 dc in ch-row over armhole, work 1 dc in each of the next 76 dc but inc 4 dc evenly (= 80 dc), work 27 dc in ch-row over armhole, and fasten with 1 sl st in first dc at beg of round = 180 dc. ROUND 17 to 23: Continue with dc – at the same time inc 10 dc evenly on every round. After 23rd round there are 250 dc on round and piece measures approx. 28 cm / 11'' from the middle to edge. Fasten off. Then work only over 83 dc in each side - i.e. the 42 dc at the top by neck and the 42 dc at the bottom of back are no longer worked. Continue with explanation below front piece. LEFT FRONT PIECE - ALL SIZES: = 60-68-74-83 dc. Insert 1 marker after 18-20-22-24 sts in from each side (= 24-28-30-35 sts between markers). Then work stripes and dc back and forth while AT THE SAME TIME inc 1 st at each marker on every row (i.e. inc 2 dc on row - inc alternately before and after each marker outwards) until a total of 6-6-8-8 rows have been worked back and forth and AT THE SAME TIME work according to DECREASE TIP 1 Fasten off. RIGHT FRONT PIECE: Work same way as on left front piece over 60-68-74-83 dc in right side. SLEEVE: Worked back and forth from sleeve cap and down - see STRIPES - SLEEVE above. Ch 24-27-28-34 LOOSELY with 1 strand of color 3250 + 1 strand of color 3125. ROW 1: Turn and work 1 dc in 4th ch from hook (the first 3 ch = 1 dc), then work 1 dc in every ch the entire row = 22-25-26-32 dc. Turn piece. ROW 2: ch 3 + 2 dc in first dc, 1 dc in every dc until last dc and 3 dc in last dc = 26-29-30-36 dc. Turn piece. ROW 3: ch 3 + 1 dc in first dc, 1 dc in every dc until 1 dc remains and 2 dc in last dc. Turn piece. Work 1-1-2-2 more rows as 3rd row = 30-33-36-42 dc. NEXT ROW: ch 3 + 2 dc in first dc, 1 dc in every dc until last dc and 3 dc in last dc = 34-37-40-46 dc. Turn piece. Now work 1 dc in every dc until piece measures 7-8-9-10 cm / 2 3/4"-3"-3½"-4". Continue with dc while AT THE SAME TIME dec 1 dc in each side - SEE DECREASE TIP! Repeat dec every 8th-6th-5th-4th row 2-3-4-6 more times = 28-29-30-32 dc. Continue with 1 dc in every dc until sleeve measures 38-41-45-48 cm / 15"-16"-17 3/4"-19". Fasten off. ASSEMBLY: Sew sleeve seams edge to edge to avoid a chunky seam. Work 1 round around the entire body as follows with 2 strands of color 0100: 1 sl st in first st, * ch 3, 1 dc in first ch (= 1 picot), skip 1 dc, fasten with 1 sc in next st *, repeat from *-* the entire round and finish with 1 sl st in first sl st. Sew sleeves in body - make sure that sleeve cap is sewn in at the top of armholes, i.e. where the distance is shortest. Work an edge around the sleeves the same way as around body but with 2 strands of color 4088. |
|

|
|
|
Have you made this or any other of our designs? Tag your pictures in social media with #dropsdesign so we can see them! Do you need help with this pattern?You'll find tutorial videos, a Comments/Questions area and more by visiting the pattern on garnstudio.com. © 1982-2024 DROPS Design A/S. We reserve all rights. This document, including all its sub-sections, has copyrights. Read more about what you can do with our patterns at the bottom of each pattern on our site. |
|


With over 40 years in knitting and crochet design, DROPS Design offers one of the most extensive collections of free patterns on the internet - translated to 17 languages. As of today we count 304 catalogs and 11422 patterns - 11417 of which are translated into English (US/in).
We work hard to bring you the best knitting and crochet have to offer, inspiration and advice as well as great quality yarns at incredible prices! Would you like to use our patterns for other than personal use? You can read what you are allowed to do in the Copyright text at the bottom of all our patterns. Happy crafting!
Comments / Questions (134)
Hallo, verstehe es mit den Ärmeln leider nicht. Ich soll für die Ärmel 34 Luftmaschen anschlagen und den Ärml von oben nach unten häkeln. Weiß nur net wie der anschließend ins Armloch passen soll. Denn ich lasse doch beim Rumpfteil 25 Maschen für den Ärmel aus und beim linken Vorderteil 35 Maschen. Das sind ja dann 60 Maschen die ich für die Öffnung des Armloches habe. Wenn ich nun 34 LM für den Ärmel anschlage, ist es doch viel zu klein?
06.10.2014 - 15:48DROPS Design answered:
Liebe Steffi, am Vorderteil lassen Sie nicht 35 M aus - die Markierer mit 35 M dazwischen beziehen sich nur auf die Zunahmen am Vorderteil. Das Armloch besteht aus 25 ausgelassenen M + 27 Luft-M, die Sie darüber gehäkelt haben (= 52 M). Beim Ärmel beginnen Sie mit einer Armkugel und nehmen im Laufe der Armkugel M zu (von 34 M auf 42 M). Durch diese Formgebung passt der Ärmel dann hinterher in den Armausschnitt.
07.10.2014 - 14:34Hallo, verstehe es mit den Ärmeln leider nicht. Ich soll für die Ärmel 34 Luftmaschen anschlagen und den Ärml von oben nach unten häkeln. Weiß nur net wie der anschließend ins Armloch passen soll. Denn ich lasse doch beim Rumpfteil 25 Maschen für den Ärmel aus und beim linken Vorderteil 35 Maschen. Das sind ja dann 60 Maschen die ich für die Öffnung des Armloches habe. Wenn ich nun 34 LM für den Ärmel anschlage, ist es doch viel zu klein?
06.10.2014 - 15:47DROPS Design answered:
Antwort siehe oben! :-)
07.10.2014 - 14:34Bonjour, je pense qu'il y a un soucis avec les explications des manches . pour la première taille , entre le rang 2 et le 4 on doit avoir 4 b en plus en 2 rang alors qu'il ne faut augmenter que d'une bride par rang (crocheter 2b a la dernière bride= une seule augmentation). De plus je ne comprends pas comment il faut coudre les manches a l'emmanchure puisque la manche fait 22b et l'emmanchure 22b+20 cote dos, doit faire comme des plis? Merci
01.10.2014 - 16:45DROPS Design answered:
Bonjour Mme Fluteaux, au rang 2 de la manche, on augmente 2 m de chaque côté (en début de rang: 3 ml + 2B dans la 1ère B et en fin de rang 3 B dans la dernière B), on a ainsi 4 B en plus au 2ème rang. La manche se crochète de haut en bas, à partir du haut de l'arrondi, on augmente régulièrement pour atteindre la largeur d'emmanchures puis on diminue de chaque côté pour le bas de la manche. Bon crochet!
01.10.2014 - 17:10Müsste es in der Anleitung Gr. 11/12 Jahre Runde 14 nicht so heißen? "1 Stb in jedes Stb, aber in jedes 13. Stb 2 häkeln = 168"
27.09.2014 - 20:51DROPS Design answered:
Liebe Sandra, ja, Sie haben Recht, da stimmt etwas nicht. Man muss in der Tat in jedes 13. Stb 2 Stb häkeln. Die Anleitung wird in Kürze korrigiert.
28.09.2014 - 11:35Bonjour. Je voudrais réaliser ce modèle mais avec de la laine safran. Dois je dans ce cas utiliser 2 fils ? toujours avec un crochet 5 ? si avec 1 seul fil, crochet 3 ? Merci de votre réponse. Cordialement
17.09.2014 - 14:26DROPS Design answered:
Bonjour Mme Héral, Safran peut remplacer Baby Alpaca Silk (même groupe), mais pour suivre le modèle, il faudra également travailler avec 2 fils Safran (comme dans les explications). Pour calculer la quantité de fil nécessaire, cliquez ici. Bon crochet!
17.09.2014 - 16:43Heb dit patroon gemaakt voor de leeftijd 6 / 8. Nadat hij af was en ik heb alles precies volgens patroon gedaan wou ik hem mijn nichtje van 5 aantrekken de mouwen zijn lang genoeg maar het lijf was echt te klein. Vond ik erg jammer omdat ik er nu dus helemaal niks mee kan
12.09.2014 - 19:43Serait il possible d avoir le modele avec les fils correspondants
06.09.2014 - 13:39DROPS Design answered:
Bonjour Mme Sepetdjian, si vous souhaitez acheter ce modèle tout fait, vous pouvez contacter directement les différents magasins DROPS pour connaître leurs propositions. Merci.
08.09.2014 - 09:41Haken doe je van rechts naar links voor het lezen van het telpatroon. De tekens staan erboven een lang kruis is een stokje enz..
05.09.2014 - 10:08Hallo ik snap niks van het voorpand ik moet er meerdere en gelijktijdig minderen help wie kan mij helpen
04.09.2014 - 20:59Guten Morgen, ich habe das Rumpfteil und die Vorseite fertig. Super Jacke, allerdings die Ärmel mit 22 Laufmaschen von der Achsel aus gehäkelt ist viel zu eng. Kann sein, dass ich da irgendetwas falsch verstanden habe.
23.06.2014 - 07:50DROPS Design answered:
Liebe Brigitte, haben Sie die Maße in der Maßskizze unter dem Diagramm beachtet? Dort können Sie sehen, wie weit der Armausschnitt in den verschiedenen Größen wird. Außerdem müssen Sie beachten, dass die Luftmaschen locker gehäkelt werden müssen, auch das wirkt sich sonst auf die Weite des Armausschnitts aus.
23.06.2014 - 18:00