
Popular categories
Looking for a yarn?


|
|||||||||||||||||||
Jude |
|||||||||||||||||||
 |
 |
||||||||||||||||||
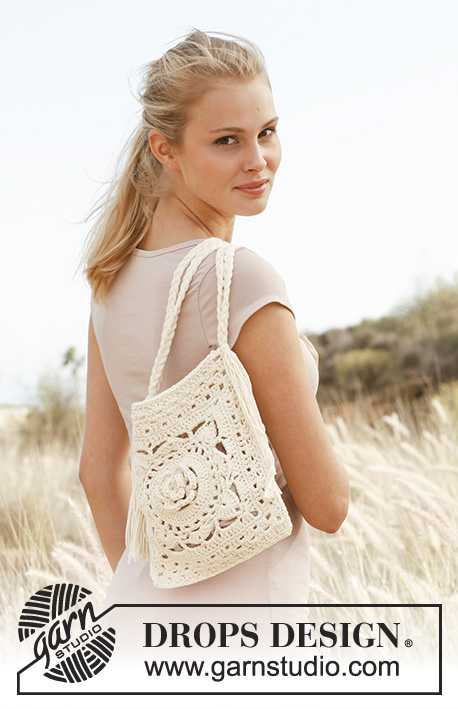
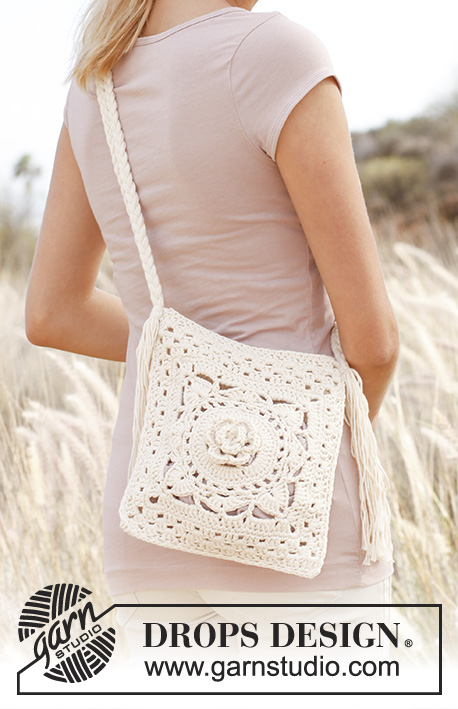
Crochet DROPS bag with plaited shoulder strap in ”Paris”.
DROPS 146-13 |
|||||||||||||||||||
|
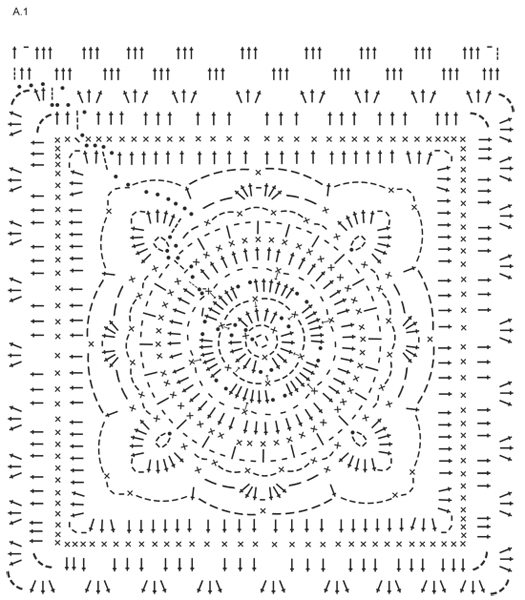
CROCHET INFO: At beg of sc round, replace first sc with 1 ch and finish round with 1 sl st in ch from beg of round. Replace first dc at beg of dc round with ch 3, finish the round with 1 sl st in 3rd ch from beg of round. ---------------------------------------------------------- BAG: Beg with a crochet flower in 2 layers and then continue outwards to 1 square. CROCHET SQUARE WITH FLOWER: See diagram A.1, i.e. work as follows: With Paris ch 4 on hook size 4 mm / G/6 and form a ring with 1 sl st in first ch. ROUND 1: Work * 1 sc in ch-ring, ch 3 *, repeat from *-* a total of 3 times and finish with 1 sl st in first sc from beg of round = 3 ch-spaces. ROUND 2: Work as follows in every ch-space: 1 sl st, 5 dc and 1 sl st = 3 leaves. Turn piece - work next round on the back of the flower. ROUND 3: ch 1, work 1 sc around first sc from 1st round, ch 4, work 1 sc at the bottom in the middle of first leaf from 2nd round, * ch 4, work 1 sc around next sc from 1st round, ch 4, work 1 sc at the bottom in the middle of next leaf from 2nd round *, repeat from *-* until a total of 5 ch-spaces have been worked, finish with 4 ch and 1 sl st in first sc from beg of round = 6 ch-spaces. Turn piece - work next round on the front of the flower. ROUND 4: Work as follows in every ch-space: 1 sl st, 6 dc and 1 sl st = 6 leaves. Turn piece - work next round on the back of the flower. ROUND 5: ch 1, 1 sc in the middle of bottom on 1st leaf, * ch 5, 1 sc in the middle of bottom on next leaf *, repeat from *-* a total of 5 times and finish with ch 5 and 1 sl st in first sc from beg of round = 6 ch-spaces. Turn piece - work next round and every round onwards on the front of the flower. ROUND 6: ch 1, 1 sl st in first ch-space, ch 3 (= 1 dc), 7 dc in same ch-space, then work 8 dc in every ch-space, finish with 1 sl st in 3rd ch from beg of round = 48 dc. ROUND 7: ch 1, then work 1 sc in every dc from previous round, finish round with 1 sl st in first sc from beg of round = 48 sc. ROUND 8: 4 ch (= 1 hdr + 2 ch), skip 1 sc, * 1 hdr in next sc, 2 ch, skip 1 sc*, repeat from *-* the entire round and finish with 1 sl st in 2nd ch from beg of round = 24 hdr with 2 ch between each. ROUND 9: 1 sl st in first ch-space, * ch 5, 1 sl st in 5th ch from hook, 1 sc in next ch-space, ch 2, 1 sc in next ch-space, ** ch 3, 1 sc in next ch-space **, repeat from **-** 3 times in total, ch 2, 1 sc in next ch-space *, repeat from *-* 4 times in total but finish last repetition with 1 sl st in sl st at beg of round (instead of 1 sc in next ch-space). ROUND 10: 1 sl st in 5-ch-space, ch 3 (= 1 dc), in same ch-space work 4 dc + ch 3 + 5 dc (= 1 corner), * 1 sc in next ch-space, ch 2, skip 1 ch-space, in next 3-ch-space work 3 dc + ch 1 + 3 dc, ch 2, ** skip 1 ch-space, 1 sc in next ch-space, in 5-ch-space work 5 dc + ch 3 + 5 dc *, repeat from *-* 4 times in total but finish last repetition after **, then work 1 sl st in 3rd ch from beg of round. ROUND 11: Work sl sts until ch-space in the middle of first dc-group in the corner. Ch 4 (= 1 sc + 3 ch), 1 sc in same ch-space, * ch 6, 1 dc in next sc, ch 5, 1 sc in ch in the middle of next dc-group, 5 ch **, 1 dc in next sc, ch 6, in ch-space in the middle of dc-group in the corner work 1 sc + ch 3 + 1 sc *, repeat from *-* 4 times in total but finish last repetition after **, then work 1 sl st in 1st ch from beg of round. ROUND 12: 1 sl st in ch-space in the corner, ch 3 (= 1 dc), 2 dc + ch 3 + 3 dc in same ch-space, * 6 dc in next ch-space, 4 dc in next ch-space, 4 dc in next ch-space, 6 dc in next ch-space **, in ch-space in the corner work 3 dc + ch 3 + 3 dc *, repeat from *-* 4 times in total but finish last repetition after **, then work 1 sl st in 3rd ch from beg of round. ROUND 13: Work sl sts until ch-space in the corner, ch 1, 5 sc in same ch-space, then work 1 sc in every dc and 6 sc in ch-space in every corner the entire round, finish round with 1 sl st in ch from beg of round = 128 sc. ROUND 14: ch 3 (= 1 dc), 1 dc in each of the next 2 sc, ch 3, 1 dc in each of the next 3 sc (= corner), * skip 2 sc, (1 dc in each of the next 3 sc, skip 1 sc) **, repeat from (-) 6 times in total, 1 dc in each of the next 3 sc, ch 3, 1 dc in each of the next 3 sc (= corner) *, repeat from *-* 4 times in total but finish last repetition after **, then work 1 sl st in 3rd ch from beg of round. ROUND 15: Work sl sts until ch-space in the corner, ch 3 (= 1 dc) 2 dc + ch 3 + 3 dc in same ch-space, then work 3 dc between every dc-group and 3 dc + ch 3 + 3 dc in ch-space in every corner, finish round with 1 sl st in 3rd ch from beg of round. Now work back and forth only over one side of square as follows (= at the top of bag): ROW 1: Work sl sts until the middle of ch-space in the corner, turn piece, ch 3 (= 1 dc), 2 dc in same ch-space, then work 3 dc between every dc-group from previous row and finish with 3 dc in ch-space in the corner, turn piece = 10 dc-groups. ROW 2: ch 4 (= 1 dc + 1 ch), then work 3 dc between every dc-group until 9 dc-groups have been worked, finish row with ch 1 and 1 dc in last dc on row. Fasten off. Work another square with flower. Place the 2 squares tog, WS against WS, and work tog along three of the sides as follows (i.e. do not work along the one side with 2 extra rows and work through both squares at the same time): 1 sl st in outermost st, ch 1, skip 1 st, 1 sc in next st, * ch 1, 1 sc before next dc-group, ch 1, 1 sc in the middle dc in dc-group *, repeat from *-* along the 3 sides on bag (where square was made longer = opening at the top of bag). Then work a finishing edge around the opening on bag with 1 sc in every st the entire round. PLAITED SHOULDER STRAP: Cut 18 strands Paris of 2 m/2.2 yds each and hold the strands tog. Make a loose knot approx. 30 cm / 12" in from the end. Divide the long strands in 3 equal parts with 6 strands in each part and plait a classic plait until approx. 30 cm / 12" strands remain, make a loose knot at the end. Plait another plait the same way (2 plaits = approx. 1 ball Paris). Undo the knots in each end, hold the 2 plaits tog. Take a new strand and wrap it tightly around these 2 plaits (approx. 30 cm / 12" in from the end), fasten the strand tightly (the 2 plaits have now been locked). Take a new strand and wrap it tightly around plaits the same way in the other end, fasten the strand tightly. Sew the 2 plaits on the bag in each side of bag, fasten tightly. Cut the yarn ends to desired length. |
|||||||||||||||||||
Diagram explanations |
|||||||||||||||||||
|
|||||||||||||||||||
|
|||||||||||||||||||
|
Have you made this or any other of our designs? Tag your pictures in social media with #dropsdesign so we can see them! Do you need help with this pattern?You'll find tutorial videos, a Comments/Questions area and more by visiting the pattern on garnstudio.com. © 1982-2024 DROPS Design A/S. We reserve all rights. This document, including all its sub-sections, has copyrights. Read more about what you can do with our patterns at the bottom of each pattern on our site. |
|||||||||||||||||||


With over 40 years in knitting and crochet design, DROPS Design offers one of the most extensive collections of free patterns on the internet - translated to 17 languages. As of today we count 304 catalogs and 11422 patterns - 11417 of which are translated into English (US/in).
We work hard to bring you the best knitting and crochet have to offer, inspiration and advice as well as great quality yarns at incredible prices! Would you like to use our patterns for other than personal use? You can read what you are allowed to do in the Copyright text at the bottom of all our patterns. Happy crafting!
Comments / Questions (46)
Sehr geehrte Damen und Herren, leider finde ich kein Video dazu. Gibt es denn eins ? Mfg
13.08.2015 - 14:55DROPS Design answered:
Zu dieser Tasche gibt es nur Grundlagen-Videos, oben im Kopf neben dem Foto unter "Videos".
16.08.2015 - 17:45Sehr geehrte Damen, Hänge in der 11 Runde fest.kapiere nicht wo die kettmaschen hin sollen. Wohin wird der Rest gehäkelt? Auf die Ecken oder an die Ecke.wenn ich mit der Runde fertig bin,soll das ganze 4 x wiederholt werden.habe aber 4 Ecken plus Mittelstück.
29.04.2015 - 09:44DROPS Design answered:
Sie häkeln zum Überbrücken des Abstands so lange Kettmaschen in die Maschen, bis Sie in der Mitte der 1. Stb-Gruppe in der Ecke angekommen sind, d.h. bis zur Mitte des Lm-Bogens zwischen den je 5 Stb der Ecke (1 Ecke besteht in der 10. Rd aus 5 Stb + 3 Lm + 5 Stb). Dort ist Rd-Beginn. Sie häkeln 4 Lm (= 1 fM + 3 Lm), dann 1 feste M um den gleichen Lm-Bogen in der Ecke und dann wie ab * beschrieben weiter. Im Diagramm ist die 11. Rd die Rd, die fast nur aus Lm besteht.
03.05.2015 - 11:02Hvor bred og hvor lang bliver tasken, jeg har strikket den, men ved ikke om den er for lille?!
10.10.2014 - 17:59DROPS Design answered:
Hej Charlotte, målene er ca 22 x 24 cm, du finder dem lige til højre for billedet. God fornøjelse!
17.10.2014 - 15:33Ups ich hänge schon bei der 2. Reihe wo sollen denn bitte die 2 Kettmaschen hin? sorry aber bin noch am Anfang
27.08.2014 - 22:22DROPS Design answered:
Die Kett-M häkeln Sie auch um die Lm-Bögen, die Sie in der 1. Rd gehäkelt haben. Sie häkeln also um jeden Bogen 1 Kett-M, 5 Stb und 1 Kett-M. Dann um den nächsten Bogen ebenso häkeln. Sie stechen also nicht in die Lm ein, sondern holen den Faden um den Luftmaschenbogen herum.
01.09.2014 - 13:33Buonasera,non riesco a capire come cucire i 3 lati della borsa,se dal rov. O dal diritto!per caso avete un video da farmi vedere.? Colgo l'occasione per ringraziarvi della Vs tempestività'e bravura nelle spiegazioni.Grazie
09.06.2014 - 18:18DROPS Design answered:
Buongiorno Benedetta. Per unire la borsa sovrapponga i due quadrati, con l’esterno verso di lei. Unisca i 3 lati come spiegato. Purtroppo non abbiamo un video per questo modello. Può trovare un esempio di come effettuare una cucitura con l’uncinetto, passando attraverso i due strati, nel seguente video: Grazie e Buon lavoro!
10.06.2014 - 13:06Thank you for a lovely website.
14.05.2014 - 23:12Buongiorno,vorrei fare questa borsetta,ma con lana eskimo,e' possibile?che numero di uncinetto devo usare?grazie
15.02.2014 - 14:52DROPS Design answered:
Buonasera Benedetta, dal momento che non è indicato il campione, può realizzare questa borsa anche con l'Eskimo, probabilmente le dimensioni saranno diverse; per l'Eskimo viene indicato 9 mm, ma dal momento che è una borsa può provare con l'uncinetto n° 8 mm e vedere come le sembra. Buon lavoro!!
15.02.2014 - 19:37Wat een leuk patroon wil het graag meenemen en maken.
06.03.2013 - 13:25Ich verstehe bei dieser Anleitung die 9. Reihe nicht. Es ist doch symmetrisch, oder? Aber wenn ich so beginne wie aufgeschrieben komme ich nicht klar. es wäre schön, wenn sie mir schreiben könnten, wie ich diese Reihe richtig häkle.
10.02.2013 - 23:16DROPS Design answered:
Liebe Frau Bitzmann, können Sie mir genau die Stelle beschreiben, an der Sie in Rd 9 einen Fehler vermuten? Dann kann ich es an die Designabteilung zur Kontrolle geben.
11.02.2013 - 09:20Desperately waiting for the pattern ...
06.02.2013 - 12:30