DROPS Paris
DROPS Paris
100% Cotton
from 1.60 $ /50g
Get the yarn to make this pattern from 19.20$.

The yarn cost is calculated from the pattern’s smallest size and the yarn’s cheapest product type. Looking for an even better price? You might find it on the DROPS Deals!

DROPS SS24

Hugs and kisses

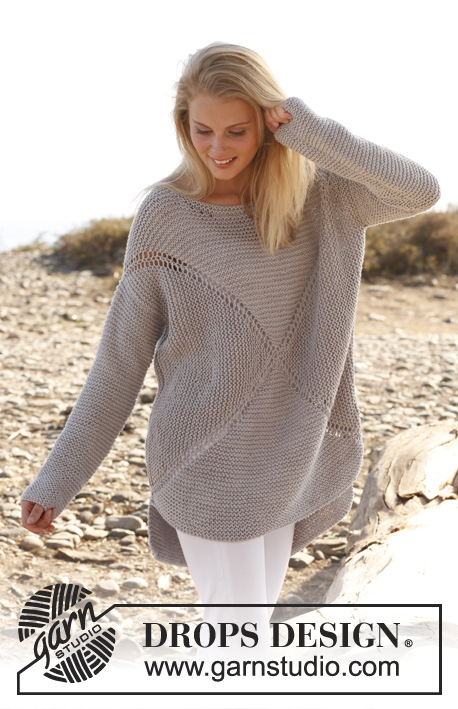
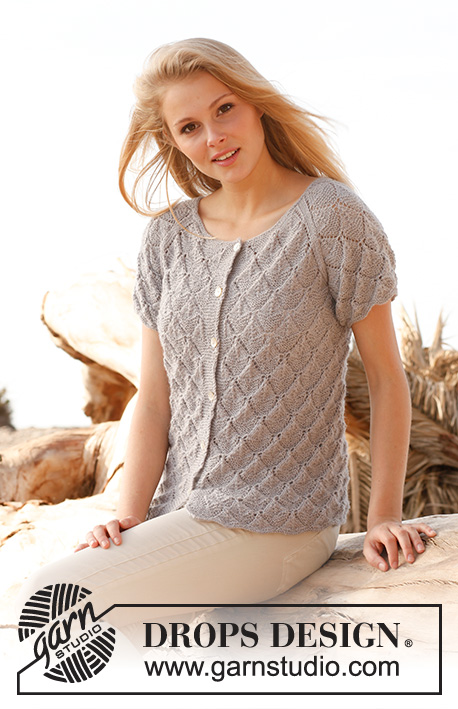
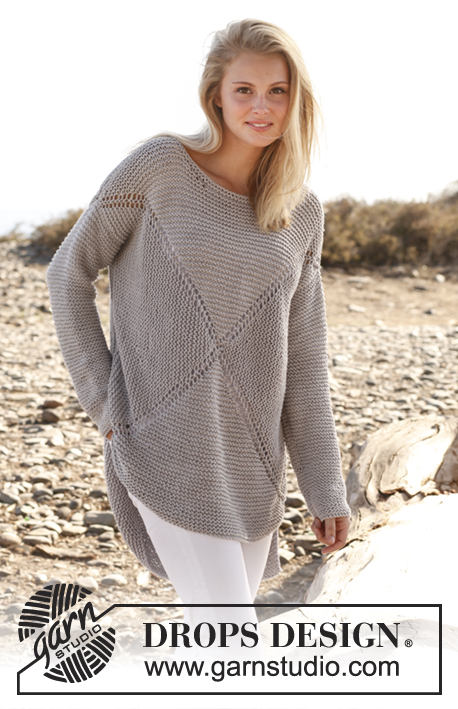
Knitted DROPS jumper worked in a square in garter st in ”Paris”. Size: S - XXXL.

DROPS 146-2
DROPS design: Pattern no w-477
Yarn group C
-----------------------------------------------------------
Size: S - M – L/XL - XXL - XXXL
Finished measurements:
Bust: 102-110-118-128-136 cm /
40"-43½"-46½"-50½"-53½"
Full length front: 51-55-59-64-68 cm /
20"-21½"-23¼"-25¼"-26¾" + 9 cm / 3½" in the back

Materials: DROPS PARIS from Garnstudio
600-650-750-800-900 g color no 23, light gray

DROPS DOUBLE POINTED NEEDLES AND CIRCULAR NEEDLE (40 and 80 cm / 16" and 32") SIZE 6 mm / US 10 - or size needed to get 15 sts x 30 rows in garter st = 10 x 10 cm / 4" x 4".

-------------------------------------------------------

Alternative Yarn – See how to change yarns here
Yarn Groups A to F – Use the same pattern and change the yarn here
Yarn usage using an alternative yarn – Use our yarn converter here

-------------------------------------------------------

DROPS Paris
DROPS Paris
100% Cotton
from 1.60 $ /50g
Get the yarn to make this pattern from 19.20$.

The yarn cost is calculated from the pattern’s smallest size and the yarn’s cheapest product type. Looking for an even better price? You might find it on the DROPS Deals!

Pattern instructions

NOTE: This pattern is written in American English. All measurements in charts are in cm. For conversion from inches to cm - click here. There are different terms for crocheting in American and British English. If this pattern includes crochet, click for "crochet terms" here. For this pattern in British English, please click here.
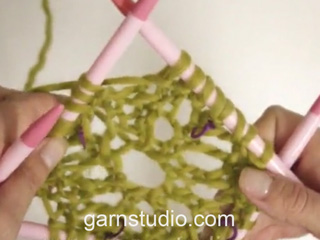
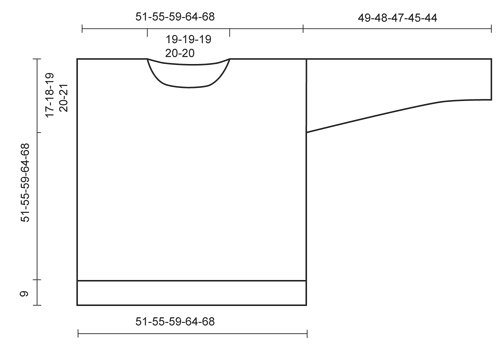
GARTER ST (in the round on circular needle):
* K 1 round and P 1 round *, repeat from *-*. 1 ridge = 2 rounds.

GARTER ST (back and forth on needle):
K all rows. 1 ridge = 2 K rows.

MEASURING TIP:
Hold the piece up when measuring. Because of the garter st and the weight of the yarn the sleeve will be somewhat longer. If a lighter sleeve is wanted, work 4 ridges at the bottom of sleeve, then work in reversed stockinette st.
----------------------------------------------------------

JUMPER:
Worked in 2 parts from mid front/mid back in a square. Cast on and work on double pointed needles, switch to circular needle when needed. Finish by working the sleeves.

FRONT PIECE:
Cast on 8 sts with Paris and divide them on 4 double pointed needles size 6 mm / US 10 (= 2 sts on every needle). Insert a marker in the first, third, fifth and seventh st (= 4 markers).
Then work in the round and in GARTER ST over all sts - see explanation above.
AT THE SAME TIME on every other round make 1 YO on each side of every marker (= 8 inc on every other round), on next round K YOs to make holes.
Continue like this until there are 240-264-288-320-344 sts on needle (= 29-32-35-39-42 inc and 60-66-72-80-86 sts on each of the 4 sides). Stop with 1 P round.
Now slip the middle 16-16-18-18-18 sts between 1st and 2nd marker on a stitch holder for neck, then work piece back and forth. Continue in garter st and continue inc at markers - AT THE SAME TIME bind off towards the neck on every other row as follows: 2 sts 2 times and 1 st 2 times.
Continue inc until there are 284-308-330-362-386 sts on needle (= 38-41-44-48-51 inc, 78-84-90-98-104 sts between markers, 25-28-30-34-37 sts on each side of neck). Keep sts between 3rd and 4th marker on needle, bind off the other sts = 78-84-90-98-104 sts on needle.
Work 2 ridges back and forth over these sts. Bind off. Insert a marker in each side, 17-18-19-20-21 cm / 6¾"-7"-7½"-8"-8¼" down from the shoulder.
This shows where the sleeve is sewn in.

BACK PIECE:
Cast on 8 sts with Paris and divide them on 4 double pointed needles size 6 mm / US 10 (= 2 sts on every needle). Insert a marker in the first, third, fifth and seventh st (= 4 markers).
Then work in the round and in garter st over all sts, AT THE SAME TIME on every other round make 1 YO on each side of every marker (= 8 inc on every other round), on next round K YOs to make holes.
Continue like this until there are 288-312-336-368-392 sts on needle (= 35-38-41-45-48 inc and 72-78-84-92-98 sts between markers).
Now bind off the middle 28-28-30-30-30 sts between 1st and 2nd marker for neck, then work piece back and forth = 260-284-306-338-362 sts.
Continue inc until there are 284-308-330-362-386 sts on needle (= 38-41-44-48-51 inc, 78-84-90-98-104 sts between markers, 25-28-30-34-37 sts on each side of neck).
Keep sts between 3rd and 4th marker on needle, bind off the other sts = 78-84-90-98-104 sts on needle.
Work 15 ridges back and forth over these sts. Bind off. Insert a marker in each side, 17-18-19-20-21 cm / 6¾"-7"-7½"-8"-8¼" down from the shoulder.
This shows where the sleeve is sewn in.

SLEEVE:
Worked back and forth on circular needle. READ MEASURING TIP!
Cast on 37-38-41-44-45 sts (incl 1 edge st in each side) on circular needle size 6 mm / US 10 with Paris.
Work in garter st. When piece measures 8 cm / 3⅛", inc 1 st in each side.
Repeat inc every 5-4½-4½-4-3½ cm / 2"-1¾"-1¾"-1½"-1¼" 7-8-8-8-9 more times (= 8-9-9-9-10 inc in total) = 53-56-59-62-65 sts. Bind off when piece measures 49-48-47-45-44 cm / 19¼"-19"-18½"-17¾"-17¼" (shorter measurements in the larger sizes because of wider shoulders).


ASSEMBLY:
Sew the shoulder seams. Sew in sleeves down to markers on front/back piece. Sew underarm and side seams in one inside 1 edge st, leave the bottom 10 cm / 4" = vent.

NECK EDGE:
Pick up approx. 66 to 74 sts (includes sts on stitch holder) on a short circular needle (40 cm / 16") around the neck.
Work 2 ridges. Bind off.

This pattern has been corrected.

Updated online: 06.08.2019
FRONT PIECE: ....(= 29-32-35-39-42 inc and 60-66-72-80-86 sts on each of the 4 sides).

Diagram

All measurements in charts are in cm.

diagram measurements
Do you have a question? See a list of frequently asked questions (FAQ)

Knitting tension is what determines the final measurements of your work, and is usually measured per 10 x 10 cm. It is provided like so: number of stitches in width x number of rows in height - eg: 19 stitches x 26 rows = 10 x 10 cm.

The knitting tension is very individual; some people knit/crochet loosely while others work tightly. You adjust the knitting tension with the needle size, which is why the suggested needle size only serve as a guide! You need to adjust this (up or down) to ensure that YOUR knitting tension matches the knitting tension provided in the pattern. If you work with a different knitting tension than provided you will have a different yarn consumption, and your work will have different measurements than what the pattern suggests.

The knitting tension also determines which yarns can replace each other. As long as you achieve the same knitting tension you can replace one yarn with another.

See DROPS lesson: How to measure your tension/gauge

See DROPS video: How to make a gauge tension swatch

The required amount of yarn is provided in grams, eg: 450 g. To calculate how many balls you’ll need you first need to know how many grams are in 1 ball (25g, 50g or 100g). This information is available if you click on the individual yarn quality on our pages. Divide the amount required with the amount of each ball. For example, if each ball is 50g (the most common amount), the calculation will be as follows: 450 / 50 = 9 balls.

The important thing when changing from one yarn to another is that the knitting/crochet tension remains the same. This is so that the measurements of the finished piece will be the same as on the sketch provided. It is easier to achieve the same knitting tension using yarns from the same yarn group. It is also possible to work with multiple strands of a thinner yarn to achieve the knitting tension of a thicker one. Please try our yarn converter. We recommend you to always work a test swatch.

Please NOTE: when changing yarn the garment might have a different look and feel to the garment in the photo, due to individual properties and qualities of each yarn.

See DROPS lesson: Can I use a different yarn than the one mentioned in the pattern?

All our yarns are categorised into yarn groups (from A to F) according to thickness and knitting tension – group A contains the thinnest yarns and group F the thickest. This makes it easier for you to find alternative yarns to our patterns, should you wish to switch yarn. All yarns within the same group have a similar knitting tension and can easily replace each other. However, different yarn qualities have different structures and properties which will give the finished work a unique look and feel.

Click here for an overview of the yarns in each yarn group

At the top of all our patterns you’ll find a link to our yarn converter, which is a helpful tool should you wish to use a different yarn than suggested. By filling in the yarn quality you wish to replace, the amount (in your size) and number of strands, the converter will present good alternative yarns with the same knitting tension. Additionally it will tell you how much you’ll require in the new qualities and whether you’ll need to work with multiple strands. Most skeins are 50g (some are 25g or 100g).

If the pattern is worked with multiple colours, every colour will have to be converted separately. Similarly, if the pattern is worked with several strands of different yarns (for example 1 strand Alpaca and 1 strand Kid-Silk) you will have to find alternatives for each, individually.

Click here to see our yarn converter

Since different yarns have different qualities and textures we have chosen to keep the original yarn in our patterns. However, you can easily find options among our available qualities by using our yarn converter, or simply pick a yarn from the same yarn group.

It is possible that some retailers still have discontinued yarns in stock, or that someone has a few skeins at home that they would like to find patterns for.

The yarn converter will provide both alternative yarn as well as required amount in the new quality.

If you think it's hard to decide what size to make, it can be a good idea to measure a garment you own already and like the size of. Then you can pick the size by comparing those measures with the ones available in the pattern's size chart.

You'll find the size chart at the bottom of the pattern.

See DROPS lesson: How to read size chart

The needle size provided in the pattern serves only as a guide, the important thing is to follow the knitting tension. And since knitting tension is very individual, you will have to adjust the needle size to ensure that YOUR tension is the same as in the pattern – maybe you’ll have to adjust 1, or even 2 needle sizes, up or down to achieve the correct tension. For this, we recommend that you work test swatches.

Should you work with a different knitting tension than the one provided, the measurements of the finished garment might deviate from the measurement sketch.

See DROPS lesson: How to measure your tension/gauge

See DROPS video: How to make a gauge tension swatch

Working a garment top-down provides more flexibility and room for personal adjustment. For example it is easier to try the garment on while working, as well as making adjustments to length of yoke and shoulder caps.

The instructions are carefully explaining every step, in the correct order. Diagrams are adjusted to the knitting direction and are worked as usual.

The diagram depicts all rows/rounds, and every stitch seen from the right side. It is read from bottom to top, from right to left. 1 square = 1 stitch.

When working back and forth, every other row is worked from the right side and every other row is worked from the wrong side. When working from the wrong side, the diagram will have to be worked reversed: from left to right, knit stitches are purled, purl stitches are knit etc.

When working in the round every round is worked from the right side and the diagram are worked from right to left on all rounds.

See DROPS lesson: How to read knitting diagrams

The diagram depicts all rows/rounds, and every stitch seen from the right side. It is worked from bottom to top, from right to left.

When working back and forth every other row is worked from the right side: from right to left and every other row is worked from the wrong side: from left to right.

When working in the round, every row in the diagram are worked from the right side, from right to left.

When working a circular diagram you start in the middle and work your way outwards, counter clockwise, row by row.

The rows usually start with a given number of chain stitches (equivalent to the height of the following stitch), this will either be depicted in the diagram or explained in the pattern.

See DROPS lesson: How to read crochet diagrams

Instructions for working several diagrams after each other on the same row/round, will often be written like so: “work A.1, A.2, A.3 a total of 0-0-2-3-4 times". This means you work A.1 once, then A.2 is worked once, and A.3 is repeated (in width) the number of times provided for your size – in this case like so: S = 0 times, M = 0 times, L=2 times, XL= 3 times and XXL = 4 times.

The diagrams are worked as usual: begin with the first row in A.1, then work the first row in A.2 etc.

See DROPS lesson: How to read knitting diagrams

See DROPS lesson: How to read crochet diagrams

The total width of the garment (from wrist-to-wrist) will be larger in the larger sizes, despite the actual sleeves being shorter. The larger sizes have longer sleeve caps and wider shoulders, so there will be a good fit in all sizes.

The measurement sketch/schematic drawing provides information regarding the full length of the garment. If it’s a jumper or a jacket the length is measured from the highest point on the shoulder (usually closest to the neckline), and straight down to the bottom of the garment. It is NOT measured from the tip of shoulder. Similarly, the length of yoke is measured from the highest point on the shoulder and down to where yoke is split into body and sleeves.

See DROPS lesson: How to read a schematic drawing

Diagrams are often repeated on the round or in height. 1 repeat is the diagram the way it appears in the pattern. If it says to work 5 repeats of A.1 in the round, then you work A.1 a total of 5 times after/next to each other in the round. If it says to work 2 repeats of A.1 vertically/in height you work the entire diagram once, then begin again at the start and work the entire diagram one more time.

Chain stitches are slightly narrower than other stitches and to avoid working the cast-on edge too tight, we simply chain more stitches to begin with. The stitch count will be adjusted on the following row to fit the pattern and measurement sketch.

The rib edge is more elastic and will contract slightly compared to, for example, stocking stitch. By increasing before the rib edge, you avoid a visible difference in width between the rib edge and the rest of the body.

It’s very easy to cast off too tightly, and by making yarn overs while casting off (and simultaneously casting these off) you avoid a too tight cast off edge.

See DROPS video: How to bind off with yarn overs (yo)

To achieve an even increase (or decrease) you can increase on, for example: every 3rd and 4th row alternately, like so: work 2 rows and increase on the 3rd row, work 3 rows and increase on the 4th. Repeat this until the increase is complete.

See DROPS lesson: Increase or decrease 1 st on every 3rd and 4th row alternately

Should you prefer to work in the round instead of back and forth, you may of course adjust the pattern. You’ll need to add steeks mid-front (usually 5 stitches), and follow the instructions. When you would normally turn and work from the wrong side, simply work across the steek and continue in the round. At the end you’ll cut the piece open, pick up stitches to work bands, and cover the cut edges.

See DROPS video: How to knit steeks and cut open

Should you prefer to work back and forth instead of in the round, you may of course adjust the pattern so you work the pieces separately and then assemble them at the end. Divide the stitches for the body in 2, add 1 edge stitch in each side (for sewing) and work the front and back pieces separately.

See DROPS lesson: Can I adapt a pattern for circular needles into straight needles?

Pattern repeats can vary slightly in the different sizes, in order to get the correct proportions. If you’re not working the exact same size as the garment in the photo, yours might deviate slightly. This has been carefully developed and adjusted so that the complete impression of the garment is the same in all sizes.

Make sure to follow instructions and diagrams for your size!

If you have found a pattern you like which is available in women’s size it’s not very difficult to convert it to men’s size. The biggest difference will be the length of sleeves and body. Start working on the women size that you think would fit across the chest. The additional length will be worked right before you cast off for the armhole/sleeve cap. If the pattern is worked top-down you can add the length right after the armhole or before the first decrease on sleeve.

Regarding additional yarn amount, this will depend on how much length you add, but it is better with a skein too many than too few.

All yarns will have excess fibres (from production) that might come off as lint or shedding. Brushed yarns (ie hairier yarns) have more of these loose, excess fibres, causing more shedding.

Shedding also depends on what is worn under or over the garment, and whether this pulls at the yarn fibres. It’s therefore not possible to guarantee that there will be no shedding

Below are some tips on how to get the best result when working with hairier yarns:

1. When the garment is finished (before you wash it) shake it vigorously so the looser hairs come off. NOTE: do NOT use a lint roller, brush or any method that pulls at the yarn.

2. Place the garment in a plastic bag and put it in your freezer - the temperature will cause the fibres to become less attached to each other, and excess fibres will come off easier.

3. Leave in the freezer for a few hours before taking it out and shaking it again.

4. Wash the garment according to the instructions on the yarn label.

Pilling is a natural process that happens to even the most exclusive of fibers. It's a natural sign of wear and tear that is hard to avoid, and that is most visible in high friction areas of your garment like a sweater's arms and cuffs.

You can make your garment look as new by removing the pilling, using a fabric comb or a pill/lint remover.

Still can't find the answer you need? Then scroll down and leave your question so one of our experts can try to help you. This will be done normally within 5 to 10 working days.
In the meantime, you can read the questions and answers that others have left to this pattern or join the DROPS Workshop on Facebook to get help from fellow knitters/crocheters!

You might also like...

Post a comment to pattern DROPS 146-2

We would love to hear what you have to say about this pattern!

If you want to leave a question, please make sure you select the correct category in the form below, to speed up the answering process. Required fields are marked *.

Comments / Questions (140)

country flag Mathilde Hansen wrote:

Jsodkhhpfpflieje dofkekk

01.11.2019 - 19:15

country flag Dagmara wrote:

Witam. Zaczynam właśnie robić ten sweter i mam pytanie. Ile par drutów z żyłką potrzebuję? Czy po przejściu z drutów pończoszniczych robię sweter na jednym drucie z żyłką? Pozdrawiam.

28.10.2019 - 21:56

DROPS Design answered:

Witaj Dagmaro, potrzebujesz drutów z żyłką (40 i 80 cm) nr 6. Te krótsze będą potrzebne jak przerabiasz robótkę po usunięciu drutów pończoszniczych. A 80 cm przyda się jak będzie już więcej oczek i będziesz przerabiać 3 boki (bez dekoltu) w tę i z powrotem. Jednocześnie pracujesz tylko na jednych drutach z żyłką. Powodzenia!

29.10.2019 - 07:59

country flag Jutta wrote:

Hallo, irgendwas stimmt in der Anleitung nicht. Wenn ich 240 m(bei Gr.s) auf der Nadel habe, sind es bei 4 markierern dazwischen nur 59m.Von wo bis wo genau muss ich stilllegen?

29.07.2019 - 11:41

DROPS Design answered:

Liebe Jutta, die Frage wurde ans Design-Team weitergeleitet. Bitte noch ein wenig Geduld, bevor eine Antwort zu erwarten ist... :-)

01.08.2019 - 09:23

country flag Crystal wrote:

Hello! I am having some difficulty understanding the neck section of the pattern. Do I knit the stitches on the holder? Do I bind off 2 stitches just before the stitches on the holder or am I binding off the stitches on the holder? Do I bind off each row? Do I bind off 2 stitches on each side of the holder per row? A video would be so helpful! I have seen others ask questions about the neckline already but I’m not finding the answers are helping me and just confusing me more

12.06.2019 - 13:15

DROPS Design answered:

Dear Crystal, the stitches on stitch holder will only be worked for collar later. The rows are now starting from neck. To shape neckline, bind off at the beginning of each row from the neck (= at the beginning of row from RS and from WS), ie after the stitches on the stitch holder. Happy knitting!

12.06.2019 - 15:43

country flag Georgina Sullivan wrote:

Hi Can you please tell me how many balls of Drops Paris are required to make a medium sized Hugs and Kisses Drops Sweater? Thanks Gina

20.03.2019 - 13:43

DROPS Design answered:

Dear Mrs Sullivan, you will find required amount of yarn in each size under the header, eg: 600 g in Size S divided by 50 g a ball DROPS Paris = 12 balls are required in size S. Happy knitting!

20.03.2019 - 15:43

country flag Jenni wrote:

Valmiin työn mitat eivät millään voi täsmätä mallipiirroksen mittoihin, jos kerran ohjeen mukaan kaikki mitat tulee ottaa työtä riiputtamalla. Esim. S-koko on tasossa (riiputtamatta) sen 51cm x 51cm, koska etu- ja takakappaleet ovat neliöitä, mutta kun työtä riiputtaa, niin sehän venyy pituussuunnassa melko paljonkin. Voisiko ohjeeseen lisätä ns. riiputetut mitat? :)

19.09.2018 - 10:02

DROPS Design answered:

Hei, mittausvinkki koskee ainoastaan hihaa, eli tekemäsi neliöt ovat oikean kokoiset.

19.09.2018 - 17:12

country flag Małgorzata Frąckowiak wrote:

Witam! Dziękuję, robiłam wszystko dokładnie tak, jak na filmiku. Niestety, linia przejścia z rzedów prawych na lewe i odwrotnie jest bardzo widoczna. Musi być jakiś inny sposób na uniknięcie tej nieestetycznej kreski. Pozdrawiam.

09.09.2018 - 16:31

DROPS Design answered:

Witam, może chodzi o sposób przerabiania oczek prawych i lewych? Proszę zobaczyć w naszych video lub kursach. A może Pani przesłać zdjęcie robótki na Drops Workshop na naszym facebooku?

10.09.2018 - 17:04

country flag Iwona wrote:

W opisie tyłu i przodu jest mowa o 1 rękawie, a co z drugim?

05.09.2018 - 14:31

DROPS Design answered:

Witaj Iwono! Drugi rękaw wykonujemy dokładnie tak samo jak pierwszy. Miłej pracy!

06.09.2018 - 10:17

country flag Małgorzata Frąckowiak wrote:

Witam, b.dziękuję na odpowiedź,jednak zostałam źle zrozumiana.Chodzi mi o to, że problem pojawia się zaraz na początku robótki, od pierwszych rzędów. Kiedy w co 2-im okrążeniu dodajemy przed 1-ym markerem narzut, to moment rozpoczęcia kolejnego okrążenia przesuwa się w prawo;ponieważ przerabiamy rzędy raz na prawo, raz na lewo, to pojawia się linia tego przejścia dokładnie pośrodku między 1 a 4 markerem.

17.08.2018 - 16:33

DROPS Design answered:

Witaj Małgorzato! W tym filmie znajdziesz pomoc, KLIKNIJ TUTAJ. Powodzenia!

06.09.2018 - 10:15

country flag Małgorzata Frąckowiak wrote:

Witam. Zaczęłam robić sweter tak, jak w opisie. Niestety, w miejscu rozpoczęcia każdego nowego okrążenia ( czyli przejścia z przerabiania oczek na prawo do przer.o. na lewo i odwrotnie ), które wychodzi pośrodku między 1 a 4 markerem, widoczna jest linia tego przejścia. Tej linii nie ma na zdjęciu swetra. Proszę o odpowiedź, jak tej linii uniknąć. Dziękuję.

11.08.2018 - 23:11

DROPS Design answered:

Witaj Małgosiu! Dopóki przerabiamy na okrągło na drutach pończoszniczych/z żyłką to ścieg francuski jest wykonywany następująco: 1 okrążenie na prawo, 1 okrążenie na lewo. Jak już zdjęliśmy część oczek na drut pomocniczy, przerabiamy w tę i z powrotem pozostałe oczka, wtedy ścieg francuski wykonujemy przerabiając wszystkie okrążenia na prawo. Może tutaj leży problem. Pozdrawiamy

14.08.2018 - 06:59