
Popular categories
Looking for a yarn?


|
|||||||||||||||||||
DROPS 75-18 |
|||||||||||||||||||
|
|
|||||||||||||||||||
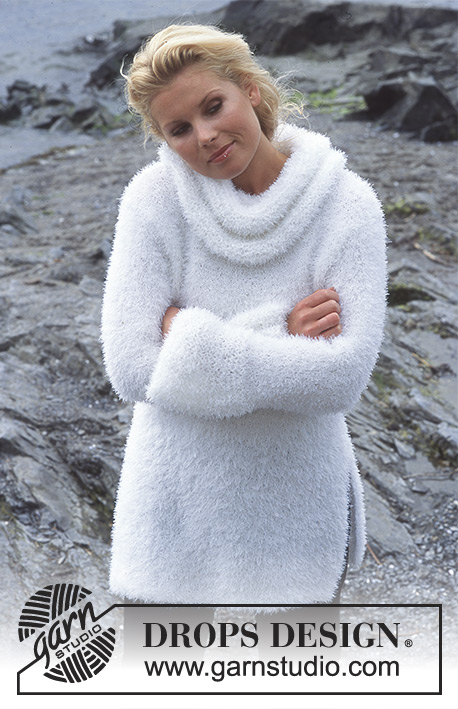
DROPS Pullover in Angora-Tweed and Karisma Superwash.
DROPS 75-18 |
|||||||||||||||||||
|
Gauge: 21 sts x 28 rows = 10 x 10 cm on larger needles in stockinette st. Rib: * K 2, P 2 *, repeat from * - *. Pattern: See charts. The Stripe Patterns are knit in stockinette st and Rib stitch (see instructions within the pattern). Body: Cast on 176-200-224-240-264 sts on smaller circular needles with dark olive Karisma; join and place a marker at the join. Knit rib for 2 cm. Change to larger circular needles and Stripe Pattern 1 and establish stitch pattern across the row as follows: 12-16-20-24-28 sts rib (start with K 2 and end with P 2 so that the rib follows the previous rows), 74-78-82-82-86 sts in stockinette st, 14-22-30-38-46 sts rib (start and end with P 2), 74-78-82-82-86 sts in stockinette st, 2-6-10-14-18 sts rib (start and end with P 2). Continue with pattern as established, following Stripe Pattern 1 – there will be 14-22-30-38-46 sts rib at each side - put a marker in the middle of each of these sts for the sides (7-11-15-19-23 rib sts each side of each marker). After Stripe Pattern 1 knit Stripe Pattern 2, then continue with camel Angora-Tweed to finished measurements. When the piece measures 34-35-36-37-38 cm bind off 10 sts at each side for armhole (5 sts each side of each marker). Knit each piece separately. Front: = 78-90-102-110-122 sts. Bind off for armhole at each side every other row: 4 sts 0-1-1-1-2 times, 2 sts 0-0-2-3-3 times and 1 st 2-2-2-4-4 times = 74-78-82-82-86 sts. All the rib sts are now bound off – continue with stockinette st to finished measurements. When the piece measures 48-50-52-54-56 cm bind off the center 14-16-18-18-20 sts for the neck. Then bind off at each neck edge every other row: 3 sts 1 time, 2 sts 2 times and 1 st 3 times = 20-21-22-22-23 sts remain on each shoulder. Bind off when the piece measures 54-56-58-60-62 cm. Back: = 78-90-102-110-122 sts. Bind off for armholes as on front = 76-78-82-82-86 sts. When the piece measures 52-54-56-58-60 cm bind off the center 30-32-34-34-36 sts for the neck. Then dec 1 st at each neck edge every other row 2 times. Bind off the remaining 20-21-22-22-23 sts on each shoulder when the piece measures 54-56-58-60-62 cm. Sleeve: Cast on 52-56-56-56-60 sts on smaller double-pointed needles with dark olive Karisma; join and place a marker at the join. Knit rib for 2 cm. Change to larger double-pointed needles and Stripe Pattern 1 in stockinette st keeping 3 sts each side of marker in rib (P 2, K 2, P 2). When the piece measures 6 cm inc 1 st at each side of the K 2 rib – and repeat inc a total of 12-12-12-16-16 times: Size S: alternately every 10th and 11th row. Sizes M and L: every 10 rows. Size XL: every 7 rows Size XXL: alternately every 6th and 7th row = 76-80-80-88-92 sts - knit the increased sts into rib as you go along. After Stripe Pattern 1 Stripe Pattern 2 and then camel Angora-Tweed to finished measurements. When sleeve measures 51-49-48-46-44 cm bind off 5 sts each side of marker and knit back and forth. Then bind off for sleeve cap at each side every other row: 2 sts 4-3-2-2-2 times, 1 st 1-5-8-11-16 times, then bind off 2 sts at each side until the piece measures 58 cm, then bind off 3 sts at each side 1 time. Bind off, sleeve measures approx. 59 cm. Assembly: Sew shoulder seams. Collar: Pick up approx. 84 to 96 sts around the neck on smaller double-pointed needles with camel Angora-Tweed; join and place a marker at the join. Knit rib following Stripe Pattern 3 – increasing evenly distributed on the first row to 96-100-104-108-112 sts (divisible by 4). After Pattern 3 continue in rib with dark olive Karisma until the collar measures 12 cm. Bind off in rib. Sew in sleeves. |
|||||||||||||||||||
Diagram explanations |
|||||||||||||||||||
|
|||||||||||||||||||

|
|||||||||||||||||||

|
|||||||||||||||||||
|
Have you made this or any other of our designs? Tag your pictures in social media with #dropsdesign so we can see them! Do you need help with this pattern?You'll find tutorial videos, a Comments/Questions area and more by visiting the pattern on garnstudio.com. © 1982-2024 DROPS Design A/S. We reserve all rights. This document, including all its sub-sections, has copyrights. Read more about what you can do with our patterns at the bottom of each pattern on our site. |
|||||||||||||||||||


With over 40 years in knitting and crochet design, DROPS Design offers one of the most extensive collections of free patterns on the internet - translated to 17 languages. As of today we count 304 catalogs and 11422 patterns - 11417 of which are translated into English (US/in).
We work hard to bring you the best knitting and crochet have to offer, inspiration and advice as well as great quality yarns at incredible prices! Would you like to use our patterns for other than personal use? You can read what you are allowed to do in the Copyright text at the bottom of all our patterns. Happy crafting!
Comments / Questions (7)
Bonjour, Je ne comprends pas au niveau des diminutions des manches : "puis 2 m jusqu'à 58cmde hauteur totale". Dois je faire cette diminution une fois puis continuer jusqu'à 58 cm ? Merci de votre réponse. Cordialement
03.07.2023 - 18:34DROPS Design answered:
Bonjour Mme Rigane, vous devez continuer à rabattre pour la tête de manche 2 mailles de chaque côté (au début de chaque rang sur l'endroit + chaque rang sur l'envers) jusqu'à ce que la manche mesure 58 cm de hauteur totale, veillez à avoir bien rabattu le même nombre de mailles de chaque côté. Rabattez ensuite 3 m au début des 2 rangs suivants puis les mailles restantes. Bon tricot!
04.07.2023 - 08:36Olika antal maskor på fram och bakstycke minsta storleken efter ärmavmaskn.: 74 eller 76.
24.11.2017 - 17:24Do you have a tip or video on how to change colors on the purl side without showing the previous color? I notice on this pattern that the ribbing is very even and does not show the previous color when changing on the P2 of the K2P2 ribbing. Thank you
25.01.2017 - 15:46DROPS Design answered:
Dear Mrs Whitlock, you can try tighten the thead just enough to avoid a too large gap, but not too much to avoid contracting. Happy knitting!
25.01.2017 - 17:02Hur ska man göra vid färgbyte när man gjort avmaskning för ärmhål och gått över till vanliga stickor? Ett varv med färgen, ska man då klippa av garnet och börja med ny färg?
03.08.2015 - 23:01DROPS Design answered:
Hej Kerstin, Ja det måste du, eller så kanske du kan ha 2 nystan att byta med, 1 från varje sida. Lycka till!
04.08.2015 - 15:49Hur kan det vara 74 m kvar på framstycket efter ärmavm. men 76 på bakstycket?
20.06.2011 - 08:44Halten sie die Maschenprobe in der Höhe? Wenn die Maschenprobe nicht eingehalten wird strickt man zu vielen Riehen (= Abnahmen) bis die Arbeit 58 cm misst.
14.01.2011 - 10:29Bei der Berechnung der Armelabnahmen stimmt was nicht. Durch die Abnahme der mittleren 10 Maschen (Körper) reduziert sich die verbleibende Maschenanzahl (Vorderteil/Rückenteil) auf 17 Maschen je Schulter. Bin noch beim Stricken, aber ich meine 17 Maschen reichen in Größe XL nicht aus.
14.01.2011 - 09:17