
Popular categories
Looking for a yarn?


|
|||||||
Donna |
|||||||
 |
 |
||||||
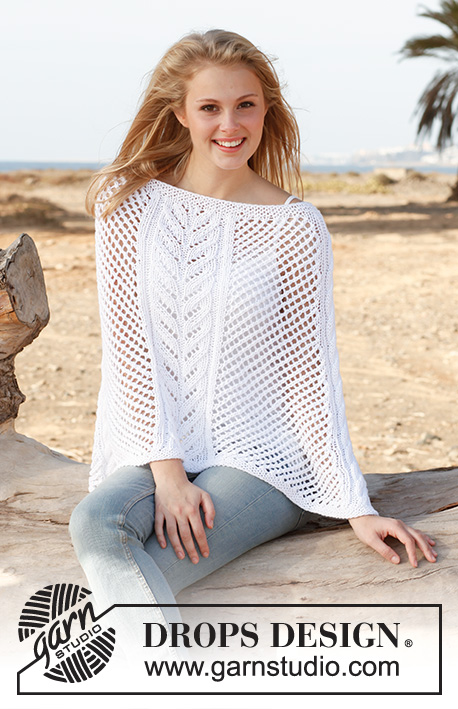
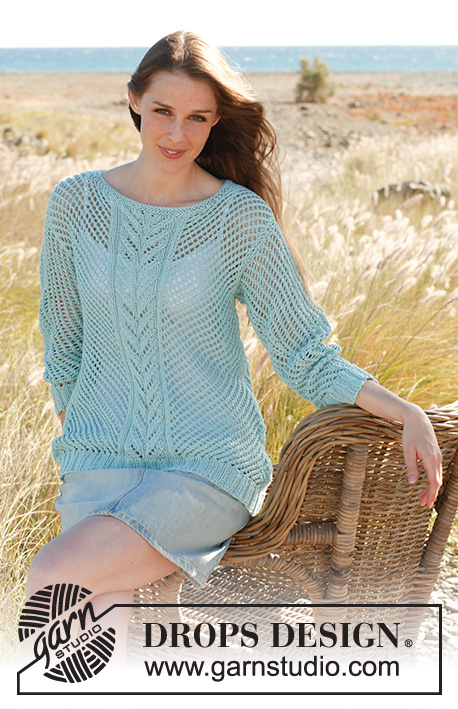
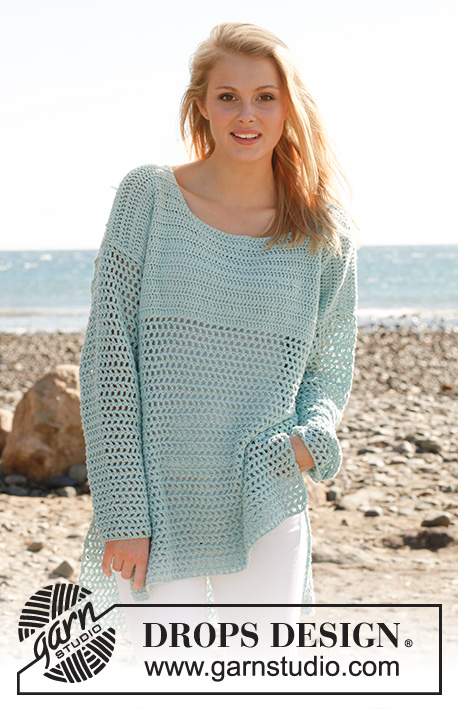
Crochet DROPS jumper in ”Cotton Light”. Size: S - XXXL.
DROPS 145-19 |
|||||||
|
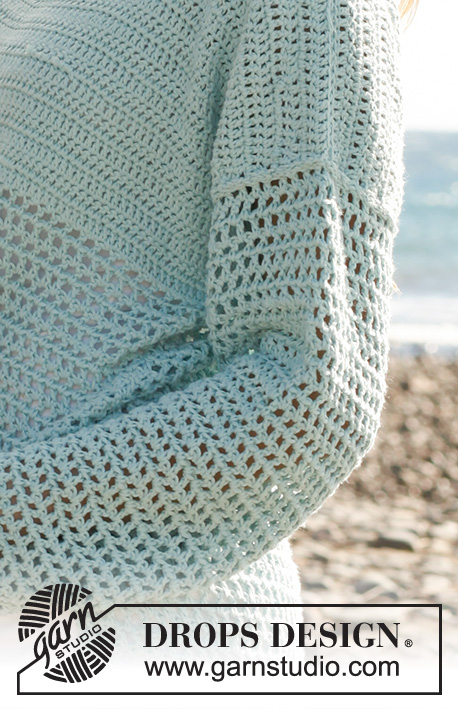
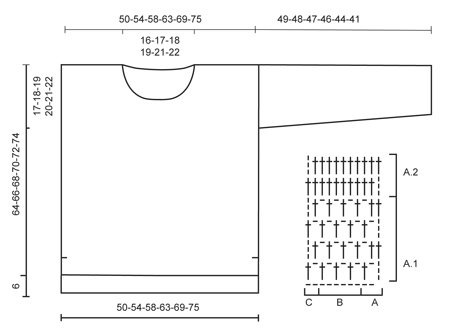
PATTERN: Work according to A.1 and A.2. DECREASE TIP: Turn when one dc remains = 1 dc dec. INCREASE TIP: Inc by working 1 dc + 1 ch extra in outermost dc in each side. Work the inc sts gradually in A.1. ---------------------------------------------------------- BACK PIECE: Read US/UK above! Worked back and forth. Back piece is worked 6 cm / 2⅜" longer than front piece. Work a row with 88-94-102-110-120-130 LOOSE ch (it is important that the ch are loose to avoid a tight edge) on hook size 4 mm / G/6 with Cotton Light. Turn and work 1 dc in 6th ch from hook (A.1 A has now been worked – see Diagram). Work A.1 B over the next 80-86-94-102-112-122 ch, and finish with A.1 C in the last 2 ch. Then continue to work according to A.1. When piece measures 47-48-49-50-51-52 cm / 18½"-19"-19¼"-19¾"-20"-20½", work as follows: A.2 A, repeat A.2 B until 2 dc/ch remain, work A.2 C = 85-91-99-107-117-127 dc. Continue with A.2 until finished measurements. When piece measures 53-54-55-56-57-58 cm / 21"-21¼"-21⅝"-22"-22½"-22¾", insert 1 marker in each side (marks where armhole beg). When piece measures 68-70-72-74-76-78 cm / 26¾"-27½"-28⅜"-29⅛"-30"-30¾", the middle 27-29-31-33-35-37 dc are no longer worked = 29-31-34-37-41-45 dc remain on each shoulder. Now finish each shoulder separately. Continue with A.2, fasten off when piece measures 70-72-74-76-78-80 cm / 27½"-28⅜"-29⅛"-30"-30¾"-31½". FRONT PIECE: Beg and work as on back piece until piece measures 41-42-43-44-45-46 cm / 16⅛"-16½"-17"-17¼"-17¾"-18" - NOTE: Back piece should be 6 cm / 2⅜" longer than front piece - hence the different measures. Now continue as follows: A.2 A, repeat A.2 B until 2 dc/ch remain, work A.2 C = 85-91-99-107-117-127 dc. Continue with A.2 until finished measurements. When piece measures 47-48-49-50-51-52 cm / 18½"-19"-19¼"-19¾"-20"-20½", insert 1 marker in each side (marks where armhole beg). When piece measures 56-58-60-62-64-66 cm / 22"-22¾"-23⅝"-24⅜"-25¼"-26", the middle 23-25-27-29-31-33 dc are no longer worked. Now finish each shoulder separately, at the same time dec 1 dc on every row towards the neck 2 times in total – read DECREASE TIP = 29-31-34-37-41-45 dc remain on each shoulder. Continue with A.2, fasten off when piece measures 64-66-68-70-72-74 cm / 25¼"-26"-26¾"-27½"-28⅜"-29⅛". SLEEVE: Work sleeve back and forth. Work a row with 48-48-50-52-54-56 LOOSE ch (it is important that the ch are loose to avoid a tight edge) on hook size 4 mm / G/6 with Cotton Light. Turn and work 1 dc in 6th ch from hook (A.1 A has now been worked). Work A.1 B over the next 40-40-42-44-46-48 ch, and finish with A.1 C in the last 2 ch = 45-45-47-49-51-53 dc/ch. Then continue to work according to A.1. When piece measures 8 cm / 3⅛", inc 1 st in each side - READ INCREASE TIP! Repeat inc every 7-5-4½-3½-3½-3 cm / 2¾"-2"-1¾"-1¼"-1¼"-1⅛" 5-7-8-9-9-10 more times (6-8-9-10-10-11 inc in total) = 57-61-65-69-71-75 dc/ch. Fasten off when piece measures 49-48-47-46-44-41 cm / 19¼"-19"-18½"-18"-17¼"-16⅛" (shorter measurements in the larger sizes because of wider shoulders). ASSEMBLY: Sew the shoulder seams. Sew in sleeves – from shoulder and down to marker on front and back piece. Sew underarm seams and side seams in one, stop when 26 cm / 10¼" remain on back piece and 20 cm / 8" remain on front piece = vent. |
|||||||
Diagram explanations |
|||||||
|
|||||||
|
|||||||
|
Have you made this or any other of our designs? Tag your pictures in social media with #dropsdesign so we can see them! Do you need help with this pattern?You'll find tutorial videos, a Comments/Questions area and more by visiting the pattern on garnstudio.com. © 1982-2024 DROPS Design A/S. We reserve all rights. This document, including all its sub-sections, has copyrights. Read more about what you can do with our patterns at the bottom of each pattern on our site. |
|||||||


With over 40 years in knitting and crochet design, DROPS Design offers one of the most extensive collections of free patterns on the internet - translated to 17 languages. As of today we count 304 catalogs and 11422 patterns - 11417 of which are translated into English (US/in).
We work hard to bring you the best knitting and crochet have to offer, inspiration and advice as well as great quality yarns at incredible prices! Would you like to use our patterns for other than personal use? You can read what you are allowed to do in the Copyright text at the bottom of all our patterns. Happy crafting!
Comments / Questions (117)
Ik ben volgens patroon aan het haken maar als ik het tweede gedeelte haak A.2 A, B, C dan wordt het patroon steeds wijder. Ik haak nu in. Iedere vaste, klopt dit?
13.02.2018 - 14:13DROPS Design answered:
Hoi Anne, Nee, het patroon wordt niet wijder. Het aantal steken verandert niet door het patroon. Je haat in A.2 stokjes over alle steken, dus over de lossen en de stokjes van het vorige patroon, maar het totaal aantal steken verandert niet.
15.02.2018 - 23:14Hello, What stitch would you recommend for sewing it all together ?? Thank you
30.07.2017 - 20:55DROPS Design answered:
Dear Sophia, since the crocheted fabric is thicker and more stiff, I would recommend the method that is often used when sewing blocks of blankets together. You can see it in this video.
How to sew crochet squares together from Garnstudio Drops design on Vimeo.
30.07.2017 - 23:14Hello , I am on the back side , S, and now started A2 It seems to go wider than A1. Is it all going to even out once I put it together ? tension is the same as A1 so I am not sure what to do about it. Can you help please?
15.06.2017 - 04:50DROPS Design answered:
Dear Sophia, measure each diagram to check where you loose the tension - make sure the chain stitches in A.1 were as width as the dc - so that 17 sts in A.1 = 4" (10 cm) in width in this diagram too. Happy crocheting!
15.06.2017 - 08:27Lisa wrote:
Hi, I am working on the sleeve for size S, and after the third increase I already have the total 57 tr/ch stitches , because increasing by 1tr+1ch at each end of the row means there is an increase of 4 stitches for the row, but the pattern only counts 2 to calculate the total. Is that correct, and if so should I end up with a total of 69 stitches? Or am I doing something wrong? thanks
30.04.2017 - 16:33DROPS Design answered:
Dear Lisa, number of sts after increase will be check, thank you. Happy crocheting!
02.05.2017 - 10:35What does, A.1B stands for. First time doing symbols. Thanks
02.04.2017 - 07:12DROPS Design answered:
Dear Sylvia, diagram A.1 is divided into 3 parts: A.1A = beg of row from RS (= row1: 3 ch, 1 ch, skip 1 st, 1 dc in next st) and end of row from WS, then A.1B to repeat until last 3 sts on row 1 (= *1 ch, skip 1 st, 1 dc in next ch*, repeat from *-* a total of 3 times for 1 repeat of A.1B, repeat these until 2 sts remain on row, and A.1C = end of row from RS, beg of row from WS (row 1 = 1 ch, 1 dc in last st). Your DROPS store will provide you any further invidivual assistance required for reading charts. Happy crocheting!
03.04.2017 - 10:39Can you send me the pattern for this. I would be happy to pay for a pdf or written out.
03.11.2016 - 02:33DROPS Design answered:
Dear Tommie, you will find the pattern for free scrolling down the page. Happy crocheting!
03.11.2016 - 09:45Eva wrote:
Hello!!!Can you tell me the size of the jumper on picture?Thank you.
10.08.2016 - 00:13DROPS Design answered:
Dear Eva, our models are usually wearing size M - read more about sizing here. Happy crocheting!
10.08.2016 - 08:45I am on the back section starting A2 which seems to be a row of treble's. I've done that and I have 5 extra trebles which I don't know how to get rid of but also, because it has gone from a mesh pattern to all treble's, it is very curly. Am I reading the pattern correctly, is it a row of all treble's?
04.08.2016 - 23:51DROPS Design answered:
Dear Wendy, A.2 is all trebles - remember to check and keep gauge (17 tr = 10 cm) when working A.1, and do not work too tight the rows with ch and tr. Happy crocheting!
05.08.2016 - 09:45I really want to make this and looking at it, it appears easy, however, I don't understand the pattern at all. On the back piece, after the foundation row, I've done a treble in the 6th chain from the hook as instructed. It tells me that is A.1A, but the diagram shows it as two chains and a treble. Is it possible to get the written pattern instructions as opposed to looking at the diagram? If not, can you tell me what to do after the first treble in row 2.
31.07.2016 - 01:57DROPS Design answered:
Dear Wendy, when you work first row you skip first 5 ch (working in the 6th ch from hook), these first 5 ch are : 1st tr (= 3 ch), 1 ch before next tr + 1 ch skipped before crocheting next tr). At the beg of row 2 work A.1C: 3ch, 1 tr around next ch, then repeat A.1B and finish with A.1C. Happy crocheting!
01.08.2016 - 09:35I need further clarification on the sleeve increases, inadvertently I am acquiring an extra two stitches when increasing the sleeves leading to too many stitches. I have looked at the pattern to see how I can prevent the extra stitches from occurring but having great difficulty in figuring out how, can you advise further? The first increase stitch is placed at A.1 A and at the end however the extra stitches are occurring in every third row following this, hope this makes sense, Thanks Sarah
11.03.2016 - 23:30DROPS Design answered:
Dear Sarah, you inc for sleeve 1 st in each side, ie you will have a total of 2 tr more on every inc row - increase should be done by working 1 tr + 1 ch more in outermost tr in each side. On next row, work in A.1 as before, you will have same as before, but just 2 more tr per inc row. Happy crocheting!
12.03.2016 - 18:03