
Popular categories
Looking for a yarn?


|
|
Francis |
|
 |
 |
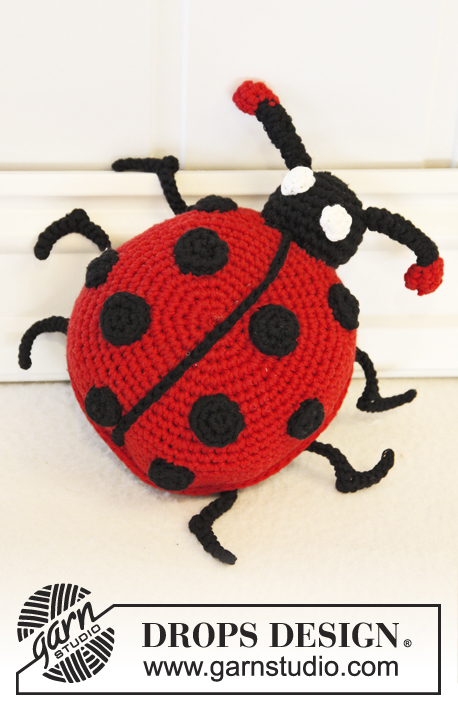
Crochet DROPS lady bug in "Cotton Light".
DROPS Extra 0-890 |
|
|
MAGIC CIRCLE: When piece is worked in the round, start with this technique to avoid holes in the middle (instead of ch-ring): Hold the yarn end and wind the yarn one time around the index finger to make a loop. Hold the loop with left thumb and middle finger, place the yarn over left index finger. Insert hook through the loop, make a YO and pull yarn through loop, work 1 ch, then work dc around the loop. When the desired no of dc have been reached, pull the yarn end to tighten the loop. Fasten the yarn end at the back. Continue to work in the round in a circle. WORK IN THE ROUND IN A CIRCLE: After last dc on the round, continue to next round with 1 dc in next dc which is 1st dc from previous round. NOTE: Insert a marker at the beg of round between last dc and 1st dc on round, move the marker upwards when working. DECREASE TIP: Dec 1 st by working 2 sts tog as follows: * Insert hook in next st, get yarn *, repeat from *-* one more time, make 1 YO and pull yarn through all 3 sts on hook. COLOUR CHANGE: To get a nice colour change work last dc on round as follows: Insert hook in last dc, get yarn, make a YO with the new colour and pull it through all sts on hook. Continue on to next round with the new colour. CROCHET TIP 1: Beg every dc round with 1 ch which replaces the first dc. -------------------------------------------------------- TOP SIDE OF LADY BUG: Worked in the round in a circle from mid on top of upper part of body with red on hook size 3.5 mm. Start by making a MAGIC CIRCLE - read explanation above. ROUND 1: Work 8 dc in the magic circle - READ WORK IN THE ROUND IN A CIRCLE - Insert 1 marker at beg of round and move it upwards when working. ROUND 2: Work 2 dc in every st = 16 dc. ROUND 3: * 1 dc in next dc, work 2 dc in next st *, repeat from *-* the entire round = 24 dc. ROUND 4: * 1 dc in each of the next 2 dc, work 2 dc in next st *, repeat from *-* the entire round = 32 dc. ROUND 5: * 1 dc in each of the next 3 dc, work 2 dc in next st *, repeat from *-* the entire round = 40 dc. ROUND 6: Work 1 dc in every dc. ROUND 7: * 1 dc in each of the next 4 dc, work 2 dc in next st *, repeat from *-* the entire round = 48 dc. ROUND 8: Work 1 dc in every dc. ROUND 9: * 1 dc in each of the next 5 dc, work 2 dc in next st *, repeat from *-* the entire round = 56 dc. ROUND 10: Work 1 dc in every dc. ROUND 11: * 1 dc in each of the next 3 dc, work 2 dc in next st *, repeat from *-* one more time, work 1 dc in each of the next 11 dc. ** Work 2 dc in next st, 1 dc in each of the next 3 dc, work 2 dc in next st **, 1 dc in each of the next 7 dc, repeat from **-** one more time, work 1 dc in each of the next 11 dc, repeat from **-** one more time, 1 dc in each of the last 4 dc on round = 64 sts (= 8 inc sts). ROUND 12: Work 1 dc in every dc. ROUND 13: 1 dc in each of the first 4 dc, work 2 dc in next st, 1 dc in each of the next 3 dc, work 2 dc in next st, work 1 dc in each of the next 15 dc, * work 2 dc in next st, 1 dc in each of the next 3 dc, work 2 dc in next st *, 1 dc in each of the next 7 dc, repeat from *-* 1 more time, work 1 dc in each of the next 15 dc, repeat from *-* one more time, 1 dc in each of the last 3 dc on round = 72 sts (= 8 inc sts). ROUND 14-18: Work 1 dc in every dc. Put piece aside - do not cut the yarn. LADY BUG'S DOTS: Work 6 small dots (stop after 2nd round) and 4 large dots (stop after 3rd round) with black as follows: Work 5 ch and form a ring with 1 sl st in first ch. READ CROCHET TIP 1! Round 1: 8 dc in ch-ring, finish with 1 sl st in 1st dc from beg of round. Round 2: 2 dc in every dc = 16 dc, finish with 1 sl st in 1st dc from beg of round. Round 3 (for large dots): * 1 dc in next dc, work 2 dc in next st *, repeat from *-* the entire round = 24 dc. Fasten off. Fasten the dots on the top side. Work a ch row of 24-28 cm with black. Fasten the row down along the middle of the top side. UNDERSIDE OF LADY BUG: Work as top side but with black to and with 13th round, fasten off. Now place the underside and top side on top of each other and work them tog with a dc round in red through both layers while at the same time filling the lady bug with cotton wool. Fasten off. LEG: Crochet 16 ch with black. Turn piece and work back as follows: Beg in 2nd st from hook and work 1 dc in each of the next 6 ch, then work 2 ch, work 1 dc in each of the next 9 ch. Cut the yarn - this is used to fasten the leg to the lower part of body. Work 6 legs in total and fasten them evenly on each side. ANTENNAS: Worked in the round in a circle. Work 4 ch with black, form a ring by working 1 sl st in first ch, then 1 dc in every ch made = 4 dc. Then work 1 dc in every dc until piece measures approx. 4 cm, switch to red - READ COLOUR CHANGE. Then work 2 dc in each of the next 4 dc = 8 dc. Work 1 dc in each of the next 8 dc, then work all dc on round tog 2 by 2 = 4 dc, fasten off. Pull yarn end through the antenna and tighten until it bends. EYE: Worked in the round in a circle. Start by making a magic circle in off white. Work 6 dc in the magic circle, cut, tighten and fasten the yarn. HEAD: Start by making a MAGIC CIRCLE - read explanation above with black. ROUND 1: Work 6 dc in the magic circle - READ WORK IN THE ROUND IN A CIRCLE - Insert 1 marker at beg of round and move it upwards when working. ROUND 2: Work 2 dc in every st = 12 dc. ROUND 3: * 1 dc in next dc, work 2 dc in next st *, repeat from *-* the entire round = 18 dc. ROUND 4: * 1 dc in each of the next 2 dc, work 2 dc in next st *, repeat from *-* the entire round = 24 dc. ROUND 5-9: Work 1 dc in every dc. Fasten off. Fasten 1 antenna in each side of head, fasten the eyes, then fill the head with some cotton and fasten it to body. |
|
|
Have you made this or any other of our designs? Tag your pictures in social media with #dropsdesign so we can see them! Do you need help with this pattern?You'll find tutorial videos, a Comments/Questions area and more by visiting the pattern on garnstudio.com. © 1982-2024 DROPS Design A/S. We reserve all rights. This document, including all its sub-sections, has copyrights. Read more about what you can do with our patterns at the bottom of each pattern on our site. |
|


With over 40 years in knitting and crochet design, DROPS Design offers one of the most extensive collections of free patterns on the internet - translated to 17 languages. As of today we count 304 catalogues and 11422 patterns - 11422 of which are translated into English (UK/cm).
We work hard to bring you the best knitting and crochet have to offer, inspiration and advice as well as great quality yarns at incredible prices! Would you like to use our patterns for other than personal use? You can read what you are allowed to do in the Copyright text at the bottom of all our patterns. Happy crafting!
Comments / Questions (15)
What i wont to know the botton of the ladybug is round so where do i place the legs the lower part or the upper part
11.08.2023 - 20:32DROPS Design answered:
Dear Mrs Pinson, sew the legs on each side of piece evenly distributed; look at the picture to inspire you. Happy crocheting!
14.08.2023 - 08:38Super einfache Anleitung und der Käfer sieht echt wie auf den Foto aus. 👍👍 Werde ziemlich sicher nochmal 1 oder 2 machen zum verschenken
31.05.2021 - 20:07Ska man göra huvudet i två delar eller ska man efter 9e varvet minska på maskorna för att det ska bli runt så man kan fylla med vadd?
05.09.2020 - 16:07DROPS Design answered:
Hei Sigrid. Hodet hekles rundt, men du skal ikke minske ved 9. omgang. Om du ser på bildet skal ikke hodet snurpes igjen, men sys fast i kroppen. God Fornøyelse!
07.09.2020 - 08:07Marcia Eliane wrote:
Boa tarde.Sou Brasileira. Gostaria de ver a parte de baixo da Joaninha e se possível a receita completa. Agradeço antecipadamente.
09.11.2018 - 16:48Chci se zeptat proč jsou v potřebách 2 kancelářské sponky na vyztužení křídel, ale v návodu jsem nenašla kdy a kam je zakomponovat? děkuji Hanka
17.10.2016 - 09:33DROPS Design answered:
Dobrý den, Hanko, díky za upozornění - berušce se krovky nevyztužují, sponky se nám do návodu zatoulaly z křídel netopýra. Omlouvám se a návod opravuji. Hodně štěstí s beruškou! Hana
17.10.2016 - 18:19Kirsten Johanson wrote:
Pletterne er forkerte i opsk.de kan ikke være så store på billedet er de også mindre dvs. 1 rk. og 2 rk. kirsten
14.10.2016 - 13:56Ik ben deze lieveheersbeestje aan het haken ik heb een vraag over toer11 ik bergrijp het niet zo kunt u mij helpen
06.07.2016 - 13:06DROPS Design answered:
Hoi Dina. Wat begrijp je niet precies in toer 11?
06.07.2016 - 14:21Ik vind het lieveheersbeestje heel leuk. en de andere figuurtjes ook natuurlijk. maar komen er nog figuurtjes bij? ik heb er al veel gemaakt, en ik weet niet wat ik nu zou maken. komen er dus nog figuurtjes bij? ik zou het graag hebben
14.08.2015 - 13:42DROPS Design answered:
Hoi Emma. Dat weet ik niet, het kan zijn dat er later wel meer bij komen.
18.08.2015 - 17:08Ben bezig maar zit vast bij toer 11,die begrijp ik niet goed, er staat 11 vasten en wat moet ik dan
21.04.2014 - 19:02DROPS Design answered:
Hoi Janneke. Je hebt na toer 10 56 v op de toer, dan moet je haken: 1 v in elke van volgende 3 v, haak 2 v in volgende st *, herhaal van *-* nog een keer, haak 1 v in elke van volgende 11 v. ** Haak 2 v in volgende st, 1 v in elke van volgende 3 v, haak 2 v in volgende st **, 1 v in elke van volgende 7 v, herhaal van **-** nog een keer, haak 1 v in elke van volgende 11 v, herhaal van **-** nog een keer, 1 v in elke van de laatste 4 v op toer = 64 st (= 8 st gemeerderd).
22.04.2014 - 16:43Ein richtig süsser Marienkäfer. Einfach zu häkeln, allerdings habe ich fürs zusammen nähen fast genauso lange gebraucht.
17.01.2014 - 18:41