
Popular categories
Looking for a yarn?


|
|
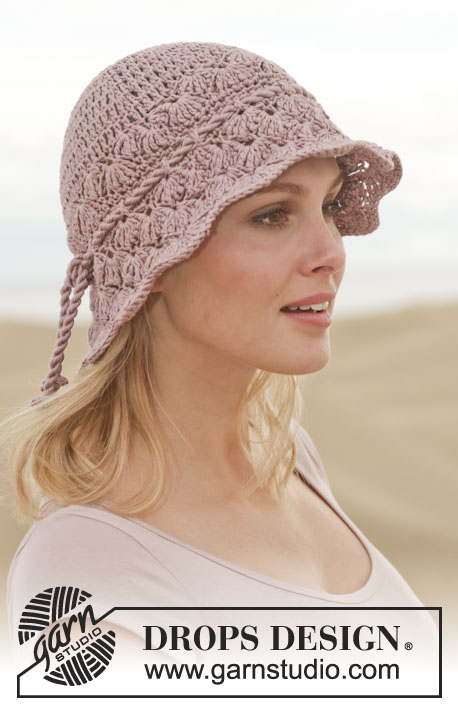
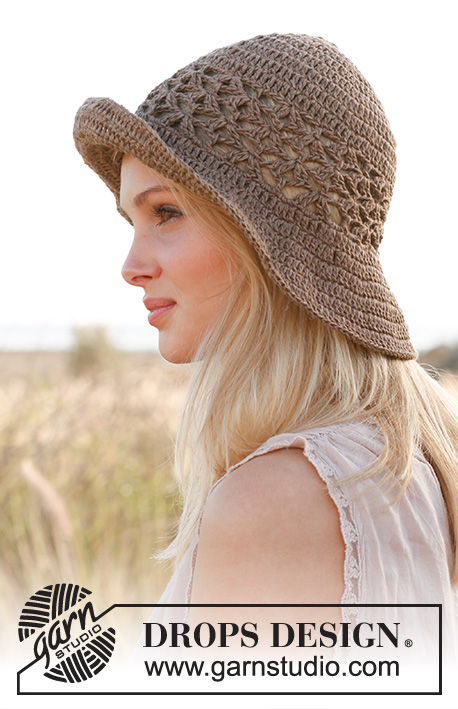
Marlene |
|
 |
 |
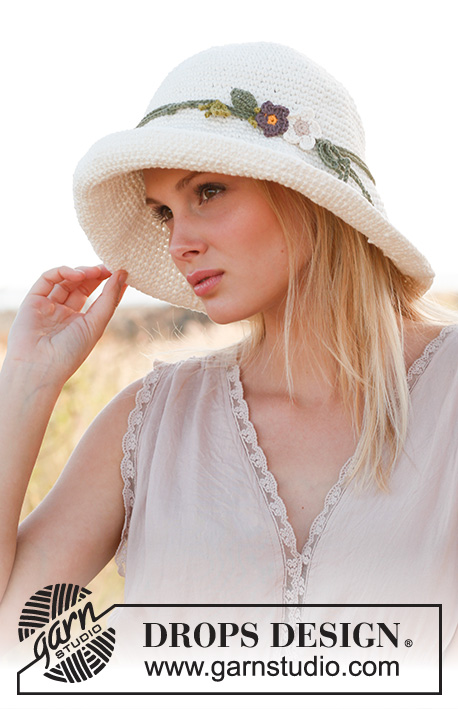
Crochet DROPS hat in 2 threads "Bomull Lin" or 2 threads "Paris".
DROPS 146-32 |
|
|
CROCHET INFO: After last dc on the round, continue to next round with 1 dc in next dc (= 1st dc from previous round). NOTE: Insert a marker at the beg of round between last dc and first dc on the round, move the marker upwards when working. --------------------------------------------------------- HAT: The hat is worked top down. Crochet 4 ch on hook size 3 mm with 2 threads Bomull-Lin or 2 threads Paris and form a ring with 1 sl st in first ch. REMEMBER THE CROCHET TENSION! ROUND 1: Work 1 ch, 5 dc in ch-ring – READ CROCHET INFO! ROUND 2: Work 2 dc in every dc = 10 dc. ROUND 3: * 2 dc in first dc, 1 dc in next dc *, repeat from *-* = 15 dc. ROUND 4: * 2 dc in first dc, 1 dc in next dc, 1 dc in next st *, repeat from *-* = 20 dc. Insert 1 marker at the beg of round. Then inc 5 dc on every round, inc the same place as on previous round, i.e. 1 dc more between every inc on every round. The circle will become a pentagon. Continue like this until 16-17 rounds in total have been worked = 80-85 dc on round. Then work in the round with 1 dc in every dc until piece measures 15-16 cm from the centre. Continue to crochet the brim as follows: ROUND 1: Work 1 dc in every dc while at the same time inc 8 dc evenly = 88-93 sts. ROUND 2: Work 1 dc in every dc. ROUND 3-19: Continue as 1st and 2nd round by inc 8 dc on uneven rounds and working dc in every dc on even rounds. ROUND 20: Work 1 dc in every dc, finish with 1 sl st in first dc = 160-165 dc. Cut and fasten the thread. TIE: Work ch with Safran colour no 26 on hook size 3 mm until tie measures approx. 180 cm, cut and fasten the thread. SMALL FLOWER: Work as follows: 4 ch with Safran colour no 11 on hook size 3 mm and form 1 ring with 1 sl st in first ch. ROUND 1: Work 1 ch, 5 dc in ch-ring, 1 sl st in first ch from beg of round. ROUND 2 (switch to colour no 23): In every dc work: * 3 ch, 2 tr, 1 ch, 1 dc *, repeat from *-* the entire round and finish with 1 sl st in 1st ch from beg of round (= 5 leaves). Cut and fasten the thread. LARGE FLOWER: Work as follows: 4 ch with Safran colour no 21 on hook size 3 mm and form 1 ring with 1 sl st in first ch. ROUND 1: Work 1 ch, 5 dc in ch-ring, 1 sl st in first ch from beg of round. ROUND 2 (switch to colour no 18): In every dc work: * 4 ch, 3 dtr, 1 ch, 1 dc *, repeat from *-* the entire round and finish with 1 sl st in 1st ch from beg of round (= 5 leaves). Cut and fasten the thread. LEAF: Work the leaf with sts on both sides of a ch-row. Work 2 leaves with colour no 26 and work 1 leaf with colour no 14. Work as follows: 8 ch, turn and skip first ch, continue with 2 dc, 3 tr, 2 dc. Work 1 ch at the end of row, continue on the other side of row with 2 dc, 3 tr, 2 dc, finish with 1 sl st in 1st dc. Cut and fasten the thread. BRANCHES: Work 1 branch with colour no 26 and work 2 branches with colour no 14. Work as follows: 8 ch, 1 dc in tie where you want to place the branch, 8 ch, cut the threads and tie 1 knot at the bottom in beg and end of ch-row. Crochet 2 more branches. ASSEMBLY: Fasten the flowers and leaves on the tie. Place the tie 2 times around the hat before tying a bow. |
|
|
Have you made this or any other of our designs? Tag your pictures in social media with #dropsdesign so we can see them! Do you need help with this pattern?You'll find tutorial videos, a Comments/Questions area and more by visiting the pattern on garnstudio.com. © 1982-2024 DROPS Design A/S. We reserve all rights. This document, including all its sub-sections, has copyrights. Read more about what you can do with our patterns at the bottom of each pattern on our site. |
|


With over 40 years in knitting and crochet design, DROPS Design offers one of the most extensive collections of free patterns on the internet - translated to 17 languages. As of today we count 304 catalogues and 11422 patterns - 11422 of which are translated into English (UK/cm).
We work hard to bring you the best knitting and crochet have to offer, inspiration and advice as well as great quality yarns at incredible prices! Would you like to use our patterns for other than personal use? You can read what you are allowed to do in the Copyright text at the bottom of all our patterns. Happy crafting!
Comments / Questions (89)
Ik haak behoorlijk strak dus 2 draden krijg ik nooit op 3mm zelfs 1 is al moeilijk. 4mm is het kleinste waarop ik 1 draad krijg en dat voelt stevig aan in het eerste deel. Dus mijn vraag is als je heel strak haakt of hij dan met 1 draad stevig word want de stevigheid is het belangrijkste voor de rand neem ik aan? Want voor een hoed in de zomer met 2 draden word ik erg warm of niet?
08.03.2016 - 12:21DROPS Design answered:
Hoi Anitra. Je moet de naald gebruiken die je nodig hebt voor de juiste steekverhouding: 17 v in de breedte x 17 toeren hoog. Het is voor dit model belangrijk dat het strak en stevig is - of de rand zal niet mooi vallen. Het is een katoenen hoed, het zou niet te warm worden met 2 draden.
08.03.2016 - 12:41Ich weiß zwar, dass die Standfestigkeit leidet, wenn einfädig gehäkelt wird, aber da ich unter starker Arthritis leide, schaffe ich es auf Dauer nicht, das mit der Nadelstärke durchzuhalten und ich würde so gerne dieses Modell häkeln. Ich erwarte keine Garantie, nur einen Tipp: s. Gr. S/M "... bis inges. 16 Rd. gehäkelt wurden (= 80 fm in der Rd).. weiter häkeln bis.." Da ein- statt zweifädig, wieviele Rd müsste ich ca. "noch mehr" zunehmen, um auf etwa die gleiche Größe zu kommen?
06.03.2016 - 16:52DROPS Design answered:
Liebe Elke, wenn Sie mit komplett anderer Maschenprobe häkeln müssten Sie den Hut immer wieder anprobieren, um die richtigen Masse zu erhalten.
07.03.2016 - 09:35In der Anleitung steht zwar "Häkelinfo lesen", jedoch ist diese bei dem Modell leider nicht angegeben! Ich nehme mal an, dass mit "spiralförmig" häkeln dann gemeint ist, dass die Runden nicht mit einer Kettmasche geschlossen werden? Falls ja, da ich zweifarbig häkeln möchte, kann ich die Rd auch mit KM schließen (wegen schönerem Farbverlauf) oder ändert sich dadurch die gesamte Hutform?
06.03.2016 - 12:30DROPS Design answered:
Liebe Elke, Sie haben recht, die HÄKELINFO wurde bei der deutschen Übersetzung vergessen, wir haben das nun ergänzt. Sie können die RD natürlich auch mit Kettmaschen schliessen wenn Sie mehrfarbig häkeln.
06.03.2016 - 14:34Hello! I love this hat and am very happy to start it but I don't understand the following direction for rounds 5-16 or 17. "Then inc 5 sc on every round, inc the same place as on previous round, i.e. 1 sc more between every inc on every round." Does this mean that at certain points in every round, I sc twice in the same st 5 separate times?
02.03.2016 - 16:59DROPS Design answered:
Dear Mrs Cordaro, you have to work 1 more sc between each inc, ie on round 5 you will work *2 sc in first st, 1 sc in next 3 sts*, then on round 6: *2 sc in first st, 1 sc in next 4 sts*, and so on. Number of inc will always be the same, but number of sts between inc will inc on every round. Happy crocheting!
02.03.2016 - 18:10Louise Heckford wrote:
Love this hat... got the yarn, slowly making it, cant wait to get it finished and on my head :)
27.04.2015 - 11:36How did you block the finished hat?
08.04.2015 - 04:31DROPS Design answered:
Dear Mrs Rodriguez-Solano, you can block the hat when finished. Happy crocheting!
08.04.2015 - 09:12I am new to crochet and I have completed the first 16 rounds of this pattern and would like to know if you can tell me what it means when the pattern says to work in the round until the "piece measures 15-16 cm from the middle." Just wondering where I measure from the middle. Thank you.
01.04.2015 - 16:54DROPS Design answered:
Dear Julia, the 15-16 cm should be taken from the middle of the work, ie from the beginning of hat (round 1). Happy crocheting!
02.04.2015 - 09:48Confused by instructions - The pattern states 300-300g are needed of DROPS BOMULL-LIN from Garnstudio to crochet this hat. How many skeins should I purchase? Thank you.
24.03.2015 - 03:56DROPS Design answered:
Dear Julia, DROPS Bomull-Lin = 50 g a ball, divide total amount of yarn stated by 50 g, ie 300/50= 6. You need 6 balls Bomull-Lin (+ Safran for the flowers). Happy crocheting!
24.03.2015 - 09:39I made this beautiful hat last summer. I entered it at the 2014 Minnesota State Fair and won the first prize blue ribbon in the category of crochet accessories. Thank you, Drops, for the winning pattern !
05.09.2014 - 03:47Diane Court wrote:
Dear garnstudio I live in Australia and made this hat in a recycled cotton .I love it, tho hat is heavy. I want to make it again and to buy your recommended yarn from you. I checked tension & made it single strand using 4 mm). Your website info on Paris says use a 5mm hook on one strand. The pattern says use 2 strands on a size 3mm. I see you have one question in English on this subject, but doesn't two strands of Paris make up very thick and bulky? Thank you for your time.
08.12.2013 - 05:55DROPS Design answered:
Dear Mrs Court, you work here with a tight gauge to get the hat as it should be, that's the reason why your swatch should be 16 dc in width and 17 rows in height with a crochet hook size 3 mm or size required to get the correct measurements = 10 x 10 cm to match final result. Happy crocheting!
08.12.2013 - 20:58