
Popular categories
Looking for a yarn?


|
|
Sea Waves |
|
 |
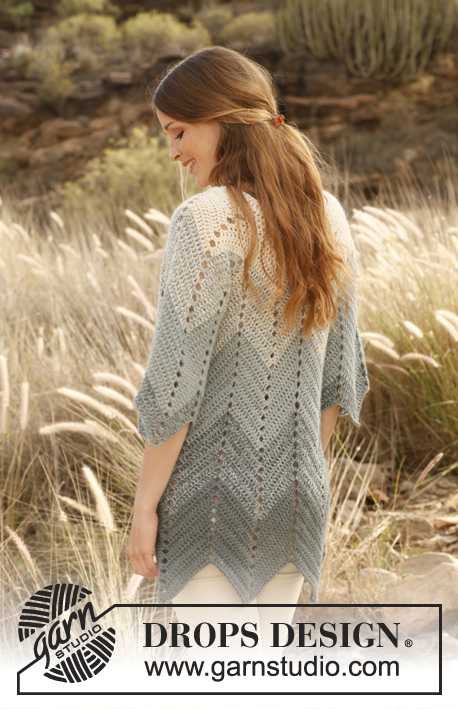 |
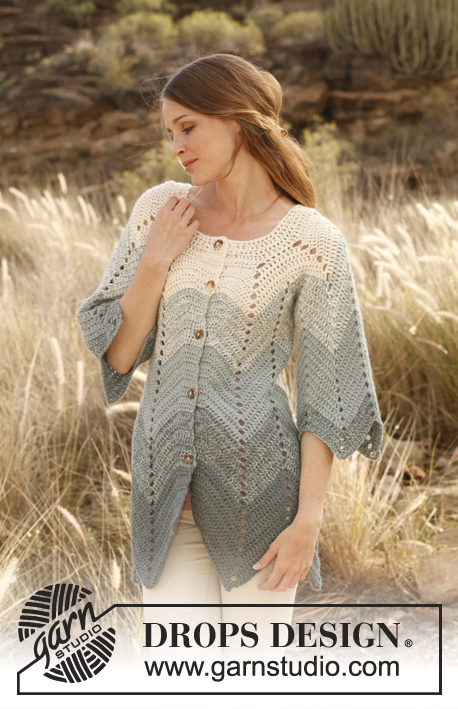
Crochet DROPS jacket with zig-zag pattern in 2 strands "Alpaca". Size: S - XXXL.
DROPS 147-10 |
|
|
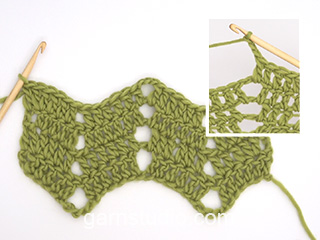
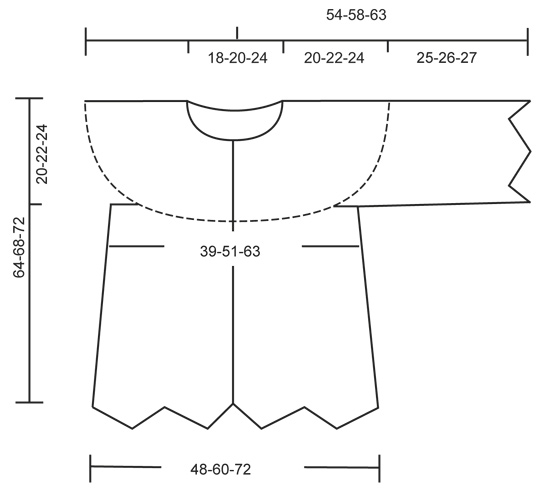
MEASURING TIP: All measurements should be done up along band mid front. STRIPES: Work stripes as follows: BODY - SEE MEASURING TIP: From beg edge to 11 cm / 4½": 2 strands dark gray green 11 to 22 cm / 4½" to 8¾": 1 strand dark gray green and 1 strand light grayish green 22 cm to 33-34-35 cm / 8¾" to 13"-13½"-13¾": 2 strands light grayish green 33-34-35 cm to 44-46-48 cm / 13"-13½"-13¾" to 17¼"-18"-19": 1 strand light grayish green and 1 strand off white 44-46-48 cm / 17¼"-18"-19" until finished measurements: 2 strands off white SLEEVE: From beg edge to 3 cm / 1": 1 strand dark gray green and 1 strand light grayish green 3 to 14 cm / 1" to 5½": 2 strands light grayish green 14 cm to 25-26-27 cm / 5½" to 9¾"-10¼"-10½": 1 strand light grayish green and 1 strand off white DECREASE TIP: Work 1 dc, but wait with last pull through (= 2 sts on hook), work next dc, but on last pull through, pull yarn through all sts on hook - 1 dc has been dec. ---------------------------------------------------------- JACKET: Jacket is worked back and forth from mid front, bottom up. With 2 strands dark gray green ch 236-284-332 loosely on hook size 4.5 mm / US 7. Work STRIPES - see explanation above. ROW 1: Work 1 dc in 4th ch from hook (= 2 dc), 1 dc in each of the next 20-24-28 ch, * skip 5 ch, 1 dc in each of the next 16-20-24 ch, ch 3, 1 dc in each of the next 16-20-24 ch *, repeat from *-* 5 times in total, skip 5 ch and finish with 1 dc in each of the last 22-26-30 ch = 204-252-300 dc. ROW 2: ch 3 (= 1 dc), 1 dc in each of the next 5 dc (= 6 dc in band), 2 dc in each of the next 2 dc, 1 dc in each of the next 12-16-20 dc, * skip 4 dc, 1 dc in each of the next 14-18-22 dc, 2 dc in ch-space, ch 3, 2 dc in ch-space, 1 dc in each of the next 14-18-22 dc *, repeat from *-* a total of 5 times, skip 4 dc, finish with 1 dc in each of the next 12-16-20 dc and 2 dc in each of the next 2 dc, 1 dc in each of the last 6 dc (= band) = 16-20-24 dc between every hole, 204-252-300 dc in total. Repeat 2nd row until piece measures 12 cm / 4¾" – READ MEASURING TIP. Now work as follows: ROW 1: ch 3 (= 1 dc), 1 dc in each of the next 5 dc (= 6 dc in band), 2 dc in next dc, 1 dc in each of the next 13-17-21 dc, * skip 4 dc, 1 dc in each of the next 14-18-22 dc, 1 dc in ch-space, ch 3, 1 dc in ch-space, 1 dc in each of the next 14-18-22 dc *, repeat from *-* a total of 5 times, skip 4 dc, finish with 1 dc in each of the next 13-17-21 dc, 2 dc in next dc and 1 dc in each of the last 6 dc (= band) = 192-240-288 dc (15-19-23 dc between every hole). ROW 2: ch 3 (= 1 dc), 1 dc in each of the next 5 dc (= 6 dc in band), 2 dc in each of the next 2 dc, 1 dc in each of the next 11-15-19 dc, * skip 4 dc, 1 dc in each of the next 13-17-21 dc, 2 dc in ch-space, ch 3, 2 dc in ch-space, 1 dc in each of the next 13-17-21 dc *, repeat from *-* a total of 5 times, skip 4 dc, finish with 1 dc in each of the next 11-15-19 dc, 2 dc in each of the next 2 dc and 1 dc in each of the last 6 dc (= band) = 192-240-288 dc (15-19-23 dc between every hole). Repeat 2nd row until piece measures approx. 22 cm / 8¾". Now work as follows: ROW 1: ch 3 (= 1 dc), 1 dc in each of the next 5 dc (= 6 dc in band), 2 dc in next dc, 1 dc in each of the next 12-16-20 dc, * skip 4 dc, 1 dc in each of the next 13-17-21 dc, 1 dc in ch-space, ch 3, 1 dc in ch-space, 1 dc in each of the next 13-17-21 dc *, repeat from *-* a total of 5 times, skip 4 dc, finish with 1 dc in each of the next 12-16-20 dc, 2 dc in next dc and 1 dc in each of the last 6 dc (= band) = 180-228-276 dc (14-18-22 dc between every hole). ROW 2: ch 3 (= 1 dc), 1 dc in each of the next 5 dc (= 6 dc in band), 2 dc in each of the next 2 dc, 1 dc in each of the next 10-14-18 dc, * skip 4 dc, 1 dc in each of the next 12-16-20 dc, 2 dc in ch-space, ch 3, 2 dc in ch-space, 1 dc in each of the next 12-16-20 dc *, repeat from *-* a total of 5 times, skip 4 dc, finish with 1 dc in each of the next 10-14-18 dc, 2 dc in each of the next 2 dc and 1 dc in each of the last 6 dc (= band) = 180-228-276 dc (14-18-22 dc between every hole). Repeat 2nd row until piece measures approx. 32-33-34 cm / 12½"-13"-13½". Now work as follows: ROW 1: ch 3 (= 1 dc), 1 dc in each of the next 5 dc (= 6 dc in band), 2 dc in next dc, 1 dc in each of the next 11-15-19 dc, * skip 4 dc, 1 dc in each of the next 12-16-20 dc, 1 dc in ch-space, ch 3, 1 dc in ch-space, 1 dc in each of the next 12-16-20 dc *, repeat from *-* a total of 5 times, skip 4 dc, finish with 1 dc in each of the next 11-15-19 dc, 2 dc in next dc and 1 dc in each of the last 6 dc (= band) = 168-216-264 dc (13-17-21 dc between every hole). ROW 2: ch 3 (= 1 dc), 1 dc in each of the next 5 dc (= 6 dc in band), 2 dc in each of the next 2 dc, 1 dc in each of the next 9-13-17 dc, * skip 4 dc, 1 dc in each of the next 11-15-19 dc, 2 dc in ch-space, ch 3, 2 dc in ch-space, 1 dc in each of the next 11-15-19 dc *, repeat from *-* a total of 5 times, skip 4 dc, finish with 1 dc in each of the next 9-13-17 dc, 2 dc in each of the next 2 dc and 1 dc in each of the last 6 dc (= band) = 168-216-264 dc (13-17-21 dc between every hole). Repeat 2nd row until piece measures approx. 44-46-48 cm / 17¼"-18"-19". Put piece aside. SLEEVE: With 1 strand dark gray green and 1 strand light grayish gree ch 93-117-141 loosely on hook size 4.5 mm/ US 7 and form a ring with 1 sl st in first ch. Work in the round and with STRIPES - see explanation above. ROUND 1: ch 3 in first ch (= 1 dc), * ch 3, 1 dc in each of the next 13-17-21 ch, skip ch 5, 1 dc in each of the next 13-17-21 ch *, repeat from *-* 2 times, ch 3, 1 dc in each of the next 13-17-21 ch, skip ch 5, 1 dc in each of the last 12-16-20 ch and finish with 1 sl st in 3rd ch from beg of round. ROUND 2: ch 3 (= 1 dc), 1 dc in ch-sp, ch 3, 2 dc in ch-sp, * 1 dc in each of the next 11-15-19 dc, skip 4 dc, 1 dc in each of the next 11-15-19 dc, 2 dc in ch-space, ch 3, 2 dc in ch-space *, repeat from *-* 2 times, 1 dc in each of the next 11-15-19 dc, skip 4 dc, 1 dc in each of the next 10-14-18 dc and finish with 1 sl st in 3rd ch from beg of round, 1 sl st in each of next 2 sts = 78-102-126 dc. Repeat 2nd round until sleeve measures 25-26-27 cm / 9¾"-10¼"-10½", fasten off. YOKE: Work piece tog as follows – beg on right front piece with 2 strands off white on hook size 4.5 mm/ US 7: ch 3 (= 1 dc), 1 dc in each of the next 5 dc (= 6 dc in band), 2 dc in each of the next 2 dc, 1 dc in each of the next 9-13-17 dc, skip 4 dc, 1 dc in each of the next 11-15-19 dc, 2 dc in ch-space, ch 3. Continue work from sleeve: 2 dc in a ch-space, 1 dc in each of the next 11-15-19 dc, skip 4 dc, 1 dc in each of the next 11-15-19 dc, 2 dc in ch-space, ch 3, 2 dc in ch-space, 1 dc in each of the next 11-15-19 dc, skip 4 dc, 1 dc in each of the next 11-15-19 dc, 2 dc in ch-space, ch 3. Skip the remaining dc on sleeve, skip 1 repetition from body (13-17-21 + 13-17-21 dc), then work from body as follows: 2 dc in ch-space, 1 dc in each of the next 11-15-19 dc, skip 4 dc, 1 dc in each of the next 11-15-19 dc, 2 dc in ch-space, ch 3, 2 dc in ch-space, 1 dc in each of the next 11-15-19 dc, skip 4 dc, 1 dc in each of the next 11-15-19 dc, 2 dc in ch-space, ch 3. Continue work from sleeve: 2 dc in a ch-space, 1 dc in each of the next 11-15-19 dc, skip 4 dc, 1 dc in each of the next 11-15-19 dc, 2 dc in ch-space, ch 3, 2 dc in ch-space, 1 dc in each of the next 11-15-19 dc, skip 4 dc, 1 dc in each of the next 11-15-19 dc, 2 dc in ch-space, ch 3. Skip the remaining dc on sleeve, skip 1 repetition from body (13-17-21 + 13-17-21 dc), then work from body as follows: 2 dc in ch-space, 1 dc in each of the next 11-15-19 dc, skip 4 dc, finish with 1 dc in each of the next 9-13-17 dc and 2 dc in each of the next 2 dc, 1 dc in each of the next 6 dc (= band) = 220-284-348 dc (13-17-21/26-34-42 dc between every hole). ROW 1: ch 3 (= 1 dc), 1 dc in each of the next 5 dc (= 6 dc in band), 2 dc in each of the next 2 dc, 1 dc in each of the next 9-13-17 dc, * skip 4 dc, 1 dc in each of the next 22-30-38 dc, skip 4 dc, 1 dc in each of the next 11-15-19 dc, 2 dc in ch-space, ch 3, 2 dc in ch-space, 1 dc in each of the next 11-15-19 dc *, repeat from *-* 3 times in total, skip 4 dc, 1 dc in each of the next 22-30-38 dc, skip 4 dc, finish with 1 dc in each of the next 9-13-17 dc and 2 dc in each of the next 2 dc, 1 dc in each of the last 6 dc (= band) = 204-268-332 dc. ROW 2: ch 3 (= 1 dc), 1 dc in each of the next 5 dc (= 6 dc in band), 2 dc in next dc, 1 dc in each of the next 10-14-18 dc, * skip 4 dc, 1 dc in each of the next 18-26-34 dc, skip 4 dc, 1 dc in each of the next 7-11-15 dc, work the next 2 dc tog - READ DEC.TIPS, work the next 2 dc tog, 2 dc in ch-space, ch 3, 2 dc in ch-space, work the next 2 dc tog, work the next 2 dc tog, 1 dc in each of the next 7-11-15 dc *, repeat from *-* 3 times in total, skip 4 dc, 1 dc in each of the next 18-26-34 dc, skip 4 dc, finish with 1 dc in each of the next 10-14-18 dc and 2 dc in next dc, 1 dc in each of the last 6 dc (= band) = 174-238-302 dc. ROW 3: ch 3 (= 1 dc), 1 dc in each of the next 5 dc (= 6 dc in band), 2 dc in each of the next 2 dc, 1 dc in each of the next 8-12-16 dc, * skip 4 dc, 1 dc in each of the next 14-22-30 dc, skip 4 dc, 1 dc in each of the next 5-9-13 dc, work the next 2 dc tog, work the next 2 dc tog, 2 dc in ch-space, ch 3, 2 dc in ch-space, work the next 2 dc tog, work the next 2 dc tog, 1 dc in each of the next 5-9-13 dc *, repeat from *-* 3 times in total, skip 4 dc, 1 dc in each of the next 14-22-30 dc, skip 4 dc, finish with 1 dc in each of the next 8-12-16 dc and 2 dc in each of the next 2 dc, 1 dc in each of the last 6 dc (= band) = 146-210-274 dc. ROW 4: ch 3 (= 1 dc), 1 dc in each of the next 5 dc (= 6 dc in band), 2 dc in next dc, 1 dc in each of the next 9-13-17 dc, * skip 4 dc, 1 dc in each of the next 10-18-26 dc, skip 4 dc, 1 dc in each of the next 5-9-13 dc, work the next 2 dc tog, 4 dc in ch-space, work the next 2 dc tog,1 dc in each of the next 5-9-13 dc*, repeat *-* 3 times in total, skip 4 dc, 1 dc in each of the next 10-18-26 dc, skip 4 dc, finish with 1 dc in each of the next 9-13-17 dc and 2 dc in next dc, 1 dc in each of the last 6 dc (= band) = 122-186-250 dc. ROW 5: ch 3 (= 1 dc), 1 dc in each of the next 5 dc (= 6 dc in band), 2 dc in each of the next 2 dc, 1 dc in each of the next 7-11-15 dc, * skip 4 dc, 1 dc in each of the next 6-14-22 dc, skip 4 dc, 1 dc in each of the next 4-8-12 dc, 1 dc in next dc, 2 dc in each of next 2 dc, 1 dc in next dc, 1 dc in each of the next 4-8-12 dc *, repeat from *-* 3 times in total, skip 4 dc, 1 dc in each of the next 6-14-22 dc, skip 4 dc, finish with 1 dc in each of the next 7-11-15 dc and 2 dc in each of the next 2 dc, 1 dc in each of the last 6 dc (= band) = 100-164-228 dc. Now finish the jacket with 1 dc in every dc - the zig-zag pattern is no longer worked. Replace first dc on every row with 3 ch. ROW 6: Work 1 dc in every dc while AT THE SAME TIME dec 5-9-10 dc evenly (do not dec over dc in bands) = 95-155-218 dc. Work 3-7-11 more rows with 1 dc in every dc while AT THE SAME TIME dec 5-9-10 dc evenly on every row = 80-92-108 dc. Fasten off. ASSEMBLY: Sew tog the openings under the sleeves and sew on buttons on left band. Sew the upper button 2 cm / ¾" from upper edge, then distribute the rest of the buttons downwards approx. 8 cm / 3⅛" apart. Button the buttons between dc on right front piece. |
|
|
|
|
Have you made this or any other of our designs? Tag your pictures in social media with #dropsdesign so we can see them! Do you need help with this pattern?You'll find tutorial videos, a Comments/Questions area and more by visiting the pattern on garnstudio.com. © 1982-2024 DROPS Design A/S. We reserve all rights. This document, including all its sub-sections, has copyrights. Read more about what you can do with our patterns at the bottom of each pattern on our site. |
|


With over 40 years in knitting and crochet design, DROPS Design offers one of the most extensive collections of free patterns on the internet - translated to 17 languages. As of today we count 304 catalogs and 11422 patterns - 11417 of which are translated into English (US/in).
We work hard to bring you the best knitting and crochet have to offer, inspiration and advice as well as great quality yarns at incredible prices! Would you like to use our patterns for other than personal use? You can read what you are allowed to do in the Copyright text at the bottom of all our patterns. Happy crafting!
Comments / Questions (197)
Habe die Jacke in senfgelb/orange/weinrot gehäkelt. Ich finde das Modell superschön, auch die Garnfarben, habe aber ein paar Veränderungen vorgenommen. Am oberen Rand eine Reihe Stäbchen mehr und noch eine Reihe halbe Stäbchen zum Abschluss. Außerdem an der mittleren Rückenzacke etwas geändert, da ist eine Art Beule entstanden, als ich es nach Anleitung gemacht habe. Hab die Zacke jetzt früher abgeflacht. Von der mittleren Farbe braucht man etwas mehr Garn als empfohlen.
09.07.2013 - 13:06Der er noget galt med mønsteret på ærmet. 2 omg. som skal gentages stemmer ikke. I slutningen mangler der hele tiden 1-2 st. Er der nogen, der kan hjælpe. Jeg kan ikke løse det
18.06.2013 - 22:09DROPS Design answered:
Hej Stine. 2. omg skulle stemme. Vaer sikker paa at du haekler praecis som der staar. Men hvis du vil melde hvilken str du haekler kan jeg tjekke det endnu engang.
19.06.2013 - 13:16På 5.rad på bærestykket må det være en feil. Det står : "* hopp over 4 st, 1 st i hver av de 6-14-22 neste st, hopp over 4 st, 1 st i hver av de 4-8-12 neste st, hekle de 2 neste sammen, 1 st i hver av de neste 4 st, hekle de 2 neste st sammen ,1 st i hver av de 4-8-12 neste st *, Jeg hekler største størrelse og får/har bare 10 st der hvor det i mønsteret står 12.
18.06.2013 - 16:37DROPS Design answered:
Hei Torill. Mönstret er rettet, der var en fejl ved ermet. Undskyld den lange ventetid!
21.02.2014 - 11:54Kamalpreet wrote:
I loved this pattern . its very beautiful. But when I tried it usin 234 chain its length comes out appx 32 inches( 164 cms). I checked gauge. it was same as given in pattern that is 15 tr = 10 cms. I am confused how can it fit to a person of small size. can you please share me same pattern for smile size as the instructions given here seems for very large people
15.06.2013 - 18:55DROPS Design answered:
Dear Kamalpreet, in size S, you start with a foundation ch of 236 ch but then skip some ch on first row to get 204 tr at the end of 1st row. If you get the correct tension of 15 tr = 10 cm with 2 strands, you should get the correct measurements. Don't forget that you ned more sts to form the tips but then working in pattern you should get correct final measurements. Happy crocheting!
17.06.2013 - 10:17Palun abi jaki seljataguse osa lõpetamisel.pildilt ei näe vikliosade lõpetamist seljaosal ega ka nende lõpetamist.kuidas kahandada ülemisi sakke?Palun vastust Epostiga .kodulehte ei ole. Aitäh. kerstin
07.06.2013 - 09:33DROPS Design answered:
Passeosa kirjelduses on toodud, kuidas heegeldada valge lõngaga õle sakkide.
29.08.2013 - 15:55Anteide wrote:
Heute wirklich fertig.Am Ende hab ich die Passe 4xfrisch angefangen und dann nach DaumenxPi selber fertig gestellt. Die Anleitung ist nicht korrekt.Wenn man der folgt,dann hat man mitten im Rücken einen Buckel :-)Der Rest ist gut und die Jacke seeehr schön. En fin je l'ai fini, je devais recommencer 4 fois et a la fin je ne suivait pas les instructions pour l'empiecement. Est-ce qu'il est possible, que j'etait la seule de faire ce model en L/XL? En tout cas, tres belle veste, merci Drops!
05.05.2013 - 21:06Anteide wrote:
Perdon, perdon, perdon. Maintenant j'ai lu les instructions Norge, ca va. J'ai compris les ranges 3-7-11 a la fin, c'est bon. Restent encore le enigma du range 4 et 5. Je vais le termine aujour d'hui!
04.05.2013 - 21:37Lisa wrote:
Encore unefois moi :-) RANG 6: 1 B dans chaque B, EN MÊME TEMPS diminuer 5-9-10 B à intervalles réguliers (ne pas diminuer au-dessus des B des bordures devants) = 95-155-218 B. Crocheter encore 3-7-11 rangs de B (= 1 B dans chaque B), EN MÊME TEMPS diminuer 5-9-10 B à intervalles réguliers à chaque rang = 80-92-108 B. Arrêter. Rang 6 en XL. Si j'ai 155 B et je diminue 3 x 9B=27 j'arrive a 128. XXL ne corresponde pas non plus. Ou est-ce que je malcompris? Merci, gracias, Danke schön
04.05.2013 - 17:26Antoine wrote:
Merci DropsDesign. Mais il me manquet d B, voir:sauter 4 B, 1 B dans chacune des 6-14-22 B suivantes, sauter 4 B, 1 B dans chacune des 4-8-12 B suivantes, écouler les 2 B suiv ens, 1 B dans les 4 B suiv, Je n'ai plus 8B plus 2 pour ecouler y 2 de sauter.Total est 12. Du rang 4 il y a que 10B. Tres complique d'ecrire tout ca. Merci quand meme, je n'eocule pas alors et tout va bien pour rang 6 :-) Merci encore, Lisa des Iles Canaries
04.05.2013 - 14:57Lisa wrote:
Hat irgendjemand das fertig gehäkelt?Ich habe ein Problem bei der Passe, Reihe 5, das geht sich mit der Zählung nicht aus. Has anyone made this model? Have a prob with yoke, row no5, numbers just dont match. Est-ce qu'il y a qqu, qui a termine ce model? J'ai un problem avec empiecement, ligne no 5, le nos ne correspondent pas!!!
03.05.2013 - 23:27DROPS Design answered:
Bonjour Lisa, le rang 5 "marche" bien au-dessus du rang 4, placez peut-être un marqueur entre chaque répétition de *-* pour vous aider, dès le rang 4 si nécessaire. Bon crochet !
04.05.2013 - 08:47