
Popular categories
Looking for a yarn?


|
|
Edelweiss |
|
 |
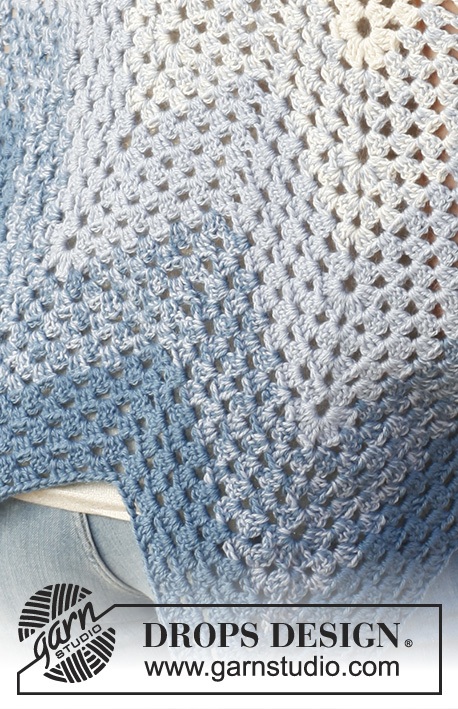 |
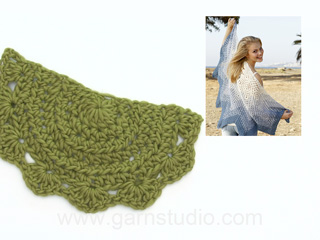
Crochet DROPS shawl with zig-zag pattern in 2 strands ”BabyAlpaca Silk”.
DROPS 145-6 |
|
|
MAGIC CIRCLE: When piece is worked in the round, start with this technique to avoid hole in the middle (instead of ch-ring): Hold the yarn end and wind the yarn one time around the index finger to make a loop. Hold the loop with left thumb and middle finger, place the yarn over left index finger. Insert hook through the loop, make a YO and pull yarn through loop, ch 3, then work 11 dc around the loop. Pull yarn end to tighten the loop. Fasten the yarn end on the back side. CROCHET TIP: Replace 1 hdc at beg of round with 2 ch. STRIPES: Work stripes as follows: 0-27 cm / 0-10½": 2 strands off white 27-37 cm / 10½"-14½": 1 strand off white and 1 strand ice blue 37-47 cm / 14½"-18½": 2 strands ice blue 47-57 cm / 18½"-22½": 1 strand ice blue and 1 strand gray blue 57-67 cm / 22½"-26½": 2 strands gray blue ---------------------------------------------------------- SHAWL: The shawl is worked in stripes - see explanation above. Work a magic circle with 12 dc on hook size 5 mm / H/8 – see explanation above. Turn. ROW 1: READ CROCHET TIP! 2 hdc in first dc, * 1 hdc in each of the next 2 dc, 2 hdc in next dc *, repeat from *-* until 2 dc remain and finish with 1 hdc in each of the last 2 dc = 16 hdc. Turn. ROW 2: 2 hdc in first hdc, * 1 hdc in each of the next 3 hdc, 2 hdc in next hdc *, repeat from *-* until 3 hdc remain and finish with 1 hdc in each of the last 3 hdc = 20 hdc. Turn. ROW 3: 2 hdc in first hdc, * 1 hdc in each of the next 4 hdc, 2 hdc in next hdc *, repeat from *-* until 4 hdc remain and finish with 1 hdc in each of the last 4 hdc = 24 hdc. Turn. ROW 4: 2 hdc in first hdc, * 1 hdc in each of the next 5 hdc, 2 hdc in next hdc *, repeat from *-* until 5 hdc remain and finish with 1 hdc in each of the last 5 hdc = 28 hdc. Turn. ROW 5: 2 hdc in first hdc, * 1 hdc in each of the next 6 hdc, 2 hdc in next hdc *, repeat from *-* until 6 hdc remain and finish with 1 hdc in each of the last 6 hdc = 32 hdc. Turn. ROW 6: ch 4, work 3 dc in next hdc, * skip 3 hdc, work 3 dc + ch 1 + 3 dc in next hdc *, repeat from *-* 6 times in total, skip 3 hdc, work 3 dc + ch 1 in next hdc, skip 1 hdc, work 1 dc in last hdc. Turn. ROW 7: ch 4, work 3 dc in first ch, * skip 6 dc, work 3 dc + ch 3 + 3 dc in next ch-space *, repeat from *-* 6 times in total, skip 6 dc, work 3 dc + ch 1 in next ch, 1 dc in last dc. Turn. ROW 8: ch 4, work 3 dc + ch 1 + 3 dc in first ch, * skip 6 dc, work 3 dc + ch 1 + 3 dc + ch 3 + 3 dc + ch 1 + 3 dc in next ch-space *, repeat from *-* 6 times in total, skip 6 dc, work 3 dc + ch 1 + 3 dc + ch 1 in last ch and 1 dc in last dc. Turn. ROW 9: ch 4, work 3 dc + ch 1 in first ch, skip 3 dc, work 3 dc + ch 1 in next ch, * skip 6 dc, work 3 dc + ch 1 in next ch, skip 3 dc, work 3 dc + ch 3 + 3 dc + ch 1 in next ch-space, skip 3 dc, work 3 dc + ch 1 in next ch *, repeat from *-* 6 times in total, skip 6 dc, work 3 dc + ch 1 in next ch, skip 3 dc, work 3 dc + ch 1 in next ch and 1 dc in last dc. Turn. ROW 10-11: Work as 9th row. ROW 12: ch 4, work 3 dc + ch 1 + 3 dc + ch 1 in first ch, skip 3 dc, work 3 dc in next ch,* skip 6 dc, work 3 dc + ch 1 in next ch, skip 3 dc, work 3 dc + ch 1 + 3 dc + ch 3 + 3 dc + ch 1 + 3 dc + ch 1 in next ch-space, skip 3 dc, work 3 dc in next ch *, repeat from *-* 6 times in total, skip 6 dc, work 3 dc + ch 1 in next ch, skip 3 dc, work 3 dc + ch 1 + 3 dc + ch 1 in last ch and 1 dc in last dc. Turn. ROW 13: ch 4, work 3 dc + ch 1 in first ch, skip 3 dc, work 3 dc + ch 1 in next ch, skip 3 dc, work 3 dc + ch 1 in next ch,* skip 6 dc, work 3 dc + ch 1 in next ch, skip 3 dc, work 3 dc, + ch 1 in next ch, skip 3 dc, work 3 dc + ch 3 + 3 dc + ch 1 in next ch-space, skip 3 dc, work 3 dc + ch 1 in next ch, skip 3 dc, work 3 dc in next ch *, repeat from *-* 6 times in total, skip 6 dc, work 3 dc + ch 1 in next ch, skip 3 dc, work 3 dc + ch 1 in next ch, skip 3 dc, work 3 dc + ch 1 in next ch and 1 dc in last dc. Turn. ROW 14-15: Work as 13th row. When 3 rows have been worked as row 13, inc the same way as on row 12 (in ch-space work 3 dc + ch 1 + 3 dc + ch 3 + 3 dc + ch 1 +3 dc + ch 1, and work 3 dc + ch 1 + 3 dc + ch 1 in first and last ch). Work next row as 13th row but work 3 dc + ch 1 more between every top/bottom in pattern. Work 3 rows in total like this, then inc again. Continue like this upwards, on every 4th row inc in every top and in each side. Continue until shawl measures 67 cm / 26½" measured along the middle of shawl. Fasten off. |
|
|
Have you made this or any other of our designs? Tag your pictures in social media with #dropsdesign so we can see them! Do you need help with this pattern?You'll find tutorial videos, a Comments/Questions area and more by visiting the pattern on garnstudio.com. © 1982-2024 DROPS Design A/S. We reserve all rights. This document, including all its sub-sections, has copyrights. Read more about what you can do with our patterns at the bottom of each pattern on our site. |
|


With over 40 years in knitting and crochet design, DROPS Design offers one of the most extensive collections of free patterns on the internet - translated to 17 languages. As of today we count 304 catalogs and 11422 patterns - 11417 of which are translated into English (US/in).
We work hard to bring you the best knitting and crochet have to offer, inspiration and advice as well as great quality yarns at incredible prices! Would you like to use our patterns for other than personal use? You can read what you are allowed to do in the Copyright text at the bottom of all our patterns. Happy crafting!
Comments / Questions (189)
Auch ich habe Schwierigkeiten, die Reihen nach "die nächste Reihe wie die 13. Reihe häkeln, aber 3 Stb +1Lm mehr zwischen jedem Zacken im Muster" zu häkeln. Wenn ich nach dieser Anleitung insgesamt 3 Reihen, wie in der Anleitung beschrieben, häkele, stellt sich mir die Frage: Soll ich in jeder der 2 folgenden Reihen 3 Stb + 1Lm in der "Tiefe" des Zackens rechts und links der Zackentiefe zunehmen? Vielen Dank für Ihre Mühe. MfG
25.08.2016 - 13:20Bis zur 15. Reihe, dann nochmals die Reihe 12 wieder holen ok, aber dann habe ich Schwierigkeiten da sich ja komplett alles verschiebt und nichts mehr hin haut, habe jetzt das 5. Mal aufgetrennt. halte mich ganz genau an die Anleitung, die 3 Stb+1Lm wo muss ich zwischen setzen? Ich bin Anfängerin im häkeln, finde über Videos auch nicht das passende Tuch. Gibt es ein Diagramm dazu ? Liebe Grüße Renate
15.07.2016 - 14:53DROPS Design answered:
Liebe Renate, Sie müssen darauf achten, dass sich der obere und untere Teil der Zickzack-Spitzen nicht verschiebt. Die Spitzen bleiben an der gleichen Stelle, aber der Teil dazwischen wächst.
19.07.2016 - 15:26På varv 7 och 8 är det 3st hoppa över 6 och 3st igen. På varv 9 är det 3st+1lm, hoppa 6, 3st+1. På varv 12 är det tillbaka till 3st hoppa över 6 och 3st. På varv 13 börjar det med 3st+1lm hoppa 6 sedan kommer repetitionerna där det är 3st, hoppa 6 och 3st ända till slutet, alltså ingen lm mellan. Ska det inte vara symetriskt på båda sidorna av *-*? Ska det i så fall vara 3st hoppa 6 (och inte 3st +1lm som det står i mönstret) eller ska det in en lm mellan?
01.07.2016 - 19:41Vanaf toer 6 ben ik het patroon kwijt omdat ik aan zes waaiertjes moet komen maar ik krijg er zeven. Ik heb de 32 hstk die er voor staan maar dan verder kom ik er niet mee uit want ik heb er zeven. heb mijn werk al tig keer uitgehaald en het op nieuw geprobeerd maar ik kom er niet uit. kunt u me hier mee helpen?
21.06.2016 - 10:04DROPS Design answered:
Hoi Joke. Ik krijg het volgende bij 32 hstk: 4 l, dan een kleine waaier van 3 hstk, dan 6 keer waaiers van 3 hstk+1 l+3 hstk, en aan het eind een kleine waaier van 3 hstk + 1 hstk in laatste st.
24.06.2016 - 12:51Voy por la vuelta 10 y la parte de arriba no me queda recta sino que los extremos hacen una forma en V. Esto es así o debe quedar recto en horizontal? En la foto no lo aprecio bien. Gracias!
15.05.2016 - 13:02DROPS Design answered:
Hola Olga. El problema está en la tensión del tejido y en especial el los pts de cadeneta al principio de la fila y el ultimo p.a. Ambos hay que trabajarlos flojo para que no quede el borde horizontal del chal muy tenso.
18.05.2016 - 09:04Please explain top/bottom to increase?? Also inc top and in each side doing pattern 145-6
02.04.2016 - 23:37DROPS Design answered:
Dear Elaine, when repeating row 13, you will automatically inc as on first time you worked this row, and have 3 dc+ 1ch more between each lower/down tip of zigzag pattern, ie work as before beg and ending row with 3 dc,1ch, 3dc, 1ch in first and last st, and with 3 dc + ch 1 + 3 dc + ch 3 + 3 dc + ch 1 +3 dc + ch 1 in ch-space. Happy crocheting!
04.04.2016 - 08:36Kann mir jemand bei meiner frage zu der 12, bzw 16 reihe helfen, da ich das baby alpaca silk im internet bestellt habe, kann ich keine verkäuferin fragen, mfg
12.02.2016 - 17:46DROPS Design answered:
Liebe Irina, siehe Antwort bei der vorherigen Frage. Übrigens geben auch unsere Onlineshops gerne Unterstützung.
08.03.2016 - 14:18Bei der reihe 12 nach den reihen 13, 14 15 passe ich das muster an, also anfang dann 3 überspringen 3 stb plus 1 Lm 3 mal wiederholen, 6 stb überspringen 3stb plus 1 lm und dann die mitte ? vielen dank
10.02.2016 - 21:13DROPS Design answered:
Liebe Irina, bitte häkeln Sie die Reihen genau wie im Text im Detail beschrieben, die Anleitung ist überprüft und korrekt.
08.03.2016 - 14:17Buongiorno, una cliente mi ha richiesto lo schema grafico di questo modello, è possibile averlo? In attesa di una gentile risposta porgo distinti saluti, Laura
28.12.2015 - 09:44DROPS Design answered:
Buonasera Laura, purtroppo lo schema grafico non è disponibile per questo modello, ma dica alla sua cliente che se segue perfettamente le indicazioni riuscirà sicuramente ad eseguire il modello; in caso contrario ci scriva se ha bisogno di ulteriori delucidazioni. Buon lavoro!
28.12.2015 - 17:28Habe eine Frage zu Reihe 13: Dort steht, dass ich bevor ich das erste Mal 6 Stb überspringe und in den Rapport gehe, 3 Stb +1Lfm mache. Wenn ich aber aus dem 6. Rapport raus gehe mache ich keine Lfm bevor ich die 3 Stb mache. Bisher war die Anleitung an den Rändern und auch generell symmetrisch. Könnte es sein, dass die Lfm vor dem Rapport zu viel ist, oder das am Ende eine fehlt? Freundliche Grüße und danke für die schöne Anleitung, Amber Yates
08.12.2015 - 13:28DROPS Design answered:
Liebe Amber Yates, die 13. Reihe ist in sich symmetrisch und sollte korrekt sein.
08.03.2016 - 14:13