
Popular categories
Looking for a yarn?


|
|
Edelweiss |
|
 |
 |
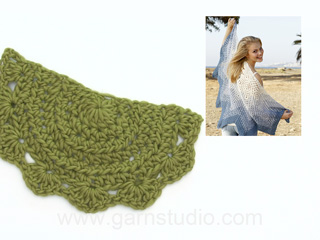
Crochet DROPS shawl with zig-zag pattern in 2 strands ”BabyAlpaca Silk”.
DROPS 145-6 |
|
|
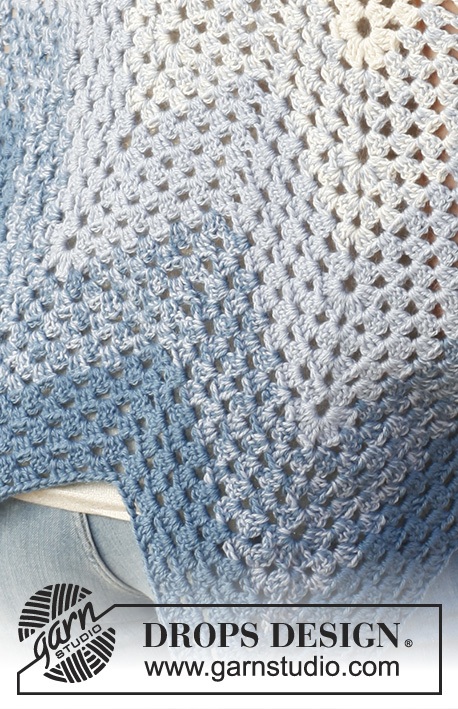
MAGIC CIRCLE: When piece is worked in the round, start with this technique to avoid hole in the middle (instead of ch-ring): Hold the yarn end and wind the yarn one time around the index finger to make a loop. Hold the loop with left thumb and middle finger, place the yarn over left index finger. Insert hook through the loop, make a YO and pull yarn through loop, ch 3, then work 11 dc around the loop. Pull yarn end to tighten the loop. Fasten the yarn end on the back side. CROCHET TIP: Replace 1 hdc at beg of round with 2 ch. STRIPES: Work stripes as follows: 0-27 cm / 0-10½": 2 strands off white 27-37 cm / 10½"-14½": 1 strand off white and 1 strand ice blue 37-47 cm / 14½"-18½": 2 strands ice blue 47-57 cm / 18½"-22½": 1 strand ice blue and 1 strand gray blue 57-67 cm / 22½"-26½": 2 strands gray blue ---------------------------------------------------------- SHAWL: The shawl is worked in stripes - see explanation above. Work a magic circle with 12 dc on hook size 5 mm / H/8 – see explanation above. Turn. ROW 1: READ CROCHET TIP! 2 hdc in first dc, * 1 hdc in each of the next 2 dc, 2 hdc in next dc *, repeat from *-* until 2 dc remain and finish with 1 hdc in each of the last 2 dc = 16 hdc. Turn. ROW 2: 2 hdc in first hdc, * 1 hdc in each of the next 3 hdc, 2 hdc in next hdc *, repeat from *-* until 3 hdc remain and finish with 1 hdc in each of the last 3 hdc = 20 hdc. Turn. ROW 3: 2 hdc in first hdc, * 1 hdc in each of the next 4 hdc, 2 hdc in next hdc *, repeat from *-* until 4 hdc remain and finish with 1 hdc in each of the last 4 hdc = 24 hdc. Turn. ROW 4: 2 hdc in first hdc, * 1 hdc in each of the next 5 hdc, 2 hdc in next hdc *, repeat from *-* until 5 hdc remain and finish with 1 hdc in each of the last 5 hdc = 28 hdc. Turn. ROW 5: 2 hdc in first hdc, * 1 hdc in each of the next 6 hdc, 2 hdc in next hdc *, repeat from *-* until 6 hdc remain and finish with 1 hdc in each of the last 6 hdc = 32 hdc. Turn. ROW 6: ch 4, work 3 dc in next hdc, * skip 3 hdc, work 3 dc + ch 1 + 3 dc in next hdc *, repeat from *-* 6 times in total, skip 3 hdc, work 3 dc + ch 1 in next hdc, skip 1 hdc, work 1 dc in last hdc. Turn. ROW 7: ch 4, work 3 dc in first ch, * skip 6 dc, work 3 dc + ch 3 + 3 dc in next ch-space *, repeat from *-* 6 times in total, skip 6 dc, work 3 dc + ch 1 in next ch, 1 dc in last dc. Turn. ROW 8: ch 4, work 3 dc + ch 1 + 3 dc in first ch, * skip 6 dc, work 3 dc + ch 1 + 3 dc + ch 3 + 3 dc + ch 1 + 3 dc in next ch-space *, repeat from *-* 6 times in total, skip 6 dc, work 3 dc + ch 1 + 3 dc + ch 1 in last ch and 1 dc in last dc. Turn. ROW 9: ch 4, work 3 dc + ch 1 in first ch, skip 3 dc, work 3 dc + ch 1 in next ch, * skip 6 dc, work 3 dc + ch 1 in next ch, skip 3 dc, work 3 dc + ch 3 + 3 dc + ch 1 in next ch-space, skip 3 dc, work 3 dc + ch 1 in next ch *, repeat from *-* 6 times in total, skip 6 dc, work 3 dc + ch 1 in next ch, skip 3 dc, work 3 dc + ch 1 in next ch and 1 dc in last dc. Turn. ROW 10-11: Work as 9th row. ROW 12: ch 4, work 3 dc + ch 1 + 3 dc + ch 1 in first ch, skip 3 dc, work 3 dc in next ch,* skip 6 dc, work 3 dc + ch 1 in next ch, skip 3 dc, work 3 dc + ch 1 + 3 dc + ch 3 + 3 dc + ch 1 + 3 dc + ch 1 in next ch-space, skip 3 dc, work 3 dc in next ch *, repeat from *-* 6 times in total, skip 6 dc, work 3 dc + ch 1 in next ch, skip 3 dc, work 3 dc + ch 1 + 3 dc + ch 1 in last ch and 1 dc in last dc. Turn. ROW 13: ch 4, work 3 dc + ch 1 in first ch, skip 3 dc, work 3 dc + ch 1 in next ch, skip 3 dc, work 3 dc + ch 1 in next ch,* skip 6 dc, work 3 dc + ch 1 in next ch, skip 3 dc, work 3 dc, + ch 1 in next ch, skip 3 dc, work 3 dc + ch 3 + 3 dc + ch 1 in next ch-space, skip 3 dc, work 3 dc + ch 1 in next ch, skip 3 dc, work 3 dc in next ch *, repeat from *-* 6 times in total, skip 6 dc, work 3 dc + ch 1 in next ch, skip 3 dc, work 3 dc + ch 1 in next ch, skip 3 dc, work 3 dc + ch 1 in next ch and 1 dc in last dc. Turn. ROW 14-15: Work as 13th row. When 3 rows have been worked as row 13, inc the same way as on row 12 (in ch-space work 3 dc + ch 1 + 3 dc + ch 3 + 3 dc + ch 1 +3 dc + ch 1, and work 3 dc + ch 1 + 3 dc + ch 1 in first and last ch). Work next row as 13th row but work 3 dc + ch 1 more between every top/bottom in pattern. Work 3 rows in total like this, then inc again. Continue like this upwards, on every 4th row inc in every top and in each side. Continue until shawl measures 67 cm / 26½" measured along the middle of shawl. Fasten off. |
|
|
Have you made this or any other of our designs? Tag your pictures in social media with #dropsdesign so we can see them! Do you need help with this pattern?You'll find tutorial videos, a Comments/Questions area and more by visiting the pattern on garnstudio.com. © 1982-2024 DROPS Design A/S. We reserve all rights. This document, including all its sub-sections, has copyrights. Read more about what you can do with our patterns at the bottom of each pattern on our site. |
|


With over 40 years in knitting and crochet design, DROPS Design offers one of the most extensive collections of free patterns on the internet - translated to 17 languages. As of today we count 304 catalogs and 11422 patterns - 11417 of which are translated into English (US/in).
We work hard to bring you the best knitting and crochet have to offer, inspiration and advice as well as great quality yarns at incredible prices! Would you like to use our patterns for other than personal use? You can read what you are allowed to do in the Copyright text at the bottom of all our patterns. Happy crafting!
Comments / Questions (189)
On rows 10-11, it says repeat row 9. On row 9 it says about skipping the next 6 sts. However repeating row 9 for rows 10-11, you cant skip 6. Am I figuring this right? Thanks
15.01.2018 - 05:12DROPS Design answered:
Dear Pat, row 10 and 11 will be worked the same way as row 9, ie also skipping the 6 sts. Happy crocheting!
15.01.2018 - 10:41Bonjour je suis bloqué au rang 9 je n’y arrive pas. Serait-il possible de l’aise
16.11.2017 - 19:03DROPS Design answered:
Bonjour Élodie, le rang 9 commence comme le 8: 4 ml, puis 3 B dans la 1ère ml, 1 ml, on saute 3 B et crochète 3 B dans la ml suivante, puis on fait 1 ml, on va ensuite répéter 6 fois la partie entre *-* c'est-à-dire: * sauter 6 B, 3 B + 1 ml dans la ml suiv, sauter 3 B, 3 B + 3 ml + 3 B + 1 ml dans l'arceau suivant, sauter 3 B, 3 B + 1 ml dans la ml suiv * et on saute 6B, et on termine par 3 B dans la m suivante, 1 ml, on saute 3 B, on fait 3 B dans la ml suivante, 1 ml, et 1 B dans la dernière B. On va ensuite répéter ce rang encore 2 fois (= rangs 10 et 11). Bon crochet!
17.11.2017 - 10:26Hvordan laver jeg det større?
07.08.2017 - 08:26DROPS Design answered:
Hej Sonja, du kan fortsætte med at tage ud på samme måde på hver 4. række i hver spids og i hver side. Fortsæt til ønsket mål. God fornøjelse!
08.08.2017 - 15:30Avant de me lancer dans un ouvrage je voudrais lire des commentaires en Français...!
09.07.2017 - 18:16DROPS Design answered:
Bonjour Mme Bernat, vous pouvez utiliser un traducteur en ligne pour les questions en langue étrangère, poser votre question ici ou bien vous adresser à votre magasin DROPS pour toute assistance personnelle. Bon crochet!
10.07.2017 - 14:17Skitmönster.
18.06.2017 - 15:17Hallo, ich bin geradedabeidas schöne Tuch zuhäkeln. Aber ich bin jetzt an einem Punkt angekommen, wo ich Hilfe brauche. Ich soll jetzt zwischen den Zacken 3 Stb und 1 LM zusätzlich einarbeiten. Nun meine Frage, nur einmal zwischen den Zacken oder auf jeder Seite zwischen den 6 zu überspringendem Stb. Und wenn nur einmal, dann wo am besten, damit es sich nicht verzieht. Ich hoffe mich deutlich genug erklärt zu haben und hoffe nun auf Hilfe.
17.05.2017 - 17:37DROPS Design answered:
Liebe Frau Meinhardt, nur einmal zwischen den Zacken übersrpringen Sie die 6 Stb, dh wie zuvor bei der 13. Reihe. Viel Spaß beim häkeln!
18.05.2017 - 08:41Om jag förstått rätt så skulle jag förenkla mönstret till Edelweiss med att skriva så här Varv 16 virkas som varv 12 därefter virkas 3 varv som varv 13 fortsätt så tills arbetet mäter 67 cm eller önskad längd.
29.04.2017 - 11:28Angående Edelweiss: Jag förstår inte Danska och det lilla jag förstod av språket gjorde mig inte klokare. Det var så länge sedan jag virkade så jag trodde detta var ett mönster för nybörjare. Ska jag behöva repa upp de virkade 15 varven ? Jag verkar inte komma längre om jag inte får en enklare beskrivning. Vad menas med botten/topp ? vad är vad ? vilka luftmaskbågar ska man öka i ?
28.04.2017 - 12:11Har fastnat på varv 15. Förstår inte beskrivningen efter det. Kan beskrivningen göras tydligare ?
27.04.2017 - 19:20DROPS Design answered:
Hej Katarina, se svar nedan. Lycka till :)
28.04.2017 - 08:34Hei jeg står litt fast ifht mønster /forklaring etter å ha heklet ferdig rad 15. Kan dere skrive detaljert hvordan jeg hekler videre; var noe uklart ifht hva som gjøres videre? På forhånd takk.
24.04.2017 - 12:19DROPS Design answered:
Hej Gøril, jo men du øger på nøjagtig samme måde på hver 4. rad, som du har gjort tidligere, ved at hækle således i de lm-buer du skal øke i: (om lm-buen hekles det 3 st + 1 lm + 3 st + 3 lm +3 st + 1 lm +3 st + 1 lm, og det hekles 3 st + 1 lm + 3 st + 1 lm om første og siste lm). God fornøjelse!
28.04.2017 - 08:32