
Popular categories
Looking for a yarn?


|
|
Edelweiss |
|
 |
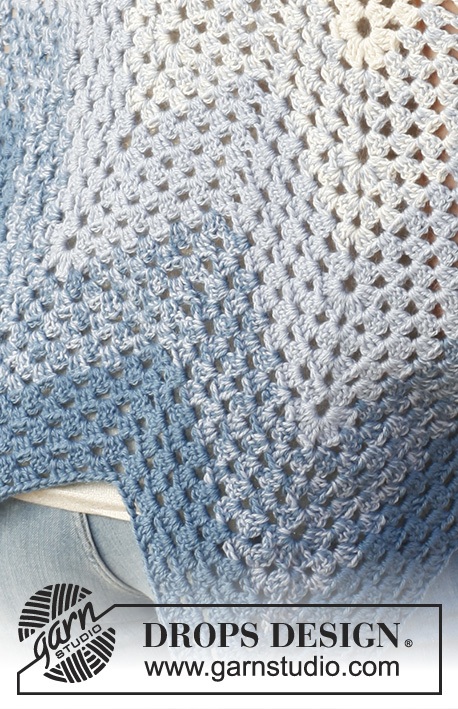 |
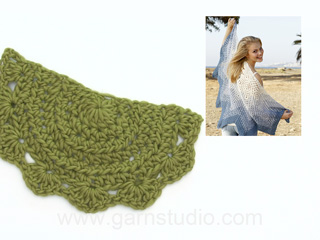
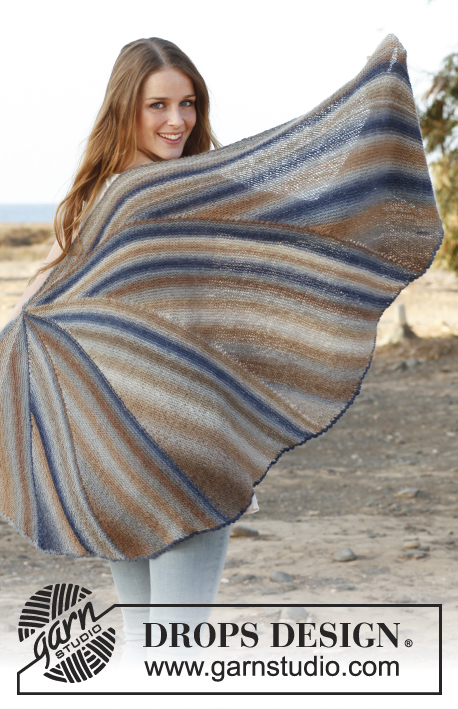
Crochet DROPS shawl with zig-zag pattern in 2 strands ”BabyAlpaca Silk”.
DROPS 145-6 |
|
|
MAGIC CIRCLE: When piece is worked in the round, start with this technique to avoid hole in the middle (instead of ch-ring): Hold the yarn end and wind the yarn one time around the index finger to make a loop. Hold the loop with left thumb and middle finger, place the yarn over left index finger. Insert hook through the loop, make a YO and pull yarn through loop, ch 3, then work 11 dc around the loop. Pull yarn end to tighten the loop. Fasten the yarn end on the back side. CROCHET TIP: Replace 1 hdc at beg of round with 2 ch. STRIPES: Work stripes as follows: 0-27 cm / 0-10½": 2 strands off white 27-37 cm / 10½"-14½": 1 strand off white and 1 strand ice blue 37-47 cm / 14½"-18½": 2 strands ice blue 47-57 cm / 18½"-22½": 1 strand ice blue and 1 strand gray blue 57-67 cm / 22½"-26½": 2 strands gray blue ---------------------------------------------------------- SHAWL: The shawl is worked in stripes - see explanation above. Work a magic circle with 12 dc on hook size 5 mm / H/8 – see explanation above. Turn. ROW 1: READ CROCHET TIP! 2 hdc in first dc, * 1 hdc in each of the next 2 dc, 2 hdc in next dc *, repeat from *-* until 2 dc remain and finish with 1 hdc in each of the last 2 dc = 16 hdc. Turn. ROW 2: 2 hdc in first hdc, * 1 hdc in each of the next 3 hdc, 2 hdc in next hdc *, repeat from *-* until 3 hdc remain and finish with 1 hdc in each of the last 3 hdc = 20 hdc. Turn. ROW 3: 2 hdc in first hdc, * 1 hdc in each of the next 4 hdc, 2 hdc in next hdc *, repeat from *-* until 4 hdc remain and finish with 1 hdc in each of the last 4 hdc = 24 hdc. Turn. ROW 4: 2 hdc in first hdc, * 1 hdc in each of the next 5 hdc, 2 hdc in next hdc *, repeat from *-* until 5 hdc remain and finish with 1 hdc in each of the last 5 hdc = 28 hdc. Turn. ROW 5: 2 hdc in first hdc, * 1 hdc in each of the next 6 hdc, 2 hdc in next hdc *, repeat from *-* until 6 hdc remain and finish with 1 hdc in each of the last 6 hdc = 32 hdc. Turn. ROW 6: ch 4, work 3 dc in next hdc, * skip 3 hdc, work 3 dc + ch 1 + 3 dc in next hdc *, repeat from *-* 6 times in total, skip 3 hdc, work 3 dc + ch 1 in next hdc, skip 1 hdc, work 1 dc in last hdc. Turn. ROW 7: ch 4, work 3 dc in first ch, * skip 6 dc, work 3 dc + ch 3 + 3 dc in next ch-space *, repeat from *-* 6 times in total, skip 6 dc, work 3 dc + ch 1 in next ch, 1 dc in last dc. Turn. ROW 8: ch 4, work 3 dc + ch 1 + 3 dc in first ch, * skip 6 dc, work 3 dc + ch 1 + 3 dc + ch 3 + 3 dc + ch 1 + 3 dc in next ch-space *, repeat from *-* 6 times in total, skip 6 dc, work 3 dc + ch 1 + 3 dc + ch 1 in last ch and 1 dc in last dc. Turn. ROW 9: ch 4, work 3 dc + ch 1 in first ch, skip 3 dc, work 3 dc + ch 1 in next ch, * skip 6 dc, work 3 dc + ch 1 in next ch, skip 3 dc, work 3 dc + ch 3 + 3 dc + ch 1 in next ch-space, skip 3 dc, work 3 dc + ch 1 in next ch *, repeat from *-* 6 times in total, skip 6 dc, work 3 dc + ch 1 in next ch, skip 3 dc, work 3 dc + ch 1 in next ch and 1 dc in last dc. Turn. ROW 10-11: Work as 9th row. ROW 12: ch 4, work 3 dc + ch 1 + 3 dc + ch 1 in first ch, skip 3 dc, work 3 dc in next ch,* skip 6 dc, work 3 dc + ch 1 in next ch, skip 3 dc, work 3 dc + ch 1 + 3 dc + ch 3 + 3 dc + ch 1 + 3 dc + ch 1 in next ch-space, skip 3 dc, work 3 dc in next ch *, repeat from *-* 6 times in total, skip 6 dc, work 3 dc + ch 1 in next ch, skip 3 dc, work 3 dc + ch 1 + 3 dc + ch 1 in last ch and 1 dc in last dc. Turn. ROW 13: ch 4, work 3 dc + ch 1 in first ch, skip 3 dc, work 3 dc + ch 1 in next ch, skip 3 dc, work 3 dc + ch 1 in next ch,* skip 6 dc, work 3 dc + ch 1 in next ch, skip 3 dc, work 3 dc, + ch 1 in next ch, skip 3 dc, work 3 dc + ch 3 + 3 dc + ch 1 in next ch-space, skip 3 dc, work 3 dc + ch 1 in next ch, skip 3 dc, work 3 dc in next ch *, repeat from *-* 6 times in total, skip 6 dc, work 3 dc + ch 1 in next ch, skip 3 dc, work 3 dc + ch 1 in next ch, skip 3 dc, work 3 dc + ch 1 in next ch and 1 dc in last dc. Turn. ROW 14-15: Work as 13th row. When 3 rows have been worked as row 13, inc the same way as on row 12 (in ch-space work 3 dc + ch 1 + 3 dc + ch 3 + 3 dc + ch 1 +3 dc + ch 1, and work 3 dc + ch 1 + 3 dc + ch 1 in first and last ch). Work next row as 13th row but work 3 dc + ch 1 more between every top/bottom in pattern. Work 3 rows in total like this, then inc again. Continue like this upwards, on every 4th row inc in every top and in each side. Continue until shawl measures 67 cm / 26½'' measured along the middle of shawl. Fasten off. |
|
|
Have you made this or any other of our designs? Tag your pictures in social media with #dropsdesign so we can see them! Do you need help with this pattern?You'll find tutorial videos, a Comments/Questions area and more by visiting the pattern on garnstudio.com. © 1982-2024 DROPS Design A/S. We reserve all rights. This document, including all its sub-sections, has copyrights. Read more about what you can do with our patterns at the bottom of each pattern on our site. |
|


With over 40 years in knitting and crochet design, DROPS Design offers one of the most extensive collections of free patterns on the internet - translated to 17 languages. As of today we count 304 catalogs and 11415 patterns - 11410 of which are translated into English (US/in).
We work hard to bring you the best knitting and crochet have to offer, inspiration and advice as well as great quality yarns at incredible prices! Would you like to use our patterns for other than personal use? You can read what you are allowed to do in the Copyright text at the bottom of all our patterns. Happy crafting!
Comments / Questions (189)
Könnten Sie dafür nicht (endlich mal, ich gucke es zum x-ten Mal an :) ) einen Chart machen?
17.05.2019 - 13:13DROPS Design answered:
Liebe Frau Kutz, es gibt zu diesem Modell kein Diagram, hier wird im Video gezeigt wie man das Tuch beginnt, dann häkeln Sie weiter wie in der Anleitung geschrieben ist. Viel Spaß beim häkeln!
20.05.2019 - 08:49A magyar nyelvű leírásban a 8. sor csillagok közötti része el van írva. Az angol leírásban jól szerepel. Helyesen: * 6 fp-t kihagyunk, 3 erp + 1 lsz + 3 erp + 3 lsz + 3 erp + 1 lsz + 3 erp a köv lsz-ívbe *
02.04.2019 - 09:21Wat moet ik doen om een grotere maat te haken ?
26.01.2019 - 16:52DROPS Design answered:
Dag Siny,
Om de omsagdoek groter te maken kan je steeds het laatste deel herhalen (dus zoals in de laatste paragraaf beschreven staat. Denk van te voren na hou je de kleuren dan zou willen verdelen.
Een andere optie is om met dikker garen te breien (bijv. met 3 draden i.p.v. met 2 draden.)
27.01.2019 - 13:33Wat moet ik doen om een grotere maat te haven?
26.01.2019 - 16:50Hi, I'm enjoying putting this together. When measuring for the stripes, I'm assuming the measurement is depth (top to 'v') rather than the width across (flat top). If depth am I measuring to the 'v' tip or bottom?
23.01.2019 - 18:27DROPS Design answered:
Dear Elaine, the width is the length from one tip to the other tip at the top of shawl (= wingspan), and height is measured from cast on row towards the bottom on mid back. Happy crocheting!
24.01.2019 - 09:30Het zou mij geweldig helpen om een schema/diagram te hebben om dit te maken. Is voor mij veel overzichtelijker dan woord voor woord te moeten volgen wat de volgende stap is.
17.01.2019 - 11:17DROPS Design answered:
Dag Anne,
Dat begrijp ik, maar helaas is er van dit patroon alleen een beschrijving. Je kunt altijd je vragen hier kwijt of hulp vragen in de winkel waar je het garen hebt gekocht (zodat er iemand met je mee kan kijken.
23.01.2019 - 11:25Hallo, ik zou graag het hele pakket met alle garens die nodig zijn willen bestellen voor het model Edelweiss. Bieden jullie zo'n compleet pakket, zodat ik niet alle garens afzonderlijk hoef te bestellen? Hartelijke groet,Cécile.
09.05.2018 - 22:03DROPS Design answered:
Hallo Cécile, De garens worden via onze verkooppunten verkocht en we hebben geen complete pakketten voor elk patroon. De benodigdheden vind je bovenaan bij het patroon en deze kun je bestellen bij het verkooppunt.
10.05.2018 - 10:25At the end of the rounds are we using a sl st
10.04.2018 - 10:37DROPS Design answered:
Dear Stacy, shawl is worked back and forth (ie in rows), at the end of first row (after the 3ch + 11 dc in the magic loop), turn and work row 1 as explained under pattern. Happy crocheting!
10.04.2018 - 10:49Guten Abend, Wenn ich beim letzten Hinweis einmal 3 Stäbchen zwischen den Zacken zunehmen soll, bleibt mir nur wischen der 6 Stäbchen die ich überspringen soll. Ist das korrekt? Ansonsten weiß ich nicht wo ich dies machen soll.Ich hoffe auf Hilfe. Vielen Dank.
18.03.2018 - 22:08Could you please provide more detailed instructions. I completed through row 15. Can you provide the written instructions for the next several rows please? I'm very new to crochet and need actual instructions in order to be able to complete a pattern. I do not know where to add stitches or what to do without following the guide. Much appreciated! I can't wait to wear this beautiful shawl!
18.02.2018 - 23:56DROPS Design answered:
Dear Justme, after row 15 work row 16 as you did on row 12 just increasing as explained. Then when working row 17 there will be one more time (3 sts, 1 ch) between each tip. Work row 18 and 19 as row 17 (= 3 rows without inc) then increase again at each tip as before and work 3 rows without inc, there will be more more time (3 sts, 1 ch) between each tip. Happy crocheting!
19.02.2018 - 10:23