
Popular categories
Looking for a yarn?


|
|
Edelweiss |
|
 |
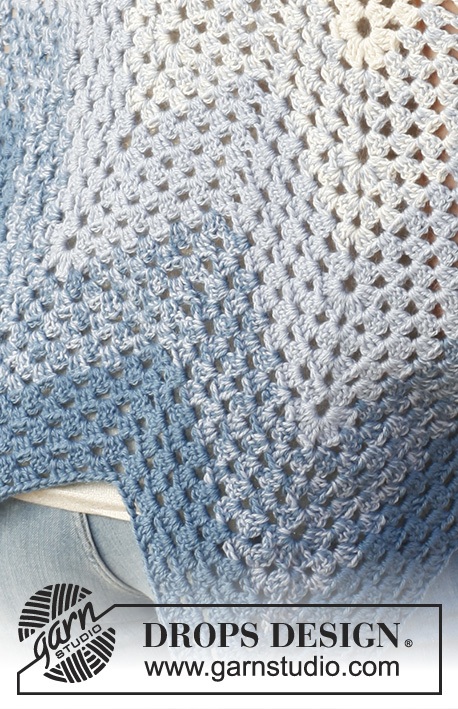 |
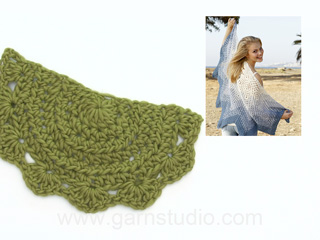
Crochet DROPS shawl with zig-zag pattern in 2 strands ”BabyAlpaca Silk”.
DROPS 145-6 |
|
|
MAGIC CIRCLE: When piece is worked in the round, start with this technique to avoid hole in the middle (instead of ch-ring): Hold the yarn end and wind the yarn one time around the index finger to make a loop. Hold the loop with left thumb and middle finger, place the yarn over left index finger. Insert hook through the loop, make a YO and pull yarn through loop, ch 3, then work 11 dc around the loop. Pull yarn end to tighten the loop. Fasten the yarn end on the back side. CROCHET TIP: Replace 1 hdc at beg of round with 2 ch. STRIPES: Work stripes as follows: 0-27 cm / 0-10½": 2 strands off white 27-37 cm / 10½"-14½": 1 strand off white and 1 strand ice blue 37-47 cm / 14½"-18½": 2 strands ice blue 47-57 cm / 18½"-22½": 1 strand ice blue and 1 strand gray blue 57-67 cm / 22½"-26½": 2 strands gray blue ---------------------------------------------------------- SHAWL: The shawl is worked in stripes - see explanation above. Work a magic circle with 12 dc on hook size 5 mm / H/8 – see explanation above. Turn. ROW 1: READ CROCHET TIP! 2 hdc in first dc, * 1 hdc in each of the next 2 dc, 2 hdc in next dc *, repeat from *-* until 2 dc remain and finish with 1 hdc in each of the last 2 dc = 16 hdc. Turn. ROW 2: 2 hdc in first hdc, * 1 hdc in each of the next 3 hdc, 2 hdc in next hdc *, repeat from *-* until 3 hdc remain and finish with 1 hdc in each of the last 3 hdc = 20 hdc. Turn. ROW 3: 2 hdc in first hdc, * 1 hdc in each of the next 4 hdc, 2 hdc in next hdc *, repeat from *-* until 4 hdc remain and finish with 1 hdc in each of the last 4 hdc = 24 hdc. Turn. ROW 4: 2 hdc in first hdc, * 1 hdc in each of the next 5 hdc, 2 hdc in next hdc *, repeat from *-* until 5 hdc remain and finish with 1 hdc in each of the last 5 hdc = 28 hdc. Turn. ROW 5: 2 hdc in first hdc, * 1 hdc in each of the next 6 hdc, 2 hdc in next hdc *, repeat from *-* until 6 hdc remain and finish with 1 hdc in each of the last 6 hdc = 32 hdc. Turn. ROW 6: ch 4, work 3 dc in next hdc, * skip 3 hdc, work 3 dc + ch 1 + 3 dc in next hdc *, repeat from *-* 6 times in total, skip 3 hdc, work 3 dc + ch 1 in next hdc, skip 1 hdc, work 1 dc in last hdc. Turn. ROW 7: ch 4, work 3 dc in first ch, * skip 6 dc, work 3 dc + ch 3 + 3 dc in next ch-space *, repeat from *-* 6 times in total, skip 6 dc, work 3 dc + ch 1 in next ch, 1 dc in last dc. Turn. ROW 8: ch 4, work 3 dc + ch 1 + 3 dc in first ch, * skip 6 dc, work 3 dc + ch 1 + 3 dc + ch 3 + 3 dc + ch 1 + 3 dc in next ch-space *, repeat from *-* 6 times in total, skip 6 dc, work 3 dc + ch 1 + 3 dc + ch 1 in last ch and 1 dc in last dc. Turn. ROW 9: ch 4, work 3 dc + ch 1 in first ch, skip 3 dc, work 3 dc + ch 1 in next ch, * skip 6 dc, work 3 dc + ch 1 in next ch, skip 3 dc, work 3 dc + ch 3 + 3 dc + ch 1 in next ch-space, skip 3 dc, work 3 dc + ch 1 in next ch *, repeat from *-* 6 times in total, skip 6 dc, work 3 dc + ch 1 in next ch, skip 3 dc, work 3 dc + ch 1 in next ch and 1 dc in last dc. Turn. ROW 10-11: Work as 9th row. ROW 12: ch 4, work 3 dc + ch 1 + 3 dc + ch 1 in first ch, skip 3 dc, work 3 dc in next ch,* skip 6 dc, work 3 dc + ch 1 in next ch, skip 3 dc, work 3 dc + ch 1 + 3 dc + ch 3 + 3 dc + ch 1 + 3 dc + ch 1 in next ch-space, skip 3 dc, work 3 dc in next ch *, repeat from *-* 6 times in total, skip 6 dc, work 3 dc + ch 1 in next ch, skip 3 dc, work 3 dc + ch 1 + 3 dc + ch 1 in last ch and 1 dc in last dc. Turn. ROW 13: ch 4, work 3 dc + ch 1 in first ch, skip 3 dc, work 3 dc + ch 1 in next ch, skip 3 dc, work 3 dc + ch 1 in next ch,* skip 6 dc, work 3 dc + ch 1 in next ch, skip 3 dc, work 3 dc, + ch 1 in next ch, skip 3 dc, work 3 dc + ch 3 + 3 dc + ch 1 in next ch-space, skip 3 dc, work 3 dc + ch 1 in next ch, skip 3 dc, work 3 dc in next ch *, repeat from *-* 6 times in total, skip 6 dc, work 3 dc + ch 1 in next ch, skip 3 dc, work 3 dc + ch 1 in next ch, skip 3 dc, work 3 dc + ch 1 in next ch and 1 dc in last dc. Turn. ROW 14-15: Work as 13th row. When 3 rows have been worked as row 13, inc the same way as on row 12 (in ch-space work 3 dc + ch 1 + 3 dc + ch 3 + 3 dc + ch 1 +3 dc + ch 1, and work 3 dc + ch 1 + 3 dc + ch 1 in first and last ch). Work next row as 13th row but work 3 dc + ch 1 more between every top/bottom in pattern. Work 3 rows in total like this, then inc again. Continue like this upwards, on every 4th row inc in every top and in each side. Continue until shawl measures 67 cm / 26½" measured along the middle of shawl. Fasten off. |
|
|
Have you made this or any other of our designs? Tag your pictures in social media with #dropsdesign so we can see them! Do you need help with this pattern?You'll find tutorial videos, a Comments/Questions area and more by visiting the pattern on garnstudio.com. © 1982-2024 DROPS Design A/S. We reserve all rights. This document, including all its sub-sections, has copyrights. Read more about what you can do with our patterns at the bottom of each pattern on our site. |
|


With over 40 years in knitting and crochet design, DROPS Design offers one of the most extensive collections of free patterns on the internet - translated to 17 languages. As of today we count 304 catalogs and 11422 patterns - 11417 of which are translated into English (US/in).
We work hard to bring you the best knitting and crochet have to offer, inspiration and advice as well as great quality yarns at incredible prices! Would you like to use our patterns for other than personal use? You can read what you are allowed to do in the Copyright text at the bottom of all our patterns. Happy crafting!
Comments / Questions (189)
Raak in de war van laatste regel dat ik 3 stk en 1 losse extra moet haken tussen elke punt/onderkant patroon.Is dat dan voor de 6 stokjes overslaan en na het overslaan dat je dan in hetzelfde gat ervoor 3 stk en 1 l extra haakt dus 6 in 1 gat om de punten ook nog langer te maken naar onderen toe?
18.05.2015 - 08:16DROPS Design answered:
Hoi. Door het meerderen zoals in de 13e toer krijg je steeds 3 stk + 1 l meer tussen elk punt = de afstand tussen de punten worden steeds breder.
20.05.2015 - 12:52Als ik deze omslagdoek groter wil maken dan het officiële patroon, welke toeren moet ik dan herhalen?
12.02.2015 - 14:28DROPS Design answered:
Hoi Yvonne. Je herhaalt steeds toer 13 en meerdert zoals beschreven tot de gewenste hoogte. Het staat beschreven aan het eind van het patroon.
12.02.2015 - 16:54Toer 12 is meerderen. Als ik vervolgens toer 14, 15 en 16 als toer 13 haak zoals u zegt, heb ik in totaal 4 toeren voordat ik weer ga meerderen. In het patroon verderop staat dat ik steeds 3 toeren moet breien en dan elke 4e toer moet meerderen. Ik heb het idee dat ik dus toer 14 en 15 als toer 13 moet breien en dan weer moet meerderen. Graag nog even een uitleg/aanvulling.
08.01.2015 - 11:44DROPS Design answered:
Hoi Karen. U haakt 3 toeren en dan meerdert u in de 4e toer. Dus zoals uitgelegd in mijn vorige antwoord: Toer 14, 15 en 16 zoals toer 13, meerder als toer 12 (toer 17) en haak dan door. Daarna weer 3 toeren haken voor het meerderen enzovoort.
08.01.2015 - 15:09Vraag 1: "Toer 14 en 15 haken als toer 13." Dat snap ik. Daarna staat "als er drie toeren zijn gehaakt zoals toer 13". Zijn dat dan de toeren 13, 14 en 15 of moet ik eerst nog toer 16,17 en 18 breien en dan pas meerderen zoals op toer 12? Vraag 2: In het laatste kopje staat "haak volgende toer als 13e toer...." Als ik doortel, welke toer zou dat dan moeten zijn?
07.01.2015 - 12:06DROPS Design answered:
Hoi Karen. Je haakt 3 toeren als 13: 14, 15 en 16. Vervolgens meerder je zoals in toer 12 (toer 17) en daarna haak je weer door zoals toer 13 (toer 18) enzovoort.
07.01.2015 - 15:24Vedr række 9 : opskriften siger : "gentag fra *-* totalt 6 gange, SPRING OVER 6 ST "... Der er fejlen. Man skal springe over 3 - ikke 6 !!!!
01.11.2014 - 23:49Jævnfør tidl. kommentar ang. række 9 : det er kun første gang man hækler række 9 det er sådan ! Næste gang passer det med at springe over 6 st masker :) Håber det giver mening ! Knus Mie
30.10.2014 - 21:29DROPS Design answered:
Hej Mie, jeg forstår ikke helt dit spørgsmål men række 10 og 11 hækles på samme måde som række 9. God fornøjelse!
31.10.2014 - 09:46Der er en fejl i række 9 på dansk : Efter man har gentaget *-* totalt 6 gange står der man skal springe over 6 st masker. Men man skal kun springe over 3 st masker ellers passer det ikke. Der skal være plads til 2 små faner som i starten af rækken. hvis det skal være ens med starten skal man springe over 3 st masker - hækle 3 st masker og 1 lm - så igen springe over 3 st masker og slutte med 3 st masker - 1 lm og 1 st maske om sidste st maske. Knus Mie
30.10.2014 - 21:16DROPS Design answered:
Hej Mie, Jo men du hopper over 3 st i hver side og der imellem hopper du over 6 st ialt 7 gange.
31.10.2014 - 09:51Vuestros patrones son preciosos pero desearía que los de ganchillo tuvieran un gráfico y no la explicación escrita de como realizarlos. Con el gráfico es mucho más fácil (y universal). Gracias!!
16.09.2014 - 11:51Vanaf toer 9 kan ik het niet meer volgen. Zit er een fout in bij 6 stokjes overslaan? Ik zie dat er meer mensen problemen mee hebben. Is er misschien een tekening?
16.08.2014 - 22:52DROPS Design answered:
Het overslaan van zes stokjes is geen fout. Er is geen tekening beschikbaar. Wellicht kunt u aangeven waarom u denkt dat dit niet klopt, dan kunnen we met u meekijken.
01.09.2014 - 16:51Ik kom niet uit het patroon. Vanaf toer 8 en 9 buigt de punt alsof ik teveel steken heb. Al tweekeer uitgehaald maar steeds hetzelfde . Is hier niet een tekening van?? Dat zou waarschijnlijk een hoop oplossen. Zie dat meerderen hier probleempjes hebben.
13.08.2014 - 11:21