
Popular categories
Looking for a yarn?


|
||||||||||||||||
Leona |
||||||||||||||||
 |
 |
|||||||||||||||
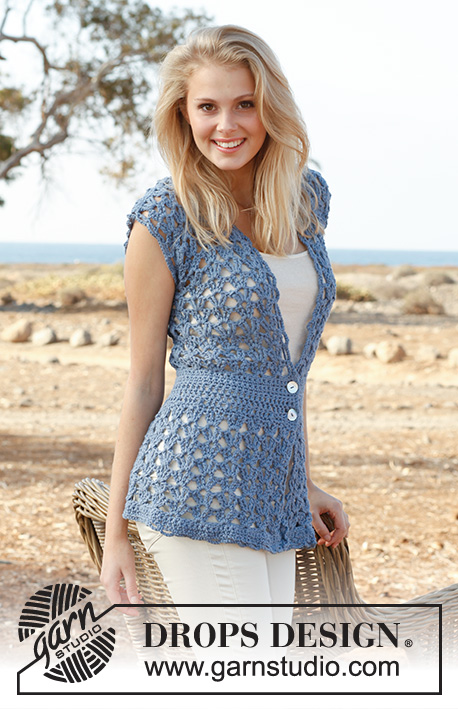
Crochet DROPS vest with fan pattern in ”Paris”. Size S-XXXL.
DROPS 145-4 |
||||||||||||||||
|
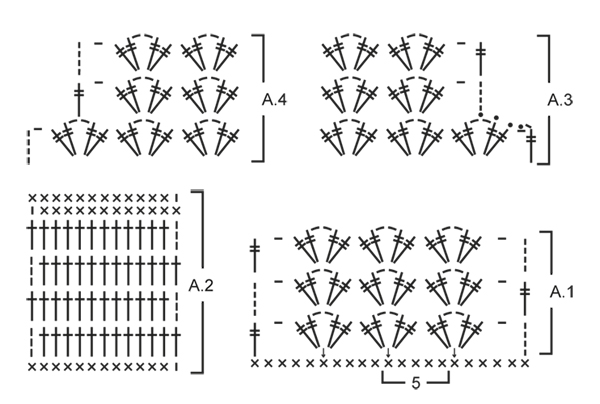
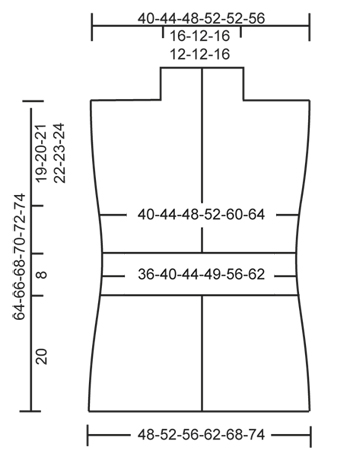
PATTERN: See diagrams A.1 and A.2 (diagrams A.3 and A.4 show dec for armhole in size XXL + XXXL). INCREASE TIP: Inc 1 dc by working 2 dc in same st. DECREASE TIP (dec 1 dc): Work 1 dc but wait with last pull through (= 2 sts on hook), then work next dc but on last pull through, pull thread through all sts on hook = 1 dc dec. ---------------------------------------------------------- VEST: Worked back and forth from mid front. Work 189-204-219-242-264-287 ch on hook size 6 mm with Paris, turn. ROW 1: 1 dc in 2nd ch from hook, * skip 1 ch, 1 dc in each of the next 2 ch *, repeat from *-* until 4-4-4-3-4-3 ch remain, skip next ch and finish with 1 dc in each of the last 3-3-3-2-3-2 ch = 126-136-146-161-176-191 dc on row, turn piece. ROW 2: 1 ch, then work 1 dc in every dc from previous row = 126-136-146-161-176-191 dc, turn piece. ROW 3: Work as 2nd row. ROW 4: Then work pattern according to diagram A.1, i.e. work 5 ch (= 1 dtr + 1 ch), * skip 4 dc, in next dc work 2 dtr + 2 ch + 2 dtr *, repeat from *-* until 5 dc remain, skip 4 dc and finish with 1 ch and 1 dtr in last dc = 24-26-28-31-34-37 dtr-groups, turn piece. ROW 5: 5 ch, in ch-loop in every dtr-group work 2 dtr + 2 ch + 2 dtr, finish row with 1 ch and 1 dtr in 4th ch on beg of previous row = 24-26-28-31-34-37 dtr-groups, turn piece. Repeat 5th row until piece measures approx. 16 cm. Work next row as follows: 4 ch (= 1 dtr), in ch-loop in the middle of every dtr-group work 2 dtr + 1 ch (instead of 2 ch) + 2 dtr, finish row with 1 dtr in 4th ch from beg of previous row = 24-26-28-31-34-37 dtr-groups, turn piece. Work 1 ch, 1 dc in same st, then work 1 dc in every dtr the entire row, finish with 1 dc in 4th ch from beg of previous row, turn piece = 98-106-114-126-138-150 dc. Continue to work as follows: ROW 1: Work pattern according to diagram A.2, i.e. work 1 ch, then work 1 dc in every dc the entire row AT THE SAME TIME dec 18-18-18-18-14-14 dc evenly – READ DECREASE TIP = 80-88-96-108-124-136 dc, turn piece. ROW 2: 3 ch (= 1 tr), then work 1 tr in every dc the entire row = 80-88-96-108-124-136 tr on row. ROW 3-5: Work as 2nd row = 80-88-96-108-124-136 tr. ROW 6: Work 1 dc in every tr AT THE SAME TIME adjust no of sts as follows: Size S + M + L + XL + XXL: Inc 5-9-5-5-5 dc evenly – READ INCREASE TIP. Size XXXL: Dec 3 sts evenly – READ DECREASE TIP = 85-97-101-113-129-133 dc, turn piece. ROW 7: 1 ch, 1 dc in same st, then work 1 dc in every dc from previous row = 85-97-101-113-129-133 dc, turn piece. ROW 8: 5 ch, * skip 3 dc, in next dc work 2 dtr + 2 ch + 2 dtr *, repeat from *-* until 4 dc remain on row, skip 3 dc and finish with 1 ch and 1 dtr in last dc on row = 20-23-24-27-31-32 dtr-groups on row, turn piece. ROW 9: Then work pattern according to diagram A.1 again, i.e. work 5 ch, in ch-loop in the middle of every dtr-group work 2 dtr + 2 ch + 2 dtr, finish row with 1 ch and 1 dtr in 4th ch on beg of previous row = 20-23-24-27-31-32 dtr-group. Repeat 9th row upwards. AT THE SAME TIME when piece measures 45-46-47-48-49-50 cm, divide for markers as follows: Insert 1 marker after 5-6-6-7-8-8 dtr-groups in from each side (= 10-11-12-13-15-16 dtr-groups between markers on back piece). Finish each part separately. BACK PIECE: = 10-11-12-13-15-16 dtr-groups. Continue back and forth with dtr-groups as shown in A.1. AT THE SAME TIME on 1st row dec for armholes in each side in size XXL + XXXL as follows: Dec 1 dtr-group on beg of row as shown in A.3, work as before until 1 dtr-group remains on row, finish row as shown in A.4 (do not dec in the other sizes) = 10-11-12-13-13-14 dtr-groups remain on row. Continue pattern back and forth until 1 row remains before piece measures 64-66-68-70-72-74 cm. Now work 1 row with dtr-groups only over the outermost 3-4-4-5-5-5 dtr-groups in the one side of piece: 5 ch, * in ch-loop in the middle of next dtr-group work 2 dtr + 2 ch + 2 dtr *, repeat from *-* 3-4-4-5-5-5 times in total, finish with 1 dtr in last dtr in same dtr-group, turn piece. Now work 1 row dc as follows: 1 ch, 1 dc in same st, * 1 dc in each of the first 2 dtr, 1 dc in ch-loop in the middle of dtr-group, 1 dc in each of the next 2 dtr *, repeat from *-* 3-4-4-5-5-5 times in total, finish with 1 dc in last ch and 1 dc in 4th ch from beg of previous row = 18-23-23-28-28-28 dc on row. Cut and fasten the thread. Repeat on the other shoulder (i.e. do not work over the middle 4-3-4-3-3-4 dtr-groups = neck.) RIGHT FRONT PIECE: = 5-6-6-7-8-8 dtr-groups. Continue back and forth with dtr-groups as on back piece. AT THE SAME TIME on 1st row dec for armhole in the side in size XXL + XXXL as shown in A.4 (do not dec in the other sizes) = 5-6-6-7-7-7 dtr-groups. Continue pattern back and forth until piece measures approx. 64-66-68-70-72-74 cm – adjust so that same no of rows with dtr-groups has been worked as on back piece. Now work 1 row dc as on back piece only over the outermost 3-4-4-5-5-5 dtr-groups on shoulder (i.e. do not work over the 2 dtr-groups towards the neck = collar) = 18-23-23-28-28-28 dc. Cut and fasten the thread. Insert 1 marker on the shoulder. Now work dtr-groups back and forth over collar as follows: 5 ch, in ch-loop in first dtr-group work 2 dtr + 2 ch + 2 dtr, in ch-loop in next dtr-group work 2 dtr + 2 ch + 2 dtr, work 1 ch and finish with 1 dtr in last dtr in same dtr-group. Continue back and forth like this until collar measures approx. 10-8-10-8-8-10 cm from marker on shoulder. Then work 1 row dc as follows: 1 ch, 1 dc in same st, 1 dc in next ch, 1 dc in each of the first 2 dtr, 1 dc in ch-loop in the middle of dtr-group, 1 dc in each of the next 2 dtr *, repeat from *-* 2 times in total, finish with 1 dc in last ch and 1 dc in 4th ch from beg of previous row = 14 dc, cut the thread. LEFT FRONT PIECE: Work as right front piece but reversed. When dec for armhole in size XXL + XXXL, dec 1 dtr-group as shown in A.3. ASSEMBLY: Sew shoulder seams edge to edge to avoid a chunky seam. Sew collar tog mid back (sew edge to edge) and sew it on to neck line at the back of neck. Sew on buttons on right front piece – see picture. Button through the crochet edge explained below. CROCHET EDGE: Work a finishing edge around the entire opening on vest and around both armholes as follows: 1 dc in first st, * 5 ch, skip approx. 2½ cm, 1 dc in next st/loop *, repeat from *-* the entire round and finish with 5 ch and 1 sl st in dc from beg of round. |
||||||||||||||||
Diagram explanations |
||||||||||||||||
|
||||||||||||||||
|
||||||||||||||||
|
||||||||||||||||
|
Have you made this or any other of our designs? Tag your pictures in social media with #dropsdesign so we can see them! Do you need help with this pattern?You'll find tutorial videos, a Comments/Questions area and more by visiting the pattern on garnstudio.com. © 1982-2024 DROPS Design A/S. We reserve all rights. This document, including all its sub-sections, has copyrights. Read more about what you can do with our patterns at the bottom of each pattern on our site. |
||||||||||||||||


With over 40 years in knitting and crochet design, DROPS Design offers one of the most extensive collections of free patterns on the internet - translated to 17 languages. As of today we count 304 catalogues and 11422 patterns - 11422 of which are translated into English (UK/cm).
We work hard to bring you the best knitting and crochet have to offer, inspiration and advice as well as great quality yarns at incredible prices! Would you like to use our patterns for other than personal use? You can read what you are allowed to do in the Copyright text at the bottom of all our patterns. Happy crafting!
Comments / Questions (189)
Hallo, ich komme leider am Rückenteil nicht weiter. Hier müssen 10 DStb-Gruppen gemäß Muster A.1 behäkelt werden. Das Muster A.1 beginnt laut Zeichnung mit 5 Lm als Ersatz für ein DStb. Beginne ich jetzt also am rechten Markierer mit 5 Lm oder lasse ich die Lm weg und beginne in der Mitte der ersten DStb-Gruppe ab Markierer mit der neuen DStb-Gruppe? Und wie beende ich eine Reihe? 1 Lm +1 DStb beim linken Markierer? Danke, Constanze
15.09.2015 - 18:53DROPS Design answered:
In der Tat ist die Anleitung hier nicht ganz genau. Ich würde so vorgehen: Damit Sie die 10 D-Stb-Gruppen in der Mitte haben und die je 5 D-Stb-Gruppen für die Vorderteile, müssten Sie das D-Stb des R-Beginns und des R-Endes zwischen 2 D-Stb-Gruppen häkeln und die Lm weglassen, damit es sich nicht wellt. Die D-Stb am Anfang und am Ende der R müssen Sie deshalb häkeln, damit sich ein Rand ergibt, der später umhäkelt werden kann.
20.09.2015 - 11:46Maria wrote:
Back piece is worked between the markers, that is to say in the middle of the piece I have to start a new row. But as we see in the A1 a new row starts with 5 chains and THEN we do dtr groups. My question is where do I start crocheting these 5 chains to start the new row since now I am in the middle of the piece.
09.07.2015 - 13:58DROPS Design answered:
You stop between two dtr-groups, make dtr between two dtr-groups from previous row, turn, work pattern according to diagram A.1, i.e. work 5 ch (= 1 dtr + 1 ch) and continue with dtr-group as before.
09.07.2015 - 15:44Maria wrote:
For starting the back piece's dtr groups do I have to do 5 ch at the beginning and 1 ch & 1 dtr, and if yes where do they start? In the gap between the last front dtr group and the first back ( where the marker is)?
09.07.2015 - 11:40DROPS Design answered:
Dear Maria, back piece is worked between markers, there are no gap, only dec for armholes in the last 2 sizes. Work A.1 as before in the other size over the middle 10-16 dtr group (between markers). Happy crocheting!
09.07.2015 - 12:39Jeg kunne tenkt meg lange armer til denne, finnes det en oppskrift man kan kombinere denne med for å få lange armer?
17.05.2015 - 21:16DROPS Design answered:
Hej Cecilie, prøv at søge på "jakke" og "hekle" og se om du kan bruge en af dem. Eller så kan du prøve at hækle ovenfra ærmegabet og ned. God fornøjelse!
18.05.2015 - 09:06Hallo, ik heb maat 52 en haak met katoen op haaknaald 4,5 (advies is 2,5-3) hoe kan ik in het begin opmeten of ik hem pas, en als hij te klein is kan ik hem ook groter maken?
02.05.2015 - 12:23DROPS Design answered:
Hoi Jacqueline. Je kan het patroon groter maken met hulp van de haakstekenverhouding in het patroon (aantal st x toeren voor elke 10x10 cm). Onderaan het patroon zie je de maattekening met alle afmetingen. Gebruik dus de maattekening en de stekenverhouding om het vestje groter te maken.
04.05.2015 - 11:55I love this pattern...I am having problems understanding how the collar is constructed. Do I start in by 4 to groups continue with pattern then do the same on the other side? I also don't understand the construction of it. Are there any other diagrams that show how to do this? Thank you so much.
26.04.2015 - 17:25DROPS Design answered:
Dear Linda, collar is worked over the outermost 2 tr-groups towards neck, join yarn and crochet ch 5, in ch-space in first tr-group work 2 tr + ch 2 + 2 tr, in ch-space in next tr-group work 2 tr + ch 2 + 2 tr, ch 1 and finish with 1 tr in last tr in same tr-group until collar measures approx. 8-10 cm (see size), ie approx. until mid neck on back piece, piece will be then sew tog with the other collar (left front piece) then sewn along neckline on back piece. Happy crocheting!
27.04.2015 - 11:29Munira wrote:
Ok thank you =)
20.04.2015 - 15:21Munira wrote:
Hello =) firstly beautiful pattern...=) very clear =) i have a problem unfortunately..i don't understand the making of the collar..i have the shoulder aligned and i have 2 tr groups all ready too...i dont understand exactly where the chain 5 begins..and i dont understand the back and forth..where do i begin the collar? thank you =)
19.04.2015 - 01:10DROPS Design answered:
Dear Munira, you left unworked the 2 tr-groups towards the neck for collar, join yarn there to continue tr-groups over neck. Happy crocheting!
20.04.2015 - 09:32Does this pattern run large? I started to make a large but went down to small and that is still to big.
06.03.2015 - 02:42DROPS Design answered:
Dear Veronica, you will find at the bottom of the pattern a measurement chart in cm with all measures for each size taken flat from side to side. Compare these measurements to a similar garment you have and like the shape to find out the matching size. Convert here cm into inch. Happy crocheting!
06.03.2015 - 09:09Guten Morgen, meine Frage hat sich erledigt, habe komplett falsch gelesen. Sorry lg Gaby
03.02.2015 - 07:55DROPS Design answered:
Kein Problem. :-) Manchmal hilft es, eine Nacht drüber zu schlafen. ;-)
04.02.2015 - 18:02