
Popular categories
Looking for a yarn?


|
|
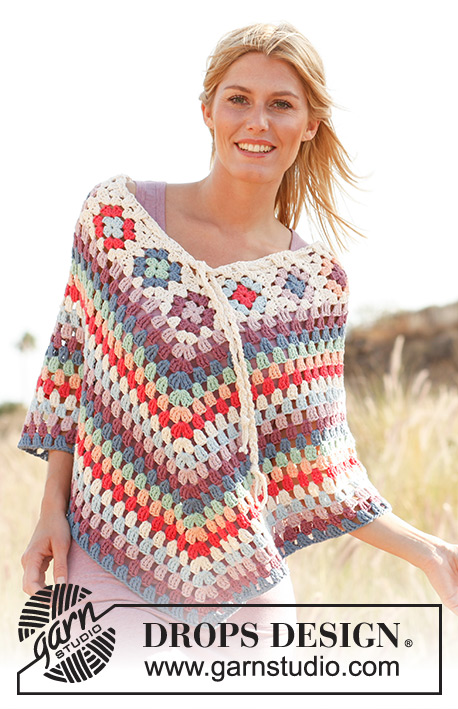
Summer Patchwork |
|
 |
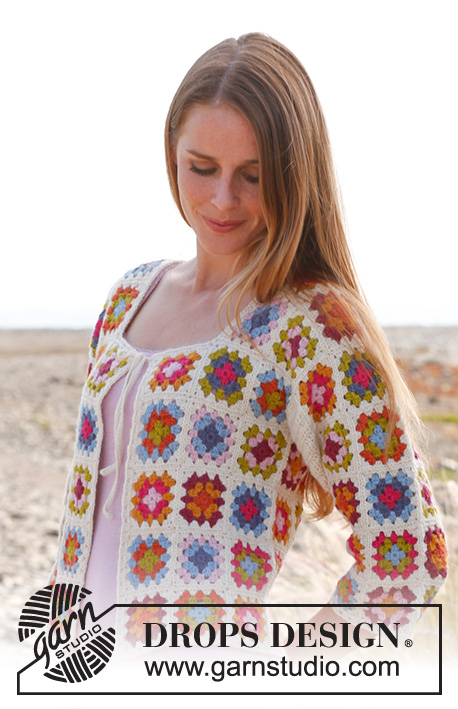 |
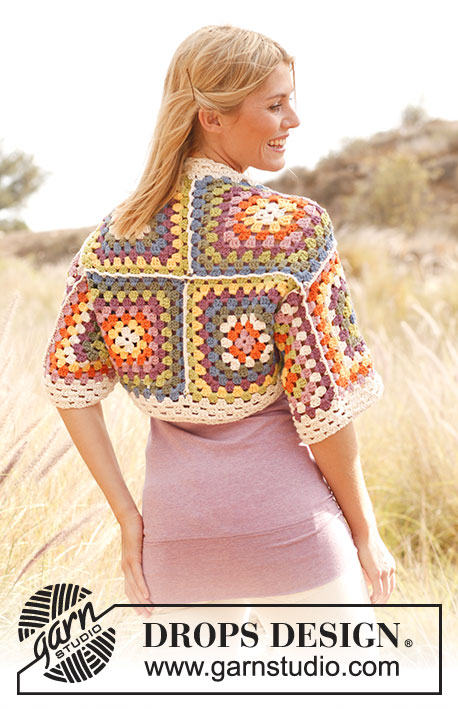
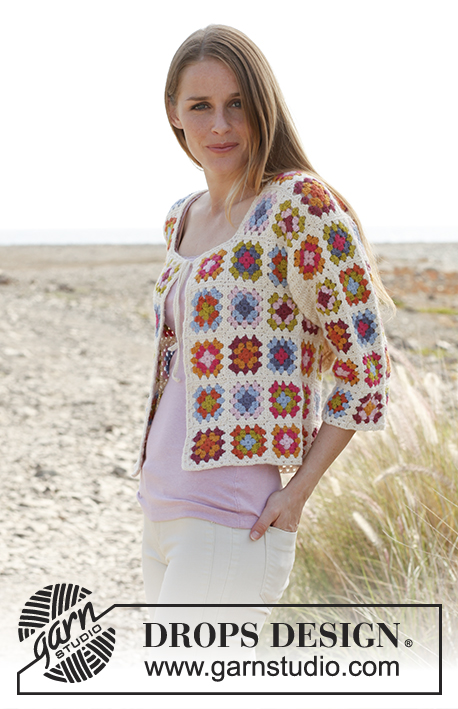
Crochet DROPS jacket with ¾ sleeves and granny squares in ”Alpaca”. Size: S - XXXL
DROPS 147-9 |
|
|
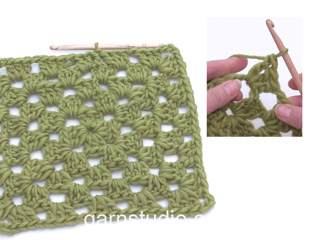
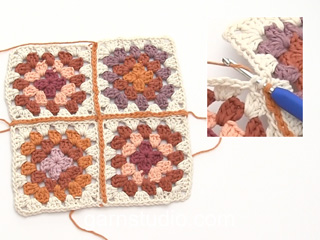
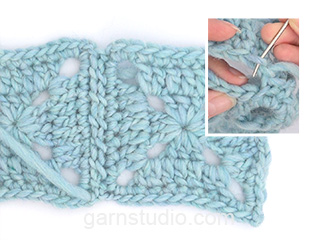
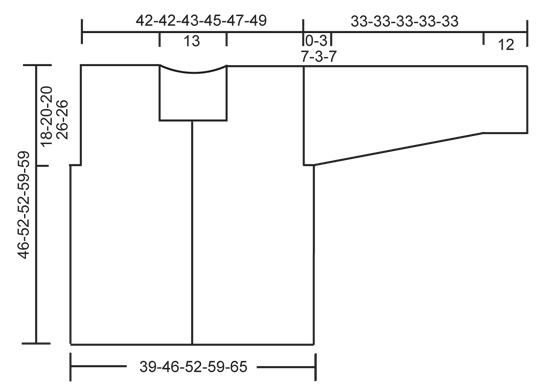
COLOURS ON SQUARES: Last round (= colour 4) on all squares is off white. SQUARE A: Colour 1 = lime, colour 2 = orange, colour 3 = light blue. SQUARE B: Colour 1 = goldenrod, colour 2 = light pink, colour 3 = dark pink. SQUARE C: Colour 1 = light blue, colour 2 = lime, colour 3 = orange. SQUARE D: Colour 1 = dark pink, colour 2 = light pink, colour 3 = lime. SQUARE E: Colour 1 = light pink, colour 2 = pink, colour 3 = goldenrod. SQUARE F: Colour 1 = pink, colour 2 = grey purple, colour 3 = light blue. SQUARE G: Colour 1 = grey purple, colour 2 = light blue, colour 3 = light pink. SQUARE H: Colour 1 = pink, colour 2 = grey purple, colour 3 = lime. SQUARE I: Colour 1 = orange, colour 2 = goldenrod, colour 3 = dark pink. SQUARE J: Colour 1 = light blue, colour 2 = lime, colour 3 = pink. GRANNY SQUARE: Crochet 6 ch on hook size 3 mm with colour 1 and form a ring with 1 sl st in first ch. ROUND 1 (colour 1): 3 ch, 2 tr in ch-ring, * 3 ch, 3 tr in ch-ring *, repeat from *-* a total of 3 times and finish with 3 ch and 1 sl st in 3rd ch from beg of round. Turn piece. ROUND 2 (colour 2): 3 ch, 2 tr in first ch-loop, 3 ch, 3 tr in same ch-loop, * 1 ch, 3 tr in next ch-loop, 3 ch, 3 tr in same ch-loop *, repeat from *-* a total of 3 times and finish with 1 ch and 1 sl st in 3rd ch from beg of round. Turn piece. ROUND 3 (colour 3): 3 ch, 2 tr in first ch-loop, 1 ch, * 3 tr in next ch-loop, 3 ch, 3 tr in same ch-loop, 1 ch, 3 tr in next ch-loop, 1 ch *, repeat from *-* a total of 3 times, 3 tr in next ch-loop, 3 ch, 3 tr in same ch-loop, 1 ch and finish with 1 sl st in 3rd ch from beg of round. Turn piece. ROUND 4 (colour 4): 3 ch, 2 tr in first ch-loop, 1 ch, * 3 tr in next ch-loop, 3 ch, 3 tr in same ch-loop, 1 ch, 3 tr in next ch-loop, 1 ch, 3 tr in next ch-loop, 1 ch *, repeat from *-* a total of 3 times, 3 tr in next ch-loop, 3 ch, 3 tr in same ch-loop, 1 ch, 3 tr in next ch-loop, 1 ch and finish with 1 sl st in 3rd ch from beg of round. Cut the thread. 1 square measures approx. 6.5 x 6.5 cm. Work 12-14-15-20-21 squares of every colour combination, work in addition 0-2-2-8-8 extra squares (choose your own colour combination on these squares) = 120-142-152-208-218 squares in total. SLEEVE GUSSET: Work a piece with tr shaped as a gusset to be sewn under sleeve so it is wider at the top than the at bottom. Replace first tr on every row with 3 ch. Work 7-8-8-8-8 ch on hook size 3 mm with off white. Turn and work 1 tr in 4th ch from hook, then work 1 tr in the remaining 3-4-4-4-4 ch = 5-6-6-6-6 tr. Continue back and forth with 1 tr in every tr until piece measures 10 cm. READ ALL OF THE FOLLOWING SECTION BEFORE FINISHING! On next row inc 1 tr in each side by working 2 tr in next to last tr in each side. Repeat inc every 3-2-2-2-2 rows a total of 9-12-12-12-12 times. NOTE: In size XS/S continue with 1 tr in every tr until piece measures 33 cm. In sizes M and XXL divide the piece in the middle when it measures 30 cm, then work each side separately with 1 tr in every tr until piece measures 33 cm. In sizes L/XL and XXXL divide the piece in the middle when it measures 26 cm, then work each side separately, when inc is done, with 1 tr in every tr until piece measures 33 cm. The piece is divided in the 4 largest sizes because of dec for armholes. This is not done in the smallest size. Work another sleeve gusset. Place the squares tog for back and front piece as shown on diagram – you can choose in which order you want to put the squares. Distribute the remaining 40-40-40-60-60 squares for 2 sleeves, with 20-20-20-30-30 squares on each sleeve. In the 3 smallest sizes there should be 4 x 5 squares and in the 2 largest sizes there should be 6 x 5 squares - there are 5 squares vertically in all sizes. Sew the squares tog edge to edge with off white. Sew sleeve gusset to each side of squares on sleeves and sew sleeves in body – with the widest part of gusset in the bottom of armhole. Then sew the side seams and shoulder seams the same way – NOTE: In sizes M and XXL there is 1 row with squares in the middle of each side under armhole, in sizes L/XL and XXXL there are 2 rows with squares in each side under armhole. Work around the entire jacket with off white as follows (beg mid back of neck): 1 dc in 1 ch at the edge of 1 square, 3 ch and 2 tr in same ch, * 1 ch, 3 tr in next ch *, repeat from *-*. NOTE: In the corners faced inwards work as follows: 1 tr in last ch before corner, 1 tr in the corner and 1 tr in first ch after corner. In the corners faced outwards work as follows: 3 tr in ch-loop in the corner on square, 3 ch and 3 more tr in the same ch-loop. In every corner at the top by neck also work a tie as follows: 3 tr in ch-loop in the corner on square, then work loose ch for approx. 28 cm, turn and work 1 dc in every ch on the way back, then 3 tr in the same ch-loop in the corner. Work the same way at bottom around the sleeves – over the section between the squares work as follows: * 1 tr in each of the first 3 tr, 1 ch, skip 1 tr *, repeat from *-*. |
|

|
|
|
|
|
Have you made this or any other of our designs? Tag your pictures in social media with #dropsdesign so we can see them! Do you need help with this pattern?You'll find tutorial videos, a Comments/Questions area and more by visiting the pattern on garnstudio.com. © 1982-2024 DROPS Design A/S. We reserve all rights. This document, including all its sub-sections, has copyrights. Read more about what you can do with our patterns at the bottom of each pattern on our site. |
|


With over 40 years in knitting and crochet design, DROPS Design offers one of the most extensive collections of free patterns on the internet - translated to 17 languages. As of today we count 304 catalogues and 11422 patterns - 11422 of which are translated into English (UK/cm).
We work hard to bring you the best knitting and crochet have to offer, inspiration and advice as well as great quality yarns at incredible prices! Would you like to use our patterns for other than personal use? You can read what you are allowed to do in the Copyright text at the bottom of all our patterns. Happy crafting!
Comments / Questions (188)
Hi. Thanks for your reply. unfortunately new to crochet and can’t picture what the gusset should look like. Is there any chance you could provide a photo, video or diagram please. Preferably with measurements of length and width. Thanks for your help. Anne
22.05.2020 - 11:46DROPS Design answered:
Dear Mrs Hansen, we do not have more than the pattern - did you already tried to? Just start to crochet following the explanations, it should then by and by have more sense. You might find more pictures of customers' projects here. Happy crocheting!
22.05.2020 - 12:38I am doing the summer patchwork cardi and have come to the sleeve gusset and I can’t figure it out. Can you help?
20.05.2020 - 22:09DROPS Design answered:
Dear Mrs Hansen, the sleeve gusset is a small piece you will crochet extra over first 5 or 6 trebles for 10 cm, then increase 1 st on each side of piece on every 3rd or 2nd row (see size) (*work 1 row inc 1 tr on each side, 2 rows without inc * repeat from *- * in first size - in other sizes *work 1 row with increases, 1 row without increases*, repeat these 2 rows. When all increases are done, continue to 33 cm in 1st size. in 2 larger sizes you will divide piece in 2 and work the 2 sides separately to make a split/vent (for the seam allowance). Hope this helps; Happy crocheting!
22.05.2020 - 08:57Ik zou graag willen weten wat het voordeel van een granny heen en weer boven een gewone granny, dus niet heen en weer, is. Wat is de voorkant bij de heen en weer granny?
17.04.2020 - 21:42DROPS Design answered:
Dag Christina Jones,
Als je een granny heen en weer haakt geeft dit een ander stekenbeeld en trekt het werk minder snel scheef. Je haakt dan afwikkelend op de voor- en achterkant van het werk. Je hebt op deze manier niet een duidelijke goede en verkeerde kant, als je alle vierkantjes maar op de zelfde manier naar de goede kant legt.
29.04.2020 - 10:06Ik wil patroon 147-9 gaan maken maar ik wil geen alpaca garen omdat hij niet vorm vast zou zijn Wat raadt u mij aan als alternatief
29.03.2020 - 21:09DROPS Design answered:
Dag Loes,
Je kan ieder ander garen uit garengroep A. nemen, zodat je dezelfde stekenverhouding hebt. (Maak wel even een proeflapje om dat te controleren. Hier vind je de garengroepen.
29.04.2020 - 10:09Maat M en XXL: splits het werk in het midden als het 30 cm meet, haak dan elke kant apart verder met 1 stk in elk stk tot het werk 33 cm meet. Ik snap dit niet zo goed. Kunt u mij hierover meer uitleg geven?
26.10.2019 - 14:04DROPS Design answered:
Dag Sanne,
Als het goed is heb je na het meerderen van stokjes in totaal 30 stokjes op de toer. Je splitst het werk nu bij een hoogte van 30 cm in tweeën door eerst steeds heen en weer te haken over de eerste 15 steken tot het werk 33 cm meet. Dan hecht je de draad aan over het tweede deel en haak je ook weer heen en weer over die 15 steken tot het werk 33 cm meet.
27.10.2019 - 16:09Non riesco a capire per il rinforzo manica taglia M cosa si intende per "dividere il lavoro al centro e proseguire separatamente", immagino che, arrivata a 30 centimetri debbo continuare lavorando con due capi in modo da avere due striscioline da 15 maglie ognuna per 3 centimetri, ma poi non capisco queste due strisce dove debbo cucirle. forse sarebbe utile una foto. grazie per la risposta
23.09.2019 - 09:52DROPS Design answered:
Buongiorno Caterina. Il rinforzo viene cucito nel sottomanica. Le due parti separate vanno cucite allo scalfo sul davanti e allo scalfo sul dietro. Buon lavoro!
23.09.2019 - 10:11I afsnittet Ærmekiler under OBS : jeg hækler xxl men kan ikke se hvordan xxl skal hækles? ( xxxl står to gange, så det er nok en skrivefejl 🤔
20.09.2019 - 22:18DROPS Design answered:
Hej Nynne, tak for info, vi skal få det rettet så det fremgår hvilken af dem som er XXL. :)
03.10.2019 - 12:02Is the 4" square including the border color?
23.08.2019 - 14:01DROPS Design answered:
Dear Mrs Segars, 1 square = 4 rounds and should measure 2½" x 2½". Happy knitting!
23.08.2019 - 14:52I am using a C hook. three rows makes 2.5 inches not 4 rows.
22.08.2019 - 19:45DROPS Design answered:
Dear Mrs Segars, Hook size is only a suggestion! If you have too many stitches on 10 cm = 4” switch to larger hook. If you have too few stitches on 10 cm = 4” switch to smaller hook. read more about tension here. Happy crocheting!
23.08.2019 - 09:05Hej igen, Min sista fråga - är det viktigt att det är En jämt antal i rutor som diagrammet visar? Jag har gjort större rutor (12x12 cm) och när jag omvandlar till strl XL blir det inte bra med jämt antal, jag hade behövt lägga till men då blir det ojämnt antal rutor? Hoppas du förstår hur jag menar :) Önskar en fin sommar.
13.07.2019 - 16:27DROPS Design answered:
Hei Ann-Li. Det er et jevnt antall ruter for å få det likt på begge sider. Om du har gjort rutene større og må bruke at ujevnt antall ruter blir det ulikt på frem og baksiden. Mvh Drops design
26.08.2019 - 11:11