DROPS Karisma
DROPS Karisma
100% Wool
from 2.50 € /50g
DROPS SS24
DROPS Children 9-17
Size, years: 1 - 2 - 3/4 (5/6 - 7/8 - 9/10)
Size in cm: 74/80 - 86/92 - 98/104 (110/116 - 122/128 - 134/140)

Materials: GARNSTUDIO's Karisma Superwash
300-350-350 (400-450-500) g colour no 37, grey blue.

DROPS pointed needles and double pointed needles size 3.5 mm and 5 mm.
DROPS Button Sten Optik, no 117K, navy:10-10-10 (12-12-12) pcs.

-------------------------------------------------------

Alternative Yarn – See how to change yarns here
Yarn Groups A to F – Use the same pattern and change the yarn here
Yarn usage using an alternative yarn – Use our yarn converter here

-------------------------------------------------------

DROPS Karisma
DROPS Karisma
100% Wool
from 2.50 € /50g

Pattern instructions

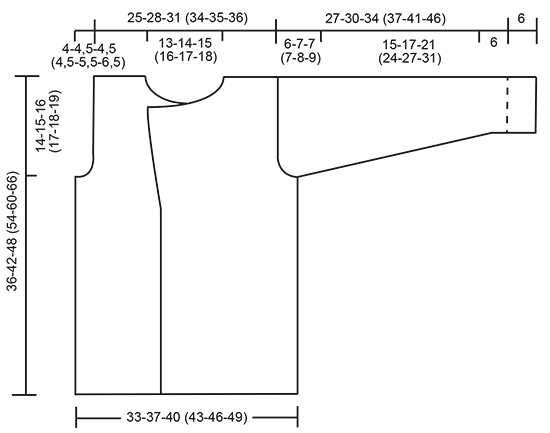
Knitting tension: 22 sts x 30 rows on needle size 3.5 and stocking st = 10 x 10 cm.
17 sts x 40 rows on needle size 5 mm garter st = 10 x 10 cm. Remember needle sizes are guidelines only!
Garter st (back and forth): knit all rows.
Garter st (on circular needle): 1st round: P. 2nd round: K.
Button hole: Only cast off for buttonholes on the front band, buttons further in on left front piece are decorative only.
The front band (10 sts in total) is folded double towards WS afterwards and you therefore need to make 2 buttonholes as follows: knit 1 front band st, cast off 2 sts, knit 4 front band sts, cast off 2 sts, knit 1 front band st. Cast on 2 new sts over the cast off sts on return row.
Cast off for buttonhole when piece measures:
Size 1 year: 11, 17 and 23 cm
Size 2 years: 13, 20 and 27 cm
Size 3/4 years: 15, 23 and 31 cm
Size 5/6 years: 13, 20, 27 and 34 cm
Size 7/8 years: 15, 23, 31 and 39 cm
Size 9/10 years: 17, 26, 34 and 43 cm

Right front piece: Cast on 51-56-61 (63-68-72) sts (incl 10 front band sts towards mid front and 1 edge st at side) on needle size 3.5 mm with Karisma Superwash. Knit 4 rows garter st. Knit next row as follows: Knit first front band in garter st and the next 9 front band sts in reverse stocking sts (=10 sts front band), 40-45-50 (52-57-61) sts stocking sts, 1 edge st in garter st. Continue like this. Remember the knitting tension. When piece measures 22-27-32 (37-42-47) cm cast off for armhole on every other row: 3 sts 1-1-1 (1-2-2) times, 2 sts 2-2-2 (2-3-3) times, 1 st 2-4-4 (4-1-3) times. At the same time, when piece measures 23-28-32 (35-40-44) cm inc mid front for collar as follows:
Size, 1 year: Inc 1 st 6 times on every 5 rows.
Size, 2 years: Inc 1 st 2 times on every 6 rows, then 1 st 4 times on every 5 rows.
Size, 3/4 years: Inc 1 st 3 times on every 6 rows, then inc 1 st 4 times on every 5 rows.
Size, 5/6 years: Inc 1 st 2 times on every 7 rows, then inc 1 st 5 times on every 6 rows.
Size 7/8 years: Inc 1 st 8 times on every 6 rows.
Size 9/10 years: Inc 1 st 6 times on every 7 rows, then inc 1 st 2 times on every 6 rows. After all dec for armhole and inc for collar are complete = 48-51-57 (59-63-65) sts on row. When piece measures 33-39-45 (50-56-62) cm cast off 26-27-31 (31-35-37) sts for neck mid front and dec to shape the neckline on every other row: 2 sts 3 times, 1 st 2 times = 14-16-18 (20-20-20) sts left on shoulder. Cast off when piece measures 36-42-48 (54-60-66) cm.

Left front piece: Knit like right front, but reversed. Remember button holes on front band - see explanation above!

Back piece: Knitted in two pieces after split.

Right side of back piece: Cast on 39-44-47 (50-54-57) sts (incl 4 sts for split towards mid back and 1 edge st at side) on needle size 3.5 mm in Karisma Superwash. Knit 4 rounds garter st, continue in stocking sts, but garter st the 4 split sts mid back + 1 edge st.
When piece measures 6-6-8 (8-10-10) cm leave to one side.

Left side of back piece: Cast on and knit like right side but reversed, when piece measures 6-6-8 (8-10-10) cm cast off the 4 split sts mid back.

Back: Slip right and left back onto same needle – with split sts against each other (right split part must lie over left) = 74-84-90 (96-104-110) sts. Continue knitting stocking sts with 1 edge st at each side in garter st. When piece measures 22-27-32 (37-42-47) cm, cast off for armhole each side as described for front piece = 56-62-68 (74-78-80) sts. When piece measures 35-41-47 (53-59-65) cm cast off the middle 24-26-28 (30-34-36) sts for the neck and cast off 2 sts on next row towards neckline = 14-16-18 (20-20-20) sts left on each shoulder. Cast off when piece measures 36-42-48 (54-60-66) cm.

Sleeve: Cast on 36-38-38 (40-42-44) sts on double pointed needle size 5 mm with Karisma Superwash and knit 6 cm garter sts (= turn-up). Insert a marking thread and measure piece from this point onwards. Change to double pointed needles size 3.5 mm and continue in stocking sts, at the same time as inc 6 sts evenly on first round = 42-44-44 (46-48-50) sts. When piece measures 6 cm inc 2 sts mid under arm: 8-9-11 (12-13-15) times as follows:
The smallest 3 sizes: Alternate between round 5 and round 6.
The 3 largest sizes: Every 6 rounds = 58-62-66 (70-74-80) sts.
When piece measures 21-23-27 (30-33-37) cm cast off 6 sts mid under arm and complete sleeve back and forth on needle. Cast off for sleeve cap on every other row: 3 sts 0-0-1 (1-1-1) times, 2 sts 3-3-2 (3-2-3) times, 1 st 1-2-2 (1-4-4) times, 2 sts 3-3-2 (2-2-2) times, 3 sts 1-1-2 (2-2-2) times. Cast off, piece measures approx 27-30-34 (37-41-46) cm (+ 6 cm turn-up).

Pocket flap: Cast on 15-17-19 (20-22-24) sts on needle size 5 mm with Karisma Superwash and knit 5-5-6 (6-7-7) cm garter sts, cast off. Knit 2 pocket flaps.

Assembly: Sew the shoulder seams. Fold front band towards WS and fasten. Sew round the buttonholes. Gather approx 70-90 sts on neckline and over collar sts on front piece on needle size 5 mm with Karisma Superwash. Knit 2 rows garter sts over all sts – at the same time as casting off for button hole on first row within 2 sts on the outer edge of each collar as follows: Cast off 1 st – cast on 1 new st over the cast off st on next row. After 2 rows garter st cast off sts over collar. Continue in garter st over remaining sts for 8-8-9 (9-10-10) cm, cast off. Sew pocket flaps on at top edge – place flaps 2-2-2 (3-3-3) cm from side seams and 15-17-20 (22-25-27) cm from bottom edge (measured from top of pocket flap). Sew buttons on double breasted with 7-7-7 (8-9-10) cm garter st between – On the 3 smallest sizes there are 3 buttons on front and on the 4 largest sizes there are 4 buttons. Sew 1 button on the inside of left collar and 1 button on the top of the right collar (almost up towards the shoulder). Sew the 2 last buttons on each of the pocket flaps. Sew tog at the top of split back – right side should be placed on top of left

HAT WITH EARFLAPS IN ALASKA

Size, years: 1- 2- 3/4(5/6-7/8- 9/10)
Hat circumference: 48-48-48 (51-51-51) cm

Materials: GARNSTUDIO`s Alaska
100-100-100 (100-100-100) g colour no 37, grey blue.

DROPS pointed needles and double pointed needles size 3.5 mm.

Knitting tension: 20 sts x 27 rows on needle size 3.5 mm and stocking st = 10 x 10 cm. Remember needle sizes are guidelines only.
Garter st (back and forth): knit all rows.

Earflap: Cast on 6-6-6 (7-7-7) sts on needle size 3.5 mm in Alaska an knit garter st. At the same time, inc 1 st each side on every other row: 7 times = 20-20-20 (21-21-21) sts. When flap measures 4-4,5 -5 (5-5,5-6) cm leave to one side. Knit 2 ear flaps.
Ear flap + back of head pieces: Slip both ear flaps onto one needle and cast on 20-20-20 (20-20-20) new sts between the flaps = 60-60-60 (62-62-62) sts. Continue in garter st for 2.5-2.5-2.5 (3-3-3) cm. Leave piece to one side.

Forehead piece: Cast on 18-18-18 (22-22-22) sts on needle size 3.5 mm with Alaska, knit garter st. At the same time, inc on each side on every other row: 2 sts 3 times and 1 st 3 times = 36-36-36 (40-40-40) sts. When piece measures 6.5-7-7.5 (8-8.5-9) cm leave to one side.

Hat: Slip pieces on one needle – insert forehead piece between earflaps = 96-96-96 (102-102-102) sts. Distribute on 4 double pointed needles. Continue in stocking st. Remember the knitting tension! When piece measures 12-12-12 (12.5-12.5-12.5) cm – measured from bottom edge mid back – insert 6 marking threads in piece with 16-16-16 (17-17-17) sts between each marking thread. Now K tog the 2 sts after each MT on every other row until there are 6 sts left. Cut the thread and pull through remaining sts. Sew tight.

Twisted ties: Cut a thread approx 150 long cm, fold it double and get someone to hold the other end! Twist the thread until it "resists" and fold it double again. Twist 2 ties and fasten at bottom of each earflap.

Assembly: Fold the piece at the forehead up over hat and fasten to ensure turn-up stays in place.

Diagram

diagram measurements

Each of our patterns has specific tutorial videos to help you.

Do you have a question? See a list of frequently asked questions (FAQ)

Knitting tension is what determines the final measurements of your work, and is usually measured per 10 x 10 cm. It is provided like so: number of stitches in width x number of rows in height - eg: 19 stitches x 26 rows = 10 x 10 cm.

The knitting tension is very individual; some people knit/crochet loosely while others work tightly. You adjust the knitting tension with the needle size, which is why the suggested needle size is only meant as a guide! You need to adjust this (up or down) to ensure that YOUR knitting tension matches the knitting tension provided in the pattern. If you work with a different knitting tension than provided you will have a different yarn consumption, and your work will have different measurements than what the pattern suggests.

The knitting tension also determines which yarns can replace each other. As long as you achieve the same knitting tension you can replace one yarn with another.

See DROPS lesson: How to measure your tension/gauge

See DROPS video: How to make a gauge tension swatch

The required amount of yarn is provided in grams, eg: 450 g. To calculate how many balls you’ll need you first need to know how many grams are in 1 ball (25g, 50g or 100g). This information is available if you click on the individual yarn quality on our pages. Divide the amount required with the amount of each ball. For example, if each ball is 50g (the most common amount), the calculation will be as follows: 450 / 50 = 9 balls.

The important thing when changing from one yarn to another is that the knitting/crochet tension remains the same. This is so that the measurements of the finished piece will be the same as on the sketch provided. It is easier to achieve the same knitting tension using yarns from the same yarn group. It is also possible to work with multiple strands of a thinner yarn to achieve the knitting tension of a thicker one. Please try our yarn converter. We recommend you to always work a test swatch.

Please NOTE: when changing yarn the garment might have a different look and feel to the garment in the photo, due to individual properties and qualities of each yarn.

See DROPS lesson: Can I use a different yarn than the one mentioned in the pattern?

All our yarns are categorised into yarn groups (from A to F) according to thickness and knitting tension – group A contains the thinnest yarns and group F the thickest. This makes it easier for you to find alternative yarns to our patterns, should you wish to switch yarn. All yarns within the same group have a similar knitting tension and can easily replace each other. However, different yarn qualities have different structures and properties which will give the finished work a unique look and feel.

Click here for an overview of the yarns in each yarn group

At the top of all our patterns you’ll find a link to our yarn calculator, which is a helpful tool should you wish to use a different yarn than suggested. By filling in the yarn quality you wish to replace, the amount (in your size) and number of strands, the calculator will present good alternative yarns with the same knitting tension. Additionally it will tell you how much you’ll require in the new qualities and whether you’ll need to work with multiple strands. Most skeins are 50g (some are 25g or 100g).

If the pattern is worked with multiple colours, every colour will have to be calculated separately. Similarly, if the pattern is worked with several strands of different yarns (for example 1 strand Alpaca and 1 strand Kid-Silk) you will have to find alternatives for each, individually.

Click here to see our yarn calculator

Since different yarns have different qualities and textures we have chosen to keep the original yarn in our patterns. However, you can easily find options among our available qualities by using our yarn calculator, or simply pick a yarn from the same yarn group.

It is possible that some retailers still have discontinued yarns in stock, or that someone has a few skeins at home that they would like to find patterns for.

The yarn calculator will provide both alternative yarn as well as required amount in the new quality.

If you think it's hard to decide what size to make, it can be a good idea to measure a garment you own already and like the size of. Then you can pick the size by comparing those measures with the ones available in the pattern's size chart.

You'll find the size chart at the bottom of the pattern.

See DROPS lesson: How to read size chart

The needle size provided in the pattern serves only as a guide, the important thing is to follow the knitting tension. And since knitting tension is very individual, you will have to adjust the needle size to ensure that YOUR tension is the same as in the pattern – maybe you’ll have to adjust 1, or even 2 needle sizes, up or down to achieve the correct tension. For this, we recommend that you work test swatches.

Should you work with a different knitting tension than the one provided, the measurements of the finished garment might deviate from the measurement sketch.

See DROPS lesson: How to measure your tension/gauge

See DROPS video: How to make a tension/gauge swatch

Working a garment top-down provides more flexibility and room for personal adjustment. For example it is easier to try the garment on while working, as well as making adjustments to length of yoke and shoulder caps.

The instructions are carefully explaining every step, in the correct order. Diagrams are adjusted to the knitting direction and are worked as usual.

The diagram depicts all rows/rounds, and every stitch seen from the right side. It is read from bottom to top, from right to left. 1 square = 1 stitch.

When working back and forth, every other row is worked from the right side and every other row is worked from the wrong side. When working from the wrong side, the diagram will have to be worked reversed: from left to right, knit stitches are purled, purl stitches are knit etc.

When working in the round every round is worked from the right side and the diagram are worked from right to left on all rounds.

See DROPS lesson: How to read knitting diagrams

The diagram depicts all rows/rounds, and every stitch seen from the right side. It is worked from bottom to top, from right to left.

When working back and forth every other row is worked from the right side: from right to left and every other row is worked from the wrong side: from left to right.

When working in the round, every row in the diagram are worked from the right side, from right to left.

When working a circular diagram you start in the middle and work your way outwards, counter clockwise, row by row.

The rows usually start with a given number of chain stitches (equivalent to the height of the following stitch), this will either be depicted in the diagram or explained in the pattern.

See DROPS lesson: How to read crochet diagrams

Instructions for working several diagrams after each other on the same row/round, will often be written like so: “work A.1, A.2, A.3 a total of 0-0-2-3-4 times". This means you work A.1 once, then A.2 is worked once, and A.3 is repeated (in width) the number of times provided for your size – in this case like so: S = 0 times, M = 0 times, L=2 times, XL= 3 times and XXL = 4 times.

The diagrams are worked as usual: begin with the first row in A.1, then work the first row in A.2 etc.

See DROPS lesson: How to read knitting diagrams

See DROPS lesson: How to read crochet diagrams

The total width of the garment (from wrist-to-wrist) will be larger in the larger sizes, despite the actual sleeves being shorter. The larger sizes have longer sleeve caps and wider shoulders, so there will be a good fit in all sizes.

The measurement sketch/schematic drawing provides information regarding the full length of the garment. If it’s a jumper or a jacket the length is measured from the highest point on the shoulder closest to the neckline, and straight down to the bottom of the garment. It is NOT measured from the tip of shoulder. Similarly, the length of yoke is measured from the highest point on the shoulder and down to where yoke is split into body and sleeves.

On a jacket measures are never taken along bands, unless specifically stated. Always measure inside band stitches when measuring the length.

See DROPS lesson: How to read a schematic drawing

Diagrams are often repeated on the round or in height. 1 repeat is the diagram the way it appears in the pattern. If it says to work 5 repeats of A.1 in the round, then you work A.1 a total of 5 times after/next to each other in the round. If it says to work 2 repeats of A.1 vertically/in height you work the entire diagram once, then begin again at the start and work the entire diagram one more time.

Chain stitches are slightly narrower than other stitches and to avoid working the cast-on edge too tight, we simply chain more stitches to begin with. The stitch count will be adjusted on the following row to fit the pattern and measurement sketch.

The rib edge is more elastic and will contract slightly compared to, for example, stocking stitch. By increasing before the rib edge, you avoid a visible difference in width between the rib edge and the rest of the body.

It’s very easy to cast off too tightly, and by making yarn overs while casting off (and simultaneously casting these off) you avoid a too tight cast off edge.

See DROPS video: How to bind off with yarn overs (yo)

To achieve an even increase (or decrease) you can increase on, for example: every 3rd and 4th row alternately, like so: work 2 rows and increase on the 3rd row, work 3 rows and increase on the 4th. Repeat this until the increase is complete.

See DROPS lesson: Increase or decrease 1 st on every 3rd and 4th row alternately

Should you prefer to work in the round instead of back and forth, you may of course adjust the pattern. You’ll need to add steeks mid-front (usually 5 stitches), and follow the instructions. When you would normally turn and work from the wrong side, simply work across the steek and continue in the round. At the end you’ll cut the piece open, pick up stitches to work bands, and cover the cut edges.

See DROPS video: How to knit steeks and cut open

Should you prefer to work back and forth instead of in the round, you may of course adjust the pattern so you work the pieces separately and then assemble them at the end. Divide the stitches for the body in 2, add 1 edge stitch in each side (for sewing) and work the front and back pieces separately.

See DROPS lesson: Can I adapt a pattern for circular needles into straight needles?

Pattern repeats can vary slightly in the different sizes, in order to get the correct proportions. If you’re not working the exact same size as the garment in the photo, yours might deviate slightly. This has been carefully developed and adjusted so that the complete impression of the garment is the same in all sizes.

Make sure to follow instructions and diagrams for your size!

If you have found a pattern you like which is available in women’s size it’s not very difficult to convert it to men’s size. The biggest difference will be the length of sleeves and body. Start working on the women size that you think would fit across the chest. The additional length will be worked right before you cast off for the armhole/sleeve cap. If the pattern is worked top-down you can add the length right after the armhole or before the first decrease on sleeve.

Regarding additional yarn amount, this will depend on how much length you add, but it is better with a skein too many than too few.

All yarns will have excess fibres (from production) that might come off as lint or shedding. Brushed yarns (ie hairier yarns) have more of these loose, excess fibres, causing more shedding.

Shedding also depends on what is worn under or over the garment, and whether this pulls at the yarn fibres. It’s therefore not possible to guarantee that there will be no shedding

Below are some tips on how to get the best result when working with hairier yarns:

1. When the garment is finished (before you wash it) shake it vigorously so the looser hairs come off. NOTE: do NOT use a lint roller, brush or any method that pulls at the yarn.

2. Place the garment in a plastic bag and put it in your freezer - the temperature will cause the fibres to become less attached to each other, and excess fibres will come off easier.

3. Leave in the freezer for a few hours before taking it out and shaking it again.

4. Wash the garment according to the instructions on the yarn label.

Pilling is a natural process that happens to even the most exclusive of fibers. It's a natural sign of wear and tear that is hard to avoid, and that is most visible in high friction areas of your garment like a sweater's arms and cuffs.

You can make your garment look as new by removing the pilling, using a fabric comb or a pill/lint remover.

Still can't find the answer you need? Then scroll down and leave your question so one of our experts can try to help you. This will be done normally within 5 to 10 working days.
In the meantime, you can read the questions and answers that others have left to this pattern or join the DROPS Workshop on Facebook to get help from fellow knitters/crocheters!

You might also like...

Post a comment to pattern DROPS Children 9-17

We would love to hear what you have to say about this pattern!

If you want to leave a question, please make sure you select the correct category in the form below, to speed up the answering process. Required fields are marked *.

Comments / Questions (3)

country flag Gisele wrote:

For size 2 do I pick up 70 sts around collar and neck or is it 70 - 90 sts for all sizes? How many sts approximately i am binding off after the 2 garter st rows on the collar and how many approximately are left to finish the neck sts.? It is noted that size 2 needed 10 buttons. Are two of those buttons on the collar?

02.10.2019 - 14:32

DROPS Design answered:

Dear Gisele, you pick up approx. 70 to 90 stitches depending on the size and your tension, just make sure work is not too tight nor too loose. Number of stitches remaining after binding off the stitches for collar depends also on your tension and the number of sts you picked up. there are 2 buttons in all sizes on the collar: Sew 1 button on the inside of left collar and 1 button on the top of the right collar (almost up towards the shoulder). Happy knitting!

02.10.2019 - 14:45

country flag Gisele wrote:

Are the button holes worked on the right side band or the left side band? Also do we fold in BOTH front bands towards WS and fasten?

02.10.2019 - 05:17

DROPS Design answered:

Hi Gisele, The buttonholes are worked on the right band - and you need to work buttonholes on both the band and the lining so when you fold the band double you have buttonholes in both layers. Both bands are folded in to the wrong side. Happy knitting!

02.10.2019 - 08:14

country flag Emilie wrote:

Bonjour, je ne comprends pas comment, pour le devant du bonnet, en montant 22 mailles, et en faisant 2 augmentations 3 fois on obtient 40 mailles. Sur la photo, il semble en effet qu'il y ait plus d'augmentations. Pouvez-vous me renseigner? Merci beaucoup pour votre aide. Emilie

02.01.2017 - 20:14

DROPS Design answered:

Bonjour Emilie, une erreur s'était effectivement glissée dans les augmentations: on augmente tous les 2 rangs de chaque côté: 3 x 2 m et 3 x 1 m = 18 augm + 22 m = 40 m. Bon tricot!

03.01.2017 - 09:05